Some time ago I decided that I wanted to somehow transform the appearance of my private home. When I looked around the facade, I realized that the sign with the house number had not changed for twenty years. After looking at ready-made options in stores, I came to the conclusion that it is high time for license plate manufacturers to change designers. No, of course, there are original options, but, as a rule, such a sign costs a pretty penny. And so, after thinking a little, I realized that making such a sign with my own hands would be much cheaper, and it would turn out no less beautiful and original than those from expensive stores.
Today I’ll tell you how to make such a sign. I have attached step-by-step instructions with photos. First, let's define a list of materials and tools.
Tools and materials
Here's what we need:
- wooden board 50 x 20 centimeters;
- sandpaper;
- wood antiseptic;
- 1/4 liter of mahogany stain;
- 1/4 l of cherry stain;
- printed number template;
- a box of long nails with a large flat head;
- hammer;
- masking tape;
- needle nose pliers;
- lint-free cloth;
- scissors;
- wooden skewer;
- flowerpot.
ClassicAutoClub.ru
08/18/2015 Cars: Mazda RX-4 / Mazda RX-5 (Cosmo AP) / Mazda RX-2 (Capella Rotary) / Mazda RX-3 (Savanna) Topics: Restoration / DIY / Badge / Emblem / Nameplate / Nameplate / Milling / Engraving / 3D printing / Plastic
An important role in the appearance of a car is played by the so-called nameplates. Indeed, the exterior of a classic car, even after a complete restoration, will not look complete without these small insignia. But what to do if such an element is simply missing from the car?
The Classicautoclub editors have compiled a list of possible options for making a copy of the badge using the “ROTARY ENGINE” nameplate from Mazda as an example. This badge can be seen on the rotary models RX-2, RX-3, RX-4 and RX-5. We had the icon itself available, which made the task easier, otherwise we would have had to first resolve the issue of making a mock-up.
Prices are approximate and current for the specific icon at the time of writing.
Original “ROTARY ENGINE” nameplate from Mazda
Order a ready-made icon on the Internet
This is, of course, the most obvious way. We found our nameplate on EBAY for 2,100 rubles including delivery, but we decided to abandon this option - not all cars can have similar elements on sale, and the price may be much higher.
Advertisements for sale on the Internet
Laser engraving
This option did not suit us. The fact is that the “ROTARY ENGINE” badge has protruding letters, but this technology does not allow us to control the accuracy of the engraving (relief) depth, which means we will not be able to get an exact three-dimensional copy. But if you are interested, for example, in a flat metal plate with the symbols of a car model, then this method may be quite suitable. The cost of engraving our badge is approximately 1,500 rubles.
Laser engraving example
Vacuum molding of plastics
This is a technology for the industrial production of plastic products without the use of metal equipment. The mold is made by pouring silicone into the formwork with a master model located inside, after which plastic is poured into the resulting silicone mold. But this technology did not suit us either - the minimum order was supposed to be 15,000 rubles, and for this money we were offered to produce 40 nameplates. Of course, we didn’t need such a quantity.
On a milling machine
This method has a fairly high price, but it may be interesting if you need a part that is more durable than plastic. The production of our brass nameplate cost the Forward-Com company 3,800 rubles.
Brass nameplate made on a milling machine
The process itself took place in several stages. First, sketches of the icon were drawn in CorelDraw.
Then these files were transferred to a special Artcam control program connected to a Sicono SIC330 milling machine.
The Artcam program simulates the operation of the machine
The actual cutting of the brass nameplate was carried out automatically using three tools. The first cutter with an angle of 90 degrees cut off the main area between the letters, and thinner and smaller transitions were made with a cutter of 36 degrees, after which the cutter separated the nameplate along the contour from the workpiece.
Trimming the nameplate along the contour
3D printing
Nameplates made using 3D printing
We submitted a request to a number of companies to make a copy of our badge, and we chose one of them, REC3D. The production cost was 2,000 rubles (of which 1,500 rubles for creating a 3D model file).
First, a 3D model of the nameplate was drawn on a computer and divided into many transverse layers.
The printer's dispensing chamber applies thin layers of composite powder, and the inkjet print head applies colorless adhesive to the area where the next layer will be applied.
Each subsequent layer of powder is “glued” to the previous one until the object is completely formed.
The advantage of this method is that you can use materials of different colors. This means that the letters on the nameplate will not need to be painted separately. From this link you can download a 3D model file of our nameplate.
You can watch a short video of the printing process.
Making it yourself
We decided to try making a copy ourselves using liquid plastic. Let us immediately make a reservation that our experience cannot be considered completely successful. But with proper skill and accuracy, you can do much better. The total cost of materials excluding tools was 2,300 rubles.
Important: all work must be carried out in a well-ventilated area wearing respirators and rubber gloves.
First it was necessary to prepare a mold for pouring plastic. We used tin-based silicone Pentalast 710A. The cost of silicone with a catalyst is 700 rubles.
Silicone with catalyst
To harden it, you need to mix the silicone with the catalyst supplied with it in a ratio of 50 to 2. We observed the dosage using a regular syringe and measuring cup.
Mixing the ingredients
Then we dipped our existing nameplate into silicone to make an impression. It didn’t have time to harden within a few hours and had to be left overnight (hardening time differs in different instructions and depends on the volume of the mixture).
The nameplate was dipped in silicone to make a mold.
The resulting mold was sprayed with Si-M universal silicone lubricant, so that later it would be easy to separate the cast from the plastic. The cost of lubricant is 200 rubles.
Universal silicone grease
Smooth Cast 300 liquid plastic is sold in a set of two cans with mixing ingredients. Cost 1,300 rubles.
Liquid plastic components
The two components are poured into a separate container (ratio 1 to 1) and mixed thoroughly. In this case, a noticeable heating of the substance occurs. The resulting mixture is poured into the mold.
Hardening occurs in approximately 10 minutes. The substance turns white.
Silicone mold before pouring liquid plastic
Then we took out our nameplate. The problem turned out to be that the impression clearly showed air bubbles that formed when the nameplate was immersed in silicone. Subsequently, we repeated the procedure several times, but we could not get rid of the bubbles.
Nameplate made of liquid plastic. Formed bubbles are visible
Then we decided to try another way of making a cast, a simpler (and more economical) one - using ordinary plasticine. Its cost is 100 rubles.
Plasticine mold
We pressed our nameplate into the plasticine and poured the prepared liquid plastic into the resulting mold.
Liquid plastic is poured into a plasticine mold
After 10 minutes the substance turned white and became solid.
Liquid plastic has hardened
The copy made using a plasticine cast turned out much better, but there were also unevenness in some places. The plasticine form is easily deformed and unnoticeable damage remains on it, which violates the geometry of the nameplate and makes small parts uneven and rough.
This liquid plastic nameplate is made using a plasticine mold.
As you can see from our experience, there are many ways to make nameplates, all that remains is to choose which one is best suited to solve your problem.
In our case, we chose a nameplate that was made using 3D printing, and we will attach it to the radiator grill of our car.
ALL PHOTOS IN ONE GALLERY
Text: Roman Okudzhava
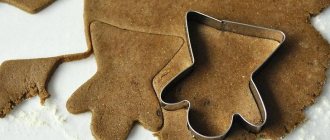
Processing wood
Since the sign will hang outside all year round, the tree must first be protected from mold and parasites. In order to apply an antiseptic to the board, it must first be sanded with sandpaper so that the surface of the board is smooth, and then thoroughly cleaned of any dust that has appeared. After mechanical processing of the wood, thoroughly mix the antiseptic and apply it generously to both sides of the board with a wide brush. Leave for 3-6 hours so that everything is absorbed.
Each age has its own: what haircuts will suit ladies by age 30, 40, 50, 60
Peach shade on hair: creating a romantic and very feminine look
Algae and beans: what the Japanese eat to maintain immunity during Covid-19
Next, mix stains of two colors (of course, you can choose stains of other shades that are more suitable for the facade of your house), dip a lint-free cloth into the resulting solution and cover the entire surface of the board with it (on both sides), evenly distributing the liquid so that no leaks. Wipe off excess liquid with a dry cloth and let the wood dry according to the manufacturer's instructions.
If you do not have a ready-made board of the required size or do not have a saw at home, then most hardware stores offer free cutting according to the specified parameters.
How to “imprint” a test on plastic/metal at home?
_MBK_
Dive bomber
Answer: How to “imprint” a test on plastic/metal at home?
All of the methods described above suffer from similar disadvantages - they require special equipment or consumables. It seems to me that the easiest way is to turn to engravers. If you want to practice silk-screen printing, first try playing with the emulsion.
Answer: How to “imprint” a test on plastic/metal at home?
This is not a thought, this is practically the only correct decision in your case.
We have had several orders for marking both on dashboards and on the panels themselves.
First, decide what exactly you want - a nameplate or markings on the dashboard itself. If there is a nameplate, then this can be done both on metal (for example, stainless steel) and on plastic. There are also special multilayer materials for nameplates. For example, if you need white on a black background, then take a sheet of aluminum, where the base is white and covered with black on top. The black is removed with a laser at the place of the design and the result is white on black. If there is engraving on the panel itself, then if it is on metal, then you need to go where there is a solid-state or fiber laser. If on plastic, then you need a CO2 laser. The cost of engraving is around 8-30 rubles. per sq. cm. Circulation from 1 piece. This is done by companies that supply personalized business souvenirs (keychains, pens, plaques, flash drives, etc.). Since there are now many Chinese lasers that are unable to do normal engraving, ask for a sample first.
Silk is not your case.
Vyacheslav NWCRAFT
Participant
Answer: How to “imprint” a test on plastic/metal at home?
I think my answer is late, but there are solutions. As a silk-screen printer, I don’t recommend bothering with frames, grids, etc., although I am happy to help with such orders. the small circulation does not scare us. illumination and stenciling and printing takes 15-20 minutes for us. at home - all day long. On business: recently a friend asked me to print a name on a cup (a gift for my father). We took a piece of durable self-adhesive that is solvent-resistant (you can buy it on zenonline.ru). it's inexpensive. The necessary inscription was cut out on a plotter and glued to the cup. then carefully pull out the letters that need to be printed from the film and carefully smooth the film through a sheet of paper. The stencil is READY. Next, take paint, dip any plastic card in it and draw it over the surface of the design. Let it dry, remove the film - DONE. Costs for everything: film 350 rubles, cutting on a plotter in any printing house 150 rubles, paint can be selected and tinted in a hardware store like Maxid + 500 rubles. When cutting such small text on a plotter, problems will arise. It’s better to saddle the outline in a correl and convert it to curves. After cutting, you can trim those places where there are unevennesses with an ordinary craft knife. PS: I can lend you 50 grams of paint for free
Source: forum.rudtp.ru
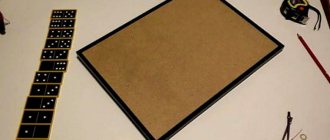
We put the number on the plate
Choose the font you like and the size of the numbers that fits the size of the board. We print out the number template in black ink on regular printer paper and cut them out, leaving about 2-3 centimeters of paper around the edges of each number so that the paper can be glued to the board with masking tape.
Next, we actually glue the template to the front side of the board with masking tape along the edges, so as not to cover the printed numbers. We leave space on one side of the board so that later we can hang a flower pot there.
You can make a sign with the street name and house number in the same way, but, as you understand, the size of the board and the amount of materials will change, and it will take much more time.
Original but standard
This is exactly what can be said about the address. It seems that the shape, size and appearance can vary, and this is true. But you won’t be able to accelerate in terms of dimensions, because you only need to specify two key positions:
Important! In some cases, only numbers are used, without indicating the street.
According to GOST, a product of this type made of metal must be at least 0.8 mm thick, with mandatory flanging, which strengthens it and makes the structure more reliable - its edges do not wrap, it does not get torn off by the wind. If it is made of another material, then it must withstand temperature changes and exposure to precipitation and sun.
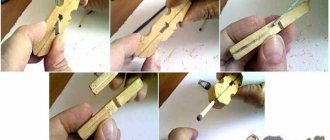
Hammering nails
We hammer in the nails following the printed template. The nails should protrude from the board by about 2 centimeters. The distance between the nails should be such that there are no gaps, but also so that the heads do not overlap each other.
Woven moccasins and 4 more pairs of flats to keep your feet from getting tired
The Ministry of Health virologist announced the world's first flu-free season
For those who don’t like tackiness: simple ideas for spring pearl manicure
Check the work from the side occasionally to make sure the nail heads are at the same height.
Functions
The importance of address signs in our lives cannot be overestimated. Their presence helps you easily find the building you need , and their appearance can say a lot about the status, financial situation and even taste of the owner of the house.
Many owners of reputable office buildings located in private mansions even order the design of signs from famous designers, realizing that the overall impression of the company will largely depend on this detail.
For the residential sector, these are, first of all, signs and landmarks: for guests, passers-by, postmen, deliveries, ambulances and other categories of citizens.
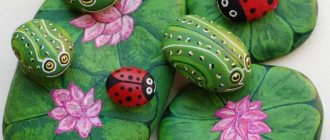
Decorating the sign
I didn’t have to buy a flowerpot because I had an old galvanized one lying around in my garage. That's what I used. My planter had no hooks to hang it from, just holes for nails. You can choose other options, with hooks, of course, more convenient, easy to remove and hang in place. If you have a cast bottom in the pot, then you must first drill drainage holes there so that excess moisture from the ground can drain, otherwise your flowers may die during the rainy season. Then use finishing nails to nail the planter to the free side of the sign. We fill it with soil and flowers or non-flowering plants. If you choose fresh flowers, you need to consider that not all plants can be outdoors all year round. But some types of cacti can thrive even in sub-zero temperatures. I decided not to bother with this and used evergreen artificial flowers.
Now the sign is ready! Hope you enjoyed it.
Found a violation? Report content
A little history
According to historical information, address signs were not used in Russia until the 17th century. This essential attribute appeared only during the reign of Catherine II, who, by her own decree, introduced them into mandatory use.
As for the numbering of houses, at first the signs were of little use, since many Russian streets in the 18th and early 19th centuries were a chaotic jumble of buildings without any plan. To cope with the problem, it was decided to number the houses in ascending order, dividing the street into even and odd sides. This is the numbering method we still use today.
Creating a spectacular exterior: original signs for the house and how to make them?
The numbers on the board should not only be beautiful, but also readable
A sign on the facade or near the front entrance is an indispensable attribute of identification of any building. But not everyone wants to use standard metal markers and boring colors. You can decorate your home or other building with a homemade address board using interesting design ideas and prints!
Volumetric stainless steel numbers on a dark background
Vertical wooden address board
Stylish fence with lighting
Chrome numbers on a rusty background
Where to order?
You can make panels yourself or order ready-made ones
Note! The cost of a designer board will be quite high - it all depends on the qualifications and popularity of the author of the creation, the materials used, technology and the size of the product.
Where to start searching for customers?
One of the most effective methods is to go around towns and the private sector in your city. You can hand out business cards or put flyers in mailboxes. You can take several copies of the finished product with you.
In a couple of hours of such a walk, you can collect up to twenty orders. Instead of going there yourself, you can hire a courier who will be interested in finding a client willing to place and pay for the order.
Order fulfillment time is five to seven days. It is better not to ask for advance payment, as this may alienate the client.
It is better to do such rounds in the evenings on weekdays or on weekends - this way you can catch the owners of the house. If you don’t find anyone at home, you can leave a business card or leaflet. Advertising on the Internet. You can also design your own website. Placement of advertising in the city on billboards or small banners.
Appeal to possible collective customers - administrations of cottage villages. In this case, you will have to register an individual entrepreneur and open a current account.