Parties, birthdays, New Year - funny and bright origami paper clowns will be appropriate for any of these holidays. Walls and windows are decorated with figures on pendants, and toppers are used in table settings. A funny little man, whose very appearance lifts the spirits, can be added to a children's gift and a flower bouquet, or simply left on the refrigerator, instead of a note with a morning greeting. There are many reasons to make an origami clown and each has its own model - among them there are very easy ones that take no more than 5 minutes and are worthy of true masters of their craft.
LiveInternetLiveInternet
—Quote book
Apple-filled rolls Crispy and incredibly tasty apple-filled rolls are Eid.
A unique technique for restoring vision. You will be surprised when you notice that you no longer need glasses! .
Fish balls in puff pastry Fish balls in puff pastry You will need: .
Orchid flowers from foamiran. MK Dear needlewomen, I offer you a wonderful master class.
The most useful infographic on the thyroid gland! Save so you don't forget! And if it's correct.
—Categories
-I'm a photographer
—Tags
—Search by diary
—Subscription by e-mail
-Statistics
'Cheerful clown', twitch toy.
Paper CLOWNS
Rice. 45. 'Cheerful Clown', twitch toy (artist V. Kalmykov, 1976).
- Several clowns
Dancer
- Crafts made from eggshells
Another material that is available regardless of the time of year is eggshells. Eggshells are an almost ideal material for children's creativity; they are easily painted or can be covered with colored paper. Its only drawback is its fragility, so when working with eggshells, extra care and attention is required.
Carefully pierce the egg on both sides and blow out the contents. Rinse the shell thoroughly with running water. Now you have a blank. You can, for example, make a clown out of her. The face is drawn in gouache, and the hair and collar are made from strips of paper or fabric and carefully glued on. The finishing touch is a fun hat, rolled up from a piece of paper and painted in bright colors.
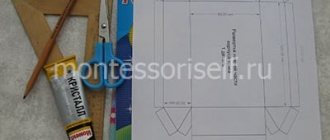
Before making crafts, print out the patterns and glue them onto thick cardboard. Craft Clown
1. Cut out the blanks.
Using scissors or a blade, cut out the eyes and mouth of workpiece A
(they are shaded), make slits for the hat and tie along the blue lines.
2.
Place blank
A B
and insert a hat and tie into the slots. 3. With one hand we hold the clown by the collar, and with the other we will move the hat up and down or move the tie in different directions. The clown funny moves his ears, eyes and tongue.
How to make a paper clown
Children from 3 to 6 years old can be asked to make a cheerful little man with their own hands in the form of an applique, while older children can make a craft in the form of a three-dimensional figurine with movable spring handles.
Application
It’s easier for kids to make applique from already prepared parts.
Before starting classes on how to make a clown with your own hands, parents or teachers should cut geometric figures and prepare everything necessary - cardboard for the base of the craft, glue, scissors with blunt tips. 15 parts needed:
- 6 circles of different colors - juggling balls and a face;
- 5 triangles – cap, pants, sleeves;
- 3 ovals – 1 for the body, 1 (in halves) for shoes, 1 (in quarters) for arms;
- 1 star – collar.
Let's start assembling the application. Just below the middle of a bright sheet of colored cardboard we glue an oval body. We “attach” arm triangles to its upper part. The next parts are the collar and head.
Then we “put on” a cap for the cheerful clown, place shoes along the bottom edge, glue on pants and sleeves, arms and legs, and balls at the top in a circle.
The final touch is the design of the face. Eyes, nose, mouth can be drawn with multi-colored pencils or felt-tip pens.
Older children can be encouraged to make a voluminous applique craft with their own hands. Work on it begins with the face. It is better to draw it for parents. We take a sheet of white cardboard as the basis for the volumetric applique.
We color the face with pencils or felt-tip pens.
We cut several sheets of paper of different colors into squares with a side of 5 cm, fold them into sharp triangles.
From the resulting blanks we make a “hairstyle” and a bow.
A voluminous, bright, structured craft for the kindergarten is ready. And if you replace the paper triangles with candy wrappers, and decorate the voluminous eyes and nose with textiles or plasticine, then your handmade clown will be even brighter and more attractive.
Video tutorial:
From corrugated cardboard and a tennis ball
A three-dimensional figurine of a funny circus performer can be made from simple materials in 20-30 minutes, and even a first-grader can cope with the task.
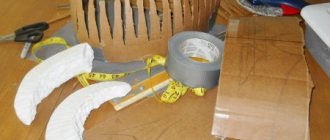
Before you start work, you need to prepare everything you need:
- tennis ball, preferably white;
- corrugated cardboard and bright “tissue” paper;
- small pieces of ordinary colored cardboard;
- multi-colored markers and thin springs;
- glue, scissors, wire.
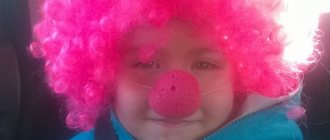
On the tennis ball we draw cross eyes, a red nose and lips with markers. We glue a cylinder from corrugated cardboard. The diameter of the cylinder should be smaller than the diameter of the head.
We will make clown hair from tissue paper with our own hands - lightly gather the folded strip in half using a thin wooden stick, and cut the edges into “noodles.” Attach the hair to the toy's head using glue.
We put springs on a thin wire. They can be bought at a specialty store or simply taken out of automatic pens. We attach pre-cut palms to one edge of each workpiece, and fasten the other edge (simply bend it) onto the cylinder. We glue the boot legs to the bottom of the cylinder.
The final stage of work is collecting and decorating the crafts. We attach the ball head with glue so that it does not roll off the base. You can decorate the “suit” with real or cardboard buttons or a corrugated paper tie.
Applications for kids - clowns
Applications for kids - print and cut out. Only 3 funny applications - clowns.
MASK
Required:
Whatman paper in A4 format, colored foil, colored paper, a ball of pink acrylic, a red sponge, gel glitter, scissors, glue, stapler.
1. Draw a diagram of the clown’s face on whatman paper and cut it out. Color with gouache. Cut out eyebrows from brown foil, an outline of the eyes from blue foil, and a mouth from red foil and glue to the mask. Cut out two circles for the cheeks from horn paper.
Clown bag - pattern of a soft textile doll - Babies
Clown bag - pattern of a soft textile doll.
1.Cut out the head, body and arms, all in 2 parts. Seam allowances 0.5 cm 2. Sew everything together, leaving a small distance open (marked in gray on the pattern) 3. Turn inside out and stuff. 4.We make hair from knitting threads (put it in a bun, tie it in the middle and glue it on the head). Hair can be any length. 5.Embroider eyes - you can simply use threads, or you can use buttons.
Mouth, nose - you can draw or embroider, it all depends on your skill and imagination. 6. Attach the head to the body - in order for the head to hold tightly, you need to take a stick, glue cotton wool on it (shown in the photo below), secure it in the neck (glue it), and then glue the neck to the head or sew it on. 7.Sew handles and ribbon to the back so that you can hang the doll. 8.Cut out the legs and cap, sew the legs, turn them inside out and stuff them tightly. Sew up the hat, trim the edge and you can put it on your head))) 9. Now we sew the bag suit itself. The size is absolutely unimportant, at your discretion. The length of the suit in the photo is 53 cm - from shoulder to bottom. We cut out the front (folding the fabric in half) - 1 piece, and the back - 2 pieces. Seam allowance -0.5 cm, on the back halves - where the fastener will be - 2 cm. 10.Sew the front and back halves, connect the back halves only at the bottom about 6cm, process the rest of the part - put it under so that you get just a slit. 11.Treat the neckline with bias tape, sew on a fastener - a button or Velcro. 12.Put in the sleeves and panties, then gather them at a distance of 5cm from the edge using an elastic band. 13.Sew the legs into the trousers. 14. All that remains is to decorate the suit with a frill. You need a piece of material, 15 cm wide, the longer, the more magnificent the cape will be. Fold in half, fold one edge and sew, insert elastic and gather to the desired length, sew on a button. Let's dress up our clown. The toy is ready!!!
Pattern of head, body and arms
Cap and boot pattern
babiki.ru
Cardboard twitch toy: a simple method of making
Twitch toys have been known since ancient times. These mechanical figures of people or animals, whose arms, legs or paws twitch funny thanks to a simple hinge mechanism, have always been especially loved by children.
Initially, twitchers were made of wood; in Rus' they were called “dancers.” Subsequently, the manufacturing technology was greatly simplified through the use of paper and cardboard. With the advent of color printing, twitch patterns drawn by artists began to be published in magazines, which made it possible to make colorful toys for everyone.
Well, the Internet has made the possibilities for creating a variety of twitches almost limitless.