Do you want to go on a trip? It's time to fold an origami train out of paper. Psychologists advise visualizing your dreams so that they become reality. Trains are especially popular among romantic types - you can not only move from point A to point B, but also admire the views flashing outside the window, communicate, and experience a keen sense of anticipation of adventure. These exciting moments will involuntarily be remembered when creating a paper origami model. And there it’s already a stone’s throw from a real train.
Maglev
China and Japan boast flying trains that compete with airplanes. The innovative transport, called “maglev”, does not have wings, but it has magnetic cushions for levitation above the rails. The lack of friction allows it to accelerate to 600 km/h in some areas - this is the speed of an average passenger airliner.
So far, maglevs are being tested at short distances to determine the optimal performance of the electromagnetic field. After all, the trains are heavy and require high power to levitate them. However, in a few years, superhigh-speed highways will appear in Japan that will connect the country's capital with the largest cities - Osaka and Nagoya.
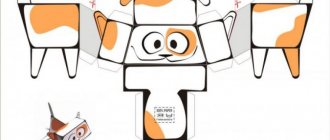
The magnetic levitation train is easy to fold using the origami technique. To do this, you will need a square of paper with one white side and a marker.
Step-by-step instruction:
- Mark the middle of the square.
- Fold the bottom and top edges ¼.
- Fold the workpiece in half into a “mountain”.
- We bring the upper left corner inside the figure.
- We bend the lower points.
We draw the windows and cabin of the train.
How to make a steam locomotive (container for toys). Master Class.
Galina Tikhova
How to make a steam locomotive (container for toys). Master Class.
You can make such a locomotive This will be a joint and exciting creative work. And the locomotive itself can serve both as a toy and as a container for storing your baby's toys . The child will be happy to collect his toys .
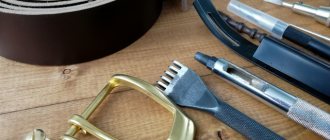
And now I bring to your attention the process of making this locomotive . For the work I needed: 5.5 m of green and 1 m. red self-adhesive wallpaper, double-sided and regular tape, lining fabric, 6 pcs of eye bolts, aerosol enamel, trays for flower pots of two sizes ( locomotive , plastic lids for 5-liter cans 8 pcs. (car wheels, cardboard boxes and other waste material.
1. To create the carriages I used banana boxes.
2. Boxes without bottom...
so I sealed the bottom with tape.
3. I inserted cardboard cut to fit the bottom.
4. For the carriage wheels I used plastic lids from 5-liter cans.
5. Using a knife, I cut off the bumps from the lids.
6. To attach the wheels to the box, I used necks from plastic bottles. In the center of the lid I cut a hole with a knife the size of the neck of the bottle.
7. I determined the location of the wheels on the box, attached the lid, and circled the hole.
8. I cut out the intended holes with a knife.
9. From inside the box I inserted the neck of a bottle into the hole
10. Put a lid on it and secured it with a cap. It was a fitting.
11. I covered the green box with self-adhesive tape.
12. To connect the cars together, I used eye bolts.
13. On the narrow side of the car I made a hole and inserted an eye bolt
14. Tighten it from the inside with a nut. I did the same on the opposite side of the carriage.
15. Cut holes for the wheels.
16. I inserted necks from plastic bottles into all 4 holes from the inside.
17. I glued double-sided tape along the top edge of the box from the inside.
18. From red lining fabric I sewed a liner for the inside of the carriage. I folded the top edge and glued it to double-sided tape.
19. I painted the covers intended for the wheels golden with spray enamel and attached them to the necks of plastic bottles. The wheels will spin as you move.
20. The carriage is ready. I made another carriage in the same way .
21. I start making a steam locomotive . I cut the end side of the box on the sides. I deepen the wall slightly. I cut off the corners with a knife. This is the front part of the locomotive .
21. I cut the cardboard to the size of the perimeter of the top part. I glue everything together with tape. I don’t seal the bottom, since we will make all the fastenings through the hole in the bottom.
22. I cover it with self-adhesive tape.
23. I used a juice box to make the cabin.
24. A plastic dog food can was used for the rounded cylindrical nose.
25. I cut a hole on the box along the neck of the jar so that it fits tightly there.
26. I made a cardboard bottom .
27. On the back of the box where the cabin will be attached, I made 3 holes (or 2, into which I inserted necks from plastic bottles from the inside. Do not pay attention to the fastening in the bow of the locomotive , it will be changed later.
28. I covered the box intended for the cabin with self-adhesive tape except for the top part (where the roof will be attached, the bottom and one side part (through which we will attach from the inside)
.
I made 3 similar holes at the bottom of the cabin
29. I connect the cabin to the bottom of the locomotive so that the necks of the bottles fit into the holes at the bottom of the cabin and screw it on from the inside with bottle caps. On the bow I cut a hole the size of the neck of a plastic bottle for attaching a can. I inserted the neck of the bottle into this hole from the inside.
30. I removed the sticker from the plastic jar and made a hole the size of the neck of the bottle (for attaching the pipe, and perpendicular to it on the back side of the jar I made the same hole in the center of the jar (for attaching it to the box)
31. I decided to make the locomotive from the top of a plastic bottle. To do this, I covered the top of the plastic bottle and the outside of the jar with golden-colored spray enamel. The middle part of the jar was sealed with self-adhesive tape. The neck of the bottle was inserted into the hole on the jar and secured with a bottle cap.
32. Removed the lid from the jar and attached it to the bottom of the jar using bolts.
33. I inserted the neck of the can into the hole in the cabin. And through the hole on the bottom of the jar I passed the neck of the bottle sticking out on the bow of the locomotive and secured it with a bottle cap.
34. I taped up the side of the cabin.
35. For the roof of the cabin, I cut out a rectangle from cardboard, with a perimeter slightly larger than the perimeter of the upper part. I cut out the sides of the roof.
36. Covered it with self-adhesive tape. Using tape I attached the side parts to the roof.
37. I put the roof on top of the cabin and secured it with self-adhesive tape.
38. An old plastic bath soap dish caught my eye. I decided to use it as a bumper for the bow of a steam locomotive . (At first I screwed on a plastic mussel tray as a bumper)
39. Painted the bumper with spray enamel.
40. Using bolts, I screwed the “bumper” to the bottom of the bow of the locomotive .
41. To make the headlights of a steam locomotive, I used necks with caps from plastic milk bottles.
42. I cut holes on the sides of the bow of the locomotive the size of the neck of a milk bottle. From the inside I inserted the necks of milk bottles into them.
43. I screwed the lids on the outside. The result is headlights. I attached eye bolts to the corners of the lower bow to tie the string.
43. I screwed the lids on the outside. The result is headlights. I attached eye bolts to the corners of the lower bow to tie the string.
44. For the wheels of the locomotive I used plastic trays for flower pots. For the front wheels, the size of the trays is slightly smaller than for the rear ones.
45. I secured them in the same way as the wheels of the carriages (using necks from plastic bottles)
. I cut out windows from yellow paper.
46. To give the finished look to the steam locomotive , I cut a hole in the plastic lid of a 5-liter jar with a diameter slightly smaller than the diameter of the top part of the pipe. I painted it with spray enamel and glued it with Moment glue to the top of the pipe.
47. And I bolted the plastic mussel tray, which I originally wanted to use as a bumper, to the rear of the cabin. At the bottom I screwed an eye bolt for coupling with the cars.
48. The locomotive and carriages were connected to each other using bolts.
49. The locomotive is ready.
Models for experienced origamists
The train presented in the video tutorial is not for beginners. However, it looks so unusual that you want to make an effort and add it to your collection of origami vehicles. The model is formed based on the basic “Bird” shape. For it you will need a standard square of single-sided paper 15x15 cm.
A very realistic three-dimensional train can be made according to the following scheme:
A little surroundings and you'll get a real model railway in miniature.
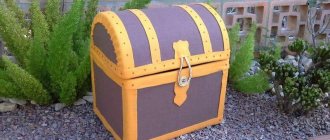
Do-it-yourself steam locomotive flowerbed from barrels
Unnecessary large containers are an excellent solution for creating a beautiful flower bed. Once filled with soil, they will be too heavy to move to the chosen location. It is better to immediately identify them in the garden, placing them one after another, like carriages in a steam locomotive. There is no need for connection here.
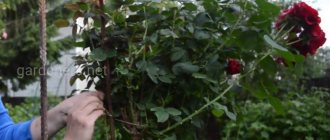
The wheels will require a thick log; they are mounted using long pins
To prepare a place for planting flowers in a barrel, you need to cut out a rectangular window with a grinder. To avoid injury, burrs on the edges must be removed and cleaned. The pipe is made from a piece of plastic, it is mounted in front, and behind the train - from a bucket turned upside down.
Required materials and tools
To make a flower bed-train, you will need ready-made containers or building material that can be easily processed. Usually wood or plastic is used for flower beds. In the first case, cutting boards, garden boxes, and storage pallets are suitable. The locomotive can be made from scraps of logs or timber.
Plastic has more advantages. The material does not rot, which is extremely important for a flower bed. It is more convenient to use ready-made containers for the train. Old cans, drink bottles of various sizes, flower pots, and buckets will do. The design of the locomotive and carriages is convenient to assemble from plastic lining. An excellent material is the plastic crates used in fruit stores.
Additionally, materials for the flower bed will be needed:
The simplest tool you need for a flower bed is:
- knife;
- scissors;
- wood saw;
- awl;
- paint brush;
- screwdriver;
- pliers;
- jigsaw
The set of tools depends on the material used to assemble the train.
How can you use logs to decorate your garden?
You can make a lot of fun and useful things from ordinary trees cut into pieces. You will definitely need a saw, an axe, a hammer, a chisel, possibly a plane and materials for decorating products. For example, it is easy to create a train from logs.
To begin, make a sketch or sketch of the future product.
First you need to determine what function the product will perform.
The train is perfect for children to play with.
For example, if you want to create an additional play element in the playground, you will need a slightly different approach than if you want to make a new flowerbed with an unusual shape.
Depending on the theme chosen for the product, select additional elements to decorate the finished train. When creating something similar to the well-known train from Romashkovo, choose bright colors and stock up on brushes. If you are planning to create a beautiful flower bed or a place to store garden tools, try to calculate what exactly you will plant, lay out and arrange, and choose the decor accordingly. Determine how many carriages will follow the locomotive and whether they will have wheels.
Material needed to build a train
In order to plant more than one flower in a trailer, it must be spacious. To make wagons, select boxes of different sizes. Containers made of metal, wood or plastic are suitable. And if you cut off the side wall of a large container (for example, from drinking water), then even a small tree can be planted in such a trailer. Take the wheels for the train from an old broken bicycle or cart.
You will get a wonderful locomotive if you put wheels on the locomotive from sawed wood, and for the train you select lids from cans of paint of the same size.
An old saucepan or bucket will do for the locomotive's boiler. The cars are beautifully connected with wire or unnecessary pieces of chain.