A trouser belt is a fairly important accessory, which sometimes determines how the whole look will look. And for the belt itself, the most important part is its buckle. A well-chosen buckle not only provides comfort and reliability, but also complements the outfit of both women and men. In the modern world, the choice of buckles is amazing. You can purchase this accessory in any store or order online. But if your ideas about the ideal plaque are so individual that it is impossible to find the right part, then why not try to make it yourself?
Do-it-yourself belt plaque: a simple master class with photos and instructions for beginners
A belt is one of the most important accessories for men. Women also love to wear this item, but men's and women's belts tend to be very different. For the female half, the design of the belt itself is usually important. It can be leather, but have some kind of pattern, for example, or in the form of a chain, or maybe even fabric, with rhinestones, etc. For the male half, the belt buckle plays the main role. It shows the status of the owner, his cultural beliefs or even life principles. It often happens that men take a rather responsible approach to choosing and purchasing a belt; they often cannot find an image on a plaque that would meet all the requirements and desires. In this case, a belt plaque, made quickly and easily with your own hands, is suitable. We want to offer one of the most unusual, but affordable ways to design a buckle. Here are some examples.
DIY leather belt - master class, templates and video
I would like to acquaint readers with the following problem: how to make your own men’s accessory – a belt for trousers. It is best to make a leather belt from pig or ox skin. They are quite inexpensive and if you spoil the workpiece, it will not be a big deal. In the middle segment there is veal or cow. Premium leather is a snake and a sheep.
Making a leather belt can serve as the basis for learning to work with leather materials. Let's look at an example of how to make a one-piece belt with a classic buckle and two loops.
Master class on making a leather belt with your own hands:
We will need two belt blanks from the materials. A wide blank for the belt itself and a narrow one for the belt loops. You can cut such blanks with a special tool, or you can purchase ready-made belt blanks.
The accessories and tools you need to work with are shown in the photo. The tools include: a belt template, it is almost invisible behind the workpiece, as well as a screwdriver for screws and a ruler.
First you need to mark all the holes. It is more convenient to do this using a template; you can also use paper printouts of similar templates from the Internet. Next, we cut everything according to the markings and punch holes for the screws and the buckle tongue.
At the next stage, armed with an edge cutter, we need to chamfer the entire perimeter of the workpiece and polish its end. We first tint the end with penetrating dark brown paint, and polish the end with toconol. As a result, we get a smooth end on vegetable tanned leather. You can use end paint or wax on chrome leather.
Now let's start making the belt loops. We fasten the belt loop by stitching with preliminary clarification in the places of stitching. You get two belt loops. We install one between the belt screws at the buckle. And we leave the second one hanging freely on the tail of the belt.
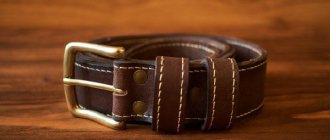
We put everything together and our product is ready. In this case, the result was a 40mm wide belt with brass fittings.
Belt templates
Photos of beautifully designed belts
Make a leather belt with your own hands, video:
Source: https://svoimi-rukam.ru/hand-made/kozhanyy-remen-svoimi-rukami/
We make a beautiful plaque on a belt with our own hands in a step-by-step tutorial
What to take as a decorative element?
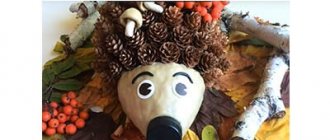
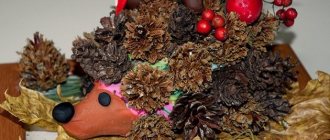
This master class will present an option for decorating a plaque using a dried maple leaf, printed paper pictures and stickers. You can choose absolutely any item. It can be any dried plants, insects, feathers - anything, as long as these things fit the size of the buckle blank and you like it.
Making the buckle must be done with gloves, since the special resin can get dirty or even damage the skin.
Do not neglect the instructions for use indicated on the resin packaging. Usually this liquid is sold as a hardener kit.
You need to pour the resin and hardener into the container and mix everything thoroughly. Heat the mixture in a water bath a little. The liquid will become very viscous, so it will be more convenient to use a wooden stick (even a popsicle stick will do).
Now pour a little liquid onto the buckle and spread the resin in an even layer over it with a stick.
Then, directly on the resin, place the decorative element you have chosen and fill it with the solution again.
The liquid will allow you to move the pattern for a while, if necessary.
After this, the buckles should be left to dry overnight.
That's all. After the buckle has dried, all that remains is to attach it to the belt.
It also happens that, for example, you were given a belt as a gift, but you didn’t like the buckle. But the belt is good and I want to wear it. Then you can try to redo the design on the buckle.
To do this, you need to grind off the protruding parts of the design with a file and cut out a suitable piece of brass 0.5 mm thick, which you will then attach to the plaque.
Then you need to draw the desired image on self-adhesive paper, as, for example, here:
and stick it on a brass plate.
Then you need to “etch” the plate in ferric chloride for about 2 hours, periodically heating the chemical reagent and washing it off the plate with running water, and then immersing it in the liquid again. This procedure after removing the film will give the following effect:
Next, 16 holes are drilled in the old buckle to attach the plate.
You attach it, remove the excess with nippers and file it with a Dremel.
If possible, it is necessary to solder the side gaps, remove excess pieces of metal and file them so that the edges are smooth.
DIY belt buckle (buckle)
Our dear readers and new visitors, the pages of the online magazine “Handmade and Creative” continue to be replenished with new and interesting master classes and ideas for handicrafts. Let's touch on the topic of clothing accessories. Recently, a belt has become not just a functional accessory; it is considered more of a fashionable item in our wardrobe.
After all, a fashionable and beautiful belt can radically change the look of any clothing. Although sometimes hidden under sweaters or shirts, they continue to be an important part of everyday clothing. You can buy a belt in any store, of any types and designs. We want to invite you to make your own unique designer item.
So, we present to your attention a master class - a DIY belt buckle.
Required materials and tools:
- prepared buckles;
- leather belt;
- gloves;
- scissors;
- paper and color printer;
- leather oil (lanolin or mink oil);
- decorative (epoxy) resin;
- container for mixing (stirring) resin;
- brush or stick for applying resin (glue).
Buckle blanks
The first thing you need to do is determine what size your DIY belt buckle will be.
In our case, it is 67x48 mm, the workpiece should be a little larger so that later it will be possible to cut it to the exact shape.
We decided to make several buckles: from decorations (in this case, a yellowed leaf) and inserts from paper printouts (or stickers). The top is covered with decorative resin.
Resin coating
When working with this material, it is best to follow the instructions that are written specifically on your packaging. Sometimes it is necessary to apply 2 layers, sometimes more. Often the resin comes in a set with a hardener.
Attention! Do not neglect the descriptions specified in the instructions. Pour the resin (mix with hardener if necessary) into the prepared container, heat it a little in warm water until it becomes viscous. Stir with a stick. Now pour a little onto the buckle and spread evenly over the entire surface.
Now you can put either a leaf or blanks on top - drawings, photographs, etc. And cover the top with resin.
You can use a stick to move the drawing for a while if you need to place it more correctly. Leave the buckles to dry overnight.
Preparing the belt
Belt dyeing is a kind of preventative and restorative remedy.
There is a special oil for the skin that softens and cares for it - this is a special oil from the bones of the feet of cattle (neatsfoot oil), although today such oil is rarely found on sale in its pure form.
If you can find it, great; if not, you can use an analogue - lanolin or mink oil. Apply oil to the belt using a soft cloth. Place to dry in the sun or under a lamp.
The belt is ready
All that remains is to attach the belt buckles, made with your own hands, to the belt itself. If you just decorated the buckle, i.e. it came with the belt - just put it in place. If it's a new buckle, you may need to make additional holes or shorten the length of the strap.
If you liked the master class, then leave a couple of lines of gratitude to the author of the article in the comments. The simplest “Thank you” will give the author a desire to please us with new articles.
Encourage the author!
Source: https://DekorMyHome.ru/rukodelie/priajka-bliaha-dlia-poiasa-svoimi-rykami.html
Learn a simple tutorial on how to create a belt for women
For women's belts, there are simpler options for making or simply decorating the buckles. They can be tied with crochet or leather braid.
You can simply cover the buckle with fabric. To do this you need:
In any case, it all depends on your imagination and the availability of the necessary materials. If you have a creative impulse and a desire to make such an important accessory, especially for men, then you should definitely make it.
DIY belt buckle
A trouser belt is a fairly important accessory, which sometimes determines how the whole look will look. And for the belt itself, the most important part is its buckle. A well-chosen buckle not only provides comfort and reliability, but also complements the outfit of both women and men. In the modern world, the choice of buckles is amazing. You can purchase this accessory in any store or order online. But if your ideas about the ideal plaque are so individual that it is impossible to find the right part, then why not try to make it yourself?
How to make a buckle
The World Wide Web contains a considerable number of all kinds of step-by-step videos and text master classes on making a belt plaque. The most popular options are discussed in detail below.
From metal parts
To make a belt plaque using this technology, prepare as many different metal parts as possible, left over from all sorts of old mechanisms . The more choice, the more opportunities for creative exploration and flight of fancy.
To begin with, you can sketch out an initial sketch in real scale and refer to it as you work.
Completing of the work
Wire adjustment buckle
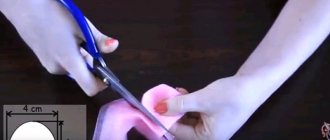
For work, it is best to use a wire about 4 mm thick, bending it around a rod with a diameter of 6-7 mm .
IMPORTANT! When forming an angle, pay attention to the distortions that invariably form due to the varying degrees of “springiness” of the metals.
Made from epoxy resin
It would not be superfluous to mention another technology for manufacturing a unique accessory. For it, you need to prepare in advance a flat buckle with sides along the outer edge .
Using epoxy resin, which, when hardened, retains its properties and remains transparent, you can fill and insert any image, herbarium, and even small metal elements into the plaque.
Source
How to cover a buckle with fabric with your own hands?
A fabric-covered plaque or belt closure looks attractive. Looks good with many things from the same fabric. This is an excellent solution if only the color of the plaque is not suitable, but the shape is ideal.
Materials
This is not that difficult to do, but to get it working you will need :
- textile;
- plaque;
- scissors;
- needles and threads;
- chalk;
- if necessary, even thicker fabric.
Pattern
Fold the fabric right sides together and use chalk to mark the lines for cutting, taking into account seam allowances.
Assembly
Place the pieces of fabric right sides together and first sew carefully inside the plaque. Then make cuts in the corners. Next, turn the scraps inside out, wrap them around the buckle and make hidden seams to one side. After folding, you can use a velvet seam when matching the sides. But this must be done very discreetly and with threads to match the main fabric.
Making a cool DIY belt buckle
A DIY belt plaque is a great gift for your beloved husband, father or grandfather for any occasion. When making a badge, you must use your imagination so that this product becomes special and characterizes the future wearer. The plaque can be made from various scrap materials, old things, pieces of metal, and the like.
If a beloved man spends hours shopping in search of a belt with a suitable plaque, this master class will certainly be useful to his caring woman.
Materials and tools
In order to make a belt buckle with your own hands, you need to stock up on at least a basic set for working with metal. For example, with the following tools:
- device for bending wire;
- vice;
- caliper or other measuring tool;
- brush for processing cuts, sandpaper or file;
- wire cutters;
- soldering iron or rubber hammer for straightening.
It is necessary to select materials based on what kind of final result you want to get. When creating a buckle, you may need the following items.
- Metal parts and plates, such as brass.
- Rivets.
- Solder for joining elements.
- Thick brass, bronze, titanium or copper wire.
- Ammonia or other agent suitable for treating the finished product.
Product with picture
To make a plaque with a picture of your favorite band or actor, the following materials will be useful:
While working, your hands must be wearing gloves, as you can get dirty and damage your skin with the resin.
It is necessary to read the instructions for using the special resin.
To begin, pour the resin and hardener into the container and mix thoroughly. Then heat this mixture in a water bath. The liquid will become very viscous, so it is best to stir it with a wooden stick (suitable for a popsicle or sushi).
Other ways to cover a buckle with fabric and leather
The buckle will look very .
But you need to know a few secrets to get a beautiful and neat product. For work use:
- buckle;
- skin;
- threads and needles;
- scissors;
- crayons.
Pattern
The pattern is almost a repetition of the buckle lines, but with small allowances. To create it, you just need to attach the part itself to the skin and draw lines with chalk. Cut carefully with scissors.
Assembly
Initially, you need to grind the middle. Use velvet stitches, and select the color of the thread exactly according to the color of the skin . Then make small slits for the middle bridge in the buckle, and you can start working on the edge.
Initially, you can make a small connection using a few stitches. Next, use a thicker thread to lay a neat and even stitch. You can use a stitch called “forward needle” and sew it in the forward and reverse directions. The result will be straight lines and very strong connections.
Important! In some models, contrasting threads on the leather will look great.
These three models can be created with your own hands and complement your favorite item or something that was also made by yourself.
Do-it-yourself quality leather belt - DIY Community on DRIVE2
For a long time I wanted to get myself some thick, reliable and good-quality belts... Solid... Mmmmm... what a rare word... now, in the age of disposable things... A word that marketers are actively uprooting from our consciousness, obsequiously laying down for us the postulates of a new trend that justify the disposability of modern third-rate quality things...Repair from sheets of plaster...jeans fraying in the crotch after a year of wear...cars that barely last out the warranty period...The times of Nif-Nif, Naf-Naf and Nuf-Nuf...The era of family plastic...So belts. There was no goal to get four belts for noon on December 5, 2016, but from time to time, passing by kosher trading boutiques, or even just ordinary leather goods, I regularly monitored what and where there was good quality and beautiful stuff for an acceptable price, but either I don’t know the fat places, or I’m not walking there, but I never saw what I expected, but I expected something four centimeters wide, five millimeters thick, and not even pressed, but cut from the backs of poor innocent bulls, cows and yaks... When I’m with sadly told the twenty-ninth seller, showing me his next one hundred and fifth masterpiece, like this -
that I would like a four-centimeter-five-millimeter non-pressed product, I received in response an arched eyebrow and the answer that you won’t see such a thing now, well, maybe in distant cities, etc. and even if there was something like that, the price list would have left me no chance of success... Maybe so. But it’s hunting.
Then everything went very dynamically - the back of my mind produced a picture of blanks for belts, which I saw somewhere when I was looking for nappa, for altering the steering wheel and dashboard. Of course, I don’t remember where it was, but I remember that someone had it for sale blanks for the belt.
DIY leather belt: step-by-step instructions
A stylish belt is considered an essential attribute in the wardrobe of women and men. In addition to its main function - to hold the trousers tightly, it also emphasizes the waist, complementing the created image.
There are a huge number of them:
- from suede;
- rag;
- leather;
- wide;
- narrow;
- monotonous;
- multi-colored;
- with classic buckle;
- designer and so on.
In clothing stores or at the clothing market, you can buy whatever you like, if your financial condition allows you to do so.
But often having one belt in your wardrobe is not enough: you need at least one for each coat, trousers, etc. And this is a big expense that not everyone can handle.
To get out of this unpleasant situation, there are two options: either get a bunch of credits for purchases or make a leather belt with your own hands. The second option is more suitable.
Waist measurement
The first thing you need to know is the size of the future belt. The easiest way to do this is to take an old belt and attach it to the workpiece and make marks everywhere. In this article we will do everything from scratch. To do this, you need to take measurements of your hip circumference at the location of the belt. Be sure to write down the received data.
My tools
To make a belt you will need some tools. In our case, the following were used:
- hole puncher;
- skiver;
- roller razor;
- cutter (or regular scissors);
- ruler;
- special tool for cutting edges.
A long piece of durable buckle leather will be enough for your material.
Carefully cut the strip
Now you need to cut a strip on the prepared skin. To ensure everything turns out smooth and beautiful, use a ruler. When choosing the length, you should make a certain margin. For example, if the waist circumference is 75 centimeters, then the length of the belt should be about 100 cm. Trim off the excess skin.
What kind of cutter do I use?
Make a perpendicular cut at each end - this will simplify your further work.
The choice of width depends on your taste
On your belt cutter, first set the thickness convex so that 89 pieces of leather will go through it. Then set the width as you wish.
The quieter you go, the further you'll get
Press a straight strip of leather against the cutter and slowly feed it through. Make sure that the skin is pressed evenly against the plane of the cutter. As the skin comes out the other end of the cutter, grab it with your free hand and help it come out. Do this carefully, because if you move too quickly, you risk damaging the belt.
Buckle Attachment Kit
I exposed my hardware set. On the left are the collapsible rivets and on the right is the buckle.
Marking the holes
Now that the strip of leather has been cut out, it's time to make marks for the holes. The easiest option is to use an old belt as an example.
Mark the old belt
How it happened
This is how the holes were made