If you are looking for an easy and cheap way to make a bird house, then the idea of using plastic bottles should interest you. Of course, this material is mainly used for feeders, since many people believe that plastic is not the most suitable choice for a nest. In fact make a birdhouse from a plastic bottle not a bad idea because birds are more interested in the shape and size of the house rather than what it is made of.
Of course, there are materials that should not be used - metal, wood impregnated with chemicals, etc. But plastic food bottles are not dangerous for birds, and by using recycled materials, you will take care of the environment. Also in this article you will learn how to make a plastic birdhouse from PVC pipe.
Beautiful birdhouse from a bottle
This is an interesting and creative project: small beautiful birdhouses made from plastic bottles . Perhaps not the most original design for a bird house, but the feathered residents should like it.
To make a birdhouse, collect the following materials:
- plastic bottles;
- sharp scissors;
- paint and brush;
- wire.
First, cut the bottle in half. The top part will fit over the bottom, so don't be afraid to shape the bottom side with your imagination, this will be the roof and it should be beautiful.
Then paint the two parts of the cut bottle as you like and leave to dry. Don't forget to punch a couple of holes in the lid. You will need these to thread the wire through and make the loop. This is for convenience so that the birds can sit inside the house. That's basically it, you have completed a project that will help the environment.
Now all that remains is to install the birdhouse on the tree and feel how you are filled with pride for a useful work.
Photo source: www.goodshomedesign.com/diy-plastic-bottle-bird-house/
Materials and tools for work
To make a birdhouse you will need only one board or scraps of boards, plywood, chipboard or fiberboard.
Tools:
- drill with cutter;
- jigsaw or hacksaw;
- nails and screws;
- wood glue;
- pencil;
- tape measure or ruler.
How to decorate?
Each person must approach this process individually and decorate the birdhouse in accordance with the design of the entire site and their own preferences. However, for those who do not know how to do this, here are some of the most interesting options to consider. A homemade bird house should be beautiful and appeal not only to you, but also to the birds living in it.
For example, you can decorate the entrance to the birdhouse in an original way. To do this, you can glue small strips of tape on the sides, preferably double-sided. Then attach a beautiful multi-colored braid on top. The bottom and top can be decorated with a row of large buttons, which are sure to be found in every home.
In addition, small decorative windows can be made from very thin plastic in several places. In addition to the roofs described above, others can be made. For example, a roof made from old wheels will look very beautiful and attractive. To do this, they need to be heated a little and then cut into equal parts. Each resulting piece can be painted with any paint.
Multi-colored “tiles” will look very beautiful. It is attached with good quick-drying glue.
In addition, for the convenience of the birds, the bottom of the bottle can be covered with either hay or cotton wool. The birds will like this decor the most. You can paint and paint the birdhouse, if possible. For this you can use acrylic paints and even gouache. However, the latter must be coated with varnish. By using all your imagination and creativity, you can make the birdhouse a real exclusive dream house for any bird.
General recommendations
As with any construction, it is recommended to follow safety precautions:
- it is necessary to work with gloves;
- preferably clothing that covers arms and legs;
- check all electrical appliances for serviceability;
- use safety glasses when cutting;
- sharpen a knife or saw teeth;
- work carefully with nails and screws.
If you are working with children, you should keep them away from the workplace while working with devices.
Important! For the birdhouse, use odorless paint and a color that does not attract attention. For example, brown, gray or burgundy.
Execution steps
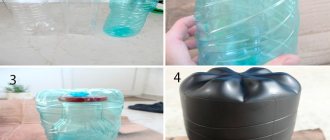
- How to make a birdhouse from a five-liter bottle? Take a large plastic bottle with a cap and place a strip of tape on the bottom. Glue the beginning of the twine onto it and begin winding the container.
- Each subsequent row of winding should be pressed tightly against the previous one. Secure the first and last row with glue.
- The next step is to draw a square on a piece of twine, apply glue along the path and cut a hole.
- Start making the roof; an unnecessary woolen hat or sleeve from an old sweater will do for this. Place the woolen cloth on the top of the workpiece. The edges of this canvas must be collected using a needle and thread, fastening the lids to the handle.
- Sew the previously prepared tufts of grass to the wool base. When all the grass is sewn on, secure the top with a cord threaded through the handle of a plastic bottle.
- Decoration of the entrance to the birdhouse. To do this, you need to stick strips of double-sided tape on the sides of the inlet hole, and a braid on top of it.
- Secure buttons at the top and bottom.
- To attract birds inside, you need to sprinkle a grain mixture with minerals and vitamins. It is not recommended to sprinkle bread crumbs, as over time they turn into mush due to humidity, which is very harmful to birds.
- Hang the feeder on the roof, out of reach of cats.
Now you understand how to make a birdhouse from a 5-liter bottle without difficulty and special expenses. The birdhouse should be placed on the east side. Approximately once a year, some time before the birds arrive, it must be disassembled, cleaned, and the mat there replaced. Then you can hang it again to meet the birds.
The most democratic option
Next, you will learn how to make a birdhouse from a bottle with your own hands, and you will understand that it is quite simple and quick. The process takes approximately one hour.
- Plastic bottle with a volume of 5 liters.
- Jute or linen twine – 1 pc.
- Scissors.
- Double-sided tape.
- Glue.
- Bunches of grass.
- A piece of woolen fabric.
- Large buttons (shiny) – 2 pcs.
- Braid – 30 cm.
- Cereal grain.
- Marker.
- Threads.
- Big needle.
- Lace.
Dimensions
The design parameters are selected based on who will live in it or fly in for a while. It is necessary to know approximately the inhabitants of the nearest area in order to build exactly the right and suitable house. The comfort that needs to be provided to the inhabitants is created through certain parameters.
Main sizes of birdhouses:
Taphole diameters
- Starling: 5 cm
- Tit, sparrow: 3-3.5 cm
- Flycatcher: 4 cm
If you cut the diameter larger, there is a possibility of large birds or predators settling in.
Height and bottom of the house
Starling:
- height=35 cm;
- bottom = 15x15 cm.
- Tit, sparrow:
- height=25 cm;
- bottom=14x14 cm.
- Flycatcher:
- height= 20 cm;
- bottom = 12x12 cm.
Approximate board thickness: 20 mm
How to do it yourself?
Building a bird house at home is not difficult. However, before this, it is necessary to remember to protect future birds that will settle in it. Therefore, it is better not to make a perch just before the hole, since the cat can catch its paw on it and pull out the emerging chicks. In addition, for the same reason, the visor should be made a little longer.
Then you need to prepare all the above materials and tools, and only then begin the work itself. The best way to make a birdhouse is from a five-liter bottle. To understand how it is done, it is necessary to consider the entire process step by step. There are several options.
Option #1
- First you need to take a 5 liter bottle and rinse it thoroughly. Next, you need to dry it and remove all the labels so that they do not interfere with your work.
- Then, on one side of the workpiece, you need to mark the middle and draw a small circle with a marker. Next, you need to cut it out with a sharp knife or scissors, and the edges are either carefully smoothed through a light cloth with an iron, or simply sanded with sandpaper. This is necessary so that birds do not get hurt when they fly inside.
- After this, just below the entrance you need to mark two small holes for the perch. Then carefully do them. This can be done with a hot nail. Then you need to insert a wooden perch into them. It must be held very tightly so that the bird sitting on it does not fall.
- Now it's time for the twine. It must be coated well with glue and wrapped around the entire birdhouse. But if you use twine, you only need to wrap the bottle up to the cut hole.
- After this, you can start making “tiles”. To do this, you need to take a 2-liter bottle prepared in advance. You need to draw sketches on paper and then transfer them to the bottle with a marker. Using scissors, you need to carefully cut out the required number of blanks. If one bottle is not enough, you can use another one.
- Next, you can begin installing tiles on the birdhouse. This is done using quick-drying glue. From above you need to wrap the neck of the bottle with the same twine. It will also cover all the “tails” of the tiles. In addition, you need to attach a rope to the neck so that you can hang the birdhouse.
- Since the bottle is transparent, birds can simply get into it, like a regular bird trap. To prevent this from happening, you need to cover the middle of the bottle with prepared burlap. The bird can easily get out of its house.
- After this, you can start decorating the birdhouse, however, this is done at will.
in bird houses.
Very often you can see WRONG birdhouses made with errors. Such beautiful painted bird houses are certainly cute and beautiful, but the birds don’t want to live in them. And the houses just hang empty on the tree - purely for decorative purposes.
Let me tell you what mistakes craftsmen make in making birdhouses. So that the bird house made by your own hands is not only beautiful, but also initially correct . Then the birds will like your homemade birdhouse at first sight.
MISTAKE #1
entry hole too low.
The window-door in the birdhouse must be located at a height of at least 30-40 cm. This height is needed so that the bird has the opportunity to create a nest at the bottom of the house.
By the way, the photo above is an example of another fastener - a metal U-shaped bracket is nailed to the roof of the bird house (like an eye for latch bolts).
Look, on the transparent birdhouses in the photo below we can see that the bird is dragging more branches into the house. And if the window is low, the branches will block the exit from the house and it will be impossible for the bird to get out of it. And the bird itself does not want to sit in a nest where its head will be level with the window, it will be so anxious. It is much safer if the window is high - and the wind does not blow on the wet, unfledged chicks, and the mother bird feels safe.
By the way, the photo above shows the original model of the birdhouse, the back wall of which is made of glass with suction cups. Such a house is mounted on a window in a large house and you can watch the birds settling in the nest. You just need to comply with the condition - a window. In the place of the window glass where you plan to mount such a birdhouse on suction cups, you must first seal it with tinting film - so that the birds do not suspect third-party observation.
MISTAKE #2
hole too big.
Starlings will not settle in a house with a door large enough for the cat's head. Cats love to climb trees in search of nests of defenseless chicks. And such a house with a large hole is easy prey for them.
The small hole of the birdhouse was not invented in vain. The cat's head and paw should not fit into the hole, but starlings and other birds should calmly climb inside. Therefore, when you make a birdhouse with your own hands, make a small hole in it.
Only if you live near a forest line and are making houses for owls flying in the vicinity, then a large hole will of course be appropriate.
MISTAKE #3
BRIGHT COLORING of a birdhouse.
If you do not live in a blooming jungle, and if the house you are planning is not designed for parrots with bright plumage, there is no need to paint it in bright colors. Birds trust only natural colors and natural materials. This birdhouse is good to use as a designer piece for your living room or as a piece for a competition for a school or kindergarten. But birds will not live in it.
Mossy, aged houses are much nicer for feathered mothers than sleek, glamorous, smoothly planed apartments.
And if you want your bird house to be original and beautiful, then know: you can make a decorative glamorous design in natural shades. Here in the photo below is just an example of such a house, which at the same time looks chic from an aesthetically human side and does not scare away birds at all with its bright colors.
But the houses that are dearest to the feathered heart are those that are maximally disguised as an ordinary hollow in a tree. After all, starlings initially settled in hollows. From time immemorial it has been this way - it is embedded in their bird genes: to look for a hollow. So make them an artificial hollow from slabs of rough bark ( sold as firewood).
Or take your house made of planed boards and additionally decorate it as a living hollow - cover (or glue) it with twigs, branches and pieces of bark.
Birds love houses made of unplaned wood, with elements of bark and rough branches.
MISTAKE #4
There is no bird stand.
It is inconvenient for birds to climb the smooth boards of a wooden house. It's hard for them, their little claws slip off.
This is especially important for the INNER SIDE of the walls of the birdhouse. It is better to line the inner front wall with small slats-ladders (so that the bird inside can climb along them to the exit window).
Or nail a piece of bark, or an old grater, or, in short, any ribbed and rough surface to the inner wall of the birdhouse. Or place a short inclined board inside the birdhouse (from the bottom to the window) so that the bird can climb up this slide to the exit of the house.
Also, if the outside of your birdhouse is made of smooth planed boards, make sure that the bird has a footrest.
These could be simple twigs or branches that you cut while pruning apple trees in the garden.
These can be river pebbles glued with hot glue from a glue gun. Or, instead of pebbles, you can stick on logs of branches (cut them into round saw cuts and paste them over the house).
Any old, rusty thing from the barn is suitable as a stand for the birds' legs - a door hinge, a valve from a water pipe, a faucet, a reel from an old fishing rod, a rake, an aluminum fork, a key. Anything can become a perch-stand in a homemade birdhouse.
Such things will only add originality and creativity to your simple bird house.
WHAT ELSE
we can
HELP THE BIRDS.
In addition to hard branches, to build a nest, birds need soft material - tufts of dry grass, moss, feathers, rag debris, pieces of paper, which they collect everywhere themselves, spending long hours on low-level search flights.
Why not make the bird's work easier and place a construction warehouse next to the bird's home. Housewarming in your birdhouse will come much earlier if everything you need to create comfort is located next to the house.
You can collect bunches of grass yourself, tear the cotton wool into pieces and place it in such a way that it is easy for the bird to pull out pieces of material from this construction warehouse. There is no need to tie the grass into tight bunches with thread - the bird will not be able to pull the grass out of the tight bunch. You need to make storage out of a mesh container.
You can hang a box with rags, cotton wool and moss nearby. To prevent the wind from blowing the material away, the box can be covered with a mesh (metal) or a plastic mesh, which we place on the bottom of the kitchen sink.
Or weave and twist balls from flexible branches and insert cotton wool, centipon and pieces of chopped newspaper or toilet paper inside such woven balls.
Even holders for bird fleeces and rags specially made for this purpose are sold. They are installed or hung next to birdhouses.
Material for the construction of birdhouses.
The MATERIAL for the house must have the correct characteristics of thickness and texture.
THICKNESS. Boards 2 cm thick. This thickness of a wooden board will better retain the heat of the house. After all, nests are built in the spring, when the nights are still quite cold and even frosty.
TEXTURE. As I already said, the boards should be rough (slab boards with unplaned bark are suitable). And if you only have smooth planed boards, you can stuff pieces of bark on them with nails and stick them on liquid nails (thick adhesive from spray cans).
Or create artificial roughness - scratch the inner wall of the birdhouse with a knife - make notches for the bird to cling to. Or nail pieces of bark onto the inner wall, several slats one after another like a ladder, or nail a grater or a piece of insulation (it is made of foam and it will also be convenient for the bird’s claws to climb on it).
You CANNOT make houses from glue boards (plywood, chipboard, fiberboard - these materials contain adhesive resins, they emit toxins that the birds may not like. I don’t know whether it’s true or not, but they say that resin pine boards are also not suitable for a birdhouse, which In the warm sun, the resinous board heats up and releases stinking resin, and that this is supposedly harmful to the birds. I haven’t checked it, I can’t presume to say.
Now I will give diagrams and drawings of simple houses. But I’ll immediately make a reservation that your designs can be completely different in shape and size. You are free not to adhere exactly to the outline from the project below. As you already understood from the photographs above, there are a variety of houses.
But the logic of the sizes must be preserved... And this logic is as follows.
What are the dimensions of a proper birdhouse?
The size of the window hole (called a tap hole) is no more than 5 cm in diameter. So that the crow cannot stick its head into the birdhouse and eat the chicks. And the cat's head didn't get in there either.
The height of the entrance window is at least 20 cm from the bottom of the house. So that the wind from the window does not blow on the nest of the chicks, and that the chicks are not near the entrance - because of the danger of meeting a crow's beak or the clawed paw of a cat.
The height of the birdhouse is at least 35 cm. It can be a little higher, but remember that if you make the ceiling too high, then such a high-ceilinged house will be harder for the birds to warm (warm air will go up and the birds below in the nest will freeze).
The width of the house (that is, the square area of its floor) should also not be very large. A spacious house is not considered cozy and a wide nest requires a longer time to build. The bird will be tortured to fill such a spacious house with twigs. Therefore, we try to stick to the bottom size of 15 x 15 cm (or 20 x 20). That is, if you are making a wide house, then put dry grass there in advance (the bird will only be happy).
As you can see, these dimensions are dictated by the logic of survival in the wild . And the right birdhouse is the one in which all these features are observed.
Well, now let's move on to the drawings and diagrams.
Here I have collected ways to make a birdhouse in the form of diagrams and drawings . You can choose your house model and estimate what parts you can assemble it. And remember, it doesn’t matter if your sizes differ slightly - we make them from available material and therefore the sizes will depend on our availability.
Here is another drawing of a birdhouse, although here the dimensions are given in inches. It will be easier for you to convert inches into centimeters if you ask your wife for a measuring tape for patterns - the one she uses to measure the circumference of her losing weight during a diet. On such a measuring tape, centimeters are written on one side and inches on the other. This way you can always see a quick conversion of any inch size to centimeter.
These drawings do not take into account one more CONDITION. In the Soviet birdhouses of our childhood there was always a clear rule: the front front wall (the one with the hole) should be tilted forward . This was done so that the starling could climb up such an inclined hill to the exit from the house.
To maintain this slope, you need to make 2 side walls from the rear edge straight vertically - and from the front edge obliquely (we see a similar principle of oblique side walls in the photo below). Only in this example does the birdhouse have a triangular side section. And in Soviet birdhouses there was such a slope, but at the same time there was also a normal bottom, so that there was enough space for the nest.
Below we see a drawing of real Soviet birdhouses from our childhood. True, the dimensions here are given in inches.
But if your house does not have a bevel on the sides, then to make it easier for the bird to escape, you can put an inclined board on the front wall on the inside of the house (it will perform the same function as a ladder).
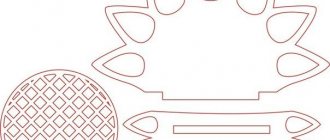
Now let's look at birdhouses of another unusual shape - a rhombus. Here he is in the photo. The idea is certainly beautiful, the house turned out elegant and decorative. But from a practical point of view, it would be better for the birds if the window was located closer to the left or right edge - then the inclined plane of the wall would serve as a support for the bird to comfortably climb out.
drawback in this house is that the window is too low - there is no place for a nest - it turns out that when the bird puts grass and twigs there, the height of the chicks will coincide with the height of the window - and they will look straight out and any crow will pull it out with its beak and eat it without a twinge of conscience.
An intelligent feathered mother would never choose such a dangerous house for housing - and it will just hang in your garden, and you will wonder why the birds do not move into the birdhouse.
Here is a drawing of a similar house, but here the entrance hole itself is located much higher - it’s better that way. Or better yet, raise it right under the roof of the birdhouse. The bird will approve of this option.