Video lesson
Very simple, colorful, creepy, but charming.
Monsters attract children like magnets. And this is wonderful, because it is thanks to their fascination with monsters that children realize and accept the fact that we are all different from each other, both externally and internally, but this dissimilarity is not an obstacle to friendship, but, on the contrary, is its highlight, its value. Creatures that are dissimilar to each other have a unique opportunity to explore other views on life, other habits and hobbies, and therefore enrich their own inner world. Of course, a child is not capable of such complex conclusions, but, plunging into the world of monsters, he intuitively learns the ability to get along and be friends with creatures that are different from each other.
are of particular importance. They symbolize the fantastic world of this, so it is impossible to imagine it without them.
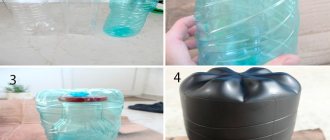
On the eve of Halloween, you can make monsters from everything that is at hand. Especially if you have a habit of storing interesting objects, bottles, and packaging in your home. Crafts made from plastic bottles are a kind of classic of the genre; they are accessible to children of any age, do not require large expenditures, but at the same time look very impressive.
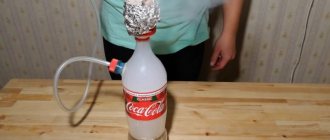
To create plastic monsters, prepare in advance:
- Plastic bottles of various shapes and sizes. Bottles for drinks, shampoos, shower gels, various food products (tea, milk, kefir, yoghurt) and medicines are suitable. DIY monsters can be made from any packaging.
- Paints and a brush, as well as water-based paint for priming (although you can do without it).
- Various details: eyes for toys, buttons, tow or straw. You can make various decorations, hats, and clothing items from paper or cardboard in advance.
So, let's turn on our imagination and start creating.
It is better and easier to work if all bottles are first primed with water-based paint. Watercolor, acrylic and gouache, which you will later use to create the desired image, fit better on it. But some bottles can be painted well without a primer, so you can skip this step.
Each bottle becomes a unique monster. We draw facial features on it, paint it in interesting colors, and add decorative elements.
If desired, we can glue on the eyes, and their number is not limited.
For Halloween, you can make an interesting toy that opens and closes a scary mouth. This paper vampire is attached to his hand, and his mouth is moved with the help of his fingers.
How to Create a 3D Monster in 9 Steps
3D artist Willem-Paul van Overbruggen explains how he created Rhinosaur, a 3D multiplayer creature.
Willem-Paul van Overbruggen has been working in the CG industry for over 15 years, 8 of which he spent as a character artist at Vanguard Entertainment Group in the Netherlands. Willem-Paul recently switched to freelancing again.
“Two of my friends once told me that they were developing their own game - Canto - a multiplayer action game where players are asked to defeat giant monsters. And without thinking twice, I offered my help in expanding the line of enemy monsters,” Overbruggen says enthusiastically. “Another friend of mine, Mark Facey, stepped up to help us with concepts and textures.”
The result of this collaboration was the monster Rhinosaur, which can be seen in the video above. The guys turned out to be a very frightening character, not without the charm of an alien. And if you follow the example of Overbruggen, you can create your own equally cool monster.
Step #01: Concept Art
A terrifying Rhinosaur in full “outfit”, with prickly spines and a tail
For Canto, we needed a large, very fast, bipedal creature that would pose a serious threat to up to four players at once and have a series of terrifying attacks and moves in store. This is precisely the potential that the Mark Facey concept had.
Step #02: Blocking
After some pretty rough blocking and planar scanning, we began to see the character better
The first thing I did was a fairly rough blocking of the concept, after which I unwrapped it using a planar scan and overlaid the existing concept onto the model. So, we were able to easily and quickly test the model in the game engine, checking the correct size of the monster and how it fits into the environment.
Step #03: Modeling
The high-pole version was created using normal maps
Once we realized we were happy with blocking, it was time to create a high-pole version of the monster in ZBrush. At the same time, I tried to be as attentive to detail as possible.
Step #04: ZBrush Pass
At this stage I completely focused on the middle details, since the smallest ones can always be added using textures
In ZBrush, using brushes such as Clay Buildup, Inflate, Trim Dynamic and Slash, I built up the monster's muscle mass and bone armor.
In addition, it was very convenient to work because while Mark was painting the textures, I could calmly focus on sculpting the middle parts, since the smallest of them had to be created using textures. For the lizard's head, Mark painted separate, even more detailed textures.
Step #05: Detailing the Low-Poly Model
Detail transferred from high-pole to low-pole
After I transferred all the detail from the high-pole model to the low-pole model, I ended up with a model weighing 18k triangles. In principle, this suited us quite well, since we were not strictly tied to a certain number of polygons.
Step #06: UV Unwrapping
UV unwrapping was done using improvised methods in Blender
The UV mapping was done in Blender using standard Pelt techniques. In this case, all seams were created using edge loops. As a result, we got a couple of scans. In order to increase the texture resolution, I unwrapped only half of the Rhinosaur, which I then mirrored.
Step #0 7: Baking Maps and Textures
All textures, including normal and AO maps, were baked in xNormal
All maps, including Normal, Ambient Occlusion, Curvature, Cavity and Convexity, were baked in xNormal.
In addition, this method was ideal for the needs of our week-long testing of the game, giving Mark the opportunity to complete the final version of the textures.
Step #0 8: Final Touches
The smallest details were created in Photoshop using normal maps with different blending modes
While Mark was painting his amazing texture, I was extracting normal maps at different levels of detail using CrazyBump, a tool that makes it easy and quick to create normal maps from textures. These maps are then layered on top of each other in Photoshop, creating relief and stunning detail.
Step # 09: Final Render
This is what Rhinosaur looks like in the final render
Source
How to make a paper toy with your own hands
He will also keep Netty the Yeti company and can become an original toy for a child. It will be very interesting to play with such funny monsters. It will delight children and once again show what unusual paper toys you can create with your own hands.
Here's an adorable, technically simple way to keep yourself entertained during your next natural disaster, power outage, or zombie apocalypse. It will also work for keeping young children occupied with quiet play during family gatherings this holiday season.
These paper shapes are easy to make and customize. You can quickly raise a complete family. You can, your child can make monsters and fight them in the arena of your coffee table. Or you can create a race of enlightened aliens or robots and build a new utopia. You can make characters to star in your next video.
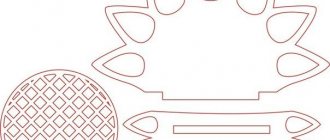
Level 1 - Make a blank.
To begin, make a paper shape to see how all the pieces fit together. 1. Print or copy the diagram of paper figures -
2. First cut out the body part (it looks like Siamese twins). 3. Fold the body part in half. You can glue it or tape it together to make it stronger if you like. Although this is not necessary. 4. Cut out a set of arms, legs and head. (There are two types of hands. Try them both!) 5. Cut the grooves inside the pieces. If you are using thick cardboard, cut wide grooves. 6. Assemble the parts as shown in the photo.
*Some Notes* Note that the chest overlaps the hips at the front. First make the cuts very narrow to begin assembly. And make them wider if you can't get a good fit
Level 2 - Give the person an identity
Now that you've seen how it all comes together, you can start creating the looks of the characters you'd like to have as friends. Using the diagram as a guide, you can add functions for the head, arms, and legs components. I made a lot of Cthulhu parts and a set of parts for the robot and the extra Calavera skull. It's a good idea to sketch out your paper cutout design idea on a piece of paper before you start cutting them out. These works are just a starting point for your imagination.
You can add additional elements. Notice that I added wings on my Cthulhu's shoulders. I added flower "hair" to the skull, and tentacles and horns to the monster's face
Level 3 – Scary Encounter
Now you can realize your dreams to become an evil demon or a mad professor in a secret underground laboratory. Why not tinker with your creations? One of the great benefits of these paper shapes is that you can completely mix and match body parts. You have an extra head and arms and legs. Use them to make crazy cybernetic gods that will destroy all your enemies.
Bonus - additional ideas for parents!
These paper figures take up very little space. Keep an envelope with the cut out parts of the entire pattern in your bag. Give them to the kids to play with when the wait gets longer. Keep blank template sheets on hand for rainy days and power outages. Encourage the children to make creatures for each other. Tell them to make up stories for the characters they are designing.
Bonus – decoration ideas
I intentionally kept my paper folk patterns quite simple so you can see how they fit together. I only used a makeup pen, I didn't use any glue or paint or extra material.
Popular articles Original collar with embroidery
But here are some ideas for you to make your people more awesome: colored paper beads eyes feathers glitter stickers texture paint glitter yarn playing cards (use face cards for faces!) photographs (use real faces for faces!)
Bonus! Activity
Here are some ideas of what you can do with your new friends once you've made them. Start a family Start an army Tic-tac-toe or ambitious chess set Use them as voodoo dolls Give them as toys to a cat Christmas cards Valentines Dioramas and historical re-enactments Actors in short films and videos
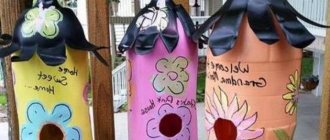
Monsters made from toilet paper rolls are incredibly funny, a little scary, but also funny. Making them is very interesting, because there are no frames or restrictions, only personal imagination. I present some ideas of what Halloween monsters could be, but starting from them it’s not at all difficult to come up with your own character, using different colors of paper, the number of eyes, and coming up with new frightening details.
We sew rustling toys for babies with our own hands
Finally I decided to open a blog section and write my first master class.
I want to share with you the process of creating a rustling toy, one of the first toys for a child. Rushalki are educational toys that are designed for children of the first year of life. They are sold almost everywhere and are inexpensive. However, many mothers want some things to be done with their own hands. After all, there is no better toy for a baby than one that mom made with her own hands! So now we’ll talk about how to sew a rustling toy for your baby yourself.
Sewing such a toy is quite simple. Let’s put everything aside for an hour and get started.
All we need:
- scraps of fabric (it is better to use different textures, I used fleece and cotton)
- ribbons of different widths
- beads
- rustling filler
- Needle, scissors, thread
First you need to decide what size and shape your toy will be. Mine is a 9x9cm square. You can make a circle, triangle, oval. Cut with an allowance of 5 mm.
We cut out the rustling filler to the same size. I used cellophane from clothing packaging in two layers. Wrappers and tea bags work well.
We prepare ribbons and beads.
Now let's make a sandwich. We put one layer of fabric face up, pin our ribbons on it, then face down the second layer of fabric and our rustle. Secure all layers with pins.
We sew the entire square around the perimeter, leaving room for turning. Trim all edges evenly.
Turn the toy inside out and sew up the hole. An hour and our toy is ready.
Your baby will definitely like this toy. And most importantly, it is made with love.
Step-by-step photo lesson:
The color pink was chosen as the base for the bookmark. For your monster, you can take a different tone or even a color that you like. Let's draw three squares 6 x 6 cm on pink paper. Place one in the corner of the sheet, the second on the left side, and the third at the bottom under the first.
We cut out three squares with scissors, which will become the basis for our bookmark.
Divide the two side squares into two equal parts using a ruler and a simple pencil.
Cut out one half from each square.
We begin to fold the bookmark into a triangle. To do this, bend the first left corner down.
Then we bend the right corner. It should be secured with glue to the first one.
Now we begin to create the muzzle. To do this, take red paper and cut out a triangle. It should be slightly smaller in size than the base. Glue it.
Rules of the game
The game begins with each player being given a secret superpower. Over the course of “six nights,” players text each other and try to set up dates. Each player can only send four messages in one night. When the time for correspondence is up, players need to choose who they want to go on a date with. If two players choose each other, they go on a date and receive a heart. Players can also receive extra hearts thanks to their secret super powers. Starting from the second night, the ability of the player in first place is revealed at the end of the night. At the end of the following nights, the ability of the highest ranked unrevealed player is revealed. Of course, it's best for players to keep their superpower a secret. An exception might be Vengeful Ghost, but the game implies that it's best not to reveal the ability until it's "officially" revealed. When spectators join, they take the place of the collective eighth player with a globe disguise. They have clues that will be sent to each player via the main screen or as replies to the one player they vote for. The completed answer will be selected by the one with the most votes. Only those who sent a message to the audience can go on a date with them.
Tips and tricks
Are common
Often not being in the first lines of the rating is a good tactic, because if you are discovered, they may not go on dates with you.
Playing as the Mummy
The mummy should curse all but one player. Keep a notepad handy to write down who is cursed and who is not.
Playing as a Vampire
When playing as a Vampire, you need to turn as many players as possible into vampires. Unlike the Mummy, in this case you don't have to make sure someone doesn't become a vampire. If all players are vampires at the end of the game, you will receive an extra 3.5 hearts!
Playing as the Vengeful Ghost
A bonus heart at the beginning of the game will give you an advantage. This ability is very destructive: those who refuse you will lose their hearts. If you are found out, you can threaten others to prevent them from losing their hearts!
Playing as a Serial Killer
Keep yourself undetected for as long as possible, and try to meet some players 2 times before you get exposed. This will mean that people will only meet you once!
Playing as Leprechaun
Keep a low profile and date players higher than you in the rankings. When you are revealed, each player you meet will lose two hearts, and if you rise higher in the rankings, you will receive additional hearts.
Playing as a Zombie
You need to infect everyone, but not reveal yourself. If you are discovered ahead of time, your chances of winning will decrease dramatically, since others will know who you met and will not spread the virus. But in any case, keep a notepad handy to write down who is infected with the virus and who is not.
Playing as a Monster Hunter
Try to date someone who is your target. If you get found out, it won't matter much, but players may become skeptical of you, assuming they are your target.
Playing as Zhizha
Try to go on a date every night. In the full game, you have many chances to double hearts twice. Another tactic is to face one/two players and double the hearts at the end of the game.
Playing as the Two-Faced Monster
Make people choose you. If you can fool many players and go on a date, you will receive bonus hearts. But there is a risk that then you will be discovered. Try to go on a date and cheat on ONE player each night. This ability is very beneficial for spectators!
Playing as a Witch
Try to meet the majority of players, preferably those higher in the rankings first, to avoid detection. If you reveal early, you won't get much of a bonus.
Playing as Bodyswapper
Stay close throughout the game and try to switch hearts with the player in first place on the penultimate or last night.
Playing as the Ventriloquist Dummy
Every night, meet with those who were rejected the previous night. But if you come out early, they might stop going on dates with you.
Playing as the Invisible Man
You will be revealed last as your result is invisible. Players may notice that you are invisible if they are paying attention. Just keep making dates.
Playing as Mom
Monitor your child and try to prevent him from going on dates. If your child comes out early, you will likely have an advantage (unless he is a Vengeful Ghost. If you come out early, your child will likely have an advantage over you, as he will try to stop YOU from going on dates.
Popular articles Hairband
In a game with a robot
Follow the Robot and try to go on a date with him. If he ends up in last place, no one will win. Even if you get rejected, he will receive a heart for your attempt. If only one person writes to him, the robot will choose that person. DON'T FORGET ABOUT THE ROBOT.
Full moon
There is never a full moon on the first night. On all other nights there will be a full moon three times. On the last night the chance of a full moon is very high.
Tips if you have received a curse or have been infected (from Zombie, Vampire, Werewolf)
If you do not want the one who infected you to win, you will have to refrain from dating. This is the only way to definitely not infect anyone. Also, if you don't want the infected person to win, take notes on who is infected and don't meet them.
We sew a rustling toy for a baby
Any mother will want to please her baby with a toy created with her own hands. But not every mother is ready to take on complex patterns and expensive materials, and there is often not enough time. Child, household chores, husband. child. troubles, etc. and so on. in a vicious circle