- May 12, 2019
- Crafts
- Dikareva Lera
Many needlewomen use plastic when creating unique and durable landscape design and home interior parts. The material is always at hand, since plastic bottles have simply filled the household. The cost of such raw materials is minimal. Greater accessibility and practicality are the main advantages of plastic. The simplest option is to create baskets or boxes. An inexperienced needlewoman in working with this type of material should first learn how to weave a basket from plastic bottles, and then proceed to more complex types of products.
Advantages of plastic and preparation for weaving
Plastic baskets can perform not only a decorative function in landscape design, but also bring practical benefits during gardening work. The strength of the material, resistance to temperature changes and precipitation, accessibility - all these qualities were appreciated by craftsmen.
If the basket is intended to decorate a site, it is designed without a bottom. This is especially convenient for further placement inside the flower bed. Using it as a container for harvest requires you to take care of a durable product with reliable handles. To work you will need:
- Plastic bottles. It is better for novice craftsmen to collect containers of the same color. When the weaving technique is at a high level, you can experiment with combining shades.
- Scissors, electrical tape.
- Nylon thread or fishing line.
- Glue for plastic.
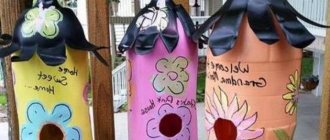
You can decorate a finished wicker basket with flowers made from plastic bottles of a different color. It is convenient to attach the decor using a glue gun. As an option, the finished product is coated with moisture-resistant acrylic paints.
What do you need?
Before you can take a cool photo of a straw basket, you need to weave it. And for this you will definitely need a form: any object that will help the product keep its given shape is suitable for this. For example, many girls use ordinary boxes, vases, and even various toys for this. For some unusual baskets, you can use various dishes, or even create and glue a mold for it yourself.
You can use newspapers as a material, preferably double sheets, then the product will be much stronger and more durable. We also weave a basket from tubes using: clothespins, scissors, regular office glue and a long wooden skewer.
Thick cardboard is usually used for the bottom of the future product, and a wide variety of decorative materials are used for decoration: ribbons, beads, various flowers, corrugated paper.
Zigzag basket
A brief algorithm of actions consists of the following steps:
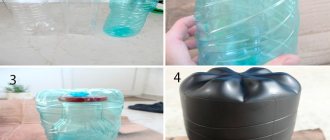
- The bottom and neck of all bottles are removed.
- Plastic cylinders are cut into strips of the required size.
- Prepare preparations.
- The elements are intertwined, forming zigzags.
- The rows of the future basket are connected to each other.
- Add a handle.
- If necessary, attach the bottom.
Now about each stage of basket weaving in more detail.
Plastic cylinders from bottles are cut lengthwise, after which strips are formed. The approximate width of the part is 1-1.5 cm. It is recommended to adhere to the proportions of 1:8 relative to the length of the strip. From a 2 liter plastic bottle, a strip of 15 cm is obtained, that is, its width can reach 1.8 cm. Thus, by increasing the size of the workpiece, the time of weaving the basket will be noticeably reduced. If you do not follow the proposed proportion, the connection of the elements will turn out to be of poor quality.
Each blank for the future basket is folded in half until a fold is formed, the resulting halves are alternately bent inward. As a result, the edges of the plastic bottle part should touch the central fold from the inside. The length of the element is reduced by 4 times compared to the original strip.
Then the plastic blanks from the bottles are connected to each other by two extreme folds. The central fold remains free at first. This is how the first corner for the basket turned out. A third part is attached to it, a fourth, and so on. As a result, a zigzag is formed, the final length of which should correspond to the perimeter or circumference of the basket.
The extreme elements are fixed with fishing line. If you do not plan to use the basket on the farm, you can make handles from plastic bottles in the same way. For practical purposes, it is better to design more convenient details.
When the required number of zigzags from plastic bottles is ready, they are connected to each other with nylon thread or fishing line. The design of the bottom depends on the purpose of the product. The part can be woven or just thick plastic, secured with a glue gun.
Using a similar technology, you can weave an original vase from plastic bottles.
Sun made of colored paper and plastic tubes
To make a sun you will need the following tools and materials:
- 2 sheets of yellow cardboard;
- 1-2 packs of yellow straws;
- glue gun;
- black felt-tip pen;
- scissors.
Popular articles Herbal tooth powder
The principle of making crafts:
- Cut out 2 circles of the same diameter from colored cardboard.
- On the front side of one of the figures, draw eyes, a nose and a smile.
- Each tube can be cut exactly in half or at an angle of 45 degrees - these are rays.
- Glue the ray blanks from the inside of the circle along the edge. To make the elements fit easier, you can flatten the edge of the tube.
- When the entire perimeter is pasted over, fix the face of the sun on top, covering the inside of the craft.
Additionally, the sun can be decorated with ribbons or sparkles. This craft will be an excellent decoration for a child's room.
Checkerboard weaving
A basket of plastic bottles can be made using the checkerboard weaving technique. To ensure an even shape of the product, select a suitable frame. Any rigid box will fulfill its role.
The method of cutting strips from a plastic bottle is somewhat different here. Parts for work need maximum length. Therefore, after the standard cutting of the neck and bottom, the cylinder is covered in a spiral with electrical tape so that the layers do not overlap each other. The bottle is cut along the resulting gaps, the electrical tape is removed.
Place a cardboard box of the desired shape on a table or chair upside down. Plastic strips are secured with tape as close as possible to each other between two parallel side edges. After this, they begin to weave the bottom of the basket, threading the loose strips in a checkerboard pattern. When the bottom is ready, the side edges are decorated in the same way.
How to make a basket handle
We tuck three tubes with their ends into the hole around the perimeter of the basket.
We bend the ends and fasten the tubes together, braiding them 2-3 times with a piece of the tube.
Glue it up.
We begin to roll the tubes lengthwise. We do this almost to the end.
We also insert the ends on the reverse side into the hole between the tubes along the edge of the basket, braid them, and secure them.
Sequencing
In order to make a basket of plastic bottles beautiful and original, it offers a certain algorithm of actions.
- First you need to decide on the color that the original basket of plastic bottles will have. The color of the source material depends on this.
- Next, you can move on to cutting the bottle.
- From it we make strips of the same length and width.
- We bend them into “corners” blanks.
- We intertwine them with each other.
- We connect individual rows with each other.
- We attach a handle to the product.
- The final step will be attaching the bottom to the finished product.
This handmade basket of plastic bottles will be an excellent decorative element for any suburban area.
Each piece is folded in half so that there is a fold towards the center. Then the halves are bent again, obtaining a strip whose length is four times less than the original sample.
A beautiful basket of plastic bottles with your own hands can be made from bottles of different colors. For example, the bottom of the product will be brown, and the sides will be green.
Designers offer a variety of options for creating such decor; it is quite possible to choose the method that seems most understandable and accessible.
To prevent the product from spreading, you can arm yourself with a fishing line.
Cardboard will quickly lose its performance characteristics when exposed to moisture, and the appearance of the product will be lost.
Dandelion from cocktail straws
You need to prepare a pack of white straws, scissors, a glue gun, and 2 green tubes.
Manufacturing Features:
- You need to cut the tube, forming a fringe. It is better to do this from the beginning of the element to the fold. Slightly straighten the resulting workpiece.
- First glue 2 blanks together. There are 2 more sticks perpendicular to them. Next, other elements are glued. Place each part so that a sphere is formed.
- Next, glue a green tube to the center. Cut the second one lengthwise and finely chop on one side, forming terry.
- Glue a green straw with terry under the white sphere, imitating a receptacle.
You can prepare a few more green elements, from which you can cut out leaves and attach them to the stem of the flower.
Second option
A basket from a plastic bottle can be made with your own hands using the “chess” method. This weaving is much more complex and requires the master to have certain skills.
For work you will need the same tools as in the first case. A cardboard box is used as additional material.
First, long strips are cut from a plastic bottle. The middle part of a plastic bottle is optimal for this.
The cardboard box will serve as a model for the basket being created, and it can also be used as a basis for creativity.
You need to turn the box upside down and fasten two plastic strips side by side in a horizontal or vertical direction. For this you will need tape. Then new plastic strips are attached in a checkerboard pattern, they are threaded between those that are already attached. Similar actions can be carried out without a box, for example, on a table.
After the bottom is woven, the side parts of the product are made in the same way. After completing the work, you need to carefully bend the edges of the plastic and glue them inside the basket.
If desired, add a handle to the created accessory. Such a basket will not be empty; for example, you can put flowers in it. Among the many advantages of such products, we note:
- ease of care for them;
- minimum cost of the product;
- aesthetic appearance;
- basket mobility
Stages of work
Before painting any decorative elements, make sure that they are all disassembled and not connected to electricity.
In addition, it is important to carry out painting work either outdoors or in a well-ventilated area.
Try to paint over everything, even the most inconspicuous elements. First we cover the frame and base of the lamp PHOTO: youtube.com The second stage is painting the tubes themselves. It is better to paint cardboard in two layers PHOTO: youtube.com
An important point - wait until the paint dries! Don't rush too much PHOTO: youtube.com
Now let's start assembling the lamp. To work, we will need a wire; we will put our tubes on it.
First we put on 4 pieces so that we get an even square PHOTO: youtube.com
At the junction we secure the wire by winding it, and remove all excess with pliers. Next you need to create the sides of the frame. Since our tubes are of sufficient width, this will not be difficult to do.
We pass a wire through each of the tubes in such a way that the side sticks can be attached to them vertically in the form of a triangle PHOTO: youtube.com This is how we give our structure the necessary volume and geometry PHOTO: youtube.com
We put our workpiece aside and move on to the next stage. We need to cut four identical tubes for the sides.
Each tube should be 10 cm in size PHOTO: youtube.com
These short blanks will be useful to us for creating the sidewalls.
Don’t forget to secure the elements by twisting the wire at each stage PHOTO: youtube.com
We twist the joints and remove the remaining wire. Our foundation for an ultra-modern masterpiece is ready!
This is the design you should get at this stage PHOTO: youtube.com
The time has come to assemble all the elements.
We secure the base with a finished metal base using wire PHOTO: youtube.com
The length of our fastening wire is 10 cm. You will need 4 of them for each side so that the base holds tightly.
We remove unnecessary elements from the twists, while it is better to bend sharp corners inward if possible PHOTO: youtube.com
To ensure that the decorative elements do not stand out, paint the wire the same color.
For stability of the entire structure, you can add one or more rows of pre-painted tubes on the sides of our lamp PHOTO: youtube.com
Thus, our lamp is almost ready! We collect all the elements, the base, screw in the lamp, and you can check the work!
As we can see, the lamp has an unusual catchy design and extreme brightness PHOTO: youtube.com
And for those who watched and read the master class to the end - a small bonus! If you have some unused tubes, you can create a small shape out of them.
We make the base in the same way as in the case of the lamp, only our sticks are smaller in size - 10 cm. For the base we fasten 4 tubes. They, like last time, form a square. We add a wire to each side and string two on each hip, creating triangles on both sides.
This is approximately the design you should get PHOTO: youtube.com
Next, we design the sidewalls on the other side, only this time whole tubes are used to create an elongated, cone-shaped top.
We connect two triangles on both sides, twist the wire to form a strong knot or winding.
An unusual pendant can be used for decoration as a spectacular flower pot PHOTO: youtube.com
Thank you for reading our master class to the end! We are confident that with the help of this technology you can create many unusual masterpieces from ordinary cocktail straws.
Watch this video on YouTube
Be sure to share the post and give us a “like” - we tried really hard!
The Homius editors invite home craftsmen and craftsmen to become co-authors of the “Stories” section. Useful first-person stories will be published on the pages of our online magazine.
Previous STORIESDesigner curtains at no cost: beautiful blinds from scrap materials Next Market news Amazing material from Italy: innovative wood with the flexibility of WoodSkin leather
Useful tips
Decorative items offered in stores are not always interesting and unique. That is why many summer residents try to create decorative elements on their own. Any craft you make yourself will be much cheaper, and no one else will have such a product. For example, wicker baskets made from old plastic bottles can be turned into original containers for country small items.
Modern designers consider plastic to be a universal and inexpensive material, so they are increasingly turning to plastic bottles in their work.
Lately, you can increasingly see homemade polyethylene flower pots at your summer cottage, which are not inferior in appearance to ready-made flower pots.
Nowadays, many craftsmen create unusual products in the handmade style, which involves the use of a variety of improvised means. Plastic bottles have become the most popular.
They are not only available, but will also be completely free, which is a significant plus. Three types of plastic are suitable for creating crafts. We have already talked about the plastic from which bottles are made. The second type of raw material for creativity is packaging polymer. Its main advantage is its length. It is much easier to divide a wide ribbon into narrow fragments than plastic bottles.
You can also make unusual decorative baskets from polycarbonate, milk packaging boxes, paper folders, and plastic cups.
Such materials are much denser than packaging polyethylene, so the finished basket will have a more impressive and presentable appearance.
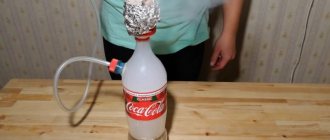
Crafts from tubes: siphon
Connect two straws to create a fun science experiment
and show the children how the siphon works.
A siphon is a structure resembling the letter P through which liquid flows upward without the aid of sediment. Gravity causes water to flow from the tube and reduces its pressure
.
As a result, water from the upper container, due to atmospheric pressure, overpowers gravity and begins to flow upward at the short end of the tube. Water will flow as long as its level in the container is lower than the water level in the other container.
1.
To make a siphon, carefully bend the end of one tube and insert it inside the other tube.
2.
Twist the tube a little so that it lines up and there is no extra hole between the two tubes. You can tape the junction of the tubes with tape.
3.
Place a glass filled with water next to the sink.
4.
Insert a tube into the glass and run a siphon, sucking out some water through the tubes.
5.
Lower the other end of the tube from the sink or another glass below.
You will notice how water flows from one glass to another.
History of weaving
Weaving originated in ancient times. This technique was used to create kitchen utensils, baskets for harvesting and storing crops, traps for hunting, house walls, furniture and toys. Wicker items were made from various natural materials - reeds, grass, vines. The toys had a sacred meaning, because they were made with their own hands. They were slandered about health and good luck. Wickerwork was believed to ward off evil spirits. Everyone knows an item called a “dream catcher” and its properties of preventing nightmares from entering the owner’s mind. And wicker furniture is always in trend, light, comfortable and durable. The first wicker chairs were found during excavations in Ancient Rome.
Vase made of straws
A simple option for making an interesting vase that will not break:
- Prepare a jar, bottle or tall glass, a glue gun and a pack of straws.
- Glue the straws sideways to the glass walls of the container.
- You can cut the straws into rings and place the elements perpendicular to the base. If you use multi-colored material, you can create the effect of an abstraction pattern.
Even a child can do this manufacturing principle.
Vase in 1 minute
Even when camping, you can make a colorful vase to place a bouquet of wildflowers. You need to take half a pack of cocktail straws, a rubber band and a jar.
Place an elastic band on the glass container and insert the tubes under it so that the fold is placed on top and directed away from the container. Instead of a rubber band, you can use thread, rope, ribbon, or lace.
Corner technique
This type of making baskets from plastic bottles is quite simple. First, corners are made from cut plastic bottles, and then the product is assembled from them into a single whole. To complete the product you will need:
- Plastic bottles;
- Scissors;
- Fishing line;
- Glue gun.
To work, you need to cut the bottles with scissors into strips 1 cm wide and 8 cm long.
If you are planning to take strips of a different size, then when calculating, remember that the length of the strip is eight times the width. It is important to choose bottles that do not have unnecessary bends.
Cut off the bottom and neck, and use the rest for cutting blanks.
The strips are ready, now you need to bend them in half, unfold them and fold the edges towards the center as shown in the photo.
You will need a lot of such blanks. Connect them together by inserting them into each other.
Weave the bottom of the basket from several parts, alternately fastening the corners. For strength, you can glue the bottom with transparent tape. The parts are attached to each other using a fishing line.
After making the bottom, a long horizontal zigzag strip is made. Its size is equal to the girth of the bottom. The strips are also held together with fishing line. You can fasten them in tight rows or make diamond-shaped passes. Don't forget to attach the correct size handle. The basket is ready!
It can be used as a vase for sweets or a garden planter. The advantage of such a product is that plastic is not afraid of changes in temperature and humidity. If you plan to use the basket as a flowerpot, then you don’t have to make a bottom. Simply fasten the zigzag strips together. Dig up the decoration a little in the flowerbed and plant some beautiful flowers. At the end of the summer season, you can simply rinse the basket with water and put it away for storage.
Arrangement and decoration of the house
The roof is glued together from paper strips cut in waves. You can install a beautiful trim on the window, which is better to draw first and only then cut and paste. Also, don’t forget about installing the door.
The courtyard can be decorated with a well. To do this, prepare an even number of tubes, then fold the well in parallel, two tubes at a time. You can transform your yard with the help of various plantings - paper trees and bushes.
At the end of the work, it is recommended to paint all products - then the finished product will delight the eye with its brightness.
In addition to the proposed options, there are also a great many crafts made from paper and cocktail sticks. Here are some of them: lush shades and lamp shades, decorative wreaths, coasters, vases, children's bracelets and photo frames.
"Chess"
This weaving method is a little more complicated than the previous one, but using detailed step-by-step instructions, you can easily cope with making the basket.
The difficulty with this method lies in making the strips: they must be long. But even here, experienced needlewomen have brought the process almost to perfection. They came up with a great method that allows you to cut strips of the same width, efficiently using the entire bottle. In order to dissolve the container into strips, you need to remove the bottom and neck and apply electrical tape or narrow masking tape to its surface in neat turns. And then cut the entire surface into a long strip one by one.
Don't try to straighten it; it will still lie correctly when working.
To work on making a basket you will need:
- Strips made from plastic bottles;
- Scissors;
- Rubber;
- Clamps;
- A small container that you will use as a base for weaving.
Weaving starts from the bottom. To do this, place vertical stripes on the table and weave horizontal ones in a checkerboard pattern using this pattern.
It should look like this. Apply clear tape along the sides to reinforce the bottom.
Now this blank can be transferred to a braided box. For convenience, secure the stripes on it with an elastic band.
Continue adding stripes, weaving them in a checkerboard pattern. If the “vine” is over, you should attach the next overlapping strip using tape. Having completed the weaving, remove the product from the base and, carefully bending the strips along the edge, secure them with tape on the inside. Make a handle if necessary. The basket is ready. It’s a great way to go into the forest to pick mushrooms.
Or you can make a large laundry basket.
Preparation of material
Empty containers should be accumulated in sufficiently large quantities, checked for scratches and other damage, removed from labels and stickers, washed and dried. Only the middle cylindrical part of the bottle is used for weaving, so the bottom and neck of the bottle should be cut off.
The strips must be equal in width and length. This is important not only for the aesthetic appearance of the future product, but also for simplifying its creation. The length of the cut ribbons will depend on the width: length = width × 8. Otherwise, the elements will not be able to
To ensure accuracy and speed up the preparatory work process, it is better to use a cutter with a long kerf. However, not everyone has such a tool, and for the manufacture of a small number of products it is not optimal to buy it.
Using a ruler, draw a straight longitudinal line with a felt-tip pen on the resulting plastic cylinder, and make a cut along it with a paper knife or scissors. The result is a quadrangle, on which strips of equal width should be measured along the short side, and then cut along the lines drawn in the same way.
You can make a kind of cutter from a pencil sharpener or do it even simpler: make a bottle cutter from scissors. To do this you will need sharp scissors and a plastic ring from the neck of the bottle.
You will need a lot of strips, but the exact number will depend on the dimensions of the required basket.
Crafts from plastic bottles for the garden: photo and description If you are wondering what else you can do for your garden plot from unnecessary bottles, read our article and look at the photos - get inspired!
Rope basket using mold
Another version of the basket, based on weaving a thick rope. Only in this case, to simplify the work, a shape in the form of a metal bucket was used (any other round or oval bucket of your choice is also possible). This way, the walls of the basket will be smooth, and the work process will be much faster.
Necessary materials:
- Rope (0.5 cm or larger in diameter)
- Glue gun
- Scissors
- Bucket
Step 1: Making the bottom of the basket
Fold the rope into a circle or oval in the center of the bottom of the bucket (depending on its shape) and secure with glue. Continue wrapping circles of rope, securing them with glue, until the entire bottom is wrapped.
Step 2: Making the Basket Walls
After wrapping the bottom, give the rope one extra twist and gradually move it so that it wraps around the sides of the bucket. Continue wrapping circles of rope around the walls.
Note: Please note that we use glue to fasten the circles of rope together, and not the rope with the bucket!
Step 3: Remove the form
Remove the bucket from the rope weave. Secure the end of the rope well.
Step 4: Making the Basket Handles
In this example, the handles are made from strips of leather, but you can create handles from rope, ribbon, or cord. Cut two identical strips of leather and attach them to the basket with rivets.
Weaving using a cardboard box
Weaving baskets from plastic bottles is also possible using a mold. We will use it as a cardboard box. Take a box of the shape and size you have in mind for the basket.
Here the task is even simpler than in the first case. You need to cut long threads from the bottles. We apply the first layer to the box and fasten it with a clothespin so that the twisting tape does not interfere with weaving. Now we apply the second layer of tapes so that they run parallel to the first. And we begin to twist them among themselves. By adding and braiding the previous rows, we make the bottom and sides of the basket to the desired height. Now all that remains is to take out the cardboard form and adjust the rows a little.
This option is suitable if you need to make large, spacious baskets. Very often, such weaving of baskets from plastic bottles is used to make a container for laundry in the bathroom or a spacious sleeping area for pets.
Machine for cutting tape from a plastic bottle
One of the global problems of modern society is waste disposal. Proper use of household waste will help you not only make the environment much cleaner, but also solve many problems without much effort and expense. We would like to give you one of these useful tips on how to properly recycle plastic bottles and what can be made from them.
Rope basket with colored thread
Craft materials in such a basket will look simply wonderful. You won't need to look for a place in the closet to hide them, because such a basket of yarn looks like an element of apartment decor. Convenient and beautiful!
Necessary materials:
- Rope (0.5 cm or larger in diameter)
- Yarn for knitting (any colors)
- Scissors
- Glue gun
- Needle
Step-by-step instruction:
Step 1: Making the Center
Take colored yarn, tie it to the end of the rope and wrap it around 2-3 cm. This will be the center of the bottom of our basket.
Step 2: Weaving the bottom of the basket
- Wrap the extension of the rope around its wrapped end, seal the curl and wrap it again with yarn.
- Using glue, continue wrapping the rope around the center of the bottom.
- As you work, wrap colored yarn around 2 adjacent ropes, creating additional fixation.
Step 3: Weaving the sides of the basket
Once you have made a flat round bottom of the desired diameter, continue the same process, alternating glue and yarn to create the sides of the basket. Make the handles of the basket by pulling the rope from the last row of sides in the basket. Secure them with glue.
Step 4: Additional Decoration
For additional decoration, wrap the rope tightly in several places with yarn of different colors. This is the beauty that results: