What is artificial ice and how to lay it?
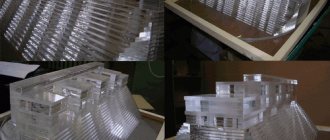
Artificial ice is a polymer material with a slippery surface. Due to its low weight, it is quickly laid down and can be transferred from one skating rink to another. However, it should only be mounted on a hard surface. As a basis, you can, for example, choose:
- plywood;
- linoleum or tiles;
- crushed stone or soil;
- wooden boards;
- metal;
- asphalt or concrete.
Whatever floor you install, it is important to level it carefully. The strength and durability of the skating rink will depend on the degree of smoothness of the base. And also how comfortable it will be to move the puck on it.
Plastic ice, by the way, is sometimes confused with artificial ice. Although the second category includes not only slippery slabs made of polymers, but also rollers sold by refrigeration machines. At the same time, the presented ice also differs from ice mats - products with cooling tubes.
Skating rink care
If the skating rink is filled to perfection, it will withstand several thaws. But this does not mean that you fill it once, you can give up and leave everything as it is. Ice is a rather complex “building material”, and also not the most durable, so caring for it is simply necessary.
When snow falls, it will need to be removed from the skating rink, and not to the very edge, but away from the edges, otherwise some part of it, due to the wind or other factors, will return to the surface and the boundaries of the skating rink will begin to narrow.
If, after skating or as a result of thaws, scratches or cracks form on the surface of the skating rink, hurry to repair them with snow to which water has been added. This mixture should be poured into a crack or scratch, compacted, allowed to harden and then poured with hot water to level it.
In general, the frequency of tidying up the surface of the skating rink depends on the frequency of skating on it. If you skate on weekends, then you should update the skating rink once a week, and if you skate daily, then, accordingly, you need to update it every day. Hot water is also used for this purpose. If it is not possible to use a hose, you can use a clever and at the same time simple device. You should take or make a box with dimensions of 200x60 cm from boards and place a rubber gasket around the perimeter of its base. A hot water tank is placed on this box, equipped with a faucet or a hose lowered into it. When this structure moves, hot water enters a box that has no bottom, and thanks to rubber gaskets, it is evenly distributed over the surface of the skating rink.
If this is difficult to do, use a mop, which can also be used to thoroughly polish the skating rink with hot water.
Type of plastic for playing hockey
There are many types and brands of plastic ice. But for its production, as a rule, 2 materials are taken. Firstly, slippery but expensive high molecular weight polyethylene. Secondly, cheap HDPE (low-density polyethylene). It produces low-quality ice, which also requires the application of lubricants.
So, let's see what variations there are of synthetic ice made from high-quality polyethylene:
- PE500 - ice plates for hockey from the "economy" category. Although, they are ideal for training rinks and can be used even without lubricants;
- PE1000 is high-quality plastic with an optimal level of slip. True, ice made from it still needs emulsions to increase the coefficient of friction;
- PE5000 and PE7000 are branded slabs with sliding properties similar to natural ice. Prices for these coatings are, of course, high;
- UHMWPE - ultra-high molecular weight polyethylene. Expensive, but the most dense, wear-resistant and durable ice flooring. It glides just as well as natural ice. Plus, this plastic can withstand any sub-zero temperatures and is used without lubricants.
Although HDPE ice has a cheap price, it is catastrophically inconvenient to skate:
- skates glide on it 3.5 times worse than on VMPE, and the plastic blades become dull after 20-30 minutes;
- You can only play hockey on such a flooring on roller skates;
- and if we take into account that HDPE boards bend and are covered with cracks, the material, among other things, does not exclude injuries during the game.
Table of main characteristics of high molecular weight polyethylene sheets
| Name | Maximum temperature | Minimum temperature | Shore hardness “D” | Impact strength kJ/m2 |
| PE500 (high molecular weight polyethylene sheet) | up to 100 °C | -100 °C | 66 | 18 |
| PE1000 (high molecular weight polyethylene sheet) | up to 80 °C | -120 °C | 60 | 180 |
| PE5000 and PE7000 (ultra-high molecular weight polyethylene sheet) | up to 130 °C | -120 °C | 67 | 120 |
| UHMWPE (ultra-high molecular weight polyethylene sheet) | up to 120 °C | -269 °C | more than 95 | More than 180 |
Note that plastic was first used in the production of synthetic ice in the 60s. But modern models of this ice are far ahead in terms of friction coefficient.
Should I use lubricant?
Is it beneficial to use emulsions for gliding? Or is it better to do without them? One of their obvious disadvantages is that they can leave marks on clothing. That's why it's important to read about it on the packaging before purchasing a lubricant. Some people get their hockey uniform so dirty that you can’t wash it off even with stain removers. However... lubricants based on silicone and ethylene glycol are now less popular. In stores there are products that do not pollute the stoves and do not make them sticky. In general, they either dry out or are absorbed into the ice. Yes, and they are washed off with plain water.
And by the way, you should take into account the high cost of lubricants. Their prices start from 1500 rubles. for 1 liter. And they are usually used up quickly. It’s probably better to immediately buy a coating with a high level of friction. Unless, of course, you need the skating rink for more than one game.
By the way, self-lubricating ice is also found on the Russian market. Examples of such coatings include Quick-Connect.
Security measures
Dry ice does not tolerate careless handling.
- First of all, it is necessary to protect your eyes and hands: a seemingly harmless substance can leave thermal burns on the skin and affect sensitive mucous membranes, so you should not approach it without protective glasses and gloves (at worst, a towel).
- In large quantities when in a closed space, ice becomes especially dangerous - inhalation can lead to carbon dioxide poisoning.
- It should not be placed in a portable refrigerator, freezer or other cramped container (expansion occurs during evaporation, which leads to destructive consequences), transported in a car with the windows closed, or thrown into the trash or sewer.
- Food use, as you understand, is strictly prohibited. In case of intoxication (typical symptoms are headache, nausea, vomiting and difficulty breathing), you must urgently seek medical help.
Attention! For disposal, ice is transferred to a gaseous state, left in room conditions or filled with warm water; Proper transportation is in a special container or bucket with access to air.
Technologies for producing ice from polymers
Extruded ice
Ice slabs formed by extrusion are not the most efficient. They may differ in size and thickness, and form joints when laid. As a result, when playing, you can catch your skate on them. And the washers bounce around because of the cracks on such floorings. In other words, this is ice for training and only for throwing areas.
Ice produced on press mats
Pressed plastic, on the contrary, is very reliable. The slabs made from it fit together perfectly. That is why they are allowed to be used throughout the entire area of the hockey field - both in the throwing zones and in the skating areas. However, keep in mind that any artificial ice is more suitable for amateur skating. It is not usually used in professional arenas.
Selecting the thickness of the coating
Plastic ice is used in arenas, shopping centers, at home and on the street. This may surprise you, but hockey simulators are even installed in apartments. Material up to 3 mm thick is intended for this purpose. Home exercises can be useful for arm training. They help improve coordination and speed of movement.
Gyms should purchase ice from 5 mm. But 8-10 mm is better. On the street you will also need thicker plastic - from 3 to 10 mm. In this case, the ground under it will need to be dug up and compacted.
For large skating rinks, buy artificial ice from 12 mm to 18 mm. The thicker the coating you purchase, the slower it will wear out.
From sodium acetate
This substance is used in the food industry. It is known as preservative E262.
To make dry ice at home from ready-made sodium acetate:
- Fill 5 tablespoons of granules with 3 tablespoons of water.
- Microwave for 10 seconds.
- Check the reaction. The granules should be completely dissolved and the mixture should be clear.
- If large particles are visible, continue heating.
- Pour the liquid into a clean container. There should be no granules on the walls.
- Place in the refrigerator.
- After cooling to +15°C, carefully dip the dry acetate granules into the liquid substance using tweezers.
Pour the ice into a cardboard box or plastic container. Use as needed.
Tile or roller?
Along with plastic tiles, there are also synthetic ice coatings available in roll form. Let's see why one and the other option is good, and where they are used.
Ice puzzle tiles are used both on a permanent and temporary basis. You can disassemble and reassemble the rollers from it as many times as you like. 2 people can lay 100 m² of such ice sheeting in 2 hours. However, before installation it is important to stock up on a wooden mallet (a hammer for joining slabs). Puzzle-type ice, in turn, comes with different locks:
- coatings with dovetail fixation are usually used indoors;
- but models with tongue-and-groove-pin fastenings are also installed outdoors.
A roller skating rink is compact ice for hockey simulators. You cannot skate on it fully and dribble the puck. But it is ideal for practicing shots (the art of dribbling).
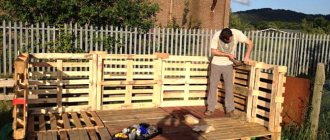
Installation of sides
After all sheets of synthetic ice are installed, a platform will be formed. In principle, you can stop there if private use is intended and no one is bothered by the lack of sides. But if some semblance of a real ice rink is being created, or children, for example, will actively play hockey, then it will be necessary to make sides.
The sides are made from another material, most often ordinary HDPE or fiberglass (depending on the need to withstand extremely high loads, professional level or not). The main problem is that all sheets are created for hockey rinks and ice rinks of standard sizes, which may not suit you personally. In this case, you will have to order rounded sheets somewhere separately, or make an exclusively rectangular platform.
Sheets must be securely fastened in several places along the entire length of the sheet, and also fixed with special racks behind them. In short, the more the rink resembles a hockey rink, the more additional work there will be. It may be that installing advanced boards will require the hands and tools of specialists.
How long do plastic decking last?
The performance of plastic ice, as we have already said, depends on the quality of the base underneath it. Ice tiles on a soft or uneven base:
- firstly, it becomes covered with dents and holes, creating inconvenience for players;
- secondly, due to the seams formed, it can also crumble.
So don't skimp on laying the base. This is the main factor affecting the durability and safety of the skating rink.
But what if you do it right? Install a flat, hard base and properly lay ice on it? Then the flooring will last about 7-10 years.
From vinegar, soda and salt
At home, you can make dry ice without a fire extinguisher using regular baking soda and 70% acetic acid:
- Take the ingredients in equal quantities (200 g of sodium bicarbonate per 200 ml of vinegar). Mix them in a glass bowl. Stir until you get a thick porridge.
- Warm the mixture slightly and add a teaspoon of vinegar. If the mixture sizzles and gas is actively released, add a little more acid. Add in small portions until the mass stabilizes.
- Heat the thick mixture. Evaporate excess water.
- As soon as a thick crust begins to form on the surface, remove the container with the substance from the heat.
- Leave at room temperature for 5-7 minutes. The surface will begin to ice up.
- Add boiling water and stir. There should be no ice or lumps.
- Pour the mixture into a plastic container and put it in the refrigerator until it cools to a temperature of 10-15 degrees.
- Add a pinch of table salt. If everything is done correctly, the process of rapid crystallization will begin.
Important: if the proportions are incorrect, crystallization will not occur. For accurate measurements, use a measuring cup and a home electronic scale.
Products by topic
- Choose …
View
Plastic sheets for hockey boards
3758 ₽ – 7207 ₽
- Choose …
View
Plastic bumpers for hockey boards
1576 ₽ – 1750 ₽
- Add to cart
View
Plastic railings for hockey boards “U” shaped
728 ₽
- Choose …
View
Hockey box made of FSF plywood 9 mm
540560 ₽ – 1474360 ₽