People have always strived for self-expression and individuality. This was manifested in the creation of unique household items and decoration of the surrounding space. Knitting in the interior allows you to make the design of your home special, highlight its advantages and highlight accents. Knitting can be done using technical devices, but crocheting can only be done by hand. For this reason, such products have great value and cost.
Sofa with knitted pillows Source roomester.ru
Types of tools for knitting reinforcement
The knitting method involves using steel wire to manually fix rods perpendicular to each other in places where they intersect crosswise.
A crochet hook is a simple and safe tool that allows you to tie reinforcement bars quickly, securely and evenly.
Today, there are three types of ready-made hooks for knitting reinforcement bars, which can be purchased in the store. In addition, you can make a hook for the reinforcement yourself.
Manual
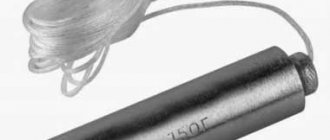
Photo of a purchased hook. The handle rotates freely.
A simple hook is a rod attached to a handle with bends that grip the wire. The hook for tying the reinforcement is rotated manually. The advantage of hand tools is their availability, durability and ease of use.
A hand crochet hook is an excellent option for novice builders, which will allow you to understand the knitting algorithm and feel the optimal degree of wire tension to obtain high-quality knots.
Screw
The knitting wire is selected with a diameter from 0.8 to 2 mm.
A semi-automatic hook is a reversible tool that operates by forward movements of the handle. The device has a rod with a hook in the form of a drill, which fits into the funnel of the handle along the thread, tightening the wire.
The cost of such a tool is higher than a manual one. But the screw tool makes it possible to cope with a wide range of work in a short time - in order to completely tighten the knot, it is enough to make only a couple of movements.
Mechanical
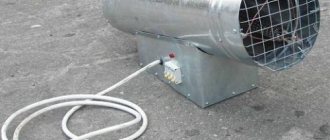
Builders who value every second choose an automatic hook (gun) for tying reinforcement. The operating principle of the gun is based on fully automatic rotation of the hook. This device is the most modern and advanced, allowing you to achieve maximum results and speed without large labor costs on the part of the builder.
Operating principle.
Buying such a hook for household purposes will not be justified: working with a gun requires a fairly large consumption of wire, and the cost of the device is high. But on large projects or when performing work that needs to be completed in an extremely short time, this option is ideal!
Homemade
Photo: hook made of wire with a diameter of 3-4 mm.
Purchased hooks are not always able to fully satisfy construction needs. Often, the shape of their rod has incorrect bends, and the length of the tools is made too short, which significantly affects the quality of work. So how then to make a hook for tying reinforcement correctly?
To make a device for tying reinforcement with your own hands, we will need a welding electrode or steel wire with a diameter of 4 mm.
In order to make a hook, you need:
- Make a handle for the device from a piece of thin hose to the size of a rod or trowel without a spatula.
- Insert the electrode into the hose or insert trowels into the funnel and secure (for example, using epoxy resin).
- Bend the rod at an angle of ninety degrees at a distance of about 5 cm from the handle (the bent rod should resemble a rocker in appearance).
- Bend the end of the rod in an arc.
- Before work, sharpen the sharp edge of the electrode using a file or sharpener.
A hook can be made from an unnecessary screwdriver or a handle from a construction roller, bending the sharp end at the required angle and sharpening it slightly. An automatic mechanism can be made by inserting an electrode rounded at the end into a screwdriver.
A homemade tool is perfect for household purposes, will save money and allow you to quickly knit even and reliable knots.
How not to make a mistake with your choice?
There are hooks of different thicknesses. You can determine the number by the size of the head. For example, a tool containing a head thickness of 2 mm will have number 2. Thin ones are used when knitting lace products: napkins, collars, capes, etc. To make it easier for you to choose a hook for a particular yarn, the number is indicated on the skeins of thread and type of knitting tools.
Which tools are suitable for which threads:
- 0.6–1 mm is used when knitting with thin cotton threads.
- 1.25–1.75 mm – for knitting with thin cotton threads or other threads of the same thickness.
- 2–3.5 mm corresponds to yarn of medium thickness.
- 4–5 mm is suitable for medium thickness yarn for double thread knitting.
- 5.4–6 mm – for double fluffy yarn.
- 7–8 mm – for ordinary wool or double thread of wool.
- 9–10 mm – suitable for thickly twisted thread, bulky yarn.
When choosing, you should focus on the surface - it must be smooth, without any snags. For confident work, the beard must be slightly rounded and sharp, so that the thread, which is hooked, is held beautifully. In this option, you will not get hurt or tear the yarn.
Stylish hand knitted carpet
If the carpet
done with passion and love, then it will exude positive energy. Using a crochet hook you can knit gorgeous rugs that will highlight the design of any living area. There are various options for knitting rugs. By adding attributes made by your own hands to your own home, you will see how the aura in your home will change positively.
Methods of knitting reinforcement
Let's consider all the existing ways to connect reinforcement. Each of the options is good in some way, and is used by builders, depending on the type of building and design requirements. There are 3 ways to connect rods; with their help, a strong and reliable metal frame is created:
- Wire knitting.
- Welding.
- Plastic clamps.
These methods of tying reinforcement have their own characteristics. Each of them is correct and is applied depending on the requirements and the material used. When reinforcing a strip foundation for a private house, the reinforcement is often connected by welding rather than tied with wire. But which option is the best?
Advantages and disadvantages of welding connections
Despite the fact that these are different technologies, the right choice can save money and time on construction, without sacrificing structural strength. The method of connecting elements by welding was previously considered one of the most reliable and effective. However, such technology is not always appropriate. Usually it was used when installing bulky frames that strengthen the foundation for multi-story buildings and large cottages.
This method has some disadvantages:
- You need to have skills in working with a welding machine, otherwise you need to spend money on the services of a professional welder. In this case, the cost increases.
- Welding points are the weak point of the structure. There the strength of the frame becomes lower.
- The method is not suitable if you use fiberglass reinforcement. In addition, the A-400 (A-3) fittings, which are the most popular, cannot be connected by welding. Only rods with the index “C” are suitable for work, for example: A500C reinforcement.
Therefore, in modern monolithic construction, welding has been replaced by viscous welding. For private and residential houses, construction of a bathhouse, garage or other buildings, this is the best option for connecting reinforcement.
Pros and cons of joining using the knitting method
Why is this method so good? It has the following positive aspects:
- Speed of work completion. Knitting with wire takes little time, it is simple and does not require skills. However, if you do it manually, the process slows down. Next we will look at how to quickly knit reinforcement.
- Ease of troubleshooting. When working with welding, it will be more difficult to eliminate errors; you will have to take a grinder and cut the welding seam. The wire can be simply bitten off with wire cutters or unwound with a crochet hook.
- You don't need to be a professional to knit reinforcement.
- The reinforcement process can be performed in formwork.
- The cost of work is much lower.
An example of knitting a mesh of reinforcement with wire.
If we talk about shortcomings, we note the precariousness of the finished frame. True, this is not a big problem. The structure will be strong, the only problem is that when the frame is moved into the formwork it begins to loosen, in this case it is possible to tack the reinforcement in several places by welding. To solve this problem with fiberglass reinforcement, you need to attach several braces to make the structure more rigid and stable. By bending, the tension in the knitting areas changes, the frame moves. Therefore, you need to be careful when installing it in the formwork. It is better to knit the reinforcement in the formwork or above it if the strip foundation is being reinforced.
Features of connecting reinforcement with plastic clamps
The main advantages of this method are that it does not require special skills, it has a high speed of work, and reliable fixation of the reinforcement. The disadvantages of this method are the following:
- Price. For large volumes, the wire will be more economical.
- Speed of work (when compared with other methods of knitting).
- Correction. You made a mistake somewhere, you will have to bite off the clamp, it becomes unusable, but the wire can be tied up.
- Reliability. It is not advisable to move around a structure connected with plastic clamps.
- Temperature. They burst at subzero temperatures.
Based on these data, we can say that this method is more suitable for private construction, with small volumes, and it is also suitable for people who want to do the reinforcement themselves with their own hands.
Thread holder
A useful and necessary device for knitting is a holder that will prevent balls from rolling out throughout the apartment. This device is especially useful for those who knit with several threads. And for working with jacquard, when the yarns are constantly tangled with each other, this device is indispensable.
To work, you need several plastic bottles. Their number depends on how many threads of different colors are in use at the same time. The volume of the bottle affects what size skein you can put inside.
First, the neck of the bottle is cut off using a utility knife. The marker marks the lines along which the container will be cut. Most of the plastic is cut off, leaving a thin strip about 2.5 cm wide. To make the tip take the shape of a hook, a match or lighter is carefully placed under the strip of plastic. This must be done very carefully, not allowing the material to melt. When the strip at the end takes the form of a loop, you will need to wait for the mold to completely harden. It is convenient to attach such a hook to the back of a chair or the handle of a desk drawer, and put a ball inside. A conveniently packaged thread will not be able to roll into the far corner.
Professional hook for fittings - use a gun
The knitting gun is a professional tool
Advantages of a professional device:
- there is no need to pre-cut the wire into blanks;
- wire is automatically fed from the working drum;
- material savings are achieved due to the absence of wire waste;
- increased pistol performance;
- increased loop tightening force;
- possibility of adjusting the twisting force and wire length.
Among the main advantages, it is necessary to note the possibility of autonomous operation from a battery, as well as the use of a special extension cord, which allows you to perform work while standing, without bending your body. The design of the device allows you to hold it in one hand, while the other hand supports the steel rods without the help of assistants. The duration of tightening the joint does not exceed one second. This is very convenient when performing work on an industrial scale.
Along with the advantages, there are also weaknesses:
- quite high price of a professional pistol;
- increased costs for purchasing special wire;
- inconvenience of use in confined spaces;
- the need to train knitters in how to work with the tool.
It is important to purchase consumables that correspond in cross-sectional size and rigidity to the characteristics of the gun. Otherwise, equipment damage may occur.
The gun is used by professionals when assembling the frames of large foundations. And at the same time, in certain places of the grille, fastening can only be done using hand tools.
Knitting gun BM-400
Combination with different styles
Knitted decor is appropriate in any direction, since there are many ways of knitting and a huge number of types of threads and yarns. There is no need to limit yourself to making only tablecloths or napkins. You can combine various techniques and create not only decorative items, but also additions to existing things.
Cushion on the chair Source roomester.ru
Knitted items always add a feeling of comfort to a room. In the cubist style, small square ottomans for seating would look appropriate. Shabby chic or country style involves an abundance of knitted items and patterns of the corresponding theme.
Rug and knitted covers Source roomester.ru
Table with plants Source roomester.ru
Vases with covers Source roomester.ru
Rug near the chair Source roomester.ru
Pillow with flowers Source roomester.ru
Sofa with cover Source roomester.ru
Chests on the floor Source roomester.ru Lanterns in the interior Source roomester.ru
Ottoman near the chair Source roomester.ru
Covers for cutlery Source roomester.ru Stands in the shape of apples Source roomester.ru
Coasters in the shape of oranges Source roomester.ru
Sofa and rug Source roomester.ru
Striped rug Source roomester.ru
Jars with hearts Source roomester.ru
Three candles next to a toy Source roomester.ru
Bright toys Source roomester.ru
Fox toy Source roomester.ru
Knitted bunnies Source roomester.ru
Pillow on the chair Source roomester.ru
How to knit the frame?
When reinforcing a small volume of concrete, builders simply place the reinforcement in the formwork and then fill it with mortar. However, if large concrete products are to be reinforced, for example, a monolithic (slab) or massive strip foundation, then a frame is required. The reinforcement must be distributed evenly throughout the entire volume of concrete in order to reliably perform its function of increasing the strength of the structure. In these cases, a complex frame is made from metal rods.
crochet hook
The first option is the simplest and most accessible. If necessary, you can buy it in a specialized store for a hundred rubles or even cheaper. Moreover, it can be made by hand if the suitable material is available - we will return to this later. The downside is low performance. A novice knitter, with a sufficient supply of wire, will be able to produce 6-10 knitting per minute.
Screw hook
The screw hook is the next step in the development of the tool for knitting reinforcement. Outwardly, it looks a little like a regular one, but thanks to it, the knitting speed will increase, and the worker will get tired much less. If, when working with a regular hook, a specialist must twist the ends of the wire and manually twist them, then a screw hook is much more convenient.
Loop the loop and ends, then gently but firmly pull towards you. The plastic handle will be fixed in the hand, and the hook itself will begin to spin quickly, securely tightening the loop. Such a tool costs from 600 to 1000 rubles, depending on the manufacturer and store. It will be an excellent choice if you need to perform work once on a relatively large object. The knitting speed will increase, however, the wire will still have to be cut and bent by hand.
Video tutorials on crocheting patterns for beginners
3 types of French crochet mesh, lesson for beginners
Lesson for beginners.
The video should load here, please wait or refresh the page.
Simple pattern for a rug, tutorial for beginners
Pattern for a crochet blanket, for a crochet rug, use all the leftover yarn you have accumulated over the years of knitting! The pattern is very simple, it consists of single crochets and embossed double crochets.
To knit a blanket or rug, you can use all the remnants of old threads, you will get a bright and beautiful pattern. Watch my master class and experiment! Lesson for beginners.
The video should load here, please wait or refresh the page.
Instructions for crocheting reinforcement
It is useless to knit the reinforcement with your bare hands - you can achieve the required force to tighten the wire only with the help of additional tools. Let's take a step-by-step look at the basic techniques for crocheting reinforcement.
Manual
To knit wire by hand you will need a hook. The wire is folded in half and hooked under the fixation point. The free end is threaded into a loop and crocheted until the wire is tightly tensioned.
Simple knot
To tie a wire with a simple knot, you will need to do the following:
- A wire 200 mm long is cut and bent in half.
- The bent section is pushed under the point where the two rods meet.
- The hook is inserted into the loop and catches the free end.
- A full revolution is performed around its axis. The free end must be held.
- Next, while tensioning the wire, the hook is turned several more times until a reliable connection is obtained.
You don't have to buy a hook at the store. You can easily make a convenient tool yourself by giving the required shape to a steel rod and putting a handle on the end.
Dead node
Before crocheting foundation reinforcement, you need to learn how to form a dead knot. This method is especially good for tying vertical rods for columns and beams.
- A piece up to 400 mm long is cut and bent in half.
- The segment is pushed forward by a loop from below the knot being fastened.
- The free end is passed through the top and again bent under the rods.
- The loop and the free end are aligned and then hooked with the hook tip.
- The hook is rotated with tension until the loop comes off.
To obtain a high-quality connection, you need to ensure that the wire is tightly laid on the surface of the reinforcement. The knitting process continues in a checkerboard pattern.
Screwdriver
The scheme of working with a screwdriver is reminiscent of the crocheting process, but instead of manual force, automation is used. Instead of a regular tip, a homemade hook is inserted into the screwdriver; usually a roofing nail is used for this purpose.
It is important to ensure that the speed of the screwdriver corresponds to the required force for tightening the wire. If you apply too much force, the wire will break, and at low speed you may end up with a weak knot.
Ready-made lums
To knit complex patterns on a luma using the Tenerife technique, it is better to buy such a device. Various shapes and sizes are available. When ordering, select models:
- with grooves on the “columns”;
- with caps so that the loops do not accidentally “go down”;
- with a side anchor mark to indicate the extreme pin in order to begin the reverse motion of the weaving from the desired place.
The most common options are round. They have pins arranged around their circumference in one or several rows. You can also buy a lum for knitting, in the form of a circle with a hole in the center, around which holes are located in several rows. Pins are inserted into them. Such models are more versatile and suitable for making the most complex openwork products.
Automatic hook for tying reinforcement
A special device with a reverse operating principle allows you to speed up and automate the twisting process. At first glance, it looks like a standard manual device, but differs in the presence of a screw mechanism consisting of the following parts:
- plastic handle with internal screw thread;
- working body with a screw thread on the rod.
When assembled, these elements form a mechanism with a reciprocating principle of operation. The reversible device works quite simply - moving the handle causes rotation of the working element on which the wire loop is put.
Advantages of the reversible device:
- increased wire binding performance;
- Possibility of use in areas with limited access;
Automatic hook for tying reinforcement
- ease of knitting operations;
- durability of the device with regular lubrication.
The device has the only drawback - its increased price when compared with the cost of a conventional hand tool.
Using a reversible tool, the knitter can perform an increased amount of work without getting tired. The screw device is superior in efficiency to the manual device when it is necessary to manually pull and twist the wire ends. Without reinstalling the working hook, by cyclically moving the handle you can achieve reliable fastening.
Procedure for using the device:
- Insert the hook of the tool into the twisted loop.
- Pull the handle towards you along the working axis.
- Return the handle to the starting position.
- Perform the next movement cycle.
You can also make your own semi-automatic tightening device using a regular screwdriver. You will need a bent nail without a head or an L-shaped rod, the end of which must be inserted into the tool chuck. With a little practice, it is not difficult to master the principles of operation using this device.
Lace
The shabby chic trend is strongly associated with lace fabrics and elements. Lace can be present on curtains, tablecloths and napkins. This gentle romantic style goes well with grandma’s rugs and other cute details of a rustic interior. Irish lace will perfectly complement the Provence style and add a special warm atmosphere to it.
Pink rug Source roomester.ru
To give the room a homey feel, you can use floral patterns. There are many interesting options for every taste that can be adapted to different designs. It is enough to apply a little imagination - for example, a knitted floor lamp will look especially interesting, creating fancy shadows on the wall, and covers for a tea set will definitely surprise guests with their originality. An unusual solution is openwork book covers that will attract attention and arouse interest in the contents of the books.
Rugs over the sofa Source roomester.ru
Related Posts via Categories
- How to calculate the cross-sectional area of reinforcement of all types?
- How much does 1 meter of construction rod reinforcement of various types weigh?
- Length of rod reinforcement - all possible options regulated by GOSTs
- Linear fittings – high-quality installation of power lines is guaranteed!
- Unmeasured reinforcement is the best option for low-rise construction!
- Brands and classes of construction rod reinforcement and wire for reinforcement
- Coupling fittings, what they are and what they are used for
- Anchoring reinforcement in concrete is a complex but important operation
- Hot-rolled reinforcement - GOST and the entire life cycle of the product
- Weight and features of steel corrugated reinforcement A3 and other classes
Thread separator, knitting thimble
There are protective thimbles that protect the sensitive skin of your fingers from rubbing with prickly woolen or coarse threads and from injury from knitting needles.
A dividing thimble has holes on its body for knitting different colors of threads for colored or jacquard knitting.
For jacquard knitting, you can purchase a small ring that fits on the tip of your index finger; this device also has holes for separating the threads.
Making your own hook
Despite the low cost of a crochet hook for reinforcement, some experienced craftsmen who have worked with reinforcement for many years prefer to use homemade ones rather than purchased ones. This has its advantages.
- When making it yourself, you can give the handle the optimal shape so that it fits comfortably in your hand. Your hand will get less tired and your productivity will increase.
- The choice of steel for production; you often come across factory hooks made of soft metal. As a result, it cannot withstand the load and bends.
- Make a hook for crocheting reinforcement of the required size. There are times when it is impossible to get to the place of tying with a factory hook because of its length.
- Small, but still savings (if materials and tools are available).
Electrode hook
An electrode hook is suitable for small amounts of work. When it is necessary to tie a small frame from reinforcement.
Making a hook with your own hands takes only 5 minutes. You will need: electrode 4, pliers and a grinder (if not, you can do without it).
Let's look at how to do it step by step:
- We beat the electrode off the protective coating.
- We retreat 1-2 centimeters from the edge and bend it at 80-90 degrees.
- We retreat 3-4 centimeters from the other edge, make the first bend at 90 degrees. We retreat another 10-12 centimeters, and make a second bend at 90 degrees. We retreat another 4-5 centimeters and make a third bend.
- Let's sharpen the tip of the hook a little so that the wire can peel off better.
The hook is ready, it should have the same shape as in the drawing below.
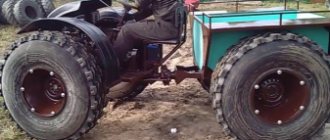
Homemade hook made from rebar with a wooden handle
A homemade hook is most often used by professional reinforcers, thanks to the advantages described above. Its production will take about 2 hours, and the result will be a hook that is in no way inferior to the factory one.
To make a hook you will need the following materials and tools:
- Corrugated fittings 8-10 in diameter, 35-50 centimeters long;
- wooden blank for handle;
- 2 washers - the diameter is equal to the hook handle;
- 2 nuts;
- pliers, knife or hatchet;
- grinders and welding;
- drill with drill 8-10 diameter;
- sandpaper.
Manufacturing procedure:
We grind the ribs of the reinforcement on a grinder so that it becomes smooth. We take a corrugated one, not a smooth one, since a higher grade of steel is used for its production, the hook will be stronger. Let's prepare the pen. Using a drill, a drill of a suitable diameter, drill a hole in the center of the workpiece. Afterwards, if necessary, we adjust it to the required size using a knife or hatchet. At the same time, make sure that the hole is in the center of the handle. Next, sand the handle until smooth with sandpaper. We put a nut on the edge of the reinforcement and weld it by welding. Put a washer on top of the nut, then put on the handle, then the washer and nut again
It is important that there is a small gap between the washers and the handle so that the hook handle can rotate well. To do this, place a piece of paper folded a couple of times between them.
Then weld the second nut. Be sure to place water near you so that if the pen catches fire, you can immediately extinguish it. Now we will sharpen the edge of the reinforcement with a grinder, do not overdo it so that it does not turn out too thin, otherwise the crochet hook will bend. We retreat 1-2 cm from the edge of the handle and make a bend at 90-140 degrees (it all depends on the chosen type of hook, see examples of bends in the picture below). We retreat 1-2 centimeters from the edge of the reinforcement and bend the tip of the hook with pliers at 80-100 degrees. Make sure that the bends are in the same plane. To increase the service life of the handle, we cover it with impregnation for wood against rotting and moisture in 2 layers. After drying, coat it with wood varnish. The hook is ready, all that remains is to make a couple of ties for testing; if it fits well, then you don’t need to bend anything, otherwise you can bend it a little to fit your hand.
Photos of handmade hooks for tying reinforcement
We recommend watching the video instructions for one of the options for making a crochet hook with your own hands.
That's all. Now you have not only learned about knitting devices, but also learned how to make a hook for tying reinforcement with your own hands and can easily cope with this task.
Measuring instruments for knitters
No needlewoman can do her work without measuring length. Taking measurements and creating a pattern requires the use of a ruler, pattern and measuring tape. However, the measurements do not end there.
The most useful measuring tools for knitting are:
- template for determining the size of the knitting needles;
- ruler for measuring density;
- row counter;
- magnetic ruler.
Knitting patterns
The diameter of the knitting needle is an important value that must be taken into account when calculating the size of the finished product. We talked about this in the instructions on choosing knitting needles.
The marking of knitting needle sizes has a step of 0.25 mm, so determination by eye is not always possible, and an error in selection can lead to a different result from the planned one. The product may turn out to be a size larger or smaller, and the pattern will not match the desired one.
The spoke size tool is a ruler with a set of different holes corresponding to the diameter of the spoke. All holes are labeled, the correct diameter is determined by selection.
Ruler for determining knitting density
The knitting density depends on many factors:
- spoke thickness;
- thread thickness and structure;
- matching knitting needles and yarn;
- the master's work style.
To determine the density, before starting work, you need to knit a piece of fabric 10x10 cm, and count the number of resulting loops and rows. Based on the data obtained, the size of the finished product is calculated.
But there is a more accurate and convenient method - a special ruler designed to determine the density of knitting. The tool allows you not only to determine the density of loops, but also makes it possible to calculate their number in one row and the total number of rows in the finished product.
As a rule, such a template is multifunctional; it has a calibrator for determining the diameter of the knitting needles, a frame for measuring density and a table for calculating knitting.
Row counter
The row counting tool is very helpful when you need to knit really large items: rugs, blankets, clothing items, scarves. It is impossible to knit a large number of rows in one sitting, so each time the needlewoman needs to write down or remember the row on which she had to stop.
Most often you can find mechanical counters , the numbers on which change by turning a wheel. These hand knitting tools are a small cylinder with a two-digit number. It fits comfortably on a knitting needle and is always at hand.
There are electronic versions of meters that are attached to the hand using a bracelet. Changing numbers on such devices occurs by pressing a large button.
Magnetic ruler
This is a special tablet designed for convenient reading of graphic diagrams. Essentially, this is a small metal plate; a sheet with a printed report is placed on it. Fixation occurs by placing a magnetic ruler on top of the paper, which, easily moving along the sheet, serves as a marker of the desired place in the instructions.
Important recommendations for choosing reinforcement for the foundation
Diameter
When choosing reinforcement for the foundation, first of all, pay attention to the diameter of the rods. The relationship is simple: the thicker the reinforcement, the more severe loads it can withstand
When determining the optimal diameter, first of all, the characteristics of the soil are taken into account (the main point is heaving) and the expected weight of the finished building, taking into account the weight of its internal arrangement and residents/visitors.
This is how it should be ideally and according to the rules. Along with this, many private developers refuse to draw up design documentation and perform related extensive calculations, adhering to average and generally accepted values. In the case of the construction of relatively small buildings, for example, such as a bathhouse, such an approach is acceptable.
The recommendations are as follows:
- if the structure is erected from relatively light materials (timber, gas blocks and other lightweight building elements from this series), reinforcement with a diameter of 1.2 cm is used. It is impossible to use rods with a diameter of less than 12 mm for arranging the foundation - reinforcement so modest in its overall characteristics is only suitable for use in the construction of supports for fences, gates and other light utility structures;
- if construction is carried out using heavier materials, the recommended diameter of the reinforcement changes accordingly. In most cases, rods with a diameter of 1.4-1.6 mm are used.
Assortment of fittings
Class
The second important indicator is the class of the reinforcement. For a private foundation, class A-3 material is suitable.
Corrugated fittings A3, steel grade A500S, GOST 5781-82
The fittings of this group are very easy to use (easily bends without the use of special tools), durable and reliable. Less commonly used are rods of class A-2 (they can be bent 180 degrees, A-3 – 90 degrees).
Table of reinforcement classes and steel grades
Row counters
Row counters are divided into mechanical and electronic .
Mechanical counters are a small drum with a side display of numbers. By turning the drum wheel back and forth from the edge, the desired digital value is selected. When choosing a mechanical meter, you need to pay attention to the size of the meter i.e. it should have an internal hole corresponding to the number of the spokes, which easily allows the spoke to pass through. There are also mechanical counters where the digital value is selected by turning a tongue or turning a wheel inside the case.
Electronic meters.
Electronic meters are battery operated. Unlike mechanical ones, they have a more modern appearance and number of functions. The number of knitted rows is adjusted by pressing a button on the body, the display of numbers appears on the digital display. Electronic meters can remember the last value after switching off. As a rule, they are attached to the knitter’s finger.
Knitting needles
The material used can be different: plastic, bone, metal. Unlike regular sewing needles, knitting needles have a large eye and a blunter tip.
Plastic needles are suitable for sewing items made from thick yarn, because... they are wider, with a larger eye. Such needles can be used with confidence and ease in children's creativity, because they are less traumatic.
Metal needles are more reliable against breakage, have different sizes, and are suitable for sewing both thin and thick knitwear.