What can you use to make a car stand with your own hands?
A do-it-yourself car stand is made from metal water pipes and other pipes. It is very reliable and allows you to adjust the height.
When repairing a car yourself, it is important that it does not roll away, because this can lead to serious injuries, damage to equipment or the vehicle itself. Therefore, supports are used for many repair work. And an inexpensive solution would be to make your own car stand.
Traces for car repairs sizes
In accordance with the requirements of the “LABOR SAFETY RULES IN ROAD TRANSPORT:
clause 2.1.1.12. “When hanging part of a car, trailer, semi-trailer using lifting mechanisms (jacks, hoists, etc.), except for stationary ones, you must first place special stops (shoes) under the wheels that cannot be lifted, then hang the car, place trestles under the suspended part and lower them onto them automobile".
Please tell me: 1 Are there any GOSTs or other regulatory documents, according to which stands (traces) used when carrying out repair work on vehicles should be manufactured?
2 What is the methodology for testing trestles (stands) used when carrying out repair work on vehicles.
3 Who should develop and approve this methodology for testing trestles (stands).
4 In accordance with what regulatory document, with what frequency and what load is it necessary to test trestles (stands).
5 What types of stands (travelers) in terms of load capacity and design can be used when repairing large-capacity vehicles (BelAZ, KAMATSU, etc.) and, accordingly, how to test these types of trestles.
I would be very grateful if anyone could answer these questions or share their experience.
Registered: Mon Oct 24, 2005 11:58 am Messages: 279 From: Moscow
Registered: Fri May 22, 2009 9:41 am Messages: 4713 From: TsChR
| Source: Ministry of Labor and Social Development of the Russian Federation RESOLUTION of the Ministry of Labor of the Russian Federation dated May 12, 2003 No. 28 Registered with the Ministry of Justice of the Russian Federation on June 19, 2003 Registration No. 4734 “On approval of Inter-industry rules for labor protection in road transport” _________________ Everything you want to achieve is lost in everyday life | |||
| |||
Design
A do-it-yourself or purchased car stand has a simple design. It is equipped with a tripod for installation on the floor, a mount that holds the car by the sills. Sometimes equipped with a height adjustment mechanism. But this lift is not used instead of a jack. Therefore, the car is first lifted with a jack, and then supports are used.
DIY car stand
Types of stands
Do-it-yourself car safety stands come in several types. They are divided into regulated and unregulated. The supports differ in the material from which they are made.
Car safety stands
A DIY wooden stand for a car is the simplest type of tripod. It is usually unregulated, but has sufficient reliability. Metal supports are often made or purchased. They are usually adjustable and fit both cars and trucks.
Unregulated
Non-adjustable tripods are cheap. This DIY wooden car stand is very quick to make. They are also made from other materials.
Adjustable
Adjustable stands for the car, purchased or made by yourself, are equipped with a mechanism that allows you to change the lifting height. It is very convenient to use. But ready-made devices are expensive. And making them is more difficult than ordinary supports. Metal or iron and wood are used for manufacturing.
Adjustable car stands
Such supports are used in garage auto repair shops. You can also use them to repair your car if the work is complex.
Video: homemade garage gadgets
Save time: selected articles delivered to your inbox every week
A garage is more than just a place to park a car. It is also a workshop, a place of relaxation, and a club of interests. Therefore, the arrangement of the garage should be convenient and thoughtful. You need to place a lot of things in a small area, and they should be convenient to use. Homemade products for the garage will help with this. What people don’t do with their own hands. From a simple shelf to a complex device. You can make all this yourself. But you need to know how. Several ideas for modernizing a garage and a plan for their implementation are in the article.
DIY stand - ready-made diagrams
You can make a car stand with your own hands. Drawings and diagrams are available online. But you can draw the layout yourself.
As you can see from the photo of do-it-yourself car stands, they usually create simple tripods made of wood without adjustment. They are used for repair and maintenance of passenger cars. The supports are light but durable.
But there are also schemes of more complex structures that allow you to adjust the height. Their creation usually requires experience working with metal and takes a little longer. But this DIY car stand is suitable for complex repairs and heavy vehicles.
Manufacturing instructions
A do-it-yourself car stand is made from metal water pipes and other pipes. It is very reliable and allows you to adjust the height. For manufacturing you will need the following materials:
Manufacturing instructions
Do-it-yourself car stand like this:
After assembly, the support can be painted or covered with other materials. It can easily support a passenger car and a small truck or SUV.
Source
Safety stand made of wheel rims for cars
Hello everyone, in this article I want to tell you how you can make a useful craft, namely a safety stand for a car from a simple, unnecessary wheel rim. So, we take a car rim and cut off the front edge with a grinder; from the photo I think it will be more clear which one it is))).
We also need a square profile measuring 60x60 and 50x50. We cut 25 cm from one and the other profile, then you need to drill holes.
In a 60x60 profile, we retreat 2 - 3 centimeters from the edge and drill a hole with a diameter of 15 mm, I selected the diameter of the hole for the bolt, almost any bolt will do, the main thing is that the length is more than 6 cm.
In a 50x50 profile, we drill holes every 3 cm, more often, less often, there is no particular connection to the size, but we drill as it will be more convenient for you.
Now we need to make a square hole in our disk in the middle, to fit the size of our profile 60x60. We apply, mark and cut out with a grinder.
Next, we insert our profile into the cut-out square hole, insert it until it rests against the table, it will be clearer in the photo, and only after that we scald it around.
On one side of the 50x50 profile I welded a pulley to provide a platform for supporting the car.
I welded a chain to the bolt, and screwed the chain itself to the disk, this is so that the bolt does not go anywhere))).
To give the stand the appearance of spray painting it, first, of course, primed it.
This turned out to be a useful, and most importantly necessary, fake. Now you can crawl under the car without fear.
All the best to you and good luck to everyone.
Author; Glavnyiy-Mehanik Sumy, Ukraine
Do-it-yourself homemade safety stand for a car from a wheel rim
You insert them into each other, then into a vice. Drill holes approximately every 3 cm to insert the bolt. Clean the disc and pipe blanks from rust using sandpaper or a drill attachment. We place the pipe in a standing position in the center of the disk, mark a square mark, and cut it out with a grinder. We insert a 6x6 pipe into the center of the disk (into the sawn hole) and weld it to the disk. We insert a 5x5 cm pipe inside, place a roller on top of the pipe and weld it. We paint all our parts and dry them. We weld a piece of chain to the bolt on one side, and screw the other side to the hole in the disk with any bolt. Our entire design is ready, we can begin testing.
This post may contain affiliate links. This means I earn a small commission from links used at no additional cost to you. See my privacy policy for more information.
Types of stands
Do-it-yourself car safety stands come in several types. They are divided into regulated and unregulated. The supports differ in the material from which they are made.
Car safety stands
A DIY wooden stand for a car is the simplest type of tripod. It is usually unregulated, but has sufficient reliability. Metal supports are often made or purchased. They are usually adjustable and fit both cars and trucks.
Unregulated
Non-adjustable tripods are cheap. This DIY wooden car stand is very quick to make. They are also made from other materials.
Adjustable
Adjustable stands for the car, purchased or made by yourself, are equipped with a mechanism that allows you to change the lifting height. It is very convenient to use. But ready-made devices are expensive. And making them is more difficult than ordinary supports. Metal or iron and wood are used for manufacturing.
Adjustable car stands
Such supports are used in garage auto repair shops. You can also use them to repair your car if the work is complex.
DIY stand - ready-made diagrams
You can make a car stand with your own hands. Drawings and diagrams are available online. But you can draw the layout yourself.
As you can see from the photo of do-it-yourself car stands, they usually create simple tripods made of wood without adjustment. They are used for repair and maintenance of passenger cars. The supports are light but durable.
But there are also schemes of more complex structures that allow you to adjust the height. Their creation usually requires experience working with metal and takes a little longer. But this DIY car stand is suitable for complex repairs and heavy vehicles.
Kozelki-dlya-remonta-avtomobilej-gost - I recognize my car!
A collection of programs for all types of machine repairs. Main page. Repair, diagnostics, electrical circuits, standard hours, body repair of Hyundai commercial vehicles.
Sale of repairs and car service in the Samara region and Kozelki on the domestic website Nadybat.Ru Samara region and Kozelki in the Russian Federation. Cars › repair and car service.
Contents of the entry Maintenance posts on production lines with forced movement of machines must be equipped with: Not allowed: Not allowed: In the area of maintenance and technical repairs of machines it is not allowed: Maintenance and technical repairs of machines must be done in accordance with the non-specialized requirements of the Regulations on the maintenance and current repair of road transport wagons . The work performed by the contractor is carried out in accordance with the labor protection instructions communicated to the contractor.
The participation of drivers and workers of second professions in the repair and maintenance of cars is allowed if their qualification characteristics correspond to the qualifications of the work being performed; in another case, the involvement of workers in these works is likely only after completion of experimental training. In connection with the transformation of working conditions, employees are required to receive instructions on labor protection in the workplace.
Maintenance and repair of machines is carried out in specially designated areas (posts), equipped with devices and necessary instruments, inventory, tools and equipment, including special ones, provided for a certain type of work. Vehicles must be delivered to maintenance and repair stations clean and dry.
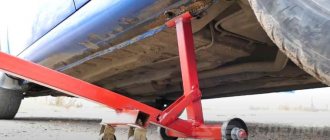
Safety stand for a car. With your own hands
This safety stand is needed in order to leave the car in a raised state after you have raised it with a jack.
For this device you will need:
First of all, cut two pieces of pipe equal in length.
Next, in a pipe with a larger diameter, use a drill to drill a hole near the end of the pipe.
It is necessary to attach a corner piece to the smaller of the pipe pieces. For ease of fastening, we suggest making a recess at the end of the pipe. It is convenient to make the recess using an angle grinder. Try to make the cut approximately in the middle of the edge.
We attach the corner piece to the pipe by welding.
Next, we place a smaller piece of pipe into a larger pipe and drill holes in 2 cm increments. These holes should coincide with each other in both pipes. To do this, fix the pipes relative to each other.
Now all that remains is to attach the larger piece of pipe with its end to the metal plate. The plate will act as a support for the entire safety post.
Thus, we have a telescopic retractable rack for fixing the car in a raised state. All that remains is to paint this homemade product and try it out.
Materials used
Car repairs are performed not only using special tools, but also using consumables. Every car owner who performs a minimum list of repair actions should have these devices.
Materials for complete body repair are presented:
- cleaning agents;
- degreasers;
- antistatic substances;
- polishes;
- anti-gravel substances.
Consumables are supplemented with elements used for protection when performing vehicle maintenance. These are useful devices that simplify car restoration. The list also includes instruments for measuring or performing other related tasks. Most devices do not require much storage space. The category of additional equipment includes workbenches and racks when used for repairs.
DIY car stand
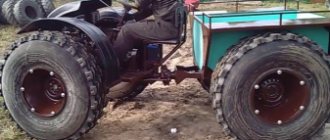
Greetings, Samodelkins!
Many of you probably have a personal car and you most likely had to independently repair your iron horse, little by little, so to speak, without fanaticism. The author of the YouTube channel “TeraFox” is no exception.
Safety precautions for hanging wheels include installing a support under the car. This rule should not be neglected in any way, and the simplest, most accessible and most importantly free method is a tree stump.
But after all, we live in the 21st century, we want something more modern, functional and no less reliable. After quite a long period of thought, the master realized that everything had long been invented before him. All you have to do is go online and choose the most suitable option.
The choice was made, the material was purchased. For this homemade product we will need two square pipes 30 by 30 and 40 by 40, wall thickness 3mm. Since there are no specific sizes, the author decides to do everything approximately, by eye, so to speak. The first step is to mark the fortieth pipe. Then we will cut off the required total length for two pieces, which in turn will also have to be cut at an angle, but closer to the edge. The parts are ready and absolutely symmetrical to each other. And now it’s the turn of the 30th pipe. It fits and exits perfectly into the fortieth pipe, therefore, the fortieth pipe can be used as a template for marking the thirtieth pipe and trim off the excess using a grinder. Out of 30 pipes we also received 2 parts. Now let's return to the 40th pipe. We need one more piece with angled edges. This is what we have at this stage. It turns out to be a kind of house; the crossbar will need to be welded to the upper sections along the edges. This is what we will do now. And everything would be fine, but there is a very small nuance in the form of a 4mm gap between the pipes. This is too much, 2mm everywhere, we need to fix it. The author found a 2 mm metal plate. It was decided to make spacers in the form of strips from it. This is the only way to reduce the gap, although if we initially took pipes 40 and 35 with a wall thickness of 2 mm, then this point could be eliminated. But still, the 35th pipe is more difficult to buy, they don’t sell it everywhere, plus a 3mm wall is still more impressive than 2mm, so that’s how it is. The gap is reduced, the movement is free, that's what we needed to get. Next, the strips must be carefully welded at points to the pipes. Using a core, we mark future holes along the edges and drill, starting with a small diameter. To make the holes coincide with each other, we hold the pipe in the pipe. We finish drilling with the tenth diameter of the drill. A bolt test shows that the idea was a success, a clear match. Using exactly the same principle, you need to make holes in the rack. And on the opposite counter there are absolutely the same manipulations. So far everything is going according to plan. Next, we disassemble the workpieces into parts and begin marking on the internal guide posts, starting from the top hole by 30mm and then repeating. A total of 4 such holes need to be drilled. So, the main part is ready, of course the stops are missing. The remainder of the 30th pipe will be used for these purposes. The parts are welded, the only thing is that we leave untouched those areas where the strut reinforcements will be located, in simple terms, gussets. Next we need a piece of 4 mm sheet. All that remains is to mark it and cut out the missing parts. The scarves are ready, positioned along the posts with an inclination relative to the surface. We immediately weld everything into place. In front of you is an old broken jack: The teeth at the base could not stand it, the lead screw was severely deformed. The reason for this breakdown was that once the author of today's homemade product raised the car too high, and it simply slid to the side, jumping off the jack and thereby damaging it. But at the moment we only need the rubber band from the top of the jack. Under the elastic band, I need to make a special base with sides. A 50 x 20mm profile pipe is perfect for this. This is what happened in the end. Now you need to make a hole in the crossbar for this base. You also need to drill a hole in the center of the base itself. And now, all the parts are ready. It's time to start assembling. And the same pin from the jack will also come into use, we’ll just correct the chamfer a little. Next, the lower part of the cross member must be strengthened using a thrust plate. To do this, we mark the same remainder of the 4 mm plate, cut it out, and then weld it. But this is not the final element of our design. Now let's put everything together and see what we ended up with. There are 4 holes in the stand and of course there are not enough latches. You can, of course, come up with something out of bolts, but perhaps not this time. We protect the tenth round timber from corrosion, cut it into 60mm pieces in the required quantity, core it and straight to the machine. And now the 4 studs are ready, all that remains is to make a chamfer. Now we need rings from cheap Chinese keychains. They are great for a new task. And how is this not a harsh keychain for a locksmith? And finally the production approached the final stage - painting. The paint is completely dry, then assembly follows. This is such an unusual stand. And of course it needs to be tested in operation. To do this, you need to move to the garage. We start by removing the cross member and placing it between the jack and the fulcrum on the stiffener, like this: Then we thread the posts through and secure them with studs. That's it, you can lower it, the stand works. Now let's raise the car higher by increasing the height of the pillars. Once secured, lower the jack. At the same time, the author noticed a displacement of the stands relative to the floor due to the support rubber. When you lift the car, it moves a little, as if sliding on an elastic band. This requires a specific clamp. Let's make a new stop with pieces of round timber on the plate.
Homemade garage: ideas for arrangement
Setting up a garage is a long process. You won’t be able to do everything right away. You have to constantly modernize, change, and create something new. In this case, they mainly use homemade products for the garage. It requires less money and is also a pleasure - making the right thing out of garbage is worth a lot.
Even in a small area you can fit everything
Tire and wheel storage
Every car owner is faced with the problem of storing out-of-season “shoes” for the car. Where to put the tires is a sore point. In general, the way tires are stored depends on whether they are mounted on rims or not.
Tire storage methods
So tires with rims can be hung or stored lying down - in the form of a stack, stacking them one on top of the other. To hang tires, you can use luggage straps, chains, or a metal cable with a diameter of 4 mm or more in a polyethylene sheath. Fasten the belts to the ceiling, wall, or beam located above.
Another available method is to drive pins or hooks with a small bending radius into the wall. The distance between the hooks is slightly larger than the diameter of the tires. The length of the pins should be such that they do not protrude beyond the tire. You can fill them almost to the ceiling so that the wheels fit.
Tires without rims can only be stored standing up. Special shelves are made for them. They are usually welded from profiled pipes. 20*20 mm, maximum 30*30 mm. You can also use a corner. It is inconvenient to weld a round pipe, but cross members can be made from it - the tires fit and hold better in this case.
The width of the shelf is 4 times the width of the tire, plus a margin of 10-15 cm for some freedom. The height of the rear wall is slightly higher than the outer diameter of the wheel. The design is simple = from the side it resembles a right triangle. Having an inverter welding machine, welding such a shelf will not be difficult.
Such shelves are usually hung on the wall. But the place must be chosen so that light does not fall on the rubber - this will deteriorate it. Not the most complicated DIY projects for the garage, but very useful.
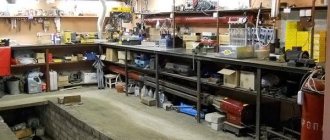
Workplace
Probably the largest number of homemade projects for the garage is related to the equipment of the workplace and tool storage systems. Moreover, shelves and racks in the garage are not the only way to solve this problem. First of all, you need to decide where the workplace will be located. There are three options:
- The entire width of the far wall. If the garage is of sufficient length and it is possible to “steal” about 1.5 meters. The advantage is that everything is located compactly, at hand, and does not interfere with walking along the car. The disadvantage of this solution is that you have to carry tools far away if work is carried out outdoors.
A table or workbench for a garage is made of boards and covered with plywood. Inexpensive, quite reliable. If you have a welding machine and verification skills, you can weld a frame from a corner or profiled pipe. Again, it is better to sheathe it with moisture-resistant plywood. The result is a smooth, abrasion-resistant surface. You can, of course, use laminated chipboard (chipboard), but the laminating layer is quickly damaged.
Wooden stands instead of a pit in the garage
brazh
Regular participant
Often there is a need to crawl under the car. For example, to change the oil. But not everyone has a hole in their garage. I don't have it either. Therefore, you must use a safe way to lift the car and secure it in this position. Climbing under a car that is only supported by jacks is very dangerous! Most often, people use special stands, as in the figure below.
The following ramps are also popular (at least in America):
But it seemed to me safer to make wooden stands for the wheels. I found the most information on this topic, again, on American sites. At the end of this post I have provided links to the most interesting articles.
Advantages of wooden stands: 1) Safety. Some people use bricks, which is not recommended at all, because... At any moment, the brick can crumble and you will merge with your favorite car. The tree, before breaking, will begin to crunch. Those. More often than not, there will be some indication that something is wrong. The likelihood that the car will slide off such stands is very low (if you follow safety precautions). 2) Easy to make stands. 3) The relative cheapness of this option.
But there are also some disadvantages: 1) You cannot remove the wheels. 2) Wooden stands take up quite a lot of space in the garage.
It is interesting to note the fact that American firefighters use approximately the same stands when they need to fix a heavy object (for example, a car). Only firefighters use separate blocks (wood cribbing) so that they can build various stands:
My version of wooden coasters looks like this:
On top I screwed 2 sheets of plywood, each 10mm thick (I had unnecessary pieces in the garage). I inserted scraps from the boards into the holes in the top of this entire structure for additional strength of the top layer. I screwed all the boards together with self-tapping screws.
The car is placed on stands like this: first the front is placed, and then the rear of the car (or vice versa). Many cars have points where you can jack up the entire front or rear at once. There are no such points on my Passat, so I first lift the front on the right side, and then on the left. The same is done with the rear. When I lift the right side, and then start to lift the left, the car’s suspension tries to “bring together” the wheels. For this reason, the stand on the side opposite to the rise begins to tilt and may tip over. Is it dangerous! Be careful and control this situation! After this, you have to return to the left side again and adjust the stand:
Be sure to use wheel chocks when lifting the car!
This is what the Passat looks like with the front end raised on stands. There is enough space to work. It's not scary to crawl under such a car.
Requirements for jacks, trestles - General issues on labor protection
Well, since that’s all there is, then catch a selection from STB 960-2011 “Maintenance and repair of vehicles. General safety requirements." Jacks 5.1.6 Jacks and special lifts with an electric drive must have working devices for automatically turning off the electric motor in the upper and lower extreme positions. 5.1.7 Hydraulic and pneumatic jacks and lifts must have sealed connections to prevent leakage of liquid or air from the working cylinders during operation. Check valves or other devices of hydraulic and pneumatic jacks and lifts must ensure a smooth, slow lowering of the rod or stopping it in the event of damage to the pipelines supplying or discharging liquid or compressed air. 5.1.8 Hydraulic jacks should be installed on a solid base so that during lifting it cannot distortions may occur that lead to jamming of the piston.5.1.9 To prevent an accident in the event of a sudden subsidence of the jack or a breakthrough of the cuff between the stationary part of the jack and the load being lifted, special gaskets (half rings) should be placed.5.1.10 The jack pressure gauge, provided for by the design of the lifting mechanism, must be in working order, be checked in the prescribed manner and not be damaged.5.1.11 In the working position, the hydraulic lift plunger must be securely fixed with a stop that prevents spontaneous lowering of the lift. 7.14 Lifts and stands must be tested in accordance with the established procedure. Testing of jacks and special lifts should be carried out with a static load greater than the limit by 10% for 10 minutes with the rod in the upper extreme position. Tests must be carried out annually, as well as after repairs and replacement of parts. For hydraulic jacks, the drop in fluid pressure at the end of the test should not be more than 5%. Traces 5.3.2.6 When carrying out maintenance and routine repairs, the raised edge of the vehicle must be installed on a safety stand made in accordance with the design documentation and tested in the prescribed manner using any lifting mechanism. When installing the vehicle body on safety supports (bollards, trestles), it is necessary to ensure that the safety supports are securely installed on the floor and that the body rests firmly on the working surface of each support. The supporting platforms of the vehicle body must be intact and without damage. 6.8 Rooms for vehicle maintenance and repair must be equipped with wheel chocks installed under the vehicle wheel, safety stands (traces, pedestals) and special stands for the shoes of the lift struts in accordance with the technological need. 7.17 Safety stands must be securely installed on the floor, and the vehicle body must rest firmly on the working surface of each support. The design of safety stands (traces, pedestals) must ensure reliability and stability during their use. The maximum permissible load must be indicated on the safety stand (tragus, cabinet). The use of safety supports (traces, pedestals) with traces of residual deformation is not allowed. It is prohibited to increase the height of the safety stands by adding foreign objects.