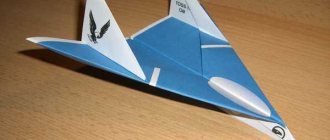
Cut out the airplane according to the template and glue it with your own hands
It is better to do modeling on a table designed for technical creativity. The foam should be cut on a flat surface; it is convenient to use a sheet of plastic or plywood. The sequence of actions is as follows:
- First of all, it is necessary to make drawings of the parts of the future aircraft model from foam plastic. Using the photo below, you can draw them on checkered paper. There are 4 types of parts in total, 3 of which need to be made in duplicate.
- When the drawings are ready, you can cut out the templates for the necessary parts.
- Next, we apply the templates to the foam tiles and trace them along the contour. As you can see, all the blanks, except for the main, largest one, need to be marked twice.
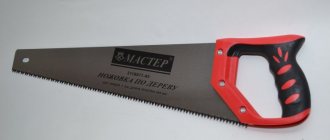
- The material is best cut with a stationery knife, and it is better to keep its blade almost parallel to the plane so that the edges are smooth. The result is details like these.
- No matter how perfect the cut is, in some places it is still necessary to correct our workpieces. Sandpaper will come in handy here, with which you need to process all the details.
- Now we take the tail parts, which have the shape of a rectangular trapezoid, and glue them to the back of the tail blank, parallel to each other. To secure them during the gluing process, you can use needles or pins. To dry quickly, place the workpiece on a radiator or in the sun.
- The remaining two types of parts also need to be glued together - long with long, short with short. For better fastening, it is better to compress them with clothespins. After this, they are also placed in a warm place to dry.
- While the parts are drying, you can make a slingshot to launch the airplane, which will serve as a motor. For this you will need a wooden stick and an elastic band. The stick should be round so that it is comfortable to hold, and its height should be about the size of a fist. You can use a regular elastic band, but it is quite elastic.
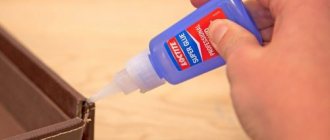
- You need to make a cut in the top of the piece of wood using a knife or saw. It does not need to be made too large, but the elastic should be inserted there with some effort. The depth of the incision is made no more than 1 centimeter.
- Now we put an elastic band into the resulting cut. If it pops out when pulled, you can secure it with glue.
- We take out the glued parts. Using the same sandpaper, they can be made absolutely even at the joints.
- Glue the finished parts to the base. At the top, where the tail guides are already glued, we place a shorter part; accordingly, there should be a longer part on the lower surface of the aircraft. They need to be glued strictly in the center of the model.
- We use an awl or a screwdriver to make a hole in the joint between the lower parts at the nose of the plane and glue a match there at an angle of approximately 45-60 degrees. The match head needs to be removed and may need to be shortened.
- Next, take a small piece of plasticine and glue it onto the nose of the plane to make it a little heavier in this place.
Here's what we did (video)
Next there will be a detailed article about the manufacture of this model. The aircraft is very easy to manufacture and repairable. In addition, the electronics it uses are from trainer models, which allows you to move from a “plane trainer” to an “aerobatic flight” without extra costs.
(downloads: 323)
The model drawing is in Excel format, just print it out and glue it together. Or even just draw on the ceiling with a marker along a ruler.
Materials:
- Ceiling tiles - Penoplex - Multi-colored tape - Wooden rulers - Bamboo sticks and skewers - Thin plywood - Steel wire - Tin - Joining tape for linoleum - Glue for ceiling tiles - PVA glue - Epoxy glue - Velcro
Tools:
- Utility knife - Metal ruler - Square - CD marker - Scissors - Jigsaw - Sandpaper - Needle files - Clothespins - Glue syringe - Electrical tape - Pliers - Screwdriver with drills - Heat gun - Iron
Electronics:
Wheels - and
Step 1. Minor changes to the drawings.
Since I made this model twice, I will give a list of changes that I made to the design.1. The fuselage was widened by 1 cm and did not narrow the nose to accommodate all the electronics and battery.2. The lower part of the fuselage was made of polystyrene foam (2 cm thick) to increase the strength of the structure.3. The wing was moved 15 mm closer to the tail so that the center of gravity was in the right place. And the wing itself will be without ribs - with several spars of different thicknesses.4. The landing gear on the first version was torn out twice, and therefore it was decided to strengthen the mounting location of the landing gear.
Step 2. Making the wing.
We mark on the ceiling with a marker for disks and cut out four rectangles measuring 155x470 mm with a cutter. On the inside we draw lines along which the spars will be glued. The distances between them are visible in the photo, but it depends on which wing profile you choose.
Step 3. Making the fuselage.
We trace the front part according to the template with a marker on a sheet of ceiling directly on the front side and draw an axis on which the engine, wing and stabilizer will be located. In addition, this line will be the border separating the colors when covering the model with tape.
Step 4. Making the motor mount and platform for the chassis.
We unravel the wooden ruler into slats 5 mm wide and begin gluing the frame with PVA glue in the drawing. The motor frame is made of 3mm plywood, the hole on it is for connecting the wires to the speed controller. We glue all the parts using a square. In the future, if necessary, it is better to tilt the engine by placing a washer under the motor mount, rather than gluing the motor mount crookedly.
Step 5. Tail.
I still had the stabilizer and fin from the first model, and then I didn’t think to take a photo of the process. But their production should not cause any difficulties.
Step 6. Covering the model with tape.
It is better to choose the color of the model based on the fact that this is a transitional model, from “trainer” to “pilots”. Therefore, it should be clearly readable in the air. We make the fuselage black on the bottom and red on top. We make the wing red below, white on top and add black tips. The tail unit is kept in the same color scheme.
First we cover the fuselage with red tape.
Step 7. Gluing the stabilizer and keel.
It is better to glue the stabilizer by placing the fuselage on a flat surface to control horizontality.
Step 9: Installing Electronics.
Using a needle, we “find” a wooden spar in the wing, apply the servo drive with the base, trace it with a marker and cut out the seat. Using a bent wire, we pull the ends of the Y-cable into the holes.
Step 10. Finishing touches.
We attach the cover of the electronics compartment with Velcro. To do this, we glue foam blocks with Velcro halves inside the fuselage, and glue the other halves onto the lid. We make a small handle from a paper clip, which will make it easier to pull the lid. From the inside, the paper clip is bent onto the bamboo and fixed with hot glue.
Model flight weight
= 640 grams. If you remove the landing gear, you can lighten the model by 50 grams. But even with the landing gear, the model behaves very well in the air - the engine is enough for simple aerobatic maneuvers. Later, when my piloting experience became greater, I added another fairing to the nose and cooker (you can see them in the first photo), but there is no point in doing them for novice pilots, since this lengthens the process of creating an aircraft by at least a day.
Flight videos:
The polystyrene foam flying model needs to be customized
Now we can customize our foam homemade airplane. To do this, you need to run it several times to identify problems and fix them. If the airplane model is descending quickly, you need to remove some plasticine or bend the edges of the rear parts of the model (they are painted in red). If after this the foam model begins to loop, they should be lowered on the contrary.
If during flight the aircraft makes spiral rotations around its axis, you need to bend the rear end of the wing towards which the rotation occurs. When an airplane makes sharp turns during flight, you need to bend the back of the parts in the form of a trapezoid in the direction opposite to the turn. Upon completion of the setup, we will receive a completely finished aircraft, which can be launched using the slingshot we made.
Having gained the necessary modeling experience, you can build a more complex version of the airplane from foam plastic according to the recommendations in the following video. In this case, it is clearly demonstrated how to debug the flight of a model in practice.
Required materials
To assemble a model aircraft you will need the following materials:
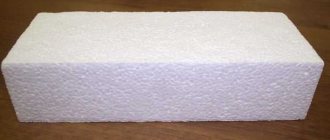
- thin sheet of foam plastic, you can use ceiling tiles;
- foam glue;
- model knife;
- ruler;
- pencil or marker;
- cardboard;
- sandpaper;
- sharp scissors.
The adhesive for polystyrene foam must be selected so that it will not deform or destroy it. It can be "Titan" or "88" glue. The sandpaper should have a minimum grit to remove only a small layer of foam during the sanding process. You can use a simple pencil to draw contours, but the marker will be more visible. Additionally, you will need a glue stick to transfer the drawings onto cardboard.
What is polystyrene foam?
Foam plastic is a class of materials that are foamed (cellular) plastic masses (Gas-filled plastics).
Since the bulk of the foam is gas, the density of the foam is significantly lower than the density of its original raw material (polymer). This determines the relatively high thermal insulation (convection flows are practically impossible in a single cell) and sound insulation (thin and relatively elastic cell partitions are a poor conductor of sound vibrations) properties of materials of this class. Foams were obtained from almost all the most widely used plastics (polymers), so the most well-known materials of this class are: polyurethane foams, polyvinyl chloride foams, phenol-formaldehyde, urea-formaldehyde foams and polystyrene foam. Depending on the composition of the raw material and its processing technology, it is possible to produce foam plastic of different densities, mechanical strength, and resistance to various types of impact. These factors determine the choice of a specific type of foam for use in certain conditions and purposes.
In everyday life, people most often encounter this type of foam, such as pressless polystyrene foam (invented by BASF in 1951). Styrofoam granules (PSV/EPS) are produced by polymerizing styrene with the simultaneous addition of a pore-forming substance (pentane). PSB-S foam (expanded polystyrene, styrofoam) is a well-known thermal insulation material, 98% consisting of gas contained in microscopic thin-walled polystyrene cells
Creating elements
To start the process, you will need to print out a drawing of the aircraft parts, which is shown in the illustration above. On some aircraft parts there is a number indicating the number of elements that will need to be manufactured later.
After the drawing is printed, you need to carefully cut out each part. To make it easier to transfer them to foam plastic, you will first need to glue each of them onto a sheet of cardboard and cut it out again. This will increase the strength of the part and make it easier to work with. You need to glue the airplane part onto the cardboard using PVA glue or a glue stick. The second method is preferable, because in this case you do not have to wait for the glue to dry.
After all the parts of the aircraft are glued to the cardboard, they can be attached to the prepared sheet of foam plastic and secured with pins so that the part does not move during the process of repeating the contour.
It is worth placing the parts as tightly as possible in order to rationally use the foam. The remaining part can be used for another aircraft model.
The easiest way to cut out airplane parts is with a model or stationery knife, precisely guiding it along the drawn contours. If the child is not old enough, then he should perform such work only under the supervision of adults, so as not to injure himself. The number of parts is cut out in accordance with the instructions on the drawing. Rounded elements can be cut out with scissors or a burner, if the latter is available.
Assembly of the structure
Once all the elements are ready, you can begin assembling the product. First of all, on the fuselage, mark the place where the stabilizer will be installed. The corresponding mark is on the drawing, so you can simply transfer it.
Next, use a knife to make a slot along the mark, which should correspond in size to the width of the stabilizer. A small amount of foam glue is applied to the stabilizer and it is installed in place, as shown in the photo above.
The next step to assemble the aircraft is to glue the parts with the cabin on both sides to the base. There should be two of them, and they are distinguished by the presence of a protruding element on top. The glue must be applied in a small layer over the entire plane of the elements to achieve good adhesion.
Parts without a cockpit are glued on top of the elements with an aircraft cabin. There should also be two of them and they differ from the previous ones only in the absence of a corresponding protrusion. This is done in order to increase the overall thickness of the aircraft for better aerodynamics.
Using a cardboard cutout, a mark for the location of the wing is transferred to the aircraft body. A through cut is made using a knife along the mark. Its size should not exceed the thickness of the sheet so that it can be well fixed inside.
The wing is initially not inserted all the way. This is done so that it can be smeared with glue on both sides; only after applying the glue can the wing be aligned the way it should be installed.
In order for the model to have better aerodynamics, it is necessary to get rid of sharp corners. A stationery knife and fine sandpaper will help with this. First of all, the corners are carefully cut with a knife. The layer should be minimal so as not to damage the structure. After this, you need to sand the product with fine sandpaper to give it a finished look.
The model will be launched using a special fixture. Therefore, it is necessary to make a small trigger for it. To do this, you will need a piece of skewer, which is fixed directly in front of the wings at an angle of 45 degrees.
The nose of the aircraft is additionally covered with glue. This will give it more rigidity, and the front part will not be deformed when dropped. In addition, this will create additional weight for balancing.
The launch catapult is assembled from a fishing elastic band, a small stick and electrical tape.
The elastic band must be folded into a loop, as shown in the photo, and secured to the stick with electrical tape. Before launching the model from the catapult, it is necessary to ensure that the aircraft glides. It is manually run several times to determine which part needs to add weight to make the model glide.
To start the model, you need to insert part of the skewer into the elastic band, tighten it and release it. You need to launch the plane parallel to the ground, this will give lift and it will take off. If you launch it upward, it will fall into the ground. To make the model easier to find after launch, you need to paint it in bright colors that will not blend in with its surroundings. The full assembly video is posted below.
How to make a plane from foam plastic: modeling with children
Often children, engaged in creative modeling, ask their parents how to make a plane out of foam plastic. In order not to get confused in such a situation and not to lose authority in the eyes of your child, you need to read this article and remember the simple sequence of actions.
Drawing a sketch
How to make a plane from foam plastic? To answer this question, you must first look at the analogues of flying machines. The main feature of designers is observation. Therefore, before you start making an airplane, you need to find out what it consists of. If parents help a small child (under 7 years old) in modeling, then you can get by with primitive shapes such as the fuselage, wings and tail. If a child is over 7 years old, then he can study well, and most importantly, understand the design of a flying machine. Any aircraft consists of:
- fuselage;
- cockpit canopy;
- power plant;
- outer and inner flaps;
- wing;
- chassis;
- stabilizer;
- elevator;
- keel;
- rudder.
It is not necessary to show all these details in the future model, but even a novice designer needs to know them.
The next step is drawing drawings. They are presented in large numbers on the Internet, one example can be seen below.
But, of course, you can show your imagination and draw your own unique plane.
What tools are needed?
Lumpy foam or foam ceiling tiles. The tile is more convenient in the sense that it is easier to cut, and its width will be the same throughout the entire part. The undoubted advantage of piece foam is the fact that you don’t need to buy it. Almost every person has it in their home and is great for children's crafts.
Stationery knife or scissors. If a child independently looks for the answer to the question of how to make a plane out of foam plastic, then it is better to give him scissors. If the creative process will be controlled by parents, then it is better to use a stationery knife.
Glue. You can take regular PVA, it is suitable for gluing foam. But if you want to assemble a model airplane quickly, then it is better to use Moment glue or its equivalent.
Paper or cardboard for patterns.
Additional details. Their number and name will depend on the type of aircraft you want to assemble. This may include paper clips, skewers and rubber bands - this is necessary for a model airplane with a rubber band motor.
You may also need a radio-controlled motor (for example, from an old radio-controlled car). If you are wondering how to make an airplane out of foam and wood, then you will need sheets of plywood, which will later become wooden parts.
Preparatory work
How to make a plane from foam plastic that flies or has only a decorative function? For both options, you need to do some preparatory work. It involves redrawing drawings onto thick cardboard. This step is necessary to ensure that all patterns are preserved until the end of the work and even longer. If any part of the plane breaks, it will be easy to make it again if you have a pattern. The next step is making foam parts. You need to transfer the paper patterns onto the material and cut them out.
We make an airplane
How to make a plane out of foam plastic with your own hands? After making all the parts, you need to assemble them in the correct order. First of all, the wings are attached to the fuselage. They need to be glued clearly in the middle, otherwise the model will not have the correct balance. The next step is gluing the “tail”. The rudder, elevator and fin all need to be exactly in place, again for the model to have excellent balance.
Working out the details
To finally close the question of how to make an airplane out of foam plastic, we need to discuss the details. As with any layout, details play an important role. And it doesn’t even matter how far the plane departs from reality. Even a fictional model needs elaboration. The first step is to draw the pilots' windows and passenger windows. If you made a three-dimensional model, you can cut out windows to increase realism. Next we move on to drawing the doors. The main thing is to make them proportional to the model. A harmonious size can be derived based on the width of the finished windows. Next you need to think about the chassis. Many may say that “my plane is taking off, and therefore he removed them.” But even if this is so, the model still needs a hole where the landing gear is hidden during flight. Not a single plane will take off without turbines. Even in a flat model you need to mark them. This can be done by gluing small circles of polystyrene foam together. Well, the most enjoyable part of creating a foam model is painting the airplane. Here you can show your imagination, or you can follow the clear canons of real flight structures. No one will judge a child if he wants to make his airplane “flowered” or “polka dotted.” Well, realistic models do not require a large abundance of colors. It is better to leave the plane white, drawing a couple of colored lines on the fuselage.
fb.ru
Making aircraft models from ceiling foam
The idea is to build small (up to 1000 mm in span) models of electric aircraft without using scarce and expensive balsa - only from available domestic materials. It is desirable to minimize the time needed to build the model and to extremely simplify the process of manufacturing parts.
These requirements are met by the construction of models made of foam panels for finishing ceilings. The quality of the resulting models is no worse than balsa ones, maintainability is much higher, and repairs are easier. Most problems can be solved right on the field, with the help of tape. A balsa leading edge or spar that has broken across cannot simply be glued together, but foam plastic is simply glued end-to-end - be it the skin or other parts. Plus, foam plastic is not afraid of water (fine rain, for example), the weight of the model is the same, and sometimes less, than that of its balsa counterparts. And, of course, you don’t feel sorry for the plane if you crash it.
Materials
To build the models, square ceiling slabs made of extruded polystyrene foam are used (foam is the kind that bowls for Doshirak are made from, not to be confused with ball ones) with a size of 500x500 mm and a thickness of 3 and 4.5 mm, and there is also a size of 1000x150 mm.
To strengthen the edges and spars, threads drawn from a clothesline are used. Glue – NACET-R or “Titan”. Epoxy resin is too rigid and, when deformed, cuts the foam like a knife.
How much does all this cost? For example, eight ceiling panels cost 90 rubles in Moscow (enough for 3-5 models), a bottle of Titan glue 0.5 liters - 42 rubles (in three years of training with foam plastic models, I used up half the bottle), a roll of adhesive tape - 10 rubles ( enough for a dozen airplanes), and a coil of rope - 10 rubles (enough for more than one hundred models).
Airplane, electric and internal combustion engine – Parkflyer
About a year and a half ago, a friend (once he was involved in cord models) gave me an MK-17 engine.
For the photos and videos, I apologize, the quality is not always good, they were photographed and filmed mainly on a mobile phone. I had an idea to make this engine as a radio model. The remodel didn't take much time. The carburetor was taken from a worn-out MDS 6.5 engine.
And so, we got such a hybrid.
In general, this hybrid worked
Then, for this engine, I made a motor mount from scraps of duralumin.
I started building an airplane. First, the front part, to determine the size of the aircraft for further construction.
I decided on the size, it was obvious: an airplane with a meter wingspan. It so happened that the model was built around the engine. First the fuselage.
The wing forehead was cut out with a foam cutter from insulating foam. Front, rear edges and side members made of pine slats. The ribs are cut from packaging foam and edged with veneer.
Covered the model with floral lavsan. The tail unit is made of polystyrene foam and edged with a pine strip, covered with paper on top, covered with liquid PVA. And top coated with varnish. This is because the exhaust from compression engines is very caustic and will saturate the paper and eat the foam.
The front part of the aircraft is removable. The idea came to make a model in two versions: internal combustion engine and electric. I also built the front part for the installation of an electric motor.
Photo after the first flight
I flew on an electric drive, and I still fly on it now. With such a small internal combustion engine, I’m afraid to take off by hand, and we don’t have a platform for take-off. In the spring, at regional competitions, I will try to take off on the internal combustion engine version. There is a good asphalt runway there. And yet, I didn’t want to go on flights today (wind turbine, cold), so the boys pulled me out. And they filmed the flight on a mobile phone.
Here's the story. Thank you for your attention.
www.parkflyer.ru
Technology
Plates with a thickness of 3 mm are cut in half using 0.2 mm nichrome wire to a thickness of 1.5 mm, after which they are used as sheathing. I cut the spar and leading edge from 4.5 mm foam, and the ribs from 3 mm.
I cut foam plastic like this: I stretch a nichrome wire across a piece of fiberboard measuring 60x100 cm in the middle: on one side tightly, on the other through a spring, from the edges I place coins of the appropriate thickness under the wire, and then I connect the current source. I place the ceiling panel, another sheet of fiberboard measuring 50x50 cm on it and evenly guide this “sandwich” through the wire. It turns out two panels 1.5 mm thick - they are suitable for covering the wing.
Nichrome is heated by an regulated power supply with a voltage of up to 30 V. The voltage is selected so that the thread cuts the panel well and does not melt it too much when the movement of the foam stops during cutting.
Foam plastic tends to stretch, which is why a wing without threads will be flimsy in terms of twisting and deflection. The solution to the problem is threads glued along the spar (between the spar and the skin) and along the leading edge. They give the wing the necessary rigidity.
I take threads from clotheslines. The ropes are white, the material is some kind of synthetic, they are sold on every corner. They are a woven tube; the threads themselves are not twisted and do not stretch or spring at all - unlike simple threads.
If you take a ceiling slab and deform it, you will immediately notice that it bends much easier in one direction than in the transverse direction. This must be taken into account (and used!) when cutting out blanks for both the fuselage and the wing, stabilizer and fin. The panels can be bent on the edge of the table, like cardboard or paper.
A little about glue. It should be thick - the same as it is sold. I tried diluting it with alcohol and denatured alcohol - unfortunately, it doesn’t hold well when it dries, so I don’t recommend diluting it.
Assembly
Wing
Assembly is carried out in the following order. Grooves for ribs are cut into the spar on top - up to half the width. Grooves are cut into the ribs for the spar from below to half the width of the rib.
We glue the ribs to the spar and the leading edge. Then glue is applied to the spar with the ribs from below, and a thread is pulled along the spar. After this, spreading a sheet of sheathing on a flat table, we glue the frame to the sheathing - naturally, only to its lower part.
Once the glue has set, apply glue to the remaining surfaces of the ribs, the leading edge, the spar and the edge of the skin, which then forms the trailing edge. We stretch the threads along the leading edge, spar and trailing edge and, by wrapping the skin around the leading edge, we get a completely foam-covered wing.
We use long wooden blocks as a press. The evenness of the surfaces is ensured by the evenness of the table. In the picture: one half of the wing is under pressure, the second is in the process of gluing:
Type of finished wing halves:
After a couple of hours, when the glue has polymerized, glue is applied to the junction of the two halves of the wing and the halves are glued together, while the threads are tied together. A day later, when the glue has completely polymerized, the wing is ready:
Fuselage
The technology for manufacturing a contour fuselage is very simple. It is made of two plates 3 mm thick.
On one of them, on the future inner side, strips of 4 mm foam plastic are glued along the contour, and a solid plate of the same foam is glued from the nose to the wing spar. We glue the keel and one or two stringers into the tail section - from the wing to the keel. The material is the same.
The sidewall with glued power elements is coated with glue, and the second half of the fuselage is placed on them. We place the assembled fuselage under a press, which is a flat table and a flat piece of fiberboard.
This technology is intended for models with engines up to 300 inclusive. For models with a 400 engine, it is advisable to glue a pine strip with a cross-section of 5x5 mm along the fuselage, so that it extends from the engine mount through the edge of the cutout for the wing and the edge of the slot for the stabilizer.
For 280 and less powerful electric motors, the fuselage can be further simplified. The fuselage is cut out of a 3 mm foam plastic plate and a pine strip with a cross section of 4x5 mm is glued to the side of it. That's all!
If the length of the fuselage is more than 500 mm (longer than the ceiling slab), then the foam is simply glued end to end. The main thing is that then the internal foam inserts should be “spaced apart” from the gluing seams.
Finally, we cover the front part of the wing, the trailing edge and the tips with tape. We glue in the stabilizer. Then we hang with tape the rudders and ailerons cut from foam plastic plates.
That's all. We get something like this:
Yak-9T made of polystyrene foam at home. — Parkflyer
I was very lucky that I had a drawing of the plane at home on a small A4 sheet. Taking a sheet of whatman paper, a pencil, a ruler, a pattern, squares, a telephone, I began to enlarge all the dimensions from the small drawing to the required scale. After a couple of hours, everything I needed to start work was on the drawing, namely: Fuselage - side and top view, frames.
In the picture, the most important thing is hard to see, so I drew the necessary lines with a pen. Let's start preparing materials and assembling! I decided to use 50 mm thick foam plastic and cut it on a string. I cut a blank for the sidewall (from stock) from a thick sheet, and began cutting on a string. The thickness of the side fuselage and its reinforcements should be made of 10mm thick foam plastic. But I somehow ended up with a thickness of 12 mm... I’ll have to make the frames smaller in width so that the overall width of the fuselage remains required. I also immediately cut off the gargrot blanks for the fuselage. I will glue them to the top and bottom of the fuselage and round them off. Using this technology, the correct shape of the fuselage is obtained, and most importantly, the strength that will be needed in air combat increases. The photo shows almost all the materials that are needed to make the fuselage. The only thing missing is the rear lower trim, I will make it from ceiling foam. And I’ll make the first motor frame from 4 mm plywood. Now I’ll start transferring the dimensions from the drawing to the foam sheets. I think everything will be clear from the photographs.
Mirrored and on the second side.
Now the sides can be put aside. Let's start with the reinforcements for the forward fuselage. They are also made of 10 mm foam.
Now you need to glue them to the nose of the fuselage. They coincide along the external contours. While the sides were drying, I started making the frames. It took them about 15 minutes maximum. So far I have only made the second and third frames, because for now only them need to be glued. The first frame can be glued already with the motor, and when the upper gargrots are glued. The photo shows glued reinforcements and cut out frames. I also decided to mark the cutout for the wing now.
Now you can glue the two sidewalls and frames together. It is very important that all center lines coincide. Especially in the tail, so that the sides are without distortions. The glued fuselage looks like this:
.Now you need to glue the back of the sides together to form an acute angle. First they need to be sanded. You need to glue it very evenly. If you glue it crookedly, you will have to correct it by tilting the keel in the opposite direction, but this is of no use.
After the glue has dried, we need to prepare the upper back part for gluing the graffiti. I sanded it so that the surfaces of the sidewalls were perfectly smooth and there were no dents. A piece of penoplex was prepared for the gargrot. I spread the glue, waited a minute, applied the gargrot blank, set it up, secured it with pins in several places and loaded it. The fuselage with the gargrot glued on looks like this...
I don’t know why it’s gray underneath. I've photographed it many times, but it's still the same. Otherwise, there is nothing related to the construction of the aircraft. Now I glued the front upper gargrot. It is also made from the same foam. Only the thickness of the workpiece was slightly smaller.
When the glue dried, I started gluing the lower front gargrot. There the workpiece was thickest of all. When it stuck, I cut off the extra pieces of foam and sanded everything under the face with the sides.
I decided in advance to cut out space for the cabin. I made 2 plywood templates according to the drawing, placed them on the sides in the right places, and simply cut them with a foam cutter. Unfortunately, I forgot to photograph this process. Now my favorite, albeit very dusty, process is the process of giving the fuselage the shape of the fuselage. I start with the rear gargrot. First, I cut the foam a little with a knife, then I shape it with coarse sandpaper, then fine sandpaper. The same goes for the front gargrots. When I have treated all the gargrots with coarse and fine sandpaper, I treat it with scratch paper so that everything is smooth. The non-rounded fuselage weighed 85 grams, at the moment it weighs only 62. It began to seem much smaller in volume.
Now all that needs to be glued is the rear lower skin of the ceiling tiles, and the fuselage is already completely covered. While the skin was being glued, I worked on the stabilizer and elevator. They are made of 7mm foam. A 7*4mm balsa strip was glued to the rear edge of the stabilizer, and a strip of the same section was glued to the leading edge of the elevator. The stabilizer needs to be glued very evenly, otherwise the plane will tilt to one side. Unfortunately, I don’t have the process for making the fin. I think everything will be extremely clear this way. I found wings from another fighter, which randomly coincided according to the drawing with the wings that I wanted to make, although each of the consoles is 10 mm shorter than I need. No problem. I glued the wingtips, which I later rounded, and gave the wing its shape.
They already had balsa ailerons, although they were mounted terribly. I took them off. I will attach the ailerons when the 2 halves of the wing are already glued together. On one part of the wing you can see a plywood corner that holds the 2 halves together. It is made from 2 mm plywood. Has a V-shape. The next day I decided to glue the cockpit canopy. It was made from a bottle. Now you need to make fastenings for the wing. It was decided to mount the wing with elastic bands. I took 2 pencils and cut them to the length I needed. I glued them into the sides. Unfortunately, there is no further manufacturing process. I only made mounts for the servos, glued the 2 halves of the wing and hung the ailerons. Now my favorite process is painting. I found white acrylic water-soluble paint for radiators at home. On the mug, the manager gave me black and blue paint (also acrylic). He poured white paint into 3 jars and added the desired color to each of them. We needed light gray, dark gray and blue. I will paint it as shown in the picture below. Pretty simple camouflage.
It took 2 hours to paint (not counting the paint drying). Acrylic water-soluble paint does not take long to dry. I also noticed that there are streaks on the ceiling after the first coat of paint. I sanded it a little with scratch pad and covered it with another layer of paint. It turned out pretty good.
I did not describe the process of making steering rods, everything is elementary, from 1mm wire. Electronics that are installed on the aircraft: The motor is: Brushless motor 2210N 1000Kv Product https://www.parkflyer.ru/ru/product/8621/ Speed controller: Hobbyking SS Series 25-30A Speed controller (card programmable) Product https://www.parkflyer.ru/ru/product/6458/
Servo mechanisms: HXT900 (9-gram micro-servo) Product https://www.parkflyer.ru/ ru/product/662/
Battery: Turnigy nano-tech 2200mah 3S 45~90C Lipo Pack Product https://www.parkflyer.ru/ru/product/1082173/
But this is better: Battery ZIPPY Compact 1500mAh 3S 25C Lipo Pack Product https://www.parkflyer.ru/ru/product/401690/
Propeller: APC Style Propeller 9×6 Bone (1pc) Product https://www.parkflyer.ru/ru/product/5439/
Propeller mounting: Propeller adapter (long, collet) to 3mm shaft Product https://www.parkflyer.ru/ru/product/382048/
Radio equipment: Turnigy 9X transmitter (Mode2 - throttle LEFT, 9 channels, version 2). HF module and receiver (8 channels) Product https://www.parkflyer.ru/ru/product/8992/
And so, now probably the most important problem of such models... If the Center of Gravity moves even 5 mm back, then the model will be very unstable. The flyby proved this. The plane flew around the stadium. During startup, the battery apparently moved backwards, which caused a shift in the CG. But that didn't stop me from flying well. The landing was planned, but not very successful. However, this is a fighter, and she was not harmed in any way (I was very surprised and happy). After the first flight, I went to a circle, stuck burdock on the battery and the side of the fuselage, and the battery held up well. To be safe, I prop it up with a piece of foam. Well, now the video: I apologize for the quality of the video, and for the fact that it was filmed vertically. I wanted to shoot another video on the same day, but it was already dark and I couldn’t see anything on camera. With a well-secured battery, the model flew just great. I didn't expect such a result. The speed was very high, it was even scary to give full throttle. Very stable. Thank you for reading or watching my writing to the end. This is my first article about building an airplane. If people are interested, I will write about other buildings. Sincerely, Andrey 15 years!
www.parkflyer.ru