Register Login
Publication date: November 6, 2019
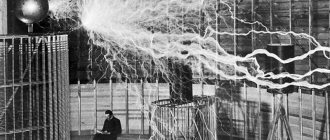
The beginning of the 20th century confronted scientists with the need to look for ways to obtain and accumulate huge amounts of electrical energy, sufficient to run massive machines and mechanisms. History has preserved information about numerous studies and scientific developments, some of which were frankly unsuccessful, while others, on the contrary, made us talk about themselves from the point of view of scientific and practical interest. Among the latter are the works of Robert Van de Graaff, who created an electrostatic generator with a unique design. Several million volts of electrical energy is more than enough, especially since we are talking about the 30s of the last century, when the world was shaken by loud military and revolutionary cataclysms that hindered the development of science. For some time the inventor reaped the benefits of his fame, and his generator found wide use as a linear accelerator. But after a short time, the bulky device was replaced by more compact and powerful models, relegating its prototype to the background of history and practical physics.
Later, Van de Graaff's invention was named after him and even found its modest practical application - demonstrating experiments on particle acceleration and energy storage. And the foundations laid by the inventor were used as a basis for improving accelerators for the purpose of their practical application.
Operating principle of a Van de Graaff generator
The Van de Graaff generator is one of the first linear accelerators. Nevertheless, anyone with even a little knowledge of electrical engineering can reproduce its current model.
The generator consists of two spheres to which positive and negative charges are applied, a dielectric looped tape stretched over 2 rotating rollers (upper and lower), two electrodes in the form of brushes located near the rollers, with the upper electrode closed to the inner surface of the sphere, and the lower connected to a high voltage source.
The device begins to work with the rotation of the tape stretched over the rollers. The top roller is made of dielectric material, and the bottom roller is made of metal with grounding. The upper electrode is connected to a metal sphere, and the lower one, connected to a high voltage source, ionizes the surrounding air and creates positive ions that “stick” to the moving belt.
It, like a conveyor, “delivers” positive charges “up”, where they are removed from the roller by a brush electrode, transferring them to the inner surface of the sphere, where the charges accumulate.
At the same time, negative charges accumulate on the other sphere. As soon as the accumulated potential reaches a critical level, an electrical discharge occurs.
At the dawn of the nuclear age, the Van de Graaff generator was used for a time as a linear particle accelerator. But his active scientific “career” did not last long. Very soon, accelerators of a new generation appeared, incomparable in power and capabilities with their predecessor.
However, unlike its “peers”, electrical devices from the middle of the last century, written off as scrap, the Van de Graaff generator leads a rather active life. From leading research centers it moved to school physical classes and institute laboratories, becoming, for example, an indispensable teaching tool for modeling natural discharges in a gaseous environment.
Perhaps one of the most famous experiences is called the “hair-standing experience.” To do this, you need to stand on a rubber mat or wooden board and touch the switched on Van de Graaff generator. Those with voluminous hair are in for a surprise worthy of a photo and subsequent posting on Instagram.
Operating principle
The design of the generator allows it to be made both horizontally and vertically. Its main part is a large metal sphere, on the surface of which charged particles accumulate. Inside the housing made of insulated material there are two rollers connected to each other by dielectric tape. It was originally made of silk and rubber, and was later replaced by a chain.
The lower roller is grounded and connected to the small sphere, and it also has a drive for rotation. The upper roller is connected to a large sphere through a metal brush.
As the lower roller rotates, the air ionizes, followed by the transfer of charged particles to the upper roller. Through a metal brush, a stream of ions is transferred to the surface of a large sphere, where it accumulates in the form of an electrostatic charge.
The power of the Van de Graaff generator is limited by the corona discharge, which creates a luminous shell around the charged electrode.
How does a Van de Graaff generator work?
The basis of the Van de Graaff generator is two spheres to which positive and negative charges are applied. Two rotating rollers serve as the basis for a dielectric tape connected into a ring. The upper roller is made of dielectric, the lower one is made of a grounded metal alloy. Near the rollers there are electrodes in the form of brushes, one of which is closed to the inner part of the sphere, and the other is connected to a source of relatively high voltage.
The principle of operation of the Van de Graaff generator is clear even to a schoolchild. Rotation of the tape stretched over the rollers starts the device into operation. The lower electrode, receiving a high voltage current, ionizes the air and creates positive ions that stick to and accumulate on the moving belt. Acting on the principle of a conveyor, the tape delivers positively charged particles to the top of the device, where they are removed by a brush electrode. With its help, the accumulated positive charges are transferred to the inner surface of one of the spheres, where they are further accumulated.
At the same time, negatively charged particles accumulate on the other sphere. As soon as the number of positive and negative charges reaches a critical level, an electrical discharge occurs. Its value directly depends on the duration of operation and the geometric parameters of the device. Thus, Van de Graaff personally managed to obtain about 7 million volts of energy from his invention, building a device of quite impressive size that impressed the inventor’s contemporaries. The models that decorate school laboratories today deliver several hundred volts. This is quite enough to demonstrate the merits of an invention that has learned to collect and accumulate charged particles from the environment.
Operating principle of the generator
Rotation of a vertical dielectric paper tape is observed inside. The roller located at the top is dielectric, and the one at the bottom is metal and connects to the ground. The brush electrode of the sphere is responsible for removing and supplying charge, which is evenly distributed in it. Near the lower electrode, ionization of air masses occurs, useful ones will settle on the tape, and the upper part will begin to charge.
To obtain a high potential difference in linear particle accelerators (it is for this purpose that a similar generator was developed), two spheres with unequal charges are used. One collects positive ones, and the other collects negative ones. At a certain concentration, an electric charge jumped through. It was he who was studied. The voltage could be several million volts.
Previously, devices were used in nuclear research and particle acceleration. After the emergence of other methods for solving these problems, their use decreased significantly. Nowadays, such generators are used for modeling. For example, they help simulate natural gas discharges. But the tapes have now been replaced by chains with plastic and iron links placed alternately.
Design and principle of operation
The generator design can be vertical or horizontal. The most common is a vertical installation. This generator includes:
- an endless dielectric rubber or silk tape moving at a speed of 20-40 m/s on 2 rotating pulleys;
- 2 pulleys. The lower pulley is made of metal and is rotated by an electric motor, and the upper pulley is made of a dielectric, such as acrylic glass;
- a hollow metal electrode in the form of a hemisphere, inside of which there is an upper pulley. This electrode is mounted on an insulator;
- high voltage source.
The lower pulley is grounded. A high voltage is applied to the electrode located near this pulley. Electrodes made in the form of a brush or comb are installed at a short distance from the upper and lower pulleys. The upper electrode is connected to a hollow hemisphere.
Operating principle of the device
Under the influence of high voltage, positively charged ions are formed in the air layer located between the lower brush electrode and the lower pulley. These ions are attracted to the metal pulley, deposited on the dielectric tape and transported to the hollow hemispherical electrode. Using the top brush electrode, these ions are removed from the tape and fall onto the surface of the spherical electrode. Over time, charge accumulates and the potential of this electrode relative to the ground increases.
The maximum value of the resulting voltage is determined by the discharge voltage that occurs around the spherical electrode as a result of ionization of the air surrounding the electrode. As the diameter of the sphere increases, this stress increases.
To increase it in installations with a relatively small sphere, the device is placed in a hermetic housing, which is filled under a pressure of 20 atmospheres with gases with high electrical strength. These gases include nitrogen, freon and other gases. This housing, made of insulating materials, also serves to ensure the safety of people.
Tandem generator
The tandem generator consists of 2 stages. In such a generator, negative ions are created that fly towards an electrode located at a high positive potential, located in the middle of a gas-filled vessel. Passing through the channel inside the electrode, negative ions with an energy of 10 MeV give up their electrons and turn into positive ions. Next, the beam of these positive electrons moves towards the electrode, which has zero potential. Thus, it is possible to obtain a beam of protons with double the energy.
History of creation
American physicist Robert Van de Graaff (1901-1967), who worked at Princeton University, went down in history as the creator of the electrostatic particle accelerator.
The first description of a Van de Graaff generator was made in 1929, and two years later he created a high-voltage accelerator that could produce an electrical voltage of 1 MV. In 1935, the improved design already produced 7 megavolts.
The Van de Graaff generator later became the basis for a modern type of linear accelerator called a pelletron. The difference between them was the method of transmitting charged particles. If in the generator they were transmitted using a dielectric tape, then in the pelletron they were transmitted by a metal chain.
Purpose and characteristics
The first generator of this type produced a voltage of 80 kV. Subsequently, the inventor obtained voltages of 1 MV and 7 MV. In this case, the voltage of the primary source was 50 kV.
Modern installations make it possible to obtain a voltage of 20 million volts using this generator. Tandem installations are used for this. In this case, the current in the beams can reach several mA, and the particle energy can reach 40-50 MeV.
To produce particles with higher energy, more powerful installations are used - cyclotrons, colliders.
The most powerful Van de Graaff generator was used in the English Daresbury laboratory, where nuclear experiments were carried out from 1983 to 1993. The installation used a tandem generator developing a voltage of 20 MV. This generator was located in a building 70 m high. The most important discovery made with the help of this installation was the discovery of superdeformed nuclei.
Before the war, the Soviet Union also built a large generator of this type. Metal balls with a diameter of 5 m were installed on 2 porcelain insulators. The voltage between the balls reached 15 MV. During the discharge, lightning 15 m in size appeared. At the same time, the charging time reached 10 minutes, and the average power of the installation was less than 100 W.
Generators for experiments and education
Van de Graaff generators can be used to conduct experiments in the fields of physics and electrostatics. At the same time, a large number of generators are available for sale. There are also many different diagrams and designs on the Internet for making a generator yourself.
An example of such a device is a generator produced by the German company 3B Scientific GmbH. The price of such a device is 104,076 rubles.
Main characteristics of the device:
- the generated voltage is about 100 kV;
- short circuit current - 15 µA;
- motor power supply from AC mains;
- power consumption -13 VA;
- dimensions -240x120x620 mm;
- ball dimensions – diameter 90 mm, height 420 mm;
- generator weight -5.8 kg.
When working with this device, you must comply with a number of safety requirements:
- This device may pose a danger to people who are close to the device and have a pacemaker.
- It may cause RF interference to computers and other electronic devices.
- Do not use the device in damp areas.
- Do not touch the device circuits.
- The device can only be plugged into a grounded power outlet.
- When replacing a fuse, be sure to disconnect the device from the mains.
Ultrasonic emitter
You can independently build an infrasound emitter that will not cause any harm to the human body, but the unwanted neighborhood will become less noisy after its use.
Ultrasound design
The scheme is as follows: the simplest generator for creating oscillations is started from a coil, which is located in the speaker for sound. The relay is needed to start the capacitor. If you push the speaker to produce sound, it turns off completely.
Next, the circuit begins to operate at the resonant frequency of the coil. We also need transistors that will be low-frequency and produce a certain sound power. A nine-volt power bank from a non-working modem is used as power supply.
Resistors R2 and R4 are volume controls. The circuit operates on a pendulum resonance. However, all the electrics take about two watts, but the output is about twenty, so the speaker does not work without them.
Any audio woofer will do. A prerequisite is to install it in a housing, since in this case an acoustic “short circuit” is eliminated. The body shape is perfect for a saucepan. When using a jigsaw, the ears of the speaker for sound are cut off, then it is stuck into a bucket and glued together around the perimeter with a “moment”.
Setting up an infrasound device
Initially, the entire system is assembled on a table and all electrical components are checked. Initially, this must be done without a weighting agent. Once turned on, the speaker should begin to hum at its resonance frequency.
If it doesn’t work right away, you should work with the capacitance of the capacitor. Then the whole device is assembled into a pan, all the cracks between the speaker and the body are glued with a “moment”, and then the spiral of the weighting agent should be coated with glue and glued to the speaker diffuser for sound.
If it is not possible to find a normal purity meter, you should set the ultrasound frequency to 13 Hz using an oscilloscope and a low-frequency generator based on the Lissajous figure. Then turn on the power to test for a few seconds to see what happens. Next, the device turns off and begins cutting the weighting spiral until a double Lissajous is obtained.
Where is the generator used?
Initially, the device was used to accelerate charged particles, but over time, more advanced accelerators appeared, and the need for it disappeared. Currently, experiments with a Van de Graaff generator are carried out mainly to simulate the processes occurring during lightning discharges.
In modern schools, this device is standard equipment in physical classrooms. The generator was not produced in the territory of the former USSR. In schools, Wimshurst's electrophoric machine was used for experiments, which was later called “Discharge”.
The ability of the generator to produce discharges is used in various show programs and circus tricks. It can create a field that holds small objects in the air, and a powerful charge allows electrical devices to operate far from a source of electricity.
Precautionary measures
Like any device that produces high voltage, the Van de Graaff generator requires precautions when working with it. The discharge does not matter where it occurs: between oppositely polarized electrodes or between a charged electrode and the human body. A significant difference in potential is enough. Therefore, when working with a generator, a person must be on a rubber mat so that its potential remains neutral with respect to the accumulated charge.
If a person is on the floor, especially on a damp one, then he will become an excellent conductor for transmitting charged particles to the ground, and a discharge of several thousand, and maybe millions of volts will pass through his body. The only thing that can allow a person to stay alive is a low current strength.
People with pacemakers should not approach the generator. Electronic devices such as watches and cell phones may malfunction. Therefore, before starting experiments, you need to leave them aside.
Neighbors are doing renovations
All repair work is a separate topic. When carrying out work using a drill, a person honestly thinks that he is not doing anything wrong, since it is working time, and therefore the law is not being violated.
But in some cases, this kind of noise can disturb an old woman who has a migraine and wake up a small child. In this case, you cannot complain, since the law has not actually been broken.
If the person is well-mannered, then you can independently decide on the time for him to carry out the noisiest repair work, which will give you the opportunity to go for a walk with your child during this period of time or not to go to bed at this time, but simply reschedule it.
Generator assembly - what to do before starting work
Generator elements, such as belts, pulleys, and a sphere, attract dust to themselves like a magnet. Before starting work, you need to clean the mechanisms. To do this, you need to remove the large sphere and wipe the parts of the device with a damp cloth. If the accumulated charge does not allow you to get rid of dust, then you can use an antistatic hair spray.
The most important thing to do before starting to rotate the generator is to make sure that the small electrode is grounded. Otherwise, the discharge will hit an object with a larger mass, that is, a person.
How to assemble a generator at home - necessary materials
Now that the operating principle of the Van de Graaff generator is known, you can independently assemble a working model for home experiments. After some testing, it turned out that PVC pipe for water supply is best suited for producing charged particles. If you rub it with a synthetic material, the charge that appears in it will allow you to attract small pieces of paper and deflect the stream of water falling down. Therefore, the PVC pipe will become a source of charged particles.
What will transfer electrons to the generator sphere? Experiments have shown that a Martens medical bandage is best suited. It is composed of polyester, latex and cotton fabric.
Now that we have decided on the main working parts, a complete list of necessary materials is compiled:
- Large metal sphere. It is made from two large salad bowls, sold in the nearest hypermarket.
- PVC pipe. You will need 2 pieces of different diameters. The first will become the generator housing, and the second must be selected in such a way that it fits tightly onto the pulley connected to the drive.
- Upper pulley. You can use any suitable object to hold the tape without coming off. For example, an old bicycle wheel hub or a large plastic spool with sides.
- A piece of copper stranded wire. Brushes will be made from it that remove and transmit the charge.
- Low-power electric motor. Required to rotate the lower pulley. However, if desired, the drive can be made manually.
- Metal strips for supporting the generator, as well as for fixing the pulleys on the PVC pipe.
- Metal ladle. It will act as a small electrode.
Do-it-yourself Van de Graaff generator: necessary materials and assembly sequence
To assemble a Van de Graaff generator with your own hands, you will need the following materials:
- Regular pencil;
- Old pasta;
- A piece of PVC pipe;
- Burnt out light bulb;
- A long piece of elastic;
- Aluminum foil and tape;
- 9 volt battery;
- A small wooden plank as a base.
To assemble a Van de Graaff generator, you need to connect all the listed materials and accessories as follows:
- A hole is made in a wooden board for a PVC pipe. To accurately make a hole, use a drill with a suitable sized spade bit.
- Two through holes are made through the tube. They are necessary for placing and tensioning the elastic. The distance between the holes should be such that the rubber band is taut, but does not slow down the operation of the generator with its difficult rotation.
- Two additional holes are made in the tube: the first is slightly higher than the previous one on the same axis, the second is perpendicular to the bottom.
- A piece is cut out of the old hardened paste that fits the diameter of the PVC tube and protrudes from it no more than 1 cm. The first roller is ready.
- The second roller is made in the same way.
- The dielectric film is assembled. It can be made from adhesive tape and an elastic band: cover the elastic band with adhesive tape or simply put it on top to press it against the rollers.
- The design of a minicopy of the Van de Graaff electrostatic generator is ready for assembly. To securely fasten individual parts, it is allowed to use superglue.
- All that remains is to add brushes to collect charged particles and redirect them into the sphere. The lower brush passes through a hole in the bottom of the device, the upper one is fixed above. Both brushes should be close to the rubber band that collects and transports the charge, but not touching it.
- An old non-working light bulb is covered with aluminum foil. The upper wire is connected to the metal surface of the resulting sphere, after which the lamp in foil is fixed in the upper part of the structure.
The device is ready for testing and operation as a static electricity storage device. It is recommended to test and demonstrate it while standing on a rubber mat to avoid electric shock.
Do-it-yourself Van de Graaff generator assembly
When all materials are prepared, you can begin manufacturing:
- Make a rectangular base for the generator from metal strips. It must be done in the shape of a square. The dimensions must ensure the stability of the structure. It is also necessary to provide mounting for the electric motor.
- Attach the lower pulley to the motor shaft. Its working surface should be covered with a piece of PVC pipe, which is cut to the width of the Martens bandage.
- Attach the electric motor to the platform so that the pulley is in its center.
- Attach a PVC pipe with a diameter of 150 mm in a vertical position above the pulley. Its length should be 50-60 cm. To make it easy to remove and put on the tape, you need to make an axial cutout 4-5 cm wide on the pipe.
- A second pulley must be installed on the top of the vertical pipe. This is done using fastening brackets.
- Make a sphere from salad bowls. To do this, cut a hole in one of them in the lower part exactly according to the diameter of the pipe. To the same salad bowl around the perimeter you need to solder several staples that will hold the second half.
- Make a brush from stranded wire. To do this, remove the insulation on a length of 2-3 cm and separate the bundle into separate wires. One end of the brush must be secured so that it touches the upper pulley, and the other end must be soldered to the sphere.
- To make an electrode from a ladle, you need to connect the handle to the metal base of the generator and ground it. The handle must be insulated. The same PVC pipe of small diameter is suitable for this.
The prototypes of the Van de Graaff generator in the photo taken a hundred years ago differ little from the device made by hand. Now that the device is completely ready, you can begin the experiments.
Making a Van de Graaff generator with your own hands - step-by-step diagram with photos
Generator assembly process:
Step one. Assembling the generator housing The generator housing consists of PVC pipes; a wooden stand is used as a base. First you need to take the base and glue a piece of plastic pipe 5-7 cm long to it (the diameter of the pipes used is 3/4 inch). Next, a PVC plumbing tee is put on this pipe. Thanks to this design, the device can be easily disassembled if you need to replace the rubber band or carry out any other work inside.
Now you can install the engine; it is inserted into the tee hole and positioned horizontally. If it turns out that the diameter of the motor is too small, it needs to be wrapped with electrical tape; it must fit into the tee body with some effort. In order for the motor shaft to interact with the rubber band, you need to put a piece of tube on it. An ampoule of a helium pen or, best of all, a soft rubber casing from a wire will do; this will provide excellent adhesion to the tape.
After installing the motor, you need to take a drill and drill a small hole opposite the motor shaft. Then you need to insert a piece of stranded wire into it, frayed at the end. It will remove an electrical charge from the tape. The wire can be secured using hot glue or tape. Now all that remains is to put a rubber band on the motor shaft and pull the other end out through the top. After this, you can move on to the next stage.
Step two. Making the second axis Now you need to take another piece of PVC pipe and cut a piece of 5-7 centimeters from it, it will be inserted into the upper part of the tee. The length of this piece of pipe should be such that the elastic is not too tight, otherwise it will not be able to rotate. But the tape should not sag much. Once a certain length has been reached, the elastic can be temporarily secured at the top with a nail.
After installing the cup, three holes need to be drilled in the top of the pipe. Two are needed to insert the second shaft, and the third to establish contact. A nail is used as a shaft, onto which a piece of glass tube is placed. When rotating, it has the smallest friction. The author made such a tube from a glass fuse. To remove metal caps, you must first heat them with a soldering iron and then carefully pull them off with pliers.
Well, then all that remains is to connect the second brush, as in the first case, you need to straighten the bristles on the wire and make sure that it is at a minimum distance from the tape, but does not touch it. The wire is fixed with tape or glue.
Again, to make the system easier to disassemble, you can make the top part removable using a plastic pipe coupling. How to do this can be seen in the photo.
Step three. Final assembly process At this stage the structure will be completely assembled. First you need to fix the cup; for this you can use hot glue or special glue for plastic.
After this, you can install an aluminum can; to do this, you need to cut a hole in its upper part that matches the diameter of the cup. The jar should fit tightly on it.
Thanks to the rounded edges, this can is excellent for working with high voltages, since the “corona discharge” is minimized. You also need to remember to pass the free end of the wire from the top brush inside the can.
Actions of infrasound
Infrasonic actions occur due to resonance, which is the frequency of vibration of a large number of processes in the body. Alpha, beta and delta brain rhythms also occur at the purity of infrasound, as, in principle, does the heartbeat.
Infrasonic vibrations can coincide with vibrations in the body. Subsequently, the latter intensify, due to which some organ malfunctions. It may not only lead to injury, but also to rupture.
The frequency of vibrations in the human body varies from 8 to 15 hertz. At the time when a person is exposed to sound radiation, all physical vibrations can resonate, but the amplitude of microconvulsions will increase many times.
Naturally, a person will not be able to understand the feeling of what is affecting, because the sound cannot be heard. However, there is a certain state of anxiety. If there is an extremely long and active impact of a special sound on the entire human organ, then ruptures of internal vessels, as well as capillaries, occur.
Typhoon, earthquake and volcanic eruption emit a frequency of 7-13 hertz, which gives a call to a person to quickly retreat from the place where disasters occur. Infrasound and ultrasound can very easily drive a person to suicide.
A very dangerous sound interval is the frequency of 6-9 hertz. Very strong psychotronic effects are most pronounced at a frequency of 7 hertz, which is similar to the natural vibration of the brain.
At such a moment, any work of a mental nature simply becomes impossible, since there is a feeling that the head could “burst like a watermelon” at any moment. If the impact is not strong, then the ears simply ring and a feeling of nausea appears, vision deteriorates and the person succumbs to unaccountable fear.
A sound that is of medium intensity can upset the digestive organs, the brain, cause paralysis, blindness and general weakness. Strong exposure damages or completely stops the heart.