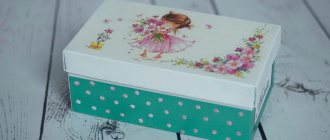
Organizer out of the box
An original organizer for papers, writing instruments, and kitchen spices can be made from a shoe box.
Remove the lid, find the center of the long sides. Make angled cutouts on the sides, then carefully bend the bottom of the box in half to become the center wall of the double organizer. To make an even fold, draw a knitting needle or the blunt end of scissors along the previously drawn line. Now you can carefully draw a fold along the ruler.
We bend the workpiece and glue the sides. We cover the inside of the organizer with paper or fabric. We cover the outer part with a primer.
Now you need eggshells. It needs to be washed with soap and cleared of the inner film. Apply PVA glue to the surface of the box and carefully glue small pieces of eggshell. We get the original surface. To be sure, we pass the brush with glue over the surface again.
Decoupage of boxes with your own hands is an interesting activity that takes a little time, but as a result you get original interior items. After trying it once, you won’t want to throw in the trash something that, after a little modification, will adequately decorate your home.
Step-by-step tutorial for beginners on decoupage of a cardboard box
For the master class to be successful, you must first prepare the materials. You can decorate an ordinary box yourself at home as shown in the photo. For this you will need:
- Pre-printed drawings or napkins, photographs and other ornaments on paper;
- Water;
- Instant coffee (if you need to age our decor);
- PVA glue;
- Acrylic lacquer.
Detailed work progress for beginners in needlework
To begin, sprinkle some sheets of paper with water and then gently spread instant coffee over them. After this, lay the sheets on the table and let them dry. After the sheets have dried, tear them into pieces, but they should not be very small. Cut out pre-printed figures (drawings). To decoupage a cardboard box, clean the surface of the box from excess elements. Glue the torn piece of paper to the surface of the box and coat the top with the solution you made.
Pay special attention to the edges. Glue the entire box like this, and glue the cut out figures on top. Let the box dry, and then, if desired, you can coat it with acrylic varnish to add shine.. See the video for an example (they decorate a wooden box there, but the situation is the same with thick cardboard)
See the video for an example (they decorate a wooden box there, but the situation is the same with thick cardboard).
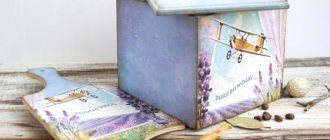
Money box
In this case, you can decoupage shoe boxes. A cut should be made in the lid for lowering money. You can decorate the box with images of various currencies.
You can buy fake money (bright dollars and euros look best) and overlap the entire container with it.
Decor options are limited only by the author's imagination. If you want to create professional products, you can take an online box decoupage master class. And to get original ideas, it is recommended to familiarize yourself with photos of decoupage boxes.
NOTE!
Paper for decoupage - basic requirements, characteristics and tips for use (105 photos)- Volumetric decoupage - modern techniques and application features. Master class on creation and best decoration ideas (140 photos)
- Do-it-yourself plastering work - a review of ideas and recommendations from the master
Master class on decoupage of a cardboard box
Creative people know that an original thing can be made from any seemingly ordinary or already unnecessary item. So, for example, an old cardboard box that wastes space and collects dust can be turned into a beautiful box. We offer step-by-step instructions on how to do this.
You will need:
- cardboard box;
- paper napkins;
- PVA glue;
- scissors;
- brush;
- acrylic lacquer.
First of all, you should prepare the basis for your future box. An old shoe or gift box will do.
It is not recommended to use colored cardboard, as the design on it may be difficult to see when finished. It is also undesirable to use gloss because the glue will not adhere well to it.
Once you have selected a suitable box, you should clean it of dust and dirt and repair any tears or other damage.
Decoupage is somewhat similar to appliqué, so we will apply the design in a similar way. Ordinary paper napkins with a beautiful pattern are best suited as an applique item. There are other options, such as a decoupage card, but for your test creation, it's better to use a more affordable option.
Select several napkins with the same or different designs and cut out the desired sections.
Take your time, act slowly and carefully so as not to inadvertently damage the surface or design itself. If your child is doing decoupage, do not leave him unattended while he is using scissors.
If you do not want the design to have clearly defined contours, you can tear the napkins with your hands instead of cutting them. Due to the torn edges, the napkin will lie more smoothly on the surface and blend into the background.
When you have decided on the future picture that you want to make from napkins, you can proceed to the next step. This type of paper is already quite thin, although it consists of 3 layers, but for decoupage you only need the top one - colored
Carefully separate it from the bottom two. If you can't do this because the edges are uneven, remove the layer before cutting out the design.
Next, we proceed directly to decoupage. First of all, it is worth noting that this decoration technique differs from conventional applique in that the glue is applied not to the surface that is being coated, or even to the reverse side of the element that needs to be glued, but on top of it.
It works like this: first you should place a section of the napkin on the place of the box where you want to place it. And already on top of it you apply glue with a brush. There is no need to rush, as the napkin, due to its structure, can tear and stretch, which will lead to the design simply deteriorating.
Gently move the brush from the center to the edges, and repeat this operation until the paper fits tightly to the cardboard.
Repeat this step until you have completely covered the box.
The cover may be a different color, have a different pattern, be only partially covered, or not covered at all. Don't limit your imagination, create the decor that you like.
After the work is completed, you need to wait until the box is completely dry and cover everything on top with acrylic varnish.
The finished decor item can be further decorated with stickers, artificial gems, decorative ribbons or dried flowers, or covered with patterns or designs.
A dusty old box has become an elegant box, which is suitable for storing valuables and for interior decoration. And a gift packed in such a box will be even more valuable to the person you give it to.
Features of application
Absolutely anyone can master decoupage. And as an object to which efforts will be directed, you can use any, even used, box. It could be a shoebox or even a drawer. If you need something special, you can make it from cardboard with your own hands. It's better to start with a small box. Having mastered the technique well, you can subsequently design large boxes for storing bulky items.
The main requirement for the workpiece is the absence of dents, folds and other damage - it will not be easy to hide them.
Design can occur in several ways, using certain devices, as well as a variety of adhesives and paints. Some products are not suitable for cardboard (it can get wet and deformed), so you can take a box made of wood or plywood.
This is interesting: What Vegetable Oil Looks Like
In this article we will look at the simplest options, most suitable for beginners. Even a small project requires time, so you need to be patient. But decoupage also has advantages. By activating all your creative abilities, you can create a truly unique thing.
This activity is suitable for people who love to draw, as the final effect will be very close, but no special skills are required.
Decoupage is ideal as a hobby - as it allows you to unleash your creative potential and has a beneficial effect on your psychological state. And the resulting boxes can be not only beautiful, but also practical.
How to decorate?
If the desire to master decoupage arises suddenly, and you have a suitable object at hand, anything can serve as a material for coating. Most often these can be paper or fabric images that match the style and color.
Paper
Most often, paper covering is used for decoupage. These can be specially designed decoupage cards, any multi-layer napkins, newspapers, pages of magazines, books or other printed publications. The main difficulties for a beginner are related to thickness and density. There is nothing worse when paper stretches, wrinkles, or tears. On poor quality paper, fibers and other inclusions can be seen in the finished product. If you use separate elements rather than a wide canvas, thick paper will make it difficult to mask the joints and borders.
For decoupage you need the following components:
- shoe box;
- napkins with a pattern;
- PVA glue;
- primer and paints (acrylic);
- brushes (narrow and wide) or sponge;
- varnish
Popular articles Poems about May 9
Let's look at the progress of the work.
- First, you need to strengthen all the weak points of the cardboard box. This primarily concerns corners and folds. For this you need pieces of masking tape.
- Then all external sides must be coated with a primer, dried and all irregularities must be sanded well. The number of layers depends on them. As a result, the surface should be perfectly flat.
- After complete drying, you can begin painting. The background color should be in harmony with the selected image. The inside of the box and the lid also need to be painted - to match the external background or any other (can be contrasting).
- Then you need to select a picture or cut out a separate fragment. Only the top layer of the napkin should be separated. The design can cover the entire box, just the lid, one or more sides to choose from.
- Next comes the most important stage - gluing the selected image. We apply it to the box, grease it with glue and smooth it thoroughly to avoid swelling and wrinkles. If you wish, you can make small adjustments. For example, paint details, shade the edges or the remaining space. At the bottom you can lay a proportionate sheet of cardboard, decorated using the same technique.
- Let the drawing dry and secure with several layers of varnish.
You will learn more about decoupage of a box using napkins by watching the following video.
Fabric
In addition to paper, you can use fabric. Moreover, you can make quite unusual combinations with it.
Let's consider a master class on a fabric design option.
- Prime the box. If the fabric is opaque, the parts to be glued over the primer do not need to be painted.
- Take measurements from the box. Mark the pattern on the canvas. To make the edges look neater, allowances are needed, which should be ironed inward.
- All fabric parts, even if they are small, should be ironed well.
- Then we lay out the workpiece. A layer of glue should be applied to it, as well as to the box.
- Then we start gluing the fabric. It should be smoothed out well, moving from the middle to the edges.
Other decorative elements
Decoupage boxes can be supplemented with ribbons, ropes, twines, as well as all kinds of beads, shells and similar materials.
Decoupage goes well with other techniques. The image can be applied not to a smooth surface, but to a textured one. For this, in addition to the items already listed above, you will need an ordinary eggshell. It should be washed and removed from the inner film. You will also need tweezers, a stick and a glue brush.
Step-by-step instructions for implementation include several steps.
- The first stage consists of gluing the shell. It can be glued in small pieces. Or, to save time, take larger pieces. The selected part of the shell must be coated with glue on the inside, and then placed in the desired place and pressed. The cracked pieces must be slightly moved apart to avoid overlapping each other. It is also better to apply glue on top of the shells.
- After the entire box is covered with the shell, it is painted with acrylic paint - white or any other in accordance with your plan. To avoid unpainted areas, there may be several layers.
- Then you can start decoupage. Cut out the required fragment of the napkin, separate the top layer, apply it and lubricate it with glue. The final layer will be a varnish layer.
DIY cardboard toys
Every child will be delighted that they made their own decoration for the Christmas tree. Children love to do decoupage from a very young age. In this case, herbal compositions are used. Instead of a primer, a thick solution of gelatin is used, and instead of glue, gelatin or egg white is used. The surface does not need to be varnished - it already shines from vegetable glue. If during operation the gelatin begins to stretch behind the brush, it is heated.
So, let's make a bird. We cut out the profile contour and the wing. We prime both parts. Let's dry it. Then the outline is pasted over with colored toilet paper or napkins in a small pattern. You can make an eye for the bird, sprinkle glitter or confectionery powder on its tail and wings. The two parts of the circuit are held together by thickening gelatin.
Older children can use a safety glue stick. In this case, a layer of glue is applied to the cardboard, the design is stuck on top, the surface is strengthened with gelatin or egg yolk, you can treat the finished toy with hairspray, cover it in 3-4 layers.
The fastening is simple: a hole is cut at the top; it is better to use a hole punch, and a braid or thin ribbon is pulled into it.
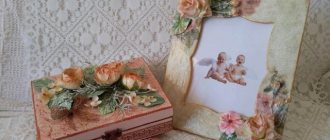
Magic chest
A beautiful container for trinkets in the “Hand-Made” style can easily become a gift in its own right. If you are decoupaging a box made from cardboard using patterns, you need to stock up on thick fabric. It is used for gluing parts of cardboard forms. Corner joints are reinforced with thick paper. The finished product is primed and completely covered with a design using the decoupage technique. The latch is attached to the varnished surface using superglue.
Additionally, you can decorate such a chest with ready-made decorative elements for bouquets, sparkles, sequins, and something else. When primed with plaster and varnished in 5-7 layers, a simple cardboard box looks like a wooden box.
Tools and materials that are necessary to perform work using the decoupage technique
- Hard brushes for applying glue and varnish;
- semi-rigid brushes for applying primer and acrylic base;
- soft artistic brushes for applying background and decorative paintings;
- spatula, palette knife or plastic stiletto from plasticine for surface treatment;
- fine-grain sandpaper or other similar abrasive material;
- sponge;
- scissors (optimally manicure scissors);
- glue: PVA or special decoupage;
- varnish: special decoupage or regular parquet (depending on the nuances of the structure of the base surface);
- paints: primer, acrylic, sometimes gouache;
- file (in cases where an additional dense base is required to transfer the design to the item being decorated);
- decoupage napkins or cards;
- various additional decorative elements: ribbons, lace, beads, clay figurines, foil, gold leaf and so on (everything that the master’s imagination suggests).
Decoupage of a wooden or plywood box. Step-by-step instruction
Wood and plywood perfectly absorb dyes and adhesives and are a good basis for decoupage. The only negative is their fibrous structure, which can spoil the appearance and prevent the uniform adhesion of napkins and cards. Therefore, an important stage of work is the preparation of a wooden or plywood base.
- Sand the surface of the box with sandpaper or other abrasive material.
- Treat the inside of the box with stain.
- Apply primer, white acrylic paint or stain to the base (depending on the desired subsequent tone of the product).
- After drying, successively apply two or three layers of acrylic paint for the background of the product onto the base. Allow to dry thoroughly. (If stain is used for the background, this item is skipped).
- Apply a layer of glue to the areas on which the picture will be applied.
- Cut out or tear out the required pictures from decoupage napkins, soak them on a file, attach the picture to the placement area on the box.
- Iron the picture thoroughly with a hard flat brush until the air is completely removed and evenly straightened.
- Complete the missing elements and patterns with paints.
- Finish the job by coating the box with several layers of varnish.
- If desired, you can use gold leaf, beads, bows, and sprigs of artificial greenery as additional decorations.
Such a box is useful for storing bulk products in the kitchen, newspapers and magazines in the hallway or in the living room, toys and construction parts in the nursery; for the presentation of wine and cognac bottles, fruits, sweets to guests during the holiday.
The process of decoupage of metal and plastic boxes is generally similar to the process of decorating wood products described above. But it should be borne in mind that the preliminary stage of working with a metal or plastic base is its complete degreasing. It is best to use alcohol for these purposes.
Decorated metal and plastic boxes are convenient for storing small, easily lost items. Metal boxes are also indispensable for storing tools, strong-smelling substances, and medicines. Plastic boxes decorated using the decoupage technique make excellent boxes, flower pots, and containers for spices.
An interesting effect of a single whole with the base can be achieved on wooden, metal and plastic surfaces by implanting a printout. In this case, the pictures from the napkins are transferred to the base not from the back, but from the front side.
Decoupage spice box using printout method
For this method, it is better to use plywood blanks, since during the implantation process the cardboard base may delaminate. However, if you work very carefully, you can also decorate a shoe box with decoupage and implantation of a printout.
In addition to the technique given here for implanting a printout “with its face into the varnish,” there is another method: transferring the design to the product using a hot iron.
This technique may seem too complicated for beginner decoupage artists, but if you follow all the steps carefully, you will be pleased with the result.
Master class for beginners on decorating a box using the technique of implanting printouts:
- Sand the box with sandpaper.
- Apply a thin layer of primer, white acrylic paint or stain to its surface and let it dry.
- On top of the primer we apply several layers of acrylic paint of the main color. Let the boxes dry thoroughly. This step does not need to be completed if you used stain to decorate the box.
- We apply several layers of acrylic varnish or special adhesive varnish to the printed motif. We cover the places where the design will be implanted with a thin layer of the same composition and until it dries, we lower the varnished image with its face into the varnish. Leave this structure in this position until completely dry.
- The next day, generously moisten the printout with water and begin to roll all the paper off the product. When you think there is no more paper on the image, dry it with a hairdryer and you will see a white coating, you need to get rid of that too.
- When only a bright image remains on the product, fill in the missing details with acrylic paint.
- Open the box with several layers of varnish and leave it until completely dry.
Despite the apparent complexity of this technique, even a beginner can handle it, the main thing is to follow the described sequence of actions exactly.
Skinning (decoupage boxes)
When I started doing decoupage, I discovered “skin” as one of the main elements of decoration. Previously, I did not attach such importance to sandpaper, but its use greatly changes the work with the product.
So, in order:
1. Regular blank, box. We collect all the necessary materials: primer (or acrylic paint), napkins, brushes, and of course the skin, the heroine of today's series.
First we sand, then prime, sand again, prime - until we achieve sufficient smoothness of the workpiece. Subsequent steps are greatly simplified if the surface of the product is smooth.
2. Apply a decoupage napkin (previously torn along the contour) to a smooth, flat surface. We also decorate the inner surface of the lid with a napkin and cover it with masking tape. for the time being.
3. Apply a layer of dark paint to the places where craquelure is supposed to be applied; this color will be the “background” for the cracks. After drying, apply single-phase craquelure to this layer.
4. While the lid is drying, we begin work on the design of the “body” of the box. We select a suitable color and apply it so that the transitions from the napkin to the surface are not noticeable. And.. right! skinning. with fine sandpaper, gently and carefully, so as not to tear off the napkin and paint. After sanding, we paint over the areas that are exposed. We paint and sand. Even where the napkin has peeled off, it’s not scary, we need the effect of antiquity, we will achieve it. But the extra waves and creases will go away.
Popular articles Camping recipes: hot smoked fish
5. The lid has dried out (we waited more than an hour for the varnish to dry). Apply paint
Moreover, when applying paint to single-phase craquelure, it is important to do it with one stroke, without passing over the same place twice. Then the cracks will be smooth and “tasty” :)
And of course, after drying, we sand it! gently!
6. Paint the product. We finish the bottom, internal surfaces, sides, lid, very carefully selecting the paint and using thin lines to achieve a uniform color. Several times we go through it not even with sandpaper, but with a sandpaper sponge (I forgot the correct name). There is a very fine grain, almost felt sanding. You can take a piece of felt or coarse fabric (such as jeans) for the same purpose.
7. Using a sponge with contrasting paint, paint the inside surface of the box and go along the edges, in places overlapping the decorated surface. The effect of an uneven coating is created, the box begins to “play”, it begins to have a story. There is imperfection in her and that makes her alive.
8. Varnish. The longest stage in all the work. We patch, dry, turn over, patch, dry. We skin it. For the first layer we use sandpaper that is quite coarse, medium-grained. Thanks to this, we remove almost all the varnish :))) And again. We patch, dry, turn over, patch, dry. We rest and leave it overnight. In the morning, everything is done again: sandpaper (fine), varnish, drying. sandpaper varnish drying. ugh. Look like that's it. There are no limits to perfection, but you have to stop sometime. It feels like when you start to like the box in your hands, then the last time is to dry the varnish. It takes a couple of days for it to completely dry to touch. It’s better not to turn over at this time.
9. Done! There's no way to do this without skin. The smooth varnish surface gives the product integrity and completeness. And smoothness is impossible without careful sanding. So don't be lazy to sand!
Tools and Supplies
Decoupage is a type of decorative and applied art that allows every person to create something truly beautiful using the simplest and most affordable materials. You may not believe it, but most of the tools you need are already in your home!
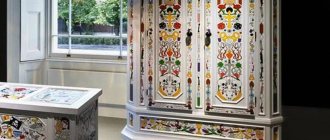
The decoupage technique for decorating products and decoupage furniture is again at the peak of popularity.
Let's figure out what is needed before starting work.
Tools
- Sharp manicure or medical scissors of a size convenient for cutting out small parts.
- You may also need a utility knife.
- Several types of brushes. If you plan to work with small details, you will need small flat brushes with thin artificial bristles. To apply acrylic paint or primer, a regular dishwashing sponge can be useful, but keep in mind that it creates a rough texture, which is not necessary for every job. To create a smooth surface, a large synthetic brush is required. Thin brushes made of synthetic bristles are suitable for drawing small details on the finished work. It is worth remembering that separate brushes are needed to apply glue, paint and varnish.
- Sandpaper for sanding surfaces during preparatory work or for correcting minor mistakes. Choose paper with fine and medium grain in several gradations.
It all depends on the goals you are pursuing.
Consumables
- Acrylic lacquer. There are many varieties of it on the market. There are both water-based and adhesive-based, with different effects (antique, with glitter, cracks) and finishes (matte, glossy, semi-matte, semi-gloss). Choose a water-based varnish, but the effect and finish should be chosen based on the desired result. Both regular construction varnish and a special one for decoupage are suitable for the job, but this is a more expensive option for advanced craftsmen.
- Acrylic paints, watercolors and pastels for drawing small details or creating additional effects.
- Glue. Craft stores sell jars of special glue for decoupage, but again, it is of no use to beginning craftsmen who just want to try themselves in a new technique. PVA glue from the middle price category (do not take the simplest one for children) diluted with water in equal proportions is suitable.
- Priming. Serves to improve adhesion between layers of glue and napkins.
- Printouts. Thin paper on which a pattern is printed using a laser printer is also suitable for decoupage.
- Napkins. Their varieties are described in more detail in the next section.
Table napkins, which are usually multi-layered, are used as an image.
Cognitive start at work
But no matter where you start your fascinating journey into the world of decorating with napkins, you should definitely like the advice of professional decorators. People who have learned to turn the most faceless, outdated pieces of furniture, dishes or packaging, if we are talking about cardboard containers, into works of art. This is exactly the kind of complex story about all the tricks of decoupage described in Natalya Fokhtina’s source.
No less useful in teaching the technique will be a book by the same author, which includes descriptions of decor in the style of Provence, vintage and many others. It describes the implementation of crafts step by step and is accompanied by photos, which is very convenient both for beginning craftswomen and for those who have already had the opportunity to try themselves in this art.
But speaking specifically about the decoupage of boxes, all kinds of caskets, key holders and other accessories for the interior, it is worth using specialized literature, which is very simply and clearly explained by the author Olga Voronova in the presented source. However, feeling the strength to make new discoveries and armed with personal ideas, you can try your hand at decorating a cardboard base based only on the advice in this publication.
I'm sure you can handle the question of how to decoupage a box. After all, if you believe the words of the famous French writer Honore de Balzac, the main goal of art is not at all the empty copying of objects and objects. Creativity should give something new, sensual, real.
Decoupage bottles for beginners: step by step with photos and recommendations
- the simplest and most affordable material from which you can make an original gift. You can buy a bottle of wine or fill the container with your own homemade drink. Luxurious decoration will make an impression in any case.
We have already listed the materials and tools necessary for the work, so we will not dwell on this in detail. The only thing that needs to be added to the list is a windshield wiper. They pre-treat the bottle, which has been cleared of labels.
Bottle decoupage sequence for beginners, step by step with photos:
| Illustration | Description of the stage |
| Applying primer | For priming, you can use acrylic varnish or PVA. The soil should dry well. |
| Making the background | For the background you need to use white or light acrylic paint. You may need to apply two or even three coats to achieve a completely opaque surface. |
| Applying images | The design on the napkin is carefully cut out with scissors. If the background of the picture and the bottle matches, do without scissors and carefully tear off the napkins. To make the design on the print easier to apply, it should be soaked in a plate of water. |
| We fix the drawing | You need to apply varnish over the surface of the drawing. This can be done with a soft flat brush or a spray bottle. You should make sure that the picture is not covered with wrinkles. If necessary, it must be carefully straightened with a brush. |
| Finishing | After complete drying, you can carefully sand minor imperfections in the work. To highlight details, use a brush and dark paint. Once finishing is complete, apply a final coat of varnish. |
Another option for an original design is decoupage of a bottle with tights. Master class on video:
Plastic box: decoupage
From an unnecessary round jar of salad or mayonnaise, you can make a great box for storing candy, a mixture of spices or craft supplies.
Before decoupaging a plastic box, it is recommended to check its surface for cracks.
For such a craft, you will not have to buy a lot of materials, and therefore there will be no large costs.
Master class on decorating a plastic box:
- Cut out four circles equal to the diameter of the box from white glossy paper;
- Cover the entire surface of the plastic jar with primer;
- Glue circles on both sides of the bottom and lid;
- We prime the side surface of the box and cover it with a strip of decoupage napkin with a pattern you like;
- We decorate the lid of the box with an artificial flower, which you can buy in a store or make yourself from ribbons and corrugated paper;
- We paint the empty spaces in a color that matches the decor and varnish them.
Such a simple box will become a real decoration of the kitchen space.
Storage box for children's toys
Taking a large box, you can make a container for storing children's toys. To make a large box in decoupage style you will need to work hard. It will have to be covered with a large layer of primer and 5-6 or more layers of varnish in order to give the products greater strength. But there are a huge number of napkins with children’s images on sale. And for every holiday you can delight children with new and new toy boxes.
On the Internet today you can find many tutorials on making various boxes in the decoupage style, which are easy to do with your own hands. There are also photos and images for decorating such boxes and boxes. You just need to use your imagination, and such products will delight your family with their beauty and originality for a long time.
Technique for decoupage boxes
You can transfer pictures from special paper for decoupage, napkins with drawings, or you can try to print any image yourself. This will allow you to get a unique design with any picture you like, which you can also draw yourself. You can also print your own photos - such things will be a wonderful gift for loved ones for any occasion.
How to print a design for decoupage
To transfer any picture or photograph onto an item, you can print it on a regular printer:
- Select a picture to print. You can find it on the Internet, assemble it from separate parts or draw it in a graphics editor, and also choose any beautiful photographs. To design a gift souvenir, a great idea would be to scan old photos from a family album.
- Take a sheet of plain paper or photo paper. You can print a picture onto a napkin or a thin sheet of paper - to do this, you will need to glue it to plain paper so that the printer can use it and not wrinkle it.
- Print the image on a printer. Make sure that it is placed in the right place; if necessary, you will have to print it again. It is worth noting that pictures obtained from a laser printer can then be soaked in water, it is easier to glue them, and at the end of the work it will be possible to coat such a box with varnish. If the printer was inkjet, especially with water-based inks, the image may spread and you will have to work with it more carefully.
Popular articles Wooden shelf
Preparing the paper
There are the following methods for separating a thin top layer with a pattern:
Thinning paper using tape. We strengthen the front part with the picture with transparent varnish (hair product is also suitable). After drying, turn the sheet over and apply a layer of tape, trying to avoid folds and bends. Carefully remove the tape from the excess paper. As a result, a thin sheet with a picture should remain. Using water. Apply a layer of varnish to the image to secure it. If the layer turns out to be too thin, you can apply it in several coats, allowing each of them to dry. Once dry, place the paper in a container of water. After half an hour, take it out and place it face down on a flat surface.
Carefully remove the unnecessary paper layer with your hands. Processing of photographic paper. Coat the front side with varnish and dry
Then place the paper side down on a wet table or board. After 5 minutes, detach the excess paper from the layer with the image: you can pick it up if you peel off the corner of the paper with a needle.
Training video for beginners
Find out more about the nuances of decoupage from our article
An ordinary hard box, such as a shoe box, can be turned into a unique piece using the decoupage technique. Decoupage of boxes transforms them into beautiful interior items in which it is convenient to store cosmetic accessories, small toiletries (hairpins, combs, brooches, etc.), various receipts, chargers, etc.
This is especially important if you have furniture in the room with open shelves. Decoupage of boxes of different sizes in the same style and color scheme will allow you to decorate any room with a classic interior, and deliberately different decoupage of cardboard boxes will emphasize the atmosphere of a children's room, hallway or dressing room
The proposed master class for beginners will introduce you to how to decoupage a cardboard box.
You will need:
- shoe box (preferably without gloss);
- napkins with a three-layer pattern;
- acrylic paints;
- decoupage glue;
- soft new sponge;
- soft brush for varnishing;
- hard brush for gluing;
- acrylic lacquer.
Before we get started, let's choose a motive. When choosing napkins for decoupage, we try to take into account the size of the box: for a large box we select a large design, for a small box – small elements.
Decoupage boxes with napkins
1. If the box has a glossy surface, we need to remove the gloss using fine sandpaper. Carefully remove small pieces and brush away dust. If the box is made of ordinary rough cardboard, then this operation is not necessary.
2. Cover the entire outer part of the box with white acrylic paint using a sponge, trying to paint evenly. Let the paint dry well.
3. Use a brush to glue the napkin, taking into account the following:
- For stickers, only the top colorful layer of the napkin is used;
- No glue is applied under the napkin, you need to glue the dry napkin with a brush dipped in glue;
- gluing should begin from the edge, holding the napkin with your hand from the other edge and spreading the glue brush with wide strokes over the surface.
If you don't have glue for decoupage, you can use acrylic varnish.
4. We glue the fragments of the drawing not only onto the lid, but also onto the side parts of the box. Let the box dry. We fix the design with acrylic varnish, applying it in several layers. If the acrylic varnish is glossy, then the product will be shiny, matte varnish will give the work a vintage character. The layers of varnish must be calculated correctly, checking after applying the next layer and drying whether the box closes well.
5. We decorate the inside of the box by covering it with napkins, covering it with acrylic paint, or lining it with fabric. You can put dividers inside to create smaller cells.
As you improve your technique, you will gradually learn how to design more complex products: original gift packaging, book covers, decorative tables.
Step-by-step instruction
Before starting work, the surface of the cardboard box must be cleaned of mechanical contamination. It is enough to lightly sand it with fine-grained sandpaper. Some boxes are coated with a glossy layer, which should also be removed to increase adhesion between the primer and the surface.
- Decoupage a kitchen table with your own hands - how to make a decoration for the tabletop and legs. Master class, video and photo
- Decoupage with rice paper: useful tips and master class on DIY decoration (video + 145 photos)
- Volumetric decoupage technique for beginners: photo and video decor master class. Step-by-step training and tips for choosing ideas for beginners
The folded areas are most susceptible to abrasion. To strengthen these areas of the box, they should be taped with masking tape.
The next step is applying the primer. To do this, use a wide brush with hard, synthetic bristles. You should try to distribute the soil over the surface in an even layer, painting over all gaps and avoiding the formation of “bulges”.
Paint the box with acrylic paint that matches the main color of the pattern on the napkin.
It is easiest to stick decoupage cards and napkins onto flat, even surfaces using a regular iron. This method is suitable for novice craftsmen who are just beginning to master the intricacies of this delicate paper craft. To do this, cover the surface of the box with a layer of adhesive varnish and wait until it dries completely.
- Instructions on how to work with decoupage paper: step-by-step description and mastering the technique of applying patterns and pictures (115 photos)
- New DIY paper decor ideas - 140 photos of new products and interior design ideas for developing craftsmanship
- Beautiful DIY living room decor - the best ideas for decorating and rules for decorating a living room (video tutorial + 120 photos)
Now apply a napkin to the dried surface, cover it with a sheet of clean white paper and gently iron it. Melting under the influence of hot temperature, the glue tightly adheres to the decoupage picture. Excess napkins are cut off with scissors or cut off with sandpaper.
In this way, all surfaces of the box are decorated. Cover all surfaces covered with napkins with a fixing varnish. Distributing it in a thin layer from the center to the edges.
To enhance the decorative effect, the contours of the design are painted over with acrylic paints, adding depth and relief to it.
The edges of the box can be painted with dark shades, applying them with driving movements using a sponge. In addition, the box can be aged by covering individual areas with a thin layer of patina. The product is coated with glossy varnish.
This is how easy and simple beautiful decoupage of boxes with your own hands allows you to turn ordinary packaging into a real work of art.
- DIY wall decor - DIY wall decor ideas. 145 photos of stylish design options
- Review of original bathroom decor ideas - 105 photo ideas on how to correctly implement a special interior design in the bathroom
- DIY stencils for decor - step-by-step instructions on how to make a beautiful stencil. 110 photo ideas for stencils and a master class on its use
Tips for thematic and compositional design of boxes
- For products that will be used in the nursery, it is best to use images of fairy-tale and cartoon characters, drawings of flowers and butterflies; the colors should be light and joyful;
- for those boxes that will be used in the kitchen, images of fruits and vegetables, flowers will be optimal;
- for boxes it is best to use common interior design motifs, such as Provence or kitsch;
- for boxes in which gifts will be presented, it is most natural to use motifs and colors that correspond to the gender of the gift recipient: for women, bright, rich colors, patterns and designs are suitable; men will be more pleased with discreet shades and images from the sphere of male interests (cars, weapons, armor, maps, etc.).
Decoupage a box is not too difficult and quite a fun activity. Proper efforts will give things a second life.
So, what napkins can be used in decoupage?
1. Ordinary three-layer ones, which are sold in packs in regular stores
or hypermarkets (standard sizes - 33x33 cm). Sometimes you can find really beautiful napkins in such packages (especially before the New Year"). Packages of napkins come with one motif (all the same) or with different ones (4 different designs, 5 pieces for each type. So, I treasure one package with incredibly beautiful autumn napkins like the apple of my eye - the motifs are so successful, they can be glued to any blank, and they will look beautiful everywhere.
A significant advantage of such packaging is price
(1-1.5 dollars per package in Belarus). Considering that in craft stores 1 napkin is sold for 8-10 Russian rubles, then this is really a significant plus.
Well, a significant disadvantage is the small selection
. By the way, be careful when buying a set of different napkins. They usually put beautiful napkins on the front and back, but inside you often find all sorts of napkin nonsense that is almost of no use in decoupage
I’ll write separately about perforated edges
, because some beginners are afraid to glue the perforated areas of the napkin. Don’t worry, all this will smooth out when wet if the napkin is of high quality. Well, if it’s of poor quality and something remains after gluing, you can press these bumps into the surface with your fingernail (before varnishing), and they should disappear.
2. Four-layer “handkerchiefs”.
Also sold in stores and also very cheap, dimensions - 21x21 cm. The pros are the same, the cons are the same. By the way, sometimes in such large packs and in “handkerchiefs” there are identical pictures, only different in size. From such a collection you can make some kind of set, for example, several boxes of different sizes or several items for the kitchen - naturally, all in the same style.
3. Very beautiful napkins, which are sold in craft stores especially for decoupage (three-layer). They are sold individually, at 8-10 Russian rubles per piece. Standard sizes are 33x33 cm, sometimes you can find 25x25 cm.
Plus - a large selection.
Indeed, a beginner’s eyes widen from such a choice, and he wants to buy everything at once (this is exactly what you don’t need to do!!!). The downside is the price (10-20 rubles). In principle, if you do several jobs a month, it comes out inexpensively, but you need to take into account that brushes, paints, and varnishes also cost a lot...
By the way, beautiful napkins can and should be brought from abroad. There they are much cheaper, and the choice is huge! Therefore, if your friends ask what to bring you from Europe, feel free to answer: “of course, napkins!”
Single-layer napkins can also be glued, but beautiful ones are rare among them. In any case, the technique for working with them is the same as with all the others, you just don’t need to layer them.