Place for a pet
All cats love enclosed spaces - it helps them cope with daily stress. To get a stylish house for your pet, just remove the internal parts, close one of the fiberboard walls and provide the lower part of the product with soft bedding.
You can decorate it at your discretion - wallpaper, self-adhesive, paint. A larger TV can be used as a bed for a small dog.
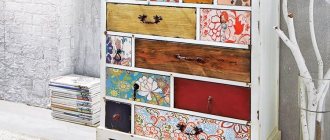
Bookshelf
If you can’t dedicate an entire room to a library, you can put your favorite books on a makeshift shelf. An old, broken TV can also be used to create it. To make a designer shelf, you need to remove all the insides from the equipment and remove the top part of the TV. Clean all surfaces, sand and paint or wallpaper. Insert a couple of chipboard shelves inside, and attach hooks to the back of the product for fixing on the wall. A makeshift shelf can accommodate quite a few books, although its exact capacity will depend on the size of the TV.
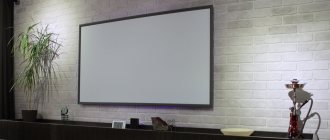
Mini bar
If you want to please your guests, do it with taste - they will surely love such a stylish piece of furniture. To decorate the minibar, we recommend using not only lighting, which will add picturesque reflections to the glass, but also a mirror on the back wall of the TV.
Disposition
So, the child broke the TV panel. What to do next with a broken TV (not a child!)?
- Throw it away
- Sell for parts
- Give a second life
Let's get busy! Actually, the second and third approaches can be combined. Some components will not be needed in our experiments. Functionally, an LCD TV consists of the following parts:
- LCD matrix that creates the image
- backlight (most often LED) and diffusing elements
- Matrix controller (T-con board)
- LED Driver
- “brains” - signal switch, TV tuner, smart part
- audio system - amplifier and speakers
- power unit
Most often, the backlight controller is combined with a power supply, and the sound amplifier is combined with a “brains” board.
Room box
An old TV is perfect for lovers of an unusual hobby - creating large-scale miniatures in the form of living rooms. “Doll Houses” are not intended for children: this composition is designed to decorate the interior, forcing you to carefully examine the small details. In combination with a TV and lighting, this decorative element looks truly impressive.
For the home with your own hands
An interesting idea is to turn an old picture tube into a window for outbuildings, a country shower, or a toilet. Preparatory work begins with creating a hole to depressurize the vacuum and not provoke an explosion. You need to insert a screwdriver into the connection point of the high-voltage contact and tap it. When the hissing stops, the kinescope will no longer pose a danger.
Next, use a grinder to cut off the top part. It will no longer be useful, so we throw it away. Use a screwdriver to pry it off and remove the mesh. This piece with small cells can be used on the farm as a sieve.
We thoroughly wash the glass itself under running water and insert it as a window. A pavilion can be built from a large number of such items. Don’t forget to wear goggles, gloves, and a respirator when working with an angle grinder.
An old TV is a treasure trove for using your imagination. You can use different techniques for decoration: decoupage, craquelure. Or leave the rarity in its natural form if you like vintage.
Diorama
Another idea for connoisseurs of original crafts. Typically, dioramas are made using cardboard boxes, but by creating a diverse composition on a real TV, you will definitely capture the imagination of observers. This is the very case when you can show your imagination by depicting any scene from a movie, a sketch from life, or just a landscape.
Lamp
An old tube TV makes original designer lamps. If you remove the screen and cover the body with a film that matches the rest of the interior, such an item will fit perfectly into the overall style. Instead of a screen, a transparent panel is installed, a light bulb with the appropriate connection is mounted inside, and then the lamp is placed in a convenient place.
Competent and rational use of old technology is a simple science. Sometimes it is enough to show a little imagination to get a lot of new, interesting things with minimal costs, but with maximum benefit.
Aquarium
Using this example, we will tell you what stages of work you will encounter when using a TV as a source material for any of the crafts.
- Getting started is always the same: we disassemble the device, starting from the back wall. Carefully remove the internal electrical components, trying not to damage anything:
- We are especially careful with the screen. We remove everything that might interfere in the future, including separators and switches if they go deep inside:
- We measure the body and select the aquarium according to the dimensions. It is important to leave room for the filter, pump and light:
- We install the necessary equipment:
- Making holes for the wires:
- Set up the aquarium:
- We fix the back wall, cut from plywood, using furniture hinges. It can be decorated as you wish.
- The TV aquarium is ready.
As you can see, even from old TVs you can make decent furnishings. Think over the design of the product in advance, implement the idea “conscientiously” - and as a result you will receive an exclusive and useful item.
We make a new and “smart” TV out of an old “stupid” TV and make it “beautiful”
It's enough to take something old and unnecessary, take something new and unnecessary, add a little tape, free time and a drop of solder to get such a wow, useful thing.
It was evening, there was nothing …
I have a TV (an old TOSHIBA with an LCD display), it hangs on the wall and collects dust (dust is wiped off regularly =)).
They turn it on only when we have guests and, as a rule, only to watch movies from a laptop or tablet connected to it. And to this day, I still have and distribute an ASUS WL-500W Internet router, in which, once upon a time, with the help of a soldering iron, the memory was expanded from 32 MiB to 128 MiB. And he was engaged, in addition to being a home NAS and WEB server, mainly by distributing torrent files 24/7. And the WL500W had a faithful friend - AgeStar SUB3AHT with a terabyte HDD inside, which stored all these torrent files. And distributing 70-80 GiB of traffic per day was commonplace for them. Time passed, a lot has changed. The WL500W is now just a router (though it still runs an SVN server for its own needs). And the box with the disc has been lying in the desk drawer for a long time.
And just recently, in my household, a Mini Xplus TV Box H24 (1GiB version, hereinafter referred to as MiniX) appeared running Android 4.0, which we all love. There is a review of this extremely interesting thing here, here and there. As a matter of fact, after reading these articles, I bought myself such a computer, as well as its smaller brother, the MK802 Mini PC, but it is just as sharp and daring. One of my friends, while visiting me, as in the well-known fairy tale - “With his mouth open like a crocodile, he grabbed the MK802 Mini PC...” and that same evening he took it to his home to live. And MiniX remained in the desk drawer until better times.
Meanwhile, my daughter has grown up. And she became interested in watching cartoons. And finally, work was found for TV. And somehow I took a meticulous look at everything that was in the desk drawer and decided that it was no good for “all this wealth” to just lie there. I connected all this stuff (TV, MiniX with its power supply, keyboard, mouse, flash drive and the box with HDD also with its power supply via an active four-port USB Hub, who would have thought, with its power supply) with wires and was horrified looking at everything this mess. And most importantly, you won’t be able to hide it out of sight, because the MiniX comes with an IR remote control, which is not very convenient, but sometimes useful. I didn’t want to buy a separate media player due to their limited functionality.
A fly went to the market...
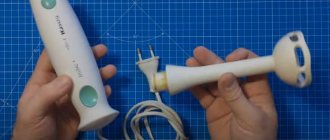
And I bought there, not a samovar at all, but the shortest and thinnest “USB hose” I could find and the smallest wireless keyboard iPazzPort Google TV 2.4G mini wireless keyboard with a laser pointer (extremely useful for remotely controlling a cat) and a touchpad.
As well as a small USB Hub with 4 ports and double-sided tape. A few words about the keyboard. Despite the not at all high price, the first thing I want to say is “How pretty!” It’s really not poorly made. The second thing I want to say is “how unusual.” Thirdly, I just want to use it like a laser pointer. In general, you need to get used to it. By the way, the touchpad has multi-touch!
Ivan went to the upper room...
And he put it on the table, no, not a toad, but everything that the “fly” had brought from the market and everything that was gathering dust in the table drawer.
During field tests, it turned out that the MiniX heats up quite noticeably, especially when watching video from the network, when the network interface is actively working. I wanted to hide it inside the box, but after testing it was decided to place it opposite the ventilation grille, on the side of the box with the HDD. This box can turn on the fan and regulate its speed depending on the temperature (there is a thermocouple that can be placed wherever we want). The MiniX comes with a stand, in the legs of which I drilled holes and screwed them to the grille with tiny bolts.
Also, the MiniX comes with a power supply that produces 5V/2A. It was decided to get rid of the unit and take 5V from the HDD power supply circuits in the box. We cut off the cord plug, make a hole on the back cover of AgeStar SUB3AHT and connect it to 5V, observing the polarity.
Now we insert the hard drive into the AgeStar SUB3AHT and attach the thermocouple. Let's put everything together and see what happened at the first stage. And it turned out, I must say, quite reliably and accurately.
Now we are looking for a place for the USB Hub. It will come in handy when I want to connect an external keyboard and mouse or a USB flash drive. We attach the USB Hub with double-sided tape (how would we live without tape). The minimum length of the wire that I was able to find is 1M. Cutting the wire and shortening it was too lazy, I promised myself to go to a store with radio components and buy USB connectors there and make the wires as needed. In the meantime, I carefully rolled them up and hid them in a stand for AgeStar SUB3AHT.
Now all that remains is to connect everything. After what happened the first time, it looks more than decent (it’s a pity that I forgot to take a photo). And this is what happened in the end.
A few more photos in daylight.
As a result, there is no shame in placing this box on a shelf next to the TV, where it will be accessible to the IR remote control and will be pleasing to the eye. And in terms of functionality, this design will give odds to any media player from the store. Now it (this design) itself downloads movies from the network using the Torrent client for Android. It can also view files from a local network, stream video from the Internet, in general, everything that Android can do today. The air flow from the fan in the AgeStar SUB3AHT contributes to additional cooling of the MiniX; if desired, the fan can be turned off; there is a switch on the rear panel.
I can’t get the thought out of my head that this thing needs to be made in the post-apocalyptic Fallout style. But we need to think through everything well and find time, maybe this idea will come true.
Corner for dogs or cats
A place for pets is another original and fun option. It is extremely important that there are no sharp corners or edges inside so that the animal does not get hurt. If necessary, grind them down or cover them with soft material. Place a soft bed inside and you're done. And if the former TV is also decorated on the outside, the result can surpass any pet corner you can buy in the store.
Diagnostics
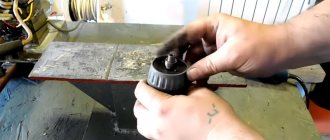
First of all, we remove the back cover of the TV to gain access to the electronics. We identify boards and connectors.
power unit
Although it may look different, this is the block where the high voltage wire comes in. Be careful with this block - there is high voltage! In my case, the high-voltage part is surrounded by a white “waffle iron”. Two braids usually extend from this block - one goes deep into the body - this is the power supply for the LEDs. In my photo - below - the second one connects to the “brains” - we will need it.
Controller or "brains"
As mentioned above, a wire comes to it from the power supply. Also on this board there are input connectors, network, etc. The following wires can come from it: - to the matrix (usually wide and flat) - to the speakers - 4 thick wires like mine or a pair for each speaker - to the buttons and remote control sensor - to auxiliary boards - WiFi, camera, etc.
T-con
This board converts the video signal from the “brains” into a format understandable by this matrix.
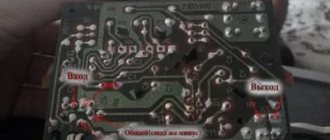
Here we see that the author of the matrix is AUO. We are no longer interested in this. As you can see in the first photo, I was lucky, and the signals between the power supply and the controller are signed. What do we see? NC - not connected (not used) GND - ground +16V - 16 volts DC +16VA - always? In general, A often denotes alternating current, but + next to it dispels it. We consider that this is standby, that is, always on PS_ON - power supply ON (signal FROM the controller that the entire power supply should be turned on) BL_O/F - backlight On/Off (turning on the backlight) DIM - dimming (backlight brightness). Usually PWM, but it can also be simple resistance
Next, we need to carefully connect the TV to the network and measure the voltage: (in the off state) - on the power lines (which is constantly on, which is not, how many volts) (in the on state) - on the PS_ON, BL_O/F, DIM lines
There will most likely be either 3.3V or 5V. If you're lucky, the power supply supplies the same voltage to the controller board and it will be enough to short-circuit these signals. In my case, a miracle did not happen - the board produces only 16 volts, and waits for 5-volt signals back.
Soldering a tube-transistor TV
Here is a photo of the main boards of the TV:
You can remove chocolate capacitors, low capacitance capacitors, high voltage capacitors and MegaOhm resistors from the boards.
We also solder the diodes and you can remove the connectors - the sockets from them are suitable for old lamps like 2K2M and similar 8-pin lamps. Low-frequency transformers can be useful when designing lamp equipment - we keep them for ourselves. Hidden under the aluminum screens are inductors with capacitors, as well as printed circuit boards—radio frequency units.
As you can see, here you can profit from small capacitors, usually from 1 to 1000 picofarads, there are also diodes and chokes.
But in other modules there are inductors - from which we can use frames with ferrite cores for tuning. We also solder capacitors and diodes from here.
The following radio modules are also interesting - in principle, everything can be removed from them: transistor, thermistor (green ring), coils and chokes (blue), diodes.
This is what I decided to keep from the TV boards.