Small metal objects are difficult to hold in one position during the welding process. Fixation is carried out using improvised means so that the products do not move. A magnetic corner is suitable as an auxiliary tool.
It is also called a welding square. It will be useful for both the home craftsman and the professional welder. This mechanism improves the quality of the weld and the part as a whole. Let's look at how to make a magnetic corner for welding with your own hands.
Design of magnetic contact and its characteristics
Consists of two nodes:
- Cable holder . The ground cable of the welding equipment is attached to it using a bolted connection.
- Magnetic node . The size of the magnet depends on the design features. Some models are equipped with a mechanism that regulates the pressure of the magnet on the working plane. Professional devices have switches.
The parts are connected to each other by a rigid fastening. The main characteristics of the devices are:
- Dimensions and weight. Depends on the manufacturer and specific model. The average weight is 1-1.2 kg.
- The force of attraction to the surface. Varies in the range from 2 to 50 kg.
- Welding current strength. The maximum value of the parameter is measured in amperes. For entry-level models, it does not exceed 200 A. An advanced tool is capable of operating at 400-500 A.
- Execution type. They produce special clamps for corners with gap adjustment.
Safety regulations prohibit connecting a cable without a special lug, which is clamped with bolts.
Clean Water Welding Gadgets
Here's how they do it:
- While the metal workpieces are precisely and securely fixed, you have more freedom in your actions. Your hands and your attention are concentrated only on the welding seam. Hence the increase in its quality.
- Using a magnetic welding angle, you can prepare and perform all welding work yourself, without outside help. That's labor savings for you. And you also don’t depend on anyone.
- The seam will be neat and precise thanks to the optimal and reliable installation of the workpieces using corners. If your work requires special precision, then the use of angles becomes not a recommendation, but a mandatory condition for welding.
- If you have a large amount of work, you cannot escape without fixing triangles: they will allow you to save your working time to a significant extent.
- It is easiest to weld workpieces of unusual or non-standard shapes using a welding angle with a magnet.
- With corners you can cook not only on horizontal surfaces, but also on vertical ones.
- These squares are useful not only for welding and soldering, but their ability to firmly hold parts is useful when cutting metals.
Why is the correct name “squares” and not “triangles”? Because these clamps are available in multi-angle configurations, their shape more closely resembles an irregular polygon. The most commonly used angles are 45°, 60°, 90°, 135°.
How to use?
The technology for using the device is not complicated. The first step is to connect the welding cable, after which the installation begins.
Most devices have switches that activate the magnetic field. At rest, the magnet will not be attracted to the surface.
One person is required for commissioning. After contact with the countertop, you need to activate the device. Once these steps are completed, the gripper enters operating mode.
When finished, perform the previous steps in reverse order. Do not attempt to separate the switched-on device from the part; many models are resistant to peeling. This may also damage the latch.
Upon completion of work, you should immediately clean the contact surface of the magnet from metal shavings, as this negatively affects the force of attraction.
Do-it-yourself switchable magnet - Metals, equipment, instructions
When welding small metal parts, it can be difficult to keep them stationary. To fix the elements in this case, the welder most often has to resort to the use of additional mechanisms and devices so that the parts do not move during welding.
The use of vices and clamps allows them to cope with this task perfectly, but the main disadvantage of such products is the need to carry out a large number of additional movements to install the part in a static position. And also the inability to fix parts at a certain angle.
A magnetic holder for welding does not have such disadvantages, so if you often have to weld parts in this way, it is recommended to purchase or make this device yourself.
Types of magnetic holders for welding
When performing welding work, magnetic devices of the following designs are most often used.
Angular: permanent
The advantage of this model of angles is the ability to quickly fix the parts to be welded in 6 positions. The device consists of 2 plates with a powerful magnet located between them.
If you often have to weld parts at different angles, it is recommended to purchase an adjustable holder.
A design with fixed angles will be much cheaper, but such a device should be purchased when the main part of the welding work involves fixing elements in the most frequently used position.
Disabled
The switchable magnetic welding holder is a device in which the magnetic field can be neutralized using a rotating lever.
Such devices cost several times more than a regular angle, but thanks to the shut-off function, using the product is easier and more comfortable.
Also, switchable models can be easily cleaned of metal shavings and other small parts.
Which type of welding holder to choose depends on many circumstances. If the corner is needed for frequent use, it is recommended to purchase a switchable model with a tearing force of at least 20 kg.
Main selection criteria
If a magnetic holder is needed for professional use, then it is difficult for a beginner to understand the models on the market.
Below are the main criteria for selecting such a device, taking into account many factors.
- Purchasing a low-quality product will complicate the performance of welding operations at a high level. The holders are exposed to high temperatures, which can lead to a significant decrease in the magnetization coefficient of poor products. When purchasing, you should inspect the product for mechanical damage. Even a small recess or unevenness of the tool at the point of contact with the fixed elements will not allow the work to be performed at the required angle.
- If you often have to weld parts at different angles, it is recommended to purchase an adjustable holder or a set of several triangles.
- Not the last selection criterion is the price. The cost of many Chinese-made models can be very attractive, but often such devices fail after the first use.
To purchase a high-quality magnetic holder, it is recommended to consider products made in Russia and Europe.
Homemade magnetic corner
If you don’t want or have the opportunity to purchase a fixing device in a store, you can make it yourself from scrap materials.
A magnetic holder for welding with your own hands can be made using the following materials:
- magnet from a powerful speaker;
- steel sheet 2.5 mm thick;
- heat-resistant glue for metal;
- rivets.
To carry out the work you will need the following tools:
A homemade magnetic holder for welding work is made in the following sequence:
- A triangular blank is marked on a metal sheet using a square and some sharp object.
- Using a grinder, the workpiece is cut strictly along the intended stripes.
- The cut blank is applied to a metal sheet and the sheet is marked again.
- An exact copy of the previous part is cut out.
- Both triangles are filed with a file so that their side planes are perfectly even and the parts are absolutely identical.
- The triangles are aligned with each other, clamped in a vice, and holes are made at their corners with a diameter equal to the thickness of the rivet used.
- A magnet from the speaker is placed between the two triangles, onto the plane of which glue is first applied.
- The square is placed in such a way that the holes of the plates are aligned and they are fixed together with rivets.
- Once the glue is completely dry, the product can be painted in any color using special heat-resistant enamel.
The assembled product will allow you to qualitatively fix a mass of up to 3 kg at a certain angle.
If a more powerful holder is required for welding work, then the device can be made according to the above diagram. Only use neodymium magnets from a computer hard drive as a magnetic material. In this case, you can get a free and high-quality device with increased power.
When making a homemade structure, using glue and rivets is the best option. If you use bolted connections, then over time the fastening will weaken due to vibration and high temperature.
Conclusion
Using magnetic angles for welding allows you to perform work more efficiently.
The cost of non-adjustable models with the ability to place workpieces in 3 positions will be about 500 rubles, so every welder can afford to purchase such a product. If you want to save money and improve your DIY skills, then the instructions provided will help you make a magnetic device with your own hands.
Squares
One of the varieties of magnets for welding includes special angles that completely replace bulky clamps and provide fixation of parts at angles of 45, 90, 135 degrees.
There are many designs and variants of such magnets produced by different manufacturers. They differ not only in their working dimensions and mounting angles, but also in their adhesion strength.
The magnetic clamp or welding angle can have a variety of configurations, providing the ability to set the required mounting angle. Such magnets can have the following designs:
- ordinary squares, through which it is possible to set fixed angles determined by the profile of the workpieces;
- clamp-type fasteners with the ability to adjust the angle of fixation, ensuring their universal use as welding elements on structures of any degree of complexity;
- modern samples of squares with several fixed angles, also related to multifunctional tools and used in organizing complex welding work;
- angles with different clamping forces, designed for both massive elements of welded structures and small (compact) parts.
Choosing the right square: here and now
Dimensions of the square for welding.
Everything is simple here: for simple home welding work, you will need holders that are simple in design. Complex processes involve fasteners with technological bells and whistles - from switchable magnets to heat-resistant options, from simple corners to 3D models.
One way or another, a high-quality magnetic holder for welding must be resistant to significant mechanical loads and have sufficient tensile strength. In the end, we are talking about fixing not fluff, but heavy metal parts. Our squares must be able to fix them completely and irrevocably. Only in such cases will welding holders make sense at all.
If you are engaged in complex welding work, and if you have the opportunity, then it is best to choose high-quality holders with on/off magnets. Such devices will help you turn on or off not just the entire square, but individual edges.
This mode makes it possible to independently work with complex tasks. Corners of this class are usually made of chrome-plated metal with increased strength.
The cost of welding holders cannot be called low; these are not cheap devices. The price depends on the number of standard angles, attraction power, adjustment mechanisms, brand, etc. The simplest copies cost about four hundred rubles, a standard set costs around a thousand rubles. Well, professional magnetic welding devices with technological additions increase in price to 3,000 - 5,000 rubles.
Is it worth buying?
The answer to this question can only be given by the master performing the work. For a novice welder who has just started his professional career, this device can make life significantly easier.
If a specialist works primarily with non-ferrous metals, a magnetic clamp will most likely not be useful.
Experienced workers have a set of various clamps for all occasions, including this device.
The cost of the device is quite high. If you have knowledge in the field of electrical engineering, you can try to make it yourself. The technology and manufacturing process will be discussed below.
Magnets for welding
Welding is a fast and reliable way to create permanent connections between metal parts.
The process itself does not last long; it often takes a lot of time to correctly position the workpieces relative to each other. They must be fixed accurately and securely so that there is no displacement during the welding process. Many devices have been developed for this.
Magnetic fasteners - angles and holders are very quick to install and remove and save the welder a lot of time.
Magnets for welding
Types of fasteners and their purpose
In order for the weld to be strong and reliable, the workpieces to be welded must be fixed. For this purpose, there are many different types of equipment, universal and specialized. These include:
- switchable magnets for welding;
- screw clamps;
- screw spacers;
- magnetic corners.
Switchable magnets
In this type of equipment, it is possible to control the intensity of the magnetic field, turning it on and off. This effect is achieved by rotating one magnet inside the housing relative to the other so that their magnetic fields either mutually enhance or neutralize each other, and the field does not pass beyond the housing.
Switchable magnets are placed and removed from workpieces with one finger movement. Such devices are especially convenient when it is necessary to correct the position of workpieces.
Another advantage is that after turning off such a holder, all sawdust, trimmings, shavings and other small metal waste fall off it, making cleaning easier
Switchable magnet
Clamps
The equipment is designed to reliably press the workpieces against each other.
Its outer part, made in the shape of a right (or other) angle with a cut out top, is the fixing part, and the inner part, equipped with a screw feed device, is a clamping device.
Essentially, this is a vice with jaws bent at an angle. The parts (profile or rod) are placed in a clamp and pressed against each other with a screw.
The dimensions and shape of the parts are limited by the size of the clamp. It can be used not only for welding, but for other plumbing work.
Clamp
Spacers
Spacers are used to create the required gap between the workpieces to be welded.
Home craftsmen choose for this purpose cutting pipes and profiles from a waste box, but it is much more convenient to use an industrial product. The spacer is also equipped with a screw and is a “reverse clamp”.
It can be adjusted to any required clearance within the screw stroke. Spacers and welding magnets are often used together.
Magnetic corners
One of the most commonly used devices is a corner. Its main advantages:
- Reduces the labor intensity of the welding process. The time for fixing workpieces is reduced several times.
- Parts can be fixed at almost any angle between them.
- The device is compact and does not interfere with welding work.
- The time for removing equipment is also reduced several times compared to clamps.
Magnetic corner
Magnetic corners are available with both fixed angles and freely variable angles. To do this, they are equipped with a hinged device with a lock.
Structurally, the equipment consists of two metal plates cut from sheet metal and permanent magnets fixed between them. The most popular are universal flat corners, reminiscent of a house with a cut off roof.
But there are also three-coordinate spatial clamps in the form of polyhedra or cylinders. They allow you to assemble very complex spatial structures, such as power line supports, spatial trusses, etc.
Purposes of use
The main goals pursued by the use of magnetic holders for welding work are the following:
- convenient and reliable fixation of workpieces;
- placing them in space in strict accordance with the product drawings;
- precise alignment of angles between parts;
- reducing the labor intensity of welding and improving its quality;
- replacement of obsolete screw clamps and clamps.
Magnetic corners for welding have a clamping force from 5 to 60 kg and are used with sheet metal and rolled profiles.
According to the degree of versatility, equipment is divided into two types:
- universal;
- corner magnets.
Universal equipment has one or more degrees of adjustment and allows you to work with workpieces of flat, cylindrical and multifaceted shapes, connecting them at arbitrary angles in several planes simultaneously. Such devices are indispensable when assembling complex spatial structures. They are given increased resistance to heat and splashes of molten metal.
These advantages of professional-grade equipment come at the price of a high price and limited availability in regular hardware stores.
The square is much simpler in design, easier to learn and allows you to cover most of the needs of the home craftsman.
Triangular Welding Magnets Hexagon Welding Magnets
Angles are available in three main forms:
- sagittal (“house”);
- triangular;
- hexagonal.
Arrow-shaped and triangular ones allow you to weld workpieces at angles of 45°, 90° and 135°. Hexagonal, in addition, support angles of 30°, 60°, 75°.
Using magnetic squares when working with simple structures saves even more time than using universal ones. The disadvantage of such devices, especially their budget models, is the low magnetic force.
Advantages of magnets
The main advantages of magnets compared to screw and wedge equipment are:
- Easy and quick rough assembly of the structure.
- Possibility of fixing parts at the most common angles of 45°, 90°, 135°. Advanced models of magnetic fasteners for welding will allow you to fasten workpieces at angles of 30°, 60°, 75°, and universal ones - at any angle.
- Saving time on preparatory operations several times.
- The fasteners are small in size and do not interfere with welding.
- Switchable welding magnets make it easier to install or remove.
- Easy to clean from shavings, sawdust and slag. (especially switchable ones).
The disadvantage compared to screw and wedge fastenings is their inapplicability to wood, plastic and other non-magnetic materials.
Criterias of choice
Before you start buying a magnet for welding, you should think about what specific operations you are going to use it for. In addition, the volume of this work and its frequency are important.
If you need to weld the frame of a fence or greenhouse once a year, or replace the trim of a trailer body for a walk-behind tractor, there is no point in buying a professional model with fixation at an arbitrary angle in three planes, but you can get by with a couple of squares.
If you are opening a business and the scope of welding for six months to a year is clear, then a professional device will pay for itself by increasing labor productivity.
There are also several general rules and recommendations for selection:
- The higher the class of equipment (and its price), the longer it will retain its working qualities, primarily its geometric dimensions and clamping force.
- High magnetic field power allows you to hold workpieces of greater mass or length. Mid-level models hold up to 35 kg.
- A larger number of angles will allow welding of a variety of structures.
Modern high-quality devices do not have a negative impact on the stability of the welding arc. Unfortunately, some cheap Chinese holders have this effect on welding quality and are best avoided.
Switchable magnets are several times more expensive than permanent ones. But they are also much more convenient.
It becomes possible to weld without an assistant. With them, it is possible to precisely adjust the position of parts with millimeter precision - just turn off the magnet for a second and move the workpiece.
It is also much easier to remove them from the finished product after welding. Another advantage is that when the magnet is turned off, all the iron debris stuck to it falls off on its own.
Whether such convenience and performance is worth the money requested is something everyone decides for themselves.
The quality of the switched-off magnet must be high. If it switches off spontaneously during welding, the structure may disintegrate into blanks and the work will have to be redone.
A simple DIY magnetic square
The magnetic square has a very simple structure and is quite accessible for self-production by a craftsman with metalworking skills. Usually they are made by hand in three cases:
- testing your strengths and abilities;
- There is no suitable size on sale;
- for welding non-standard products.
Do-it-yourself magnet for welding
For production you will need:
- sheet metal 2-3 millimeters thick;
- round magnet (from an old speaker);
- bushings made of non-magnetic material (plastic, hard rubber, etc.);
- nuts, countersunk head screws.
The manufacturing sequence is as follows:
- Draw the outlines of the holder on the sheet. You need to be especially careful and use only a high-quality and certified square and ruler for marking. The accuracy of the assembly of your future structures will depend on the accuracy of the angles when marking.
- Using a grinder or jigsaw, cut out the parts and align their edges.
- Cut the bushings to size. It is important that they are strictly the same in height and have smooth edges.
- Pick up a piece of elastic plastic and fix the magnet along its inner hole.
- Mark the places for fastening, drill the plates (preferably together).
- Assemble the product by putting the bushings on the screws and placing them and the magnet between the plates.
The clamping force of the product depends on the accuracy of the assembly and the magnetic properties of the metal; before welding, it will have to be determined experimentally.
Magnetic holder for DIY welding
This is another design option for a magnetic corner for DIY assembly. It will require:
- metal sheet 1-3 mm;
- neodymium magnets (so-called “screw magnets”);
- dry board;
- nuts, countersunk head screws, self-tapping screws.
Manufacturing of magnetic holders for welding
The manufacturing procedure is as follows:
- Mark and cut two identical blanks from the sheet, carefully monitoring the accuracy of the angles.
- Make the central part of the holder. Cut it out of the board so that it follows the contours of the metal plates, but recedes inward to the height of the magnets plus a millimeter to one and a half.
- Fasten the metal and wooden parts of the product together.
- Using self-tapping screws, screw the magnets to the wooden spacer around the perimeter so that they are at the same distance from each other.
Before starting work, you need to check the geometry of the resulting equipment - its angles and dimensions.
The cost of magnets for welding ranges from hundreds of rubles (household models made in China) to tens of thousands (switchable universal professional devices from well-known brands with the ability to work in many planes and arbitrarily set angles). But it is possible to make their analogue yourself:
- Cut two triangular-shaped plates from a sheet of metal (or in the shape of a house with a cut off roof). You need to carefully monitor the exact alignment of the angles.
- File the edges.
- The magnet can be used from faulty speakers or a microwave oven.
- Mark and drill through holes in the corners of the triangle and in its center.
- Using four screws and nuts and bushings equal in height to the magnet, fasten the structure so that the magnet is clamped in the center.
- To reduce contamination, plastic plugs can be placed along the end faces.
DIY switchable magnet
The shape of the magnet for welding may not be triangular. It is selected depending on the needs of the assembled welded structure.
, please select a piece of text and press Ctrl+Enter.
Clamp types
The grounding terminal for the welding machine can be magnetic or in the form of a clothespin, clamp, or centralizer. Let's look at the main varieties.
"Crocodile" ("clothespin")
This type of clamp is used in most electric welding machines. Attaches directly to the workpiece. Among the advantages of an alligator leather clip it is worth highlighting:
- reliable fastening to the surface of the product;
- the ability to attach a wide range of geometric shapes to parts;
- quick attachment/detachment;
- Ease of use;
- low connection resistance;
- wide opening angle.
The disadvantages of clothespins are as follows:
- it is not always possible to attach the “crocodile” directly to the part (for example, to a large diameter pipe);
- The weak point of the mechanism is the spring, which does not have the maximum level of strength.
Alligator clips are most often found in 200 A, 300 A, 500 A versions. Professional welders will need modifications for 400-500 amps.
Magnetic welding compound
This type of terminal is also often used by welding professionals. Advantages of magnetic locking:
- fastening to any surface, in particular to pipes;
- excellent option for hard-to-reach places;
- simple design;
- ability to withstand voltage surges without exhaustion;
- significant contact area.
Disadvantages of magnetic devices:
- unreliability of fastening in the case of a small contact area with the part;
- incompatibility with workpieces made of non-ferrous metals;
- the need for periodic cleaning;
- demagnetization due to overheating.
It is worth remembering that the magnetic mass clamp for the welding machine heats up when attached to a dirty surface.
Clamp
This is a screw mechanism. Features less frequent use than the two types of ground terminals listed above. Among the advantages of clamps:
- reliable fastening;
- Smooth current transmission due to excellent contact with the workpiece.
The disadvantages of clamps include a complex mechanism and cluttered design.
Recommendations on how to extend the life of an alligator clip
The main design feature of such a welded mass is a spring, which ensures quick attachment to the metal. This is also the Achilles heel of the device.
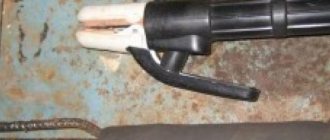
Understanding the operating principle of the “crocodile” mass allows you to extend its service life and not have to give up two or three welding jobs. What is it about. Each clamp has a strip (copper or brass) that transfers contact from one jaw to the other. If you do not monitor its condition and incorrectly connect the mass to the metal, it may deteriorate. A common malfunction: the contact fitting with the wire to one clamping jaw can slip through the spring to the other. As a result, the spring begins to heat up, which leads to a loss of its hardness and elastic properties (in metallurgy, this process is called tempering), aimed at reliably securing the clamp to the surface of the metal product. Because of this, the mass quickly collapses. To maintain working condition, it is necessary to monitor the condition of the strip: it should not touch the metal when connected. The photographs clearly show what we are talking about.
Incorrect contact
Correct contact
Find a crocodile for professional work. What positive aspects does it usually have:
- the design is correct (the strip is recessed so that it cannot be touched)
- quality materials,
- more powerful spring;
- greater girth (sometimes simply irreplaceable).
I take it with a reserve of 400 -500A.
Homemade magnetic clamps
You can make a magnetic angle for welding with your own hands; it is not difficult, especially since there is more than enough information on the order of the operations performed.
Design
A magnetic fixture or device is typically made from two separate parts. First, there is the contact or point where the lead cable is secured to the holder. Secondly, it is the magnet itself, which can have different shapes and dimensions. The two parts of the prefabricated product for welding are connected by means of a special fastening, ensuring their reliable coupling. In this case, special attention is paid to the total weight, which should not exceed a certain value.
Thus, magnetic welding triangles from ESAB have a total weight of about 850 grams and guarantee ease of handling.
Taking into account the design features of welding magnets, you can begin to directly assemble them.
Self-production
You will need a fairly “strong” magnet, which can be used as the base of a powerful speaker that has become unusable. Next, you will need to find two sets of thick washers that fit them in size. And finally, you should stock up on additional fasteners (bolt and nut) necessary to connect the welded cable clamp. When assembling the system, first drill a hole for the bolt in one of the washers (which will serve as a contact pad). After this, it is inserted into the workpiece and welded.
The head of the fastening bolt is ground down with a file to the thickness of the washer itself (flush with the contact plane).
After welding, the mushroom-shaped structure is carefully cleaned with a file, and then a magnet from the speaker is threaded onto it. To complete the work, a second washer is attached to the protruding threaded rod and the end of the cable is secured here, and then the entire structure is tightened with a nut.
At the end of the review, let us draw your attention to the fact that, despite the significant savings when making a welding holder yourself, branded magnets are still more reliable and durable.
Types of magnetic squares
Welding magnets can vary in both shape and operating principle:
- The clamp is a flexible square with adjustable angles. An excellent tool for making parts of any complexity.
- Single bend for fixed angle permanent magnet welding.
- Removable soldering magnets are an excellent technical solution for ease of use: after soldering, you can turn off their action, the supports “detach” themselves, which allows you to remove the clamps without effort or deformation.
- Universal magnetic welding angles with several standard angles are another excellent technological solution for performing a variety of jobs of varying complexity.
- Teams with different strengths. It is clear that for fastening massive parts, powerful clamps are needed, and for small work that requires jewelry precision, they must be compact both in size and in terms of attractive force.
- Three-dimensional and tetrahedral squares with cylinders and heat-resistant ferrite magnets for working in difficult temperature conditions and with parts of different sizes and weights.
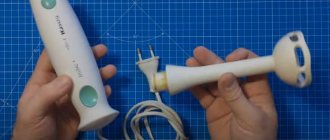
How to make magnetic mass for welding
Magnetic mass for welding is a convenient device that allows you to attach it to the parts being welded, and a good alternative to standard clothespins.
Often, additional accessories for the welding machine are either of poor quality and break, or may be missing altogether. Magnetic mass for welding is a convenient device that allows you to attach it to the parts being welded, and a good alternative to standard clothespins.
What does such a contact consist of, what positive qualities does it have and how to make it yourself. More on this later in the article.
Magnetic corner for welding, make it yourself or buy
Why are magnetic corners used in welding?
Everyone, and not just a welder, imagines the welding process. The two parts are applied to each other, if necessary, tacks are made so that the parts do not move apart, and the process begins. The whole difficulty is to keep these two parts together in a certain position until the end of the tack.
A magnetic corner for welding is a device that helps solve the issue of freedom of action. It helps not only to connect the workpieces together in the desired position, but also to fix them. The device is very popular, as it gives freedom to the welder’s hands. There is no need to hold the tack with one hand and the welding holder with the other.
The corner is usually made so that there are angles of different degrees, which helps to connect the structures in the position specified according to the drawings. Magnets hold the structure until the welding process is completed. Naturally, the welding accuracy is much higher with the use of this device, and the process itself is much faster.
Magnetic corner for welding, make it yourself or buy
By the way, such a corner can be used not only during welding, but also for metalworking work, for example, for cutting workpieces, when processing a part by cutting, for example, drilling, cutting, and so on.
Of course, different types of this device are produced, which differ from each other. It’s a good idea to have several types of corners of different shapes for work, that is, with different angles. This refers to a simple tool whose angle is set during manufacture.
There are also special, as they are also called, magnetic clamps, the angles of which can be set by adjustment.
There are those in which the magnet can be turned off, which is convenient when finishing work - the toggle switch is turned off and the magnet is easily removed.
The magnets themselves can also be manufactured with different powers. If you work with small parts, you don't need a powerful tool. And vice versa, if the structure is heavy, a weak magnet will not hold its parts.
Which is better to choose and buy a magnetic corner for welding
When choosing a magnetic corner, you already know in advance what types of parts you usually weld and how often. If the work is varied and frequent, the parts are both large and small, it is better to choose a powerful magnet or a set of several different ones. They will pay for themselves more than once later.
If the work is generally not complex, you can buy an inexpensive clamp with a standard shape.
Of course, a corner with a switchable magnet is quite expensive, but it is possible to turn it off when the welding arc approaches the place where the corner is located. After all, a welding arc and a magnet together are two incompatible things.
The price for a household magnetic corner for welding starts from 190 rubles, for example from the Inforce company, jointly produced in Russia and China. When choosing, you need to check and choose a clamp that has the most accurate angles and holds the magnets well.
The Kedr company also has good magnetic corners of Russian-Chinese origin. Price from 210 rubles, good quality, for household use.
There are many good reviews about corners from Foxweld, for example, FIX -4Pro made in Italy. Its price starts from 420 rubles, the magnets can withstand weight up to 22 kg.
Magnetic corner for welding, make it yourself or buy
The same company produces a set of such corners in the amount of 4 pieces. But they are small and useful for simple work. If you buy a corner with a magnet switch off, this will cost from 980 rubles. Good reviews about a brand like Smart. This is a completely Russian company. The price is higher than the Chinese, but the quality is better.
Magnetic corner for welding, make it yourself or buy
In Moscow, you can buy magnetic corners for welding from this company at a price of 450 rubles.
The reviews called the magnetic corners from the Russian manufacturer Bars a third hand, they hold the workpiece so powerfully and reliably. The most powerful ones, which can withstand up to 30 kg, cost from 630 rubles in Moscow.
Magnetic corner for welding, make it yourself or buy
Welding using magnetic corners is very simple. If you take a package with a corner, for example, one of Smart Solid, popular among Moscow welders, or from another company, the instructions are printed on the back of the package.
Magnetic corner for welding, make it yourself or buy
The correctness of the angles on the device can be checked using a ruler and, if anyone has one, a Svenson square or a school protractor.
Magnetic corner for welding, make it yourself or buy
Of course, if the parts are very long, there is a risk of small errors, but these can be avoided by using a second square or using a tack.
Magnetic corner for welding, make it yourself or buy
In principle, this is an indispensable item for a welder. Of course, transformable corners are even more convenient, but their price is quite high. In principle, you can use two corners to create the desired angle.
Magnetic corner for welding, make it yourself or buy Magnetic corner for welding, make it yourself or buy it
How to make a magnetic corner for welding with your own hands
Making a homemade magnetic corner with your own hands is not at all difficult if you have plumbing skills.
Of course, it’s unlikely to be possible to make a switchable magnet, but a set for the job can be made.
To do this, you need to remove the magnet from a more or less powerful speaker, make an accurate drawing of the device and the following materials:
- steel sheet approximately 2-2.5 mm thick;
- cold welding adhesive for metal with resistance to high temperatures (welding involves heating);
- rivets for connection;
- angle grinder;
- electric drill with a metal drill;
- square with protractor;
- file for deburring;
- riveter
The drawing of a magnetic corner for welding may vary depending on the shape you have chosen.
Magnetic corner for welding, make it yourself or buy Magnetic corner for welding, make it yourself or buy it
We make markings on the sheet according to the selected drawing, which we cut out using a grinder. Place the template on the sheet and cut out an exact copy. Then, using a file, we adjust the dimensions of both workpieces until they are absolutely similar and the dimensions in accordance with the angles.
Then, holding both combined blanks in a vice, we drill holes in both blanks immediately for the rivets.
We glue a magnet between the plates and press it until it locks into place. For about an hour.
Using rivets, we assemble the plates, which can then be painted with high-temperature paint. After the required time for the glue to completely cure, the corner can be used.
This product can hold weight up to 3 kg. For more power, we use more powerful magnets, for example from a used computer hard drive, which can be taken from companies that recycle such equipment.
Magnetic corner for welding, make it yourself or buy
Rivets are most suitable for making corners, as they do not become loose during use. A bolted connection is simpler, but it gives backlash over time.
You can also use ready-made blanks for the top plates, having previously adjusted them to a more precise size.
Magnetic corner for welding, make it yourself or buy
There are a lot of manufacturing options, you can also watch this video:
https://www..com/watch?v=SgN7YJ34M7Y
Having a set of corners on hand, you can do without a sliding form; you can always set any corner.
Rules for servicing the inverter device
Maintenance of an inverter-type welding machine includes the following.
- Visual inspection. It must be carried out every time before and after starting work in order to detect any damage to the insulation of welding cables and power cables. In addition, during an external inspection, the absence of damage to the housing and controls is checked (it is necessary to check the current regulator).
- Internal cleaning of the unit. This is carried out after removing the casing from the device to remove accumulated dust and dirt from all its components. Cleaning is carried out with a jet of compressed air directed at dusty parts.
- Checking and cleaning the device terminals. Power cable connection points should be checked periodically. If oxidation is found on the terminals, remove it with fine sandpaper.
Also avoid exposure to drops of water, water vapor and other liquids that may enter the machine and cause a short circuit in the electrical circuits of the inverter welding machine. If liquid gets into the device, remove the cap and remove all moisture. Dry the inverter electronic board thoroughly with a regular hairdryer.
The direction of electron movement is regulated by polarity by switching the wires to “plus” or “minus”. That is, when working with DC welding, two settings are possible:
- Straight polarity. The negative is connected to the electrode, the negative is connected to the ground terminal. In this case, the current moves from the electrode to the workpiece, and the metal heats up more.
- Reverse polarity. The plus is connected to the electrode, the minus to the ground terminal. The movement of current from minus to plus (from the workpiece to the electrode) creates more intense heating.
Direct and reverse polarity of the connection when welding with an inverter is used depending on the work and the quality of the materials. With alternating current, the type of connection is not important, but with direct current, you can change the polarity manually.
Installation and connection of the unit
To use your inverter efficiently and safely, you must first properly prepare it for operation. This process is carried out in several stages. The first task is to install and connect the unit. Installation of the inverter must be carried out according to certain rules:
- the unit must be positioned so that it is at a distance of at least 2 m from walls or objects;
- the device must be grounded;
- the welding location must be chosen so that it is away from flammable objects;
- It is recommended to cook on a free area or on a metal table.
The inverter can be connected both to a home network (220 V) and to a 380 V network, which is usually used in production. If you plan to use the unit away from electrical networks, it can be connected to a generator, diesel or gasoline.
Electrical connection
Connecting a welding machine to a household electrical outlet often causes problems. The reason for their occurrence may be old wiring or insufficient diameter of its wires. Typically, the wiring is designed for a current of up to 16 A. And since all switched on devices in the house can exceed this value, for safety reasons, circuit breakers (circuit breakers) are installed. Therefore, when connecting, you need to know the power of the welding machine so that it does not activate the machine.
Connecting the inverter to the home network
It is also worth paying attention to network drawdown. If, when the inverter is turned on, there is a decrease in the voltage in the network, this indicates an insufficient cable cross-section. In this case, it is necessary to measure to what values the voltage drops. If it falls below the minimum with which the inverter can operate (specified in the instructions), it is impossible to connect the device to this network.
Using an extension cord
The network cable connected to the inverter meets all power requirements and does not create connection problems. But if its length is not enough, it is necessary to select an extension cord with a wire cross-section of at least 2.5 mm2 and a length of no more than 20 meters. These extension cord parameters will be sufficient to operate the inverter with a current of up to 150 A.
It should be remembered that when connecting the device to the network through the holder, the remainder should not be wound, since when the unit is turned on, it will turn into an inductor. As a result, the conductors overheat and the extension cord fails.
Connection to generator
In cases where the device cannot be connected to the network, it can be connected to a generator that runs on either gasoline or diesel fuel. The most common are gasoline power plants. But not all of them are suitable for connecting welding machines. For the inverter to work effectively, the generator must have a power of at least 5 kilowatts and provide a stable output voltage. Overvoltages can damage the welding machine.
You should also consider what diameter of electrodes you will be working with. For example, if the electrode diameter is 3 mm, then an operating current of approximately 120 A will be required at an arc voltage of 40 V. If we calculate the power of the welding inverter (120 x 40 = 4800), we obtain a value of 4.8 kW. Since this will be an energy consumption, a power plant capable of delivering only 5 kW will operate at the limit of its capacity, which will significantly reduce its lifespan. Therefore, a generator must be selected with a certain power reserve, approximately 20-30% more than that consumed by the inverter.
How to do it yourself?
Experienced craftsmen try to reduce all costs for the purchase of auxiliary and working equipment to a minimum. Due to the simplicity of the design, no special equipment or complex tools are needed for manufacturing .
To assemble a homemade device, you should prepare the following equipment:
- Magnet . The working part of the unit. It must have sufficient power to securely attach to metal. Magnets from old car speakers with a power of 10-15 W are ideal for this purpose.
- Two washers . Their size must correspond to the diameter of the magnet.
Sometimes it can be difficult to select washers for the size of the magnet. It is much easier to make washers yourself from sheet metal.
- A set of hardware for fixing the welding cable.
Algorithm for performing the work:
- One of the washers will make contact with the working plane. It is necessary to make a hole in it corresponding to the size of the bolt head.
- The cap is cut to the thickness of the washer.
- After preliminary preparation, the structure is connected by welding. The product should resemble a mushroom, in which the threaded part of the bolt plays the role of a leg.
- A magnet is placed on the mushroom. Place a second washer on the reverse side.
- A welding tip is attached to the thread, and the entire structure is secured with nuts.
Functionality testing is performed only in the field. The quality criterion will be the correct functioning of the welding machine.
Do-it-yourself welding machine compound is a great way to save money, as well as a means to test your DIY construction skills.
A properly assembled device will last no less than the factory clamp.
How to improve the ground terminal?
As a rule, novice welders face this problem. Purchase an inexpensive inverter for manual arc welding at home: for a fence, gate, barn, etc. Such an inverter, which costs 6-10 thousand rubles or more, is equipped with an alligator clip. In addition to other negative aspects of such a clothespin, which were already mentioned above, it most likely has steel jaws coated with a thin layer of galvanized copper (to give the impression that they are copper). It is very easy to check whether it is copper or steel; you just need to bring a magnet. If it is magnetized, it is steel. Food grade stainless steel usually does not magnetize to an uncured state, but that's a different story (see the article "How to Tell What Type of Metal is It").
Why are steel jaws dangerous? They get very hot: steel is a much worse conductor than copper or brass. To prevent this from happening, you can remake a cheap clothespin, which costs 40-50 rubles. (unless, of course, you have copper or brass in your house, such as a plate or pipe, rubber).
What should be done? It is necessary to unscrew the original jaws, which are held on by bolts, and make other jaws from them, as if using a template. It is enough that they represent the Russian letter “P” in cross section. You can easily get good contact with a low-quality clothespin!
Advantages and disadvantages
Electric welding is the most common method of joining metal products. The quality of the future connection depends on the integrity of the electrical circuit .
That is why the invention of the device in question aroused serious interest among specialists.
The popularity of magnetic mass for welding is due to the following advantages:
- Reliable fixation will allow the welder to concentrate on work without being distracted by adjusting the clamp.
- The working mechanism is a permanent or switchable magnet. Subject to compliance with operating conditions, it can serve for an unlimited period.
- You do not need any consumables to use the holder.
- Even compact models have a contact patch sufficient for reliable closure.
- The device is resistant to sudden voltage changes or temperature changes.
- The magnet can be attached to any place to create comfortable conditions for making the connection.
Despite the large number of advantages, there are a number of disadvantages:
- Before use, it is necessary to prepare the surface. The procedure involves removing dirt and foreign particles.
- There is no possibility of attaching to small parts, for example, a circle with a small cross-section.
- It is impossible to work with non-ferrous metals because they are not magnetic.
Main selection criteria
For professional work, you should choose a high quality tool. Devices are exposed to high temperatures, which reduce the magnetization coefficient of low-quality specimens. The fixture must be free of chips, gouges and other defects where it touches the clamped product. Irregularities do not allow objects to be firmly fixed at a given angle.
- Important! The advantage of switchable corners is the ability to turn off the magnetic field both on the entire device and on its individual faces. These devices are suitable for craftsmen who often weld parts of complex configurations
Chinese angles have a budget price, but they cannot withstand temperature changes, so they quickly break. To weld products at different angles, it is recommended to choose a customizable mechanism or purchase a kit containing several types of tools for clamping at certain angles.
Features of using magnetic mass
Before using the device, you must connect the cable to it in accordance with safety regulations. It is prohibited to connect a mass without a tip with a hole for bolting. This requirement also applies to the welding machine.
Factory models are available with a knob for turning the magnetic field on/off. In the default position, the mass will not be attracted to the metal. In advanced models, the same knob is used to adjust the clamping force.
To activate the magnetic field, the mass is applied to the workpiece and the handle is turned. When disconnecting, perform the steps in reverse order. Attempts to quickly transfer the device to another place in an active state usually end in its breakdown.
You cannot install the terminal close to the welding site, as when overheated the magnet loses its properties.
Immediately after completion of welding, it is necessary to remove adhering metal particles from the contact surface, which reduce the clamping force.
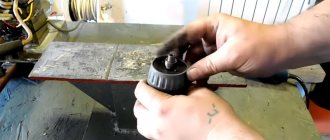
Progress of work on the manufacture of a homemade magnetic square
Using a hammer and chisel, I separated the "magnetic part" of the speaker. (It is secured with four rivets).
After this, all that remains is to remove the magnet.
Next I started making the plates. I cut them out of an old window sill. (I’m surprised myself, but it was made of “black” non-galvanized iron, 1 mm thick!). The metal was very magnetic, which was what I needed in the first place.
Using a mechanic's square, attaching it and the resulting magnet to the workpiece, I determined the dimensions of my future product, drew it and cut it out with a grinder:
Next I marked and cut out the corners. Corners need to be cut for several reasons:
Firstly, when cutting a profile pipe (and especially with a thick circle on a cutting machine, burrs remain on the edge. During welding, they will easily melt and will not interfere. But the square will rest against them. Therefore, after the pipes are cut to size , you will have to clean off these burrs.
Secondly, if there is not a large gap in the corner, you can accidentally weld the square itself to the workpiece.
I did not mark the second plate. I simply attached the first one to it (already with cutouts) and, according to this template, marked it and cut it out too:
Next I did some fine tuning. After all, it is not possible to cut very accurately with a grinder, and precision is needed down to fractions of a millimeter. Therefore, I had to finish it manually.
I took a piece of a wide profile pipe, spread a strip of emery cloth on it, and manually ground off the sides of my metal triangles on it, periodically putting them into a mechanic’s square and checking “for clearance.”
After that, folding the blanks evenly and squeezing them in a vice, I drilled holes in them for the rivets. (I forgot to photograph this process). And after that, just in case, I tightened them through the holes with M5 screws and once again “finished” them on sandpaper, this time two together.
Many DIYers make the angles “open”. That is, they don’t cover the end with anything! It is unacceptable. Because when working with metal, a lot of sawdust, scale, small scraps and other magnetic debris appear. Since all this debris is very light, it sticks abundantly to the magnet.
That is why its shape should be such that it can be easily cleaned. That is, its ends should be smooth planes. I made them from a thin aluminum plate. Some kind of edging from an old refrigerator shelf came under my hand.
From it I cut a strip with a width equal to the thickness of the magnet:
And from it I bent a frame around the perimeter of the plates. It will be inserted between them, and tightly clamped with rivets.
A ferrite magnet can be cut quite easily with a grinder. But, unlike cutting metal, you shouldn’t even try to use an abrasive wheel. It will slip and you will simply overheat the magnet. (By the way, if anyone doesn’t know, permanent magnets lose their properties due to overheating.). You need to cut with a diamond wheel. A diamond wheel for wet cutting is best suited.
And when cutting, the magnet must be cooled with water.
Why did I make the ends out of aluminum, and at the same time focus on another common mistake. As you know, any magnet has two poles, conventionally called “north” and “south”. Both poles are equally well attracted to the metal. Magnets of this shape have poles on planes. That is, when we apply metal plates to the planes, then these plates are the poles of the magnet. And it is with them that our square will “stick”, and not at all with the plane between them.
But, most importantly, the poles of the magnet cannot be “short-circuited” with magnetic material! This reduces its properties, and, in addition, contributes to the fact that the magnet, albeit slowly, demagnetizes!
I decided to connect the plates with blind rivets. I will only use aluminum parts:
Having inserted the rivet, I simply flare it from the back side with this core, once made from a car valve:
But before that you need to paint. I painted the aluminum frame black.
The next day I assembled the square: