Rules for hunting grouse in autumn
Black grouse are cautious, timid birds. Therefore, you should look for them in places where there is both food and natural shelter from enemies. What does the grouse eat depending on the season, and where to look for this bird:
- beginning of autumn - berries, thorn flowers, growing in clearings. You should look for grouse where the grass is tall enough for the bird to feel safe. Height range – from the knee to the chest of an adult;
- mid-autumn – birch buds, so you should look for birds in birch forests;
- Also, in an unfamiliar area, you should ask local hunters about the habitats of grouse.
You can only hunt males.
You can't kill the entire brood.
You should go hunting in the morning, while it is still dark. The black grouse's track is clearly visible from the fallen dew.
A good time for hunting is a cloudy, windless day. In such weather, black grouse walk all day in search of food. Also, wet leaves and branches do not rustle so much underfoot, which allows the hunter to get closer to the birds.
Surgical incision
After taking the “measurements” we get to work. You need to prepare a clean cloth in advance to remove the blood so as not to stain the feathers. We place the carcass on its back. We spread the feathers on the chest, take a large scalpel in our right hand and make an incision from the base of the neck to the end of the body.
This movement must be firm and confident. The incision must be deep so that the skin separates and does not tear or bunch up like an accordion. However, you should not go so deep that the internal organs of the bird appear. This can get your feathers very dirty.
Next, we act more carefully, using the same large scalpel or changing it to a small one. All skin and feathers should be removed from the bird. To do this, you need to cut off all the connecting fibers, muscles and film under the upper layers of the “skin”. Usually the skin is very easily separated from virtually the entire body.
Different ways
Grouse hunting is divided into several categories:
- chassis;
- ambush
Walking hunting includes : from the approach, with a dog, on the current.
Ambush hunting: with decoys, with stuffed animals.
Let's look at different methods of hunting grouse.
From the approach
Approach hunting involves the ability to silently approach a bird within shooting distance and kill the game on the spot.
The black grouse is a rather cautious bird, so you need to approach it under the cover of vegetation, carefully, noticing the moments when the bird feeds. During this period, she can let the hunter get close enough.
In the fall, the young animals have already moulted, so it is not difficult to distinguish a cockerel from a hen by eye. Suitable shot for shooting:
- at the beginning of the season, for young animals – No. 7-6;
- in October - Nos. 5-4.
The weapon of choice is usually a double-barreled shotgun.
With stuffed animals
Hunting with stuffed animals is a type of ambush commercial hunting. They hunt in this way at the end of autumn, when the birds gather in fairly large groups to feed.
The hunter prepares a hut in advance in which he will sit in ambush, as well as stuffed black grouse. The hut must be made in such a way that it does not stand out in the area and blends in with the landscape and vegetation.
When it starts to get colder, black grouse do not fly far from their feeding areas to spend the night. The hunter only needs to watch the birds carefully to spot such places. Then, in the middle of the span, place a hide. The hut is installed in such a way that nothing interferes with the view and shot. After installing the hut, you need to give the birds a few days to get used to it. You need to take 4-5 stuffed animals.
How to place stuffed animals:
- it should be as similar as possible to a sitting black grouse;
- the chest of the “grouse” is directed against the wind;
- when there is no wind, the orientation of the scarecrow is according to the sun: in the morning - to the east, in the evening - to the west;
- Stuffed animals should be placed at dawn before the birds fly to feed;
- the scarecrows are placed on several trees, placing them at different heights.
Familiarize yourself with the rules for winter hunting for grouse on holes
With decoy
Hunting with decoy takes place during the autumn grouse season. Early in the morning, a hunter, listening to the koscha muttering, quietly creeps up to him within shooting distance. You only need to go when the scythe is snoring. However, males are quite cautious, especially those that display on the ground. Therefore, for a successful hunt, the hunter approaches him about 100 meters and then begins to beckon. You should imitate the voice of the male first, and then the female. You should shoot when the scythe approaches to a distance of 30-35 meters. There must also be a good view for the shot to be productive.
However, before hunting with a decoy, you need to practice properly. Having heard the falsehood, the kosach will call out to the hunter, moving further and further.
On current
Grouse leks are permanent places. They are easy to find by sound. The sound of a black grouse can be heard over a distance of 200-300 meters, and its muttering can be heard almost a kilometer away. They breed early in the morning, so the hut for hiding should be installed during the day, when the birds have scattered.
You should arrive in the dark. It happens that black grouse even spend the night near the lek. Therefore, if the hunter is late and comes to the lek when it is dawn, the birds will fly away and will not return that day.
Sometimes it happens that there is a fairly large population of black grouse in the lands, but there is no clear current. Here and there single males are mating, or two or three whales flock together. In this case, hunters place stuffed orcas near the hut and also “chuff” them, imitating displaying males.
Features of hunting
Making bait is just the beginning of the grouse fishery. It is important to choose the right place for future hunting and arrange the stuffed animals so that the black grouse decide that this is their full-fledged gathering. The season opens in early autumn and can last all winter. The best time is mid-October, when the leaves have finally fallen from the trees.
The optimal hunting location is between the swamp, where the birds sleep, and the forest. Stuffed animals are placed on high perches, up to 4 m high. This should be done in the evening, after setting up the hut. If there are black grouse nearby, they should be carefully driven away. It's best to do this one at a time. Then you need to wait until morning. Only then can the hunt begin. An alternative option is to do the above steps at the edge of the forest. But it will be worse, since bushes and trees will interfere with normal visibility. An ambush near the swamp itself is also ineffective. Birds will return to roost late in the evening; twilight will not be favorable for targeted shooting.
Alexander
Hello, I'm Alexander, the mastermind behind the blog. In terms of career and free time, I connected my life with the forest. How could it be otherwise when you live in Karelia! In this blog, I am responsible for sections dedicated to hunting, hiking and equipment. Welcome to my world!
How to catch a grouse without a gun
You can catch black grouse without a gun using self-catchers. Use:
- fallen samolov, for example, slopets;
- live traps arranged on the principle of cages, for example, cats, mortars.
The disadvantage of a litter trap is that a grouse can also fall into it, but grouse from live traps can be released into the wild, leaving only grouse as a trophy.
See also! Shot for grouse
Making eyes
Next, you need to select the plexiglass itself. It should be about one millimeter thick if the diameter of the stuffed animal’s eye is planned to be made up to 10 mm. Accordingly, if the “eyes” are supposed to be made twice as large, then more powerful plexiglass will be required. For example, for an eye diameter of 30 mm, the thickness should be at least three millimeters.
Initially, you must take colorless plexiglass. It should be heated over a lighter or candle and cut into strips. Ideally, their width should exceed the diameter of the hole by 1.5-2 mm. And if the stuffed animal’s eyes are large, then by 3.5-4 mm.
It is advisable to cut a square on each strip, leaving it to stick to a thin part of the plexiglass so that it can be easily torn off later. The corners need to be quickly rounded while the material is heated and “fusible”, and, applying it to the hole, press it into it with a poisson, then hold for a couple of minutes, allowing it to cool.
Once the plexiglass has cooled, you can begin drawing the eye. We decorate the pupil with black, and paint the iris with the paint that is typical for this species.
Small thing
The small-caliber gun, popularly nicknamed the “small gun,” won the hearts of hunters thanks to its following qualities:
- quiet shot;
- small recoil;
- low price.
Small rifles chambered for 5.6 mm rimfire are allowed for black grouse.
However, purchasing a small gun also entails other expenses, namely, a rangefinder to track the effective shooting distance.
What you need to know when purchasing a small-caliber rifle:
- is it allowed to hunt with it in this particular region;
- a small bullet can fly up to 1 km, so the shot should be fired strictly above human height.
ATTENTION! Sharpen your shooting skills! Do not shoot at grouse further than 100-130 meters!
Pneumatics
The advantage of an air gun is that it is an accurate weapon for a reliable engagement distance of 50-70 meters. For black grouse they take a caliber of 5.5 or 6.35. Depending on the caliber, as well as the shooting distance and game, a bullet is selected.
Therefore, before hunting with an air gun, you need to be clearly confident in the gun so as not to cause wounded animals. To do this, you need to shoot at different targets made of different materials (can, plasticine, board) with bullets of different weights from different distances.
REMEMBER! The strength of the wind also affects hitting the target.
This way, you will select the optimal bullets and the optimal distance for you.
Rifled
Hunting with rifled weapons is permitted only in the autumn-winter period.
A rifled weapon is necessary for those types of hunting when it is necessary to make a long shot. For black grouse they take 5.6-7.62x39.
The cutting pitch of the barrel should also be taken into account. If it is more than 230, then the bullet, when it hits the scythe, will tear it into pieces.
Black grouse are tough to wound. A wounded animal, filmed from a considerable distance, can go into the thickets, hide there and die from its wound. Therefore, the accuracy of the shot in this case plays an important role.
For rifled weapons, the flight range of a bullet can be about 5 km, therefore:
- you can hunt with rifled weapons in vast areas;
- remote from the possible location of people;
- there must be a good view over a long distance in all directions;
- shoot above a person's height.
REMEMBER! Autumn is the period of “quiet hunting”. Don't shoot the mushroom pickers.
Carbine
Carbines can be either smooth-bore or rifled. They are used for shooting at game from a considerable distance - more than 100 meters. However, it is not recommended to shoot at 250-300 meters.
When using a carbine, you also need to have optics, and ideally also a rangefinder.
Shooting accuracy must be excellent, otherwise the hunt is fraught with wounded wounds and disappointment. Self-loading automatic or semi-automatic carbines allow you to fire several shots in a row, but practice shows that usually only one shot is fired at one group of birds. Carbines are quite heavy weapons - from 3.4 kg, therefore, if you are planning a long walking hunt, the weight of the firearm must also be taken into account.
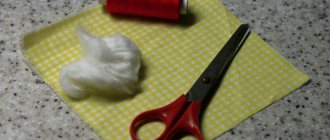
Making a stuffed bird
Hunting is a useful activity that brings not only tasty meat, but sometimes also beautiful trophies. For example, the horns of ungulates can be hung on the wall, and warm clothes can be sewn from the skins. Taxidermy masters are ready to make spectacular stuffed animals from unsightly-looking “raw materials” for a reasonable fee.
How difficult is the trophy processing process? And is it always necessary to hire a professional to do all the work? Let's try to answer both questions at once with this material and at the same time tell you step by step and as clearly as possible about making a stuffed bird - perhaps one of the most common hunter's trophies.
Measure it a hundred times...
It all starts with measurements, as in the proverb familiar to all of us from childhood. Taking a bird carcass, we look at its height, thickness and wingspan. We also fix the length of the neck and legs. It is very important to do this on the whole carcass, since after cutting we will only have the skin and it will be extremely difficult to take accurate measurements.
In the process of making a stuffed animal, we will have to make a frame. Its dimensions will have to correspond to the parameters of the bird. If the frame turns out to be larger, then the appearance of the stuffed animal will be distorted to the point of unnaturalness. This will reduce the period of its use. Therefore, remember: it is better to make the layout so that it is slightly smaller than the bird itself.
Surgical incision
After taking the “measurements” we get to work. You need to prepare a clean cloth in advance to remove the blood so as not to stain the feathers. We place the carcass on its back. We spread the feathers on the chest, take a large scalpel in our right hand and make an incision from the base of the neck to the end of the body.
This movement must be firm and confident. The incision must be deep so that the skin separates and does not tear or bunch up like an accordion. However, you should not go so deep that the internal organs of the bird appear. This can get your feathers very dirty.
Next, we act more carefully, using the same large scalpel or changing it to a small one. All skin and feathers should be removed from the bird. To do this, you need to cut off all the connecting fibers, muscles and film under the upper layers of the “skin”. Usually the skin is very easily separated from virtually the entire body.
Limb removal
Difficulties arise when removing it from the wings, head and legs. Typically, limbs must be removed to continue skin separation. Here they start, naturally, with the birds’ feet. The skin can be removed from them up to the ankle joint. Next, it is better to cut it off using, for example, wire cutters.
Then release the leg through a pre-made abdominal incision. The same procedures should be done with the second lower limb. It will be much easier to pull the leg through the incision in the abdominal cavity if the skin can be folded like an accordion.
Once you're done with both legs, start separating the tail. To do this, a cut must be made on the back of the carcass above the attachment of the feathers. The tail section should be cut off so that they remain in place and are not damaged.
Be careful with feathers!
Then you can remove the skin from the sides of the carcass and from the back. During the operation, try not to stain the feathers with blood. To do this, periodically blot the skin with a previously prepared cloth. It is recommended to use starch flour so that even small drops are absorbed into it.
Particular care should be taken when working with those areas of the bird where feathers grew intensively. You need to try to prevent them from falling out.
When processing the wings, remove the skin from all accessible areas, starting with the forearm. It is necessary to “expose” it and cut the elbow joint.
Usually, in birds the size of a common partridge or slightly larger, the skin of the forearm is cut along the inside of the wing, exactly between the ulna and radius bones. This is the only way to prevent feathers from falling out.
In smaller birds, the skin from the forearm should be wrapped in a “stocking.” After this, you can cut out the muscles along with the tendons.
Upper part processing
The skin from the neck and head of the carcass is usually removed with a “stocking”. The main thing is to prevent it from over-stretching. You need to carefully work with a scalpel in the places where it is attached to the neck. Also make cuts where the skin meets the muscles, namely in the ear canals and around the bird's eyes.
The skin from the head must be removed to the base of the beak. However, there is one subtlety here related to the specific structure of some birds. For example, in swans, ducks, geese, herons and woodpeckers, the head will not fit through a narrow section of the neck. So you need to cut it all - from the top to the back of the head.
The exposed skull should be cut off from the carcass, then the eyes, tongue and muscles should be removed. It is convenient to remove the bird's brain through the occipital bone.
Degreasing and pickling
Thus, maintaining cleanliness and accuracy, you can remove all the skin from the bird. Then it must be carefully processed. The skin must be cleaned of any remaining meat and completely degreased. To do this, you need to blot it several times with a paper napkin, then wipe it with cotton wool and sprinkle it with starch.
If it was not possible to keep it completely clean and you still got some of the feathers dirty, you can wash them with warm water and soap. And then dry, sprinkling and rubbing with starch. Sometimes feathers can get dirty with grease. In this case, you will have to use gasoline for lighters: it is pure and without impurities.
After cleaning the feathers is completed, the skin will need to be etched using a solution of copper sulfate. This substance should be used very carefully, because it is quite active.
When working, it is better to use protective equipment - gloves and a respirator. Only the inner surface of the skin needs to be treated with the solution. You cannot touch the feathers, as they will immediately turn their characteristic green color.
The skull also requires etching. To do this, it should be immersed in a solution of copper sulfate for about a quarter of an hour. However, the skull must first be completely cleared of meat. If you can’t do this right away, you can use a pan of boiling water. After a few minutes of cooking, the meat should separate from the skull. Only then can it be placed in a solution of copper sulfate.
Half-forgotten technology
In order for the stuffed bird to look natural, it is necessary to make eye sockets. Plasticine is used for this. Eyes made of plexiglass and selected according to the color typical for this species are attached to it.
I would like to dwell on this topic in more detail. Previously, the technique of creating eyes was covered in detail in hunting publications and specialized publications on taxidermy. And now for some reason this important point is being overlooked.
So, you need to take some lead, for example, from an old battery. The metal should be melted and a round pig with a diameter of about 10 centimeters and a thickness of 2-3 cm should be made. Hemispherical holes must be pressed into it. To do this, you can take bearings of the appropriate size and drive them into the lead.
Speaking of sizes: for the eyes of a quail or snipe, a hole with a diameter of 4 millimeters is needed, for a harrier, goshawk, and duck - 8-10 mm. For each hole you need to select poissons. These are metal balls, the diameter of which is approximately two thicknesses less than plexiglass. Poissons are welded to metal rods.
Making eyes
Next, you need to select the plexiglass itself. It should be about one millimeter thick if the diameter of the stuffed animal’s eye is planned to be made up to 10 mm. Accordingly, if the “eyes” are supposed to be made twice as large, then more powerful plexiglass will be required. For example, for an eye diameter of 30 mm, the thickness should be at least three millimeters.
Initially, you must take colorless plexiglass. It should be heated over a lighter or candle and cut into strips. Ideally, their width should exceed the diameter of the hole by 1.5-2 mm. And if the stuffed animal’s eyes are large, then by 3.5-4 mm.
It is advisable to cut a square on each strip, leaving it to stick to a thin part of the plexiglass so that it can be easily torn off later. The corners need to be quickly rounded while the material is heated and “fusible”, and, applying it to the hole, press it into it with a poisson, then hold for a couple of minutes, allowing it to cool.
Once the plexiglass has cooled, you can begin drawing the eye. We decorate the pupil with black, and paint the iris with the paint that is typical for this species.
"Skeleton" stuffed animal
Then comes the turn of making a frame on which we will place the bird's skin. As we wrote above, it is important to maintain the typical dimensions for the species. Frames are usually made from scrap materials. Each master chooses the one with which it is easier for him to work.
Frames can be plaster, wood or wire. The latter are the most common, and there is the most information about their production. So, for example, to assemble stuffed magpies, snipe and birds of similar size, you need to take soft wire with a diameter of 1.2-1.5 mm. For black grouse or pheasant you need thicker - 2.0-2.5 mm. For a goose or wood grouse, that is, larger birds, a wire with a diameter of 3.0-3.5 mm will come in handy.
The manufacture of a wire frame begins with the formation of the main rod. It is usually equal to the length of the bird’s body with a small margin of 1-1.5 cm. Transverse wires, which are intended for wings and legs respectively, must also be made with a “reserve” of 1 cm on each side.
At the level of the shoulder and hip joints, it is recommended to fasten the wire with rings. Then tow should be wound on it, the total thickness of which is equal to the size of the bird carcass. If the material is not of very high quality, it may begin to unwind. However, this is not a problem. Unwinding tow can be fastened using harsh threads.
Connecting all the elements
Next, the front end of the central rod must be inserted into the bird's skull, piercing it. The wire should be threaded into the neck along with the tow. As a result, the wrapped rod should hold very tightly.
After this, you need to insert the wire into the wings and, slightly bending it, push it into the legs as well, after making holes in them with a thin awl. Try to give your lower limbs a natural position. This can be done by fixing the wire connections a little more tightly and slipping tow into the places from which the muscle layer was previously removed.
Then we need to stretch the skin over the neck and chest of the base we formed, and then sew up the top layer with harsh threads. All feathers should be put in order. After this, it is better to give the stuffed animal the most natural pose possible. It can be installed on a branch specially selected in the forest and prepared in advance.
In conclusion, I would like to give simple advice: do not despair if the first time the stuffed animal does not turn out the way you would like it to be. Unsuccessful samples can be used in large compositions, placing them like prey caught by a predator - in the mouth or paws. In the future, if you practice regularly, the stuffed birds you make will turn out better and better. And in the end, you will become a real pro in the field of taxidermy.
Nikolay Khromov , Michurinsk
About consumables and components
Before you start making a stuffed grouse, you need to acquire the following:
- Copper sulfate or its solution.
- Clay. Judging by the reviews, most often craftsmen use plasticine.
- Synthetic padding or tow. The inner padding can also be made from other soft but elastic material: technical wool, stitched cotton linings, flax floss, hay, straw, shavings and leaves.
- Black threads.
- Quick-drying paints and nail polish.
- Beads or balls from which you can make black grouse eyes.
- 4mm wire. To make the bird's legs you will need 40 cm. For the wings, a wire with a diameter of 3 mm and a length of 50 cm is suitable, for the neck - 40 cm, for the tail - 50 cm.
A stuffed grouse is made in two ways. Read more about them later in the article.
How to make a stuffed animal with your own hands
Having cut out the patterns of the body and tail, the components are sewn together. The latter is bent along the midline, and the coincidence of the boundaries is checked. This will avoid further distortions. You also need to combine the two halves of the blank body of the stuffed black grouse.
Next steps:
- The blanks are sewn together on the wrong side. This is necessary so that the seams are inside the stuffed animal.
- After manufacturing, they are turned inside out and the integrity of the seams is checked.
- Padding material. It is recommended to fill the tail with cotton or cotton wool, the main body with straw or similar natural material.
- Painting. Be sure to highlight the characteristic red spots on the neck and color the beak and tail.
- For convenience, a square or rectangular wooden base plate is installed in the lower part. A small loop on the back will also help secure the stuffed grouse.
Black grouse: description, habitats, habits
The black grouse is a large bird that can weigh up to 1.5 kg. Hunting for it continues to be especially popular.
The black grouse can be recognized by its bright plumage, which is colored green and blue. The wings have a brown tint. In females, the plumage is predominantly reddish in color.
You should look for black grouse in damp or birch forests. This bird spends almost most of its time on the ground. In winter, it has the peculiarity of burying itself in the snow at night.
The bird has no tendency to migrate. She decides to take this step in case of food shortage. The diet of black grouse directly depends on the time of year. In the summer season it feeds on berries and flowers, and in winter it switches to twig delicacies.
Correct placement and number of stuffed animals used
In addition to stuffed animals, they use profiles that differ only in their volume. In the article we combine these concepts, since when arranging it does not matter, the rules are the same. The number of profiles used should not be less than two, but the best option is 3 or 4 pieces. It is noted that three stuffed roosters and one grouse are best suited. According to hunters, one of the roosters should sit above all the other stuffed animals.
Each profile should sit in its place, as naturally and naturally as possible. It is important that these “actors” are not all at the same height. Planting of scarecrows should not be carried out in front of the black grouse. If the rules are not followed, the bird may fly past and not perch on the profiles. Display them in the most natural poses possible. A strictly horizontal posture and a strongly elongated neck indicate that the boar representative is about to fly away and was most likely alarmed by something. If autumn, or a hunting day, turns out to be calm and windless, plant the stuffed animals facing the east.
When there is wind, the chest should face in its direction; when there are strong gusts, place the profiles lower and closer to the tree trunk. In calm weather or with a small amount of it, higher and away from the trunk. Change their location on the tree if you are hunting for several days. Stuffed animals are displayed on wooden poles or stuffed animals. The upper end is pointed and the profile can be easily attached to it. A split is made from below in order to secure it to a branch or tree branch. Do not place decoys on trees where grouse should perch.
The planting tree should be left empty. The length of the pole can be short or long, each has its pros and cons. The short one is easy to operate, it is compact and light, but to place it at a height you will have to climb a tree. A long bedspread is heavier, but it is easier to install it higher. The poles are prepared in advance; it is advisable to dry them well, this way they will be much lighter. Hunting is carried out both alone and collectively. By getting ready early in the morning, having a partner can extend the process.
One of the colleagues will be in the hut, and the second will walk around the nearby area, in order to scare away flocks of feeding grouse. Having become frightened and flying towards the hut, there is a good chance that the birds will land where the stuffed animals are installed, because they give confidence and calm to their fellow birds. Autumn can be cold, so it is better to choose a time when there is still no frost on the ground. The best weather condition will be a quiet and fairly warm day, light rain will not be a hindrance.
It is better to arrive at the hut 30 minutes before the black grouse fly out of the swamps. Every day the hunter can come to the hut twice. There is a morning and evening hunt, with 4 to 5 hours between them. In the morning, black grouse are in a hurry to eat and therefore almost never fly into the trees, hurrying to the fields for a meal. After eating, a well-fed bird is much more willing to perch on trees.
It is worth mentioning winter time; there are no special differences in the approach. After deep snow falls and frosty weather sets in, it’s time to start. Their habitat most often becomes shrubs in large forests or swamps. If the place is not often visited by hunters, then black grouse do not change their roosting sites. Having found such a place (by following footprints in the snow) you can come here at night. By 11-12 at night you need to be on skis and arrive at the intended place. Slowly, slowly, begin to raise the frightened and alarmed bird. You can go even further and build a hut at a distance of 150 meters and set up a profile. In the morning, before dawn, the hunter waits for the grouse to fly out from their roosting areas.