Computer chairs are a very common piece of furniture.
It is much more comfortable to work while sitting on a computer chair than on a chair or stool.
The service life of a chair depends on its quality and the materials from which it is made.
Most often, the coating from which the seats and backs are made becomes deformed and loses strength.
Woven materials can tear if used carelessly, artificial leather cracks and becomes scuffed. The chair becomes uncomfortable and looks unsightly.
Buying a new computer chair is an expensive solution to the problem.
The most cost-effective method remains - reupholstery. Many people think that this procedure can only be carried out in special workshops.
But reupholstering an office chair is easy to do at home.
Advantages of reupholstering a chair with your own hands:
- You don't need to pay a master for the work.
- Upholstering a chair at home will take from 30 minutes to 1 hour - this is much faster than in a workshop.
- You don’t need to take the chair anywhere; you can replace the upholstery in your apartment.
- The costs of the procedure are minimal.
- Everyone has the necessary set of tools.
- Disassembling and assembling the chair is not at all difficult; you do not need any special skills or abilities.
By upholstering the chair yourself, you can save both time and money.
Timoha433 › Blog › Making a chair for a computer (without wheels)
This post is not on the topic of cars, but on the topic of home furniture. My advice is not professional or expert, since I was making a chair for the first time and decided to share what awaits when assembling even the simplest chair. Yes, there will be a lot of BEECHES, and also, yes, I’m also a photographer.
So - I needed a chair for the computer, and having experience with chairs from Ikea (which fell apart in 2 or 3 years, with my weight of 85 kg and my mobility while sitting (every person is different, someone can sit motionless for hours, I - no)), after studying the market, I came to the conclusion that all these chairs are unreliable, and if they are reliable, then the price exceeds 16 kopecks. Plus, in the office, one after another, similar chairs are falling apart, plus one gets the feeling that with all the turns, bells and whistles, they are not hard and the back constantly feels the load. In the end I decided to do it myself. Without any movement, without wheeled legs, under your table (height), so that it moves behind the table, under your height of 184 cm.
Where to begin? From searching on the Internet! There are thousands of articles on the Internet about how to do it yourself, but as a rule, you need to have a bunch of tools, and the chairs themselves have a lot of frills and little specifics (although there are those that don’t fit into any of my definitions). Inspired by the following photos, I decided to design exactly what I needed:
Next I made a 3d model:
Next, I made a drawing (yes, yes, the design is not according to GOST and many things are wrong, but in order to buy boards and foam rubber, this is just the thing:
What you need from the tool: - Furniture hexagon; — Phillips screwdriver; — A screwdriver and wood drills for 3, 4 (preferably with a total length of 85 mm, so that you can clamp it by 10 mm and have 75 mm of drilling) and 7 mm; — Brush for painting; — Roulette; — Sharp knife (for cutting foam rubber); — Shilo; — Skin (I had 120);
Then I went to pick up the tree at an office called Derevyashka, since it was most convenient for me there to pick it up and cut it. There I ordered a timber (like pine) dry, planed and rolled (rounding the corners of a square) 50x50, a lath 50x10 and cut, and everything came out to 1263 rubles. I’ll say right away that the timber is different: there are 2 of them next to each other, the difference in weight is almost 2 times (that is, the humidity is different). I tried to take something light, without cracks and without defects (I tried, of course, but in the end I overlooked something).
He took the timber end-to-end so that sawing it would be normal. That is, I calculated that it was about 11 m, I took 12 (3 meters each) and stood over the guy’s soul so that he sawed it in front of me into the pieces I needed (I must keep in mind that from a 3-meter block you cannot make 4 even ones 1.5 meters each, since the saw can easily eat a centimeter, if this is of course critical. The timber itself was all 47 mm, if this is critical for anyone.
I took the slats on the basis that there would be a centimeter gap between them, it turned out to be 2 pieces more (one of them has a crack, so it’s also almost flush).
I sanded the ends of all the wood (after sawing, it was ugly there).
Next, I racked my brain about painting - choosing between Osmo oil (expensive and cool) and regular Pinotex Interior. The choice fell on the latter, because I came to a store near my house and the seller immediately recommended it to me, and in response to my question about its colorlessness he said, “let’s do some tinting,” and gave me pine paints, and the osmo, in turn, was very far…)
I started painting and then assembling and this is wrong!
You must
first drill all the holes, and then PAINT
, since this impregnation is absorbed by a couple of millimeters and creates a hard layer, which, when the drill comes out, breaks off the fibers at a distance of up to 1 cm from the drilling.
But nevertheless, unaware of the chips, I started painting. The seller said 3 layers. I hated to paint it at 3, I painted it at 2. I painted it on some chipboard that was left over from something. The action took place on a sunny day, on the balcony - I painted one side, carefully turned it over by the ends and painted the next one, after a full turn I left it overnight and repeated the next evening. Painted with a brush. I won’t focus too much on how to paint, since there are a million videos on YouTube. It turned out that the roundings, when examined with a magnifying glass, on some bars are painted more strongly than the surfaces, so it is better to paint in 3 layers))
Next, I bought a Confirmat Screw (furniture screed) 7x70 (for all tools, 50 rubles for 10 pieces, I bought 150 for 450 rubles, since I have a closet in the toilet ahead of me) and self-tapping screws for fastening the slats (I took 3.5x30, but here you can take any , as long as the length is not more than 50), two 40x30 loops like this and self-tapping screws for fastening the loops (you can use the same ones as slats) Number of screws = slats * 2 + 4 * loops The number of ties I got was 30 pieces
Next, I assembled the frames: 1) We make 7 mm holes in the parts in which we will have the tie head (if the beam is 50 by 50, then we retreat 25 mm from the two edges and drill perpendicularly)
2) We set the end and side flush, we tactilely feel that everything is normal in width, and with a 7-point drill we pulled out, we dig into the second block (mark the hole) 3) In the resulting mark we make a 4 mm hole 4) we tighten the ties with a furniture hexagon.
Features of purchasing custom-made kitchen furniture- Choosing the perfect sofa
- Upholstered furniture in Perm
We screw the slats (I drilled a hole in the first slatted one and then drilled everything into it like a template, and then screwed it to the frame made of a block with a screwdriver), mark the hinges, the dimensions according to the drawing, but as long as it is exactly on both sides. I marked with an awl. We screw the hinges and get a seat in the shape of a “T”, which rotates on the hinges.
We place the handle on the floor and our letter “T” on it. Seven Measure a hundred times (according to the drawing), and then only carefully (so as not to move anything) drill!
I drilled like this - I marked 4.5 cm from the edge with electrical tape on the drill (7mm) and drilled to the electrical tape. Then I changed the drill to 4 and drilled with it until it stopped (I had a 75 mm drill and I clamped it by 5 mm and everything was flush), but if you have a 120 mm drill, then you need to mark it with electrical tape and do not drill all the way through.
After drilling, I secured it with zip ties. Then he turns it over and also places the second side. We cancel the second side along the first (!), so that the distance from the floor to the letter “T” is the same to the millimeter on both sides.
Beds with soft panels at the head: stylish solution and comfort- Is it possible to place a bed opposite the door?
- How to sell furniture active sales?
You definitely need something soft on the legs, otherwise you’ll ruin the floor of the chair very quickly. I bought felt with adhesive backing, cut out 40 x 40 squares and glued them on.
In the end, this is what happened:
Then I looked for offices with foam rubber, and either I don’t know how to search, or you really can’t find it, but what I found were sheets of 1.6 x 2 m or 1 x 2 m (and I need half of 1 x 2 m).
In terms of hardness, I chose hard so as not to quickly lose its shape. All foam dealers have bricks - samples, but you won’t sit on them and won’t understand what it’s like, but you can spin them so that they bring you a sheet and you sit on it, but it’s difficult.
Note! How to attach a baseboard to a kitchen countertop?
Most foam rubber is marked XX YYZZ, where XX is stiffness (ST-standard, el - increased, hl - hard, there are others, but who cares), YY is density (kg per m^3) and ZZ is load (in kPa, 1kPa is approximately equal to 1kg/dm^2 (dm=10cm), you can calculate the area of your butt and hips and how much pressure they will create, but this is just for fun, because part of the load goes to the back, part to the feet and what in the end - idk)
I took 1000x2000x100 mm HL 4065, which is rigid, with a density of 40 kg/m^3 and a load of 65 kPa.
- Adhesive paper for furniture
- How to attach a countertop to a kitchen unit?
- Adhesive edge for furniture
As a result, I can say that it’s just right for me to sit on, and hard for the back, but more than 50 percent of the area remains from the sheet (but my chair cannot be cut out twice from one such sheet, if you draw, if you don’t divide the pillow into 2 parts, if you divide , then you’ll cut it out, but I didn’t want it that way) and he’ll probably go to the balcony sofa. Sheet price - almost 3k
The foam rubber is easily cut with a well-sharpened kitchen knife. Cut it and put it on the chair
I ordered pillow covers for my relatives (they sew very well), while I was waiting for them I pulled on an old blanket.
Good fabric - about another 1000 rubles
As a result, he got up to me at 6k (including fabric) and worked for several evenings. Is it a lot or a little? Idk. Do they sell the same ones in stores? The same, but not the same - or more flimsy, or expensive, or in appearance - not my thing. I’m happy with how it turned out, the only thing is that the handle needed to be made shorter (both front and back), the landing was 3-4 centimeters closer to the floor, although my legs don’t hang down anyway, but stand up straight, but nevertheless . Just like that.
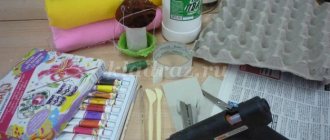
Necessary materials
To work, we first need fabric.
The best option is thick upholstery.
What materials should you not buy? There are few exceptions.
- Faux leather.
The canvas will quickly become scuffed and lose its original appearance due to constant friction.
- Thin, lightweight fabric.
Such material is susceptible to damage from sharp objects, including pointed elements on clothing.
If the seat has lost its former softness, and the foam lining is very wrinkled, then you need to buy foam rubber, it will make the chair more pleasant and comfortable.
It is easy to find in sewing stores.
Do it yourself
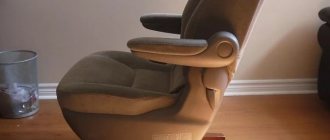
One day my favorite chair broke. I didn’t bother to repair it, since it was inexpensive and had become completely loose over the years of service. A trip to the furniture store and the market left me in a discouraging state: “Are the chairs definitely not made of gold?” Models in the lower price category are not so shocking with their prices, but it would be a stretch to call them ergonomic. But a really good thing costs as much as half a sofa.
Without further ado, I decided to make the chair myself from a car seat. I saw the idea on the Internet. Fortunately, living in a private house, it is possible to equip a primitive workshop. At first, the operation did not seem very difficult, but in fact there was a lot of fuss. But that’s the beauty of making something yourself and being proud of it for the rest of your life.
How to take measurements and how much fabric to buy?
We have already figured out the correct type and quality of fabric. The amount of fabric can be measured in several ways.
- Take measurements from the back and seat. If you plan to add additional foam, you should take this point into account when taking measurements. To the data obtained (length and width of the back and chair) you need to add 5 cm.
The fabric will be attached from the inside, this requires allowances. - You can first disassemble the chair and remove the old covering.
This can be difficult since the upholstery is tightly stapled to the frame pieces.Then you should measure the finished darts, adding allowances for using foam rubber.
Why do you need play furniture?
Modern humanity can no longer imagine its existence without IT technologies and modern gadgets. Coming home from work or after school, you want to escape from the everyday problems of the outside world and, sitting comfortably in your favorite chair, immerse yourself in the virtual world of games and entertainment. In order for such a vacation to bring complete pleasure, and damage to health to be minimized, it is necessary to properly arrange the playing area.
A standard computer chair is not entirely suitable for these purposes, despite the fact that it is also quite comfortable. It is perfect for short work at the computer, but not for hours of gaming gatherings. A special gaming chair is an improved office chair, which, thanks to its comfortable and reliable design, ergonomics and high functionality, will give you not only comfort, but will also allow you to completely immerse yourself in a real world of amazing adventures.
Let's discuss this article together:
Click to cancel reply.
The reupholstering process: step-by-step instructions
The process itself is not complicated, it is easy to cope with alone.
- The first step is to disassemble the chair. To remove the backrest, you need to turn the screw at the back (with a large head); you can remove the back panel by opening the latches (by carefully pulling each corner).
A chair with a detachable backrest.
To disassemble the seat yourself, you need to turn the chair upside down. Unscrew the screws and detach the armrests.
Seat mounting points.
It is better to put all the screws in one place, so that by the end of the chair repair you simply do not lose them. Now you can start re-upholstering.
- The old upholstery must be separated by removing the staples.
Staples that need to be removed.Next, you need to apply foam rubber and cut it along the contour of the chair, then nail it with staples.
We cut out the foam for the seat of the chair.Handle the stapler carefully; this tool is quite powerful.
Stretch the new upholstery, securing it to the back of the seat base and backrest.The outlines of the chairs are rounded, and this should be taken into account when reupholstering an office chair so that there are no folds in the fabric. Excess “tails” must be cut off.
Cylinder fixation
What happened? There is a cylinder, in the upper part of which there is a fastening to the chair. I cut off the lower part and shortened it. It needs to be secured to the crosspiece somehow. I decided to make a plug with a fairly long mounting screw attached to it. The easiest way to turn it is on a lathe. I asked a relative who works at the factory to do this.
Colorful March. Brown snow fell in Colorado (USA)
High blood pressure in your 20s and 30s can lead to problems with thinking later
Will there be happiness? Reading the marriage lines under the little finger (branches and circles)
The diameter is such that a plug 1-2 cm high is inserted into the hollow cylinder quite tightly, without dangling, but without tension. In the center of the plug you need to drill a hole for a double-sided M8 screw.
So, I inserted the plug inside the piston from the cut end side along with the screw. To prevent it from moving, I drilled a hole on the side for an M5 bolt. You can do this all the way through, or you can do it to the middle. I cut the thread and secured the linkage with a bolt. It is important that the stopper not only secures the cylinder and plug, but also the screw.
Next is a matter of technology. The lower part of the cylinder was inserted into the cross along the previously installed guide. Place a large washer on the back side of the screw and tighten it with a nut. The shortened base - the base with wheels - is ready. Now you need to mount the car seat to it.
What happened? The base has become much shorter. The design retained the ability to rotate around its axis. The disassembled cylinder no longer allows changing the height position. But this is not critical - the car seat has a similar function.
Assembly
Now you need to put the office chair back together.
The most difficult part of the job is fitting the parts correctly.
To do this, you need to do everything step by step, following the diagram for disassembling the chair, but performing the manipulations in the reverse order.
First you need to attach the armrests, then assemble the seat frame and secure it with screws.
After this, we assemble the backrest by simply snapping the protective back panel and the inner surface of the backrest together. The chair is ready!
Reupholstering an office chair at home is not at all difficult.
It is only important to choose the right material for the upholstery and take measurements. It is cheaper to do it at home yourself than to pay for repairs in a workshop. A refurbished chair will delight you for many years to come!
Simple and stylish home decor
After several layers of snow-white paint are applied to the chair, it will be completely ready. Before putting it back indoors, let it dry for half a day, otherwise the smell will linger in the apartment for a long time!
Not too bad, right? The furniture looks completely new, as if it had just come out of production. The skin is smooth and the color feels very natural, even the curve of the silhouette is preserved in its original appearance. You can start using the high chair within a few days of painting and feel it in about 15 minutes, which is quite impressive!
The raised areas were filled in very well with the paint material, thanks to the use of numerous thin layers of paint. As a result, the back was not deformed and did not become too thick!
Pay attention to what the furniture looked like before and after work. The interior item has been incredibly transformed, becoming fresher, brighter and richer.
The following photo shows a close-up of the gold support structure. It has a discreet matte appearance, which distinguishes it remarkably from the previous chrome coating.
It's almost a shame, but a designer chair won't be hidden behind a tabletop. After all, this item is incredibly stunning to be hidden from view.
Have you ever tried dyeing leather before? Do you think this idea is too bold and daring? Try it - and you won't regret it!
Features of the chair cover
Living alone or with someone, there is always a risk of getting your furniture dirty. Having pets increases the risk. Contamination may lead to repeated replacement of the chair upholstery.
How to avoid this process? Use a case. It’s better not to forget about the parameters for measuring the parts of the chair, you will need them. There are several covers; a cape would be suitable for a computer chair. To place an order in the online store, you will need to remember the necessary parameters. With their help, you can choose a cape; it can be a Eurocap with elastic bands, if the sizes are standard.
You can use a lid to avoid contamination.
If the chair has different dimensions, you will have to sew it yourself or make a similar request to the studio. Choose the color and type of fabric to your liking, but do not forget that the upholstery should still be well cleaned.
You can purchase a cover, have it custom-made, or make it yourself.
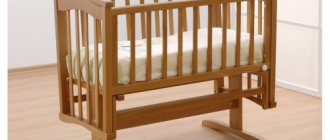
Making a rocking chair-bed
This version of the rocking chair can be placed in the garden and used for comfortable relaxation in the fresh air on a warm summer day.
Step 1. First of all, you need to purchase everything you need - a sheet of plywood 30 mm thick, a hand router, a grinder, a screwdriver, a jigsaw, and various measuring tools.
What you need for work
Step 2. Next you need to mark the parts on a sheet of plywood. The first step is to cut out a rectangle measuring 1820x1500 mm, and find the center on it.
Marking of structural parts
Step 3. Now you need to draw the shape of the side parts of the chair, focusing on the drawing. Curved lines can be drawn using a tape measure with the ability to insert a pencil into it, or a rope of the required length with a pencil tied at the end. It turns out to be a kind of compass.
The pencil is inserted into the tape measure. The shape of the side parts is drawn. Another photo of the process.
Step 4. Next you need to make holes in the plywood so that you can make cuts for the internal radii of the parts.
A hole is being drilled
Step 5. Then you need to cut out the side elements of the rocking chair using a jigsaw.
The side elements are cut out. Jigsaws are used.
Step 6. Using the first part as a template, you can make the second without unnecessary movements.
The part is used as a template
Step 7. The finished parts of the rocking chair need to be sanded well using a sanding machine.
Sanding parts
Step 8. Now you can start making the seat slats. They need to be cut from plywood.
For slats you will need plywoodCutting slats
Step 9. You also need to chamfer the side parts.
Chamfering
Step 10. Using a Forstner drill, you need to make recesses for the jumpers between the side parts of the chair. On both parts they should be located clearly opposite each other.
Creating recesses for jumpers
Step 11. The elements of the chair can be painted with a water-based stain and dried well before further work.
Applying stain
Step 12. On the slats for installing the seat, you need to attach metal corners along the edges, on which they will be held between the side elements.
Fastening metal corners
Step 13. The two side elements of the chair need to be connected using jumpers, round in cross-section. They must be securely fixed.
Connection of side parts
Step 14. Next, it’s time to screw the seat slats. They need to be fixed using the corners previously screwed to the slats on the side elements.
Slats for seating are attached
Step 15. This chair has a small roof that will protect the resting person from the scorching sun. You can secure the material (and this is fabric) using a construction stapler.
The fabric is secured with a stapler
Step 16. To make lying on the rocking chair comfortable, you can lay a thin mattress or foam rubber on the slats. The rocking chair is ready.
Rocking chair-bed It turned out quite beautifully
Video - Making a simple rocking chair
In general, making a rocking chair from plywood turns out to be quite easy. Of course, we are talking about the simplest designs possible. More complex products will require much more work and expense. But these chairs, the instructions for creating which are given above, can be made in just one day if desired.
How to clean at home?
Sometimes you can update an office chair without such an operation as replacing the upholstery, simply by removing the greasy gloss that has appeared over time, as well as greasy stains. How to clean the upholstery of a computer chair, even if it stinks, for example, because beer or soup was spilled on it? This is not difficult to do. Apply the soap solution to the surface with a sponge and then remove it using circular movements. Some dirt can be removed using a regular vacuum cleaner - by moistening the brush in a saline solution and wrapping it, for example, in gauze, you just need to vacuum the chair.
Household dust stains can be easily cleaned with a vinegar solution (2 tablespoons per liter of water).
The easiest way to remake
If you act carefully and carefully, the finished product will last longer than some modern furniture. Using simple techniques, you can restore other chairs in the house.
Converting a chair into an armchair
To work you need:
- a chair and additional reinforcing poles for it (if the furniture is broken or badly worn);
- nails;
- hammer or nail gun;
- wood glue;
- furniture stapler and staples;
- upholstery fabric;
- padding polyester;
- foam;
- furniture binding tapes;
- binding spatula;
- scissors.
If desired, additional wide armrests can be added to the chair, but this is not necessary. First, reinforcing elements are nailed to the chair or simply fastened more securely with nails so that the structure is stable and does not fall apart during use.
Cut a piece of thick foam rubber to the size of the seat and place it on the bottom of the chair. Special furniture tapes are used to completely braid the back and armrests of the future chair, and intertwine them in any way. To ensure that the tapes are stretched well on the back, use a special spatula (sold in furniture stores). All joints are fixed with staples.
Laying foam on the seat
At the next stage, a lining material - synthetic winterizer - is placed on the foam rubber, or another thick layer of foam rubber is simply used. The armrests are also sheathed with foam rubber directly on top of the binding tapes. If necessary, make small cuts on the foam rubber to make it bend more conveniently. The back of the chair is upholstered in the same way.
Furniture upholstery fabric of the selected color is pulled over the foam along the back, armrests and seat and secured with staples from below. The joints are additionally glued from the inside, or sewn from the inside out. On the back side of the chair, another layer of foam rubber and fabric are used (less expensive material can be placed here).
Covering with upholstery fabric
Advice! If the chair legs are too old, they are painted or a small “skirt” is sewn from the same fabric, attaching it to the base of the furniture.
Seat and backrest reupholstery diagram
Perhaps the most difficult thing when repairing chairs like this is to properly stretch the leather or fabric. For an inexperienced person, the fabric will be too tight or not stretched. Corners are especially bad, because the fabric has to be stretched so that the folds are not visible from the front. To evenly distribute the tension of the fabric, it is necessary to first fasten the sides with staples in the center (arrows), across. Then in the corners along diagonals and then place each corner separately. And only after parties, and in parallel.
If errors are displayed, the brackets can be removed. Unplug it with a flathead screwdriver and remove it with a wire cutter. Once the fabric has fully stretched, use scissors to trim off the excess fabric and assemble the chair.
Features of reupholstery of some types of chairs
In this section, we will describe the life characteristics of some types of chairs. It should be noted that the general technology for replacing the old coating and the procedure for carrying out the work correspond to the detailed instructions described above. Due to the fact that different types of chairs have different designs from each other, it is necessary to establish the nuances of the upholstery.
Office or computer
Office or computer chairs are a little more difficult to assemble than upholstered furniture. This is mainly due to difficulties in handling the material and disassembling the parts of the chair itself.
The most difficult to reupholster are the so-called executive chairs, upholstered in leather or eco-leather. The easiest way to change the upholstery is on computer and school chairs with a plastic frame and upholstery made of plain fabric.
Transporting complex office chairs may require some experience with tools, as well as sewing skills for a variety of designs. Similar to office furniture, hair salon and dentist chairs, rocking chairs and poeng chairs, they can be upgraded.
How to attach a backrest cover to an office chair
These four latches secure the rear casing. You need to remove it carefully so as not to break the latches, as well as the cover itself.
With a little effort we press the corner with our hand; there is no need to use any additional tools. So let's move on to the next corner and so on. To close the lid, we knock with our fist in the latch area; we do not use a hammer.
Why is it difficult to reupholster an office chair at home?
The only advantage of working from home is the cost of an office chair banner. Specialists who offer to carry out restoration for the client charge less, since the furniture does not need to be transported. However, in the future, “home” transport will hit the furniture owner’s pocket: high-quality restoration is only possible in a workshop. This is due to several factors:
- A specialist working in a workshop knows exactly where to order good quality fabric. When meeting with the customer, they bring a large sample from which the customer can choose the color and texture to his liking. And the entire fabric will go straight to the workshop, where it will be carefully opened and sewn.
- The use of industrial tools at home is prohibited. Upholstering a chair, sofa and any other upholstered furniture is impossible without special cutters, staplers and guns.
- The workshop will provide you with a hassle-free warranty. Truly high-quality restoration can be carried out in specially equipped rooms.
- In the workshop, you can quickly replace small parts, since the master has a full set of fittings and fasteners at hand.
Domestic transport does not always win even in price, since in difficult cases the master will have to repeatedly return to the workshop for tools and materials. This also has a negative impact on the duration of the restoration - it is easier to take the chair to the workshop once.
Request a free estimate on our website and find out the approximate cost of restoring your favorite chair. You can also contact a specialist and make an appointment - he will inspect the furniture, take measurements, show a fabric sample and clarify the cost of the banner. After agreeing on the details, we will assemble the chair and return it to you updated!