How to make a simple and reliable shock absorber spring remover
We tell you how to make a simple but reliable homemade puller
, with which you can easily and quickly remove springs from shock absorber struts (
compress
and decompress them). Let's look at two different designs that every craftsman can make.
But first, let's look at the main types of these devices. If we talk specifically about factory pullers, there are several types:
Factory models of pullers can always be purchased in the store, but there is not always a reason for this.
For example, if you need to replace a shock absorber strut
or
a spring
1-2 times, it is cheaper to make a homemade design.
You will learn how and what to make a stationary puller for compressing springs
. Thanks to its compact size, it can be installed both on the floor and on a desktop (workbench).
In terms of safety and reliability, a stationary puller is the optimal solution for performing repair work in a garage.
Also in this article we will tell you how to make another simple and inexpensive design - the so-called shock absorber spring tie with your own hands
.
In terms of safety, the screed is inferior to a stationary puller, but if everything is done correctly and normal material is used, then this is also a completely working option.
It’s up to you to decide which device you prefer. Blueprints
in this case they will not be required, since everything is already clear.
DIY shock absorber spring remover
The first option is a stationary structure, which you can make yourself using a mechanical jack
(can be found on ferrous metal - there are a dime a dozen of them there).
Structurally, a homemade device for tightening shock absorber springs
consists of 4 main elements:
- mechanical jack with extended stand;
- base;
- upper (fixed) fork;
- lower (movable) fork.
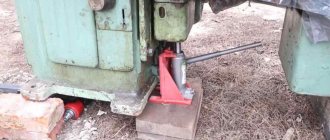
In order to be able to use a car jack to disassemble shock absorbers, it will be necessary to lengthen its stand
.
To do this, select a profile pipe of the appropriate size, cut a piece of the required length and weld it to the jack stand. The base of the jack will need to be cut off before doing this.
After extending the stand
— we clean the welded seams with a grinder. We weld the base of the mechanical jack, which was cut off earlier, to the lower part.
Then we weld our entire structure to a more powerful and reliable base, which is the flywheel.
Using a grinder, we cut off the original jack hook, and weld the lower fork in its place. It can be made from pieces of profile pipe.
To make the upper fork we will use a metal plate 7 mm thick. You need to cut a semicircular hole in it to fix the spring
shock absorber
In principle, the lower fork of the puller can also (and even should!) be made from sheet metal to make it more reliable.
At the last stage, all that remains is to clean the welds with a flap wheel and paint the metal. Homemade device
to remove
springs with your own hands
!
We install the shock absorber between the two forks. Unscrew the nut at the top of the shock absorber and remove the support cup.
Then we open the spring with a jack and remove the shock absorber strut.
The detailed process of making the puller, as well as the principle of its operation, can be seen in the video below. The idea of this homemade product belongs to the author of the YouTube channel Glavnyiy Mehanik.
What are the advantages of this design?
The most important advantage is low cost. All the necessary components can be purchased for pennies at a metal receiving station.
Also, the design itself is universal - you can disassemble shock absorbers of different sizes.
Device for assembling/disassembling shock absorber strut
To quickly and safely remove springs from car shock absorbers, in this review the author suggests making your own device, which is specifically designed for assembling/disassembling a shock absorber strut.
To make this device, you will need an old car jack (diamond screw type) and 2 square steel profiles.
And first of all, the body of the screw jack will need to be cut with a grinder in order to remove the screw. It is this that will be used to make this homemade product.
Main stages of work
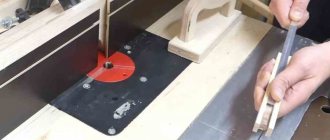
At the next stage, we cut off two pieces of profile pipe and drill one through hole in them (at the edges). The diameter of the holes must match the diameter of the threaded “barrels”.
In one of the profile blanks, in the place where the hole was drilled, the author uses a grinder to cut out a groove so that a screw from a jack can be inserted into the pipe.
The craftsman inserts a “barrel” with a thread for a screw into the hole in the second section of the profile, and then trims the protruding edges with a grinder. This pipe is then inserted into the first blank.
After this, blanks from a steel plate (hooks for the spring) need to be welded to a larger diameter profile pipe, as well as to the second section of the profile. Then you will need to drill holes in them for the bolts.
For details on how to make a device for assembling/disassembling a shock absorber strut with your own hands, we recommend that you watch this video.
Convenient wall shelf for storing clamps in the workshop
DIY shock absorber spring ties
If it is not possible to make a stationary puller, you can make ordinary ties with your own hands.
For this we will need the following materials:
- threaded rod;
- extended couplings;
- round pipe;
- regular hex nuts;
- clamps for fastening ventilation ducts.
The clamps will act as hooks. To make two ties you will need four clamps.
We weld extended couplings to two clamps, and pieces of round metal pipe to the remaining ones.
Cut two pieces of threaded rod to the appropriate length. We screw two nuts onto the end of the studs, and put on bushings made of a round pipe with clamps welded to them.
We screw extended couplings with clamps welded to them onto the top of the studs. As a result, we ended up with a pair of zip ties for disassembling the shock absorbers.
We install the couplers on the spring parallel to each other. After this, we gradually begin to tighten the spring.
Of course, unlike a stationary puller, homemade zip ties take much longer to complete the task. But, as they say: patience and work will grind everything down.
It is important to tighten the ties evenly to avoid distortions. Otherwise, the spring may “shoot”.
In terms of convenience and speed, a stationary puller definitely wins. However, if it is not possible to get a jack, then you can use zip ties.
You can watch the detailed process of making homemade shock absorber spring ties below in the author’s video. The author of the YouTube channel “Samodelkin Uman” shared his experience.
Source
Repair and restoration of shock absorber struts with your own hands, eliminating various faults
Shock absorbers are a kind of consumable item for your car. Moreover, the costs of maintaining the suspension in working condition are inversely proportional to the quality of the roads. Car owners are constantly looking for ways to save on repairs and maintenance of their cars. We will talk about self-repair and restoration of the characteristics of shock absorber struts.
When the front and rear shock absorber struts need to be checked
Typical malfunctions of this unit are known to everyone:
If any malfunction is detected, it is necessary to remove the strut and free it from the spring. Dismantling is carried out in the garage, without the use of special tools.
Sometimes owners of foreign cars, noticing that their struts have leaked, turn to a service station for diagnostics, where they will test them on a stand.
Repair or replacement? What you can do with your own hands
In fact, this is not such a simple task. Before carrying out work, you should carefully study the material and follow safety precautions. First of all, you need to determine whether your shock absorber is collapsible or not. The monolithic body cannot be repaired; opening it with a grinder and welding it is unacceptable.
If there is a nut or retaining ring where the rod enters the pipe, such a shock absorber strut can be serviced and repaired.
This is what a repairable rack looks like
Required Tools
Attention! It is necessary to take care of safety. The work involves high pressure, so eye and hand protection is required.
For convenience, work is carried out in a vice
Use a pressure gauge to control. The method is suitable for gas and gas-oil racks
The process can be seen in the video.
Video on how to pump gas in a gas-oil rack
There are different opinions on how to fill a car shock absorber. Nitrogen, carbon dioxide or just compressed air? In a garage setting, there are few options. Compressed air will not significantly degrade the performance, especially considering that this is a repair and not a factory-made rack.
Remove drips and other contamination from all rack mechanisms
No special equipment is required to work with oil struts
Replacing the rod, valves, adjusting the stiffness of shock absorbers
The next malfunction is damage to the rod, seals, and valves inside the strut. There is a certain selection of spare parts on the market for repairing dismountable shock absorbers. In addition, an experienced car enthusiast never throws away old spare parts, but tries to repair them. In addition, you can always extract workable parts from them.
Don't forget to wear gloves, the job is dusty
Turning work is usually cheaper than the cost of a new shock absorber
Tip: The entire process of disassembling the shock absorber should be photographed. This will avoid problems during assembly.
We cook the screeds ourselves
In general, it makes sense to make shock absorber spring ties yourself. How to do this is discussed further.
Four nuts and two threaded rods
The metal products listed below are easy to find in almost any supermarket. For example, you can buy two M16 threaded rods. You will also need four extended nuts, as well as a steel plumbing pipe. Its internal diameter is 16-16.5 mm.
The end result is what is shown in the pictures. You will also need a steel rod, which is used to make reinforcement. Let's look at how screeds are made:
- Two identical cylinders are cut from the pipe, the length of which is 80-120 mm;
- Threaded rods can be shortened if necessary;
- 8 rods approximately 30 cm long are made from reinforcement;
- Using any bending equipment, the rods are bent to obtain hooks;
- Four rods are welded to two nuts, another four - to pipe sections;
- The set of components is completely ready for use at this stage.
It is easier to weld by placing the workpieces on a plane. The essence of these words is illustrated by the picture:
How to weld hook rods
Actually, what follows is a film where the technology is shown “inside and out”. The author even solved the problem with the lack of a bending machine: to bend one rod, you need two similar rods welded to a steel profile.
If the reader thinks that using welding is difficult, then it is better not to take risks. Welded joints can withstand significant loads, but only if they are performed according to all the rules. Spring ties can be made without welding. A suitable drawing is given below.
Two ties in 10 minutes (video)
How should the spring be tightened?
Let's list the steps involved in tightening the shock absorber springs yourself. Everything looks simple:
- When the body is supported by a jack, two ties are brought to the spring from opposite sides;
- By rotating the nuts with your hands, you achieve confident engagement of the hooks and springs;
- Using a wrench, the nuts on different rods are rotated in turn;
- It is better to play it safe and secure the compressed spring with straps or wire.
Video of spring tensioners on shock absorber
No explanation required here. The result is shown in the photo.
When using homemade and even purchased equipment, follow these simple tips:
- Before using ties, threaded connections are lubricated with cyatim or grease;
- The ties cannot be removed from the compressed spring, even if it is additionally fixed;
- When carrying out work, exercise maximum caution. It is better to sacrifice body parts than your own health.
Features of the suspension of Lifan cars are discussed in these articles:
How does a spring remover work, and what types are they?
What is a puller used for? It overcomes the straightening force of the springs. The applied force on the puller brackets is commensurate with the weight of the car, but this does not mean that its design is too expensive and high-tech.
There are many options, but they are divided into only two types: mechanical and hydraulic drive.
Mechanical spring remover
Most often it has a threaded drive mechanism.
With a sufficient diameter of the pin (providing a good gear ratio on the thread), and a long handle of the key, you can compress the springs manually without excessive effort.
The technology is as follows: two pullers are symmetrically put on the rack. By turning the threaded rod, you bring the claws to the middle of the spring directly on the shock absorber, compressing it to the required size.
Drawings of universal threaded ties
Let's return to the question of how to make a device for tightening shock absorber springs yourself. Below is the appearance of the finished devices:
Factory-made threaded ties
On one side of the rod there is a left-hand thread, on the other - a right-hand thread. The standard thread pitch is M18. But buying threaded rods is not enough here. And to cut the thread yourself, you will need special equipment.
Drawings of the components that make up the entire structure are shown here:
Threaded tie (3 parts)
To make parts, you need a lathe, drilling and, probably, milling machine. It may be easier to contact a workshop. Print the drawing by downloading it from the website.
Most likely, there are no other drawings of universal ties on the Internet. And what is shown above is taken from a book on repairing domestic cars. You can use it.
Let's say the ties were made according to the drawings and all the parts fit together. But even then the advice about using lubricant remains valid. You need to take solid oil or cyatim and apply this material to the threads of the nuts.
Cyatim-201 lubricant is a rather expensive material. You can reduce consumption by mixing it with machine oil in a 50/50 ratio. Good luck.
Why do you need such a procedure as tightening the shock absorber springs with your own hands? Due to the current circumstances and because of our vaunted domestic roads, it happens that shock absorber units in a car, even an almost new one, fail. And if they are old enough, they wear out from time of use.
Manufacturing instructions
There are many ways to make such a device. Their main idea is to save money and use unnecessary scrap materials to make an instrument. In any automotive market you will be able to find a hydraulic device that is easily used for repairs, but its cost is high for a small device. If you dig around in your garage, you will definitely be able to find things there that seem unnecessary at first glance. Analyze whether they can partially recreate the design you saw on the market. It is unlikely that it will be possible to recreate hydraulic couplers for a shock absorber, but replacing them with a mechanical device is quite possible.
Let's look at a brief instruction on how to make ties for shock absorber springs with your own hands.
- We remove the front wheel shock absorber and measure the size of the large spring that prevents replacement. We start measuring from the first large turn and end with the last one. We write down all the data on a piece of paper, preferably in one unit of measurement (centimeters or millimeters), which is more convenient for you. It is recommended to make clamps specifically for the front wheels, since these shock absorbers most often break and require repair.
- We find a strong metal pipe with a diameter of 2 centimeters in the garage and cut it into 4 pieces 10-15 centimeters long.
- Next, we find a standard rod with a diameter of 0.7-1 centimeters and cut it into pieces 20-30 centimeters long. You should have 8 such short strong rods.
- We find a threaded rod or buy a pipe with a diameter of 1.5-1.7 centimeters and cut it into 2 pieces, the length equal to the measurement obtained in the 1st point, which can be extended to 5 centimeters. If the selected tubes do not have threads, we cut them using a special tool from all edges of each piece over 10-15 centimeters.
- We process all the edges of the tubes and rods in such a way as to get rid of metal burrs; the edges should be even and smooth.
- We bend the metal rods equally so that they form a hook on one side. Please note that such rods are very strong and difficult to bend, so you can use additional tools.
- Using mobile welding, we connect the rods and short tubes so that the hooks are evenly located on both sides of the tube. We cut off the excess edges of the rods so that they are flush with the tube. We get 4 small products from rods and pipes.
- We put the resulting parts on long tubes and tighten large nuts at the ends. The hook is put on so that its smooth side faces the edge of the bar.
- That's all the work, the shock absorber tie is ready. It will fit both the front wheel and the rear (if you added a few extra centimeters to the bar). Test it on one of the shock absorbers and correct any shortcomings if any appear.
This technique allows you to quickly build a mechanical device that can compress or slightly expand the shock absorber spring to repair, replace or check it. The only disadvantage of this method is that the master must be able to use mobile welding. If such a device is not available or you do not want to use it, then you can build a similar device without using a complex mechanism. The method of producing shock absorber ties based on an old strong jack is considered very good .
If you remember, such devices were included with old Soviet-era car models. Its operation scheme is clear; all that remains is to make sure that one part of the jack can be attached to the upper coil of the shock absorber spring, and the other branch to the lower one. This can be done through various means - look at what is present in your garage among the parts and be sure to find something suitable. Keep in mind that the above methods for producing screeds are not the only ones of their kind; they can be changed or supplemented depending on the type of car, its model, skills and desires of the car owner. It’s worth using your imagination to make this mechanism simple and uncomplicated.
Tags: tool for disassembling suspension struts
Comments 52
Well, I figured it out, what next? ZAZ used to sell repair parts. kits (seals, anthers, etc.) disassembled, reassembled and forward.
Maybe this is a device for working with racks, but not for disassembly
Class! I just missed the mark with the choice of color... the racks, in addition to black, are blue and yellow... I suggest applying a yellow stripe. (No offense)
It was possible to simply make pads on the jaws of the vice with semicircular cutouts along the diameter of the shock absorber pipe. And even cover it with rubber, if it’s so important not to scratch this rusty part)))
business in Russian steal a box of vodka pour out hand over bottles drink money
Again from the series '...if you have a lathe and sheet metal...'
if you have a vice, you don’t really need such a tool... and even without a vice on the workbench, all this is done... like lately you’ve only had fake posts - before that there was at least something useful...
Soon he will wash his car himself!