Petr Pirogov
3218 0 0
Petr Pirogov April 27, 2018
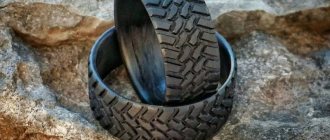
If you are a car owner, then you probably have parts from old and broken cars or motorcycles in your garage. I'll show you how to make a pair of chairs from old car shock absorbers and springs. A pair of these stools will fit well into any home, apartment or workshop.
Important! The springs under the seats are not compressed to avoid injury.
Step 3: Disassembling the Racks
Important! When removing the entire strut, do not forget that the springs are in a compressed state.
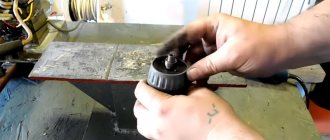
First, I loosened the nut and carefully removed the spring. Then I used a grinder to cut off the eyes for the silent blocks. I repeated the same operations with the second rack.
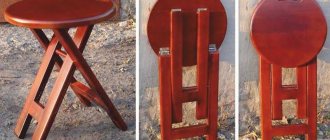
How to make a stool for the garage from an old shock absorber
After replacing a car's shock absorber struts, many owners throw away the old parts, believing that they can no longer be used. However, this opinion is wrong. Shock-absorbing struts have fairly high strength, so even heavily worn parts are able to withstand the weight of a person, successfully absorbing vertical vibrations. Using these properties, with the help of your own imagination, shock absorbers that have served their time can be turned into a comfortable stool for the garage.
To work, the master will need a shock-absorbing strut assembly with a spring, a profile pipe with a cross-section of 20x40 mm, a small piece of sheet metal 3-4 mm thick, thick plywood, artificial leather, foam rubber, glue, a furniture stapler, paint, as well as bolts, nuts and washers. The tools you will need are a grinder, a welding machine, a pencil, a tape measure, a square and an electric jigsaw.
First, the stand will have to be disassembled. To do this, special clamps are used to firmly tighten the spring. Then all parts are thoroughly cleaned of dirt and rust. Afterwards, the lower mounting eye of the shock absorber is cut off with a grinder. In this case, you must try not to damage the body of the part, otherwise the oil will leak out, rendering it completely unusable.
At the next stage, the supporting cross of the stool is made. One piece 40 cm long and two pieces 19 cm long each are cut from the profile pipe. They are welded together to form a cross. Nuts are welded into each edge, from below. Then the lower part of the shock absorber is welded strictly vertically to the middle of the crosspiece. After this, all welds are cleaned with a grinder and a grinding wheel.
Next, a support for a wooden seat is cut out of a metal plate. Holes are drilled in it for the shock absorber rod and mounting bolts. Then they move on to coloring. To do this, the shock absorber rod is covered with masking tape, and the metal surfaces are degreased. First, primer is applied in two layers. When it is completely dry, the metal parts of the stool, including the base plate, spring and stand with cross, are painted with colored enamel.
While the paint dries, a seat is cut out of plywood. It is given any necessary shape. The stool frame is assembled by installing a spring and an upper support on it. The seat is bolted to it. The plywood is smeared with any glue and covered with foam rubber or several layers of batting. The top of the seat is covered with artificial leather, securing its edges with a furniture stapler. Plastic plugs and furniture casters are installed in the legs of the cross. This completes the work on the garage stool.
Step 4: Base
For the base I used a profiled pipe:
- cut two pieces of 50 cm each;
- I cut 4 pieces of 24 cm each (for two chairs).
Bleeding the shock absorber
- The rack must be completely disassembled and cleaned of dirt and old oil. Check the O-rings and the condition of the inner pipe wall.
Remove drips and other contamination from all rack mechanisms
No special equipment is required to work with oil struts
Video: how to restore the functionality of a non-separable mechanism and is there any point?
Step 5: Assembling the Base
I welded the parts to each other, maintaining an angle of 90 degrees. Then I cleaned the cut line with a sanding disc.
Restoring gas pressure in the rack
- The shock absorber is firmly fixed in a vice, the position is vertical. It is necessary to thoroughly clean the part and blow out the entry point of the rod with compressed air. It is disassembled - the protective cap of the rod is removed.
For convenience, work is carried out in a vice
Use a pressure gauge to control. The method is suitable for gas and gas-oil racks
The process can be seen in the video.
Video on how to pump gas in a gas-oil rack
There are different opinions on how to fill a car shock absorber. Nitrogen, carbon dioxide or just compressed air? In a garage setting, there are few options. Compressed air will not significantly degrade the performance, especially considering that this is a repair and not a factory-made rack.
Step 6: support nickels
Using a grinder, I cut out 4 circles with a diameter of 5 cm:
- first applied markings to the metal;
- then I used a grinder to give it a rounded shape;
- brought to size using a sanding disc;
- welded to a steel base.
How does a spring remover work, and what types are they?
What is a puller used for? It overcomes the straightening force of the springs. The applied force on the puller brackets is commensurate with the weight of the car, but this does not mean that its design is too expensive and high-tech.
There are many options, but they are divided into only two types: mechanical and hydraulic drive.
Mechanical spring remover
Most often it has a threaded drive mechanism.
With a sufficient diameter of the pin (providing a good gear ratio on the thread), and a long handle of the key, you can compress the springs manually without excessive effort.
The technology is as follows: two pullers are symmetrically put on the rack. By turning the threaded rod, you bring the claws to the middle of the spring directly on the shock absorber, compressing it to the required size.
Important: Why can’t a mechanical puller be used alone? When compressed, the spring bends; it is impossible to control this process.
Installing one puller on a spring will cause it to break.
Pullers placed on both sides ensure uniform compression. When working with the suspension of trucks or heavy SUVs, experienced craftsmen install 3 or even 4 pullers.
Correct installation of pullers on the spring
Semi-permanent racks
Service stations often use semi-permanent struts to remove springs from shock absorber struts. The tool is quite universal and fits most pendants. Thanks to the drive mechanism gearbox, working with it is convenient and safe.
Step 8: Welding the shock absorber and base
I spot welded the shock absorber to the base, having previously leveled it strictly vertically. Then I thoroughly welded it, cleaned it and painted it with 3 layers of black paint.
Do-it-yourself repair and restoration of shock absorber struts - is it possible?
Shock absorbers are a kind of consumable item for your car. Moreover, the costs of maintaining the suspension in working condition are inversely proportional to the quality of the roads. Car owners are constantly looking for ways to save on repairs and maintenance of their cars. We will talk about self-repair and restoration of the characteristics of shock absorber struts.
Step 9: Seat
I wanted the thickness of the MDF seat base to be about 3 cm, so I glued several sheets together and tightened them with clamps until completely dry.
Bleeding the shock absorber
- The rack must be completely disassembled and cleaned of dirt and old oil. Check the O-rings and the condition of the inner pipe wall.
Remove drips and other contamination from all rack mechanisms
No special equipment is required to work with oil struts
Video: how to restore the functionality of a non-separable mechanism and is there any point?
Step 10: Steel Plate
While the glue was curing, I cut two plates from a sheet of steel:
- marked the center of the plate and drilled a 12 mm hole for the shock absorber rod;
- I drilled holes in each corner for self-tapping screws.
The most common faults
Among the most popular malfunctions are:
- Fluid leaks;
- Deformations and mechanical damage to the housing;
- Damage to the rod or piston;
- The oil is inappropriate or of poor quality.
Leaks can occur due to wear of oil seals or other seals. Oil seals also wear out naturally - the rod is constantly moving, so the edge of the oil seal wears out after some time. However, most often the oil seal gets damaged due to corrosion, scuffing and dust, sand on the rod.
Deformation of the housing is usually caused by impacts on the housing of the damping device. Dents do not allow the rod to move normally to its full height and in the place where there is deformation, the piston can rest.
Related article: How to change a valve cover gasket correctly in a garage
The piston can be damaged only in one case - if the car falls into a hole at speed. The damper cannot withstand it and breaks through. At the moment of breakdown, the piston collides with the bottom of the chamber, which causes damage to the piston. As a result, the valves are also damaged, and the processes of oil flow from chamber to chamber are seriously disrupted.
Oil is the working fluid in a car shock absorber. The operation of the damper depends entirely on its characteristics and quality. If the oil has a low viscosity, then there will not be the required resistance to the movement of the piston - the damper will “break through” even on small bumps. In winter, oil with a higher viscosity will create too much resistance.
How to properly check shock absorbers on and off the road
You can determine whether the damper is working properly by its appearance. If traces of oil are visible on the body, this indicates a violation of the tightness of the chambers due to wear of the oil seals or seals. The properties of such a damper will be below normal or will not exist at all.
The body is also inspected for deformations - even a slight dent can lead to difficulty moving the piston and to complete jamming.
Fasteners must be intact and not damaged by corrosion. The rubber bushings installed in the lower hinge must also be intact and have no signs of destruction.
The damper rod must have a perfect mirror surface. If there is no mirror, then the piston has no movement and the shock absorber does not perform its function.
If the shock absorber has already been removed, then to check it, install it vertically. The bottom bracket is fixed with your feet, and the rod is pulled out with your hands and released. If the shock absorber is working properly, then the resistance to the upward movement of the rod should be much greater than the resistance when the rod moves down.
This is interesting: How to replace an ABS sensor in a garage
If the rod moves both down and up with the same force, then there is little or no oil in the cylinders. If the resistance decreases in the extreme positions of the rod, then this indicates air in the chamber cylinder.
You can check the operation of the shock absorbers on the car. To do this, swing the car by the front and then by the back. If the damper is working properly, the car will swing once. If the rack is jammed, you won't be able to rock the car.
Step 11: Cutting the Seat
Using a compass, I drew a circle on the glued MDF sheets and cut it out using a saw. The edges were sanded with a belt sander.
Technology for mounting a folding seat to the wall
Before using the mechanism, it must be secured. Most often, a wall or partition acts as the base. If there are columns in the interior, you can attach a folding seat to them.
Even before starting work, it is necessary to determine how well the construction material corresponds to future loads. If it is lightweight and cellular concrete, and even more so plasterboard, it is necessary to strengthen the fastening points. Wood requires the appropriate type of anchorage.
The structure is fixed to anchors. The sequence of actions is as follows:
- To ensure accurate installation, markings must be made first. Some seat models come with a template to make this step easier.
- Using a hammer drill, drill holes for anchor devices.
- Expansion anchors are inserted into the drilled grooves and then secured with a wrench or screwdriver.
- The decorative trim is removed from the seat mount, attached to the anchor bolts, and then returned to its place. Check the operation and make adjustments if necessary.
Additional support devices are attached in the same way.
The installation height of the seats depends on their design; if no limitation is provided, they are installed in a way that is convenient for users. Usually this is 45-50 cm from the floor.
Step 12: Cutting for the Steel Plate
Instead of just screwing the plate to the seat, I decided to recess it into the MDF:
- To do this, I attached and traced the plate with a pencil;
- Using a hand router with a straight cutting bit, I removed material to the depth of the plate;
- I drilled a hole in the center of the seat - it will accommodate the nut on the rod.
shock absorber + spring = strut — Homemade ATV (Tomsk), 0.7 l., 2013 on DRIVE2
The idea was taken from this author, I don’t remember! You can buy racks ready-made from an ATV, but since it’s homemade, it means everything is homemade! For the front strut, I used 4 Oka rear shock absorbers and 2 Oka front struts, I had all this together with the donor, I didn’t buy anything except the shims, that’s why I chose this option. first, we disassemble the front strut, after removing the spring, carefully cut off the lower cup of the spring stop, it is welded to the strut (cut along the seam), we have two ready-made cups for the springs, then we buy two steering column boots from the store and put them on the rear shock absorber rod, having previously knocked off the thrust washers from it, this will be the base of the strut (with boot). We will also need two squeegees with a thread and a nut (I don’t remember the size of the skewer right now), I went to hardware stores with shock absorbers and measured them so that the squeegee fits on the martez, (he sits like a carpenter) We cut off a long thread from the squeegee, put it on the very bottom martez and grab it, we need this to adjust the spring stiffness! Well, for the longest time we just put on the lower cup from the front strut (which was cut off), I also put a spacer between the cup and the nuts from the 59 pipe (there was not enough thread length for adjustment) then we cut off the lower ear mount from the second set of shock absorbers with the salenblok and to it We weld two nuts that are screwed onto the shock absorber rod from the top, put thrust washers on the rod, put a spring, put the spring stop cup on top, put a washer to center the cup relative to the rod and screw a silent block with welded nuts on top of the rod - then drill a small hole in the nuts and put a stopper so that the rod does not unscrew. At first I used Oka springs in the rear, but they are soft, then I switched to the front springs, which are thicker than quads on rough terrain, I immediately became more confident in holding the road, the strut can be made without adjusting threads, but then you have to disassemble and install spacers many times to get the optimal stiffness, better with thread. The rear struts are made from VAZ 07 shock absorbers and springs from a Domani Honda, also with adjustment; the only thing is that the upper cup mount is designed differently!\ In general, I decided to write a review about this version of the strut, don’t do it as it’s written in this bortovik, it’s better to buy a ready-made mortez from a motorcycle Ural or from an ATV, it’s easier and better when riding.
Step 13: Painting
I painted all the parts with 3 coats of gloss black paint and used orange paint for the springs. The presence of a contrasting color refreshes the entire structure.
Replacing the rod, valves, adjusting the stiffness of shock absorbers
The next malfunction is damage to the rod, seals, and valves inside the strut. There is a certain selection of spare parts on the market for repairing dismountable shock absorbers. In addition, an experienced car enthusiast never throws away old spare parts, but tries to repair them. In addition, you can always extract workable parts from them.
- So, let's disassemble the shock absorber.
Don't forget to wear gloves, the job is dusty
Turning work is usually cheaper than the cost of a new shock absorber
Tip: The entire process of disassembling the shock absorber should be photographed. This will avoid problems during assembly.
Get rid of stains, dirt and dust while disassembling
All parts must be carefully checked
It is recommended to replace the oil seal
After pumping the oil, the rack needs to be pumped as usual
Video: How to repair car MacPherson struts
If you have basic information about how your shock absorbers work, you can save money on replacing them. Most rack models are repairable, and components are either purchased at reasonable prices or made independently.
Source
Step 14: Assembly
I put a cap on the shock absorbers, then a plate, which I secured with a nut and washer. I cut off the excess thread with a grinder.
Restoring gas pressure in the rack
- The shock absorber is firmly fixed in a vice, the position is vertical. It is necessary to thoroughly clean the part and blow out the entry point of the rod with compressed air. It is disassembled - the protective cap of the rod is removed.
For convenience, work is carried out in a vice
Use a pressure gauge to control. The method is suitable for gas and gas-oil racks
The process can be seen in the video.
The process of making a drilling machine from shock absorbers
According to the markings, we weld a piece of roller chain to the wide side of the profile pipe.
Using bearing housings, we mark and drill holes in the steel plate for fastening them with hardware.
We screw a nut onto the stud inserted through the bearing, put on the sprocket and secure it with a second nut.
We mark another plate for installation and welding in the center of the profile pipe, drilling holes in the corners and rounding them.
We clean the old shock absorbers, and after drilling the bottoms, drain the oil and knock off the covers. After wrapping the mirrors of the rods and threads with aluminum foil, we place them in the shot blasting chamber for complete cleaning. Finally, remove the levers.
We place the shock absorbers with their upper parts in the corners at the level of the sloping shelves and weld them.
We fix the shock absorbers parallel to the steel plate at the corners using welding.
We apply a piece of profile pipe to the ends of the painted rods and drill two holes along the marks.
We lay it flat and place a U-shaped bracket in the center with its legs facing outwards and weld it.
For a fragment of a profile pipe with a length equal to the width of the larger side, remove the opposite edge. Drill a hole in the center of the square base.
We cut a fragment of a round pipe along the generatrix and weld ears with two holes along the edges of the cut. It turned out to be a kind of clamp.
Insert a bolt into a part made from a profile pipe from the inside and weld it behind the head. We fix the hardware in a vice, place the clamp along the legs with the ears up and connect them by welding.
We place the U-shaped bracket on the profile pipe between the shock absorbers, then the rods will fit into its holes. Screw the nuts onto the threads of the rods and tighten them.
We turn the shock absorbers over and place an assembly of bearing housings, pins and sprockets on the bracket leg. We weld the assembly plate to the bracket.
Replacement or repair? What you can do yourself
Deciding what to do is not easy. First of all, you need to find out whether the stand can be disassembled or whether it has a non-demountable design. If the case is monolithic, then repairs are unacceptable - if you open the case, the part will not work.
If a nut or retaining ring is installed in the place where the rod enters the pipe, then the rack can be serviced and repaired.
How to restore gas
First of all, the part is clamped in a vice in a vertical position. Next, it is very important to clean the element well, and also to thoroughly blow out the place where the rod goes with air from the compressor. Then the assembly is disassembled - the protective cap on the rod is removed.
Next, a special fitting is put on the rod, allowing gas to be pumped in. Gas is pumped until the required pressure is reached - when performing this operation, you need to remember about safety. The procedure is carried out several times until the desired pressure is achieved. To control the pressure you need a pressure gauge.
Note: Symptoms and signs of crankshaft sensor malfunction and checking it
When the procedure is completed and the pressure corresponds to the specified pressure, lubricate the stem seal and put the cap on the body. This repair technology is suitable for gas and gas-oil shock absorbers.
Replacement of valves, stems, seals
First you need to disassemble the shock absorber. The rod and piston, valves and sealing rings are removed and checked. Bad elements change. Rubber elements can be selected from universal ones in the markets. Metal parts can be made by a turner.
Next, the assembly is carefully assembled, tracking the sequence of installation of parts. It is important to pay attention to cleanliness during assembly. If dirt or hard metal particles get inside, the repaired unit will fail.
Particular care should be taken when troubleshooting valves. Their proper operation depends on the characteristics of the shock absorber. You can adjust the softness by changing the rod washers. To do this, it is better to refer to the manufacturers’ instructions, since there are no universal solutions.
On the subject: How to check the pressure in a car's air conditioner yourself
All that remains is to install the rod into the pipe and replace the seal. It happens that the oil seal is in excellent condition. Then a new grease is added to it and used further.
Then new oil is poured into the mechanism to the top. During the installation of the rod, excess will leak out. There is no need to be afraid of excess oil consumption. The main task here is that air should not get into the chamber in any way... Then the rack needs to be pumped.
How to bleed a shock absorber
The stand is installed so that the rod faces up. Then, without jerking, the rod is smoothly compressed until the working part of the rod reaches 2 cm from the upper edge of the glass. The rod is fixed in its current position for a few seconds.
Then the rod is also smoothly pulled out to the fully expanded position. This algorithm is repeated several times – usually 3 times is enough.