If you are buying an apartment and need support, then you can always find it on the website https://www.forte-group.ru/uslugi/soprovozhdenie-pokupki-kvartiry/.
At master classes you can learn how to make various decorations for interior decoration, gift wrapping and much more. For example, to tie a bow beautifully in various ways, you should look at the step-by-step photo with instructions.
This is not as simple as it might seem at first glance, but it also does not require special skills. A few light movements are enough, and the ribbon will turn into a bright, voluminous accessory. You can learn how to make a lush bow from velvet or other ribbon in the training material.
How to create a festive mood?
A beautifully packaged gift with original decoration always creates a festive mood, no matter whether you give it or whether such a gift was given to you. It is a beautiful bow, which can be called a classic decoration technique, that “warms up” the imagination, making you tremble in anticipation of a surprise. The originality of this decoration lies in its versatility, since a bow from ribbons can be made of different shapes or sizes, and today’s market offers a wide range of colors, from plain to complex patterns. Such decorations can give the souvenir more solemnity. Initially, you need to pack the surprise in gift paper, how to do this, read the article: “How to wrap a gift in paper”, but we will teach you how to make a bow from a ribbon, the main thing is to be patient and not quit work after the first failure, because the culprit will have a wonderful grateful smile The celebration you are attending deserves a little effort.
Star bow
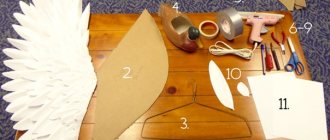
Before starting work, you need to prepare a couple of cardboard templates in the form of a five-pointed star with links of medium length. A hole with a diameter of no more than 1 cm is made in the center. If you are bored with satin ribbons, you can use lace braid. It gives the product the effect of wealth and style.
- The lace is passed through the hole, leaving a small tail.
- Wrap the braid around the links of the star, forming symmetrical loops. To prevent the loops from running away, hold the lace with two fingers.
- When all the cardboard links are covered with lace, they are carefully removed from under the loops. Sew in the center. A button or a circle of thick felt is sewn on the reverse side.
The most complex design of satin ribbon bows is kanzashi. They are multi-layered flowers with triangular petals. Photos of kanzashi and master classes are published on the Internet on thematic sites in abundance, from which you can be inspired for your own craft.
How to make a voluminous bow from ribbon to decorate a gift?
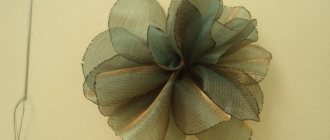
To get a truly voluminous bow, you need to give preference to cuts made of hard material. Having selected the ribbon, do the following:
- Having decided on the size of the bow (the longer the loops, the larger the bow), you need to make loops from the ribbon in 5-9 folds, placing them one on top of the other.
- Smooth out the resulting loops and carefully trim the edges, as shown in the photo below. You should end up with almost triangles around the edges.
- Take the loops by the middle and spread them to the sides so that the cut out parts are in the center.
- Secure the narrowest central part. You can do this:
- the same ribbon;
- sew with thread;
- fasten with a stapler;
- twist with wire.
- Straighten the resulting half-loops, give them volume and the beautiful bow is ready!
How to make a lush bow from ribbon? Video lesson
https://youtube.com/watch?v=kGQc4PSsxbY
Lush accessory made of three ribbons
Before you tie a bow beautifully, you need to prepare everything you need. You will need ribbons with a width of 5 mm, 2.5 cm and 5 cm. You will also need a heat gun, a needle and scissors. The cut areas must be treated with a lighter.
How to make a ribbon into a beautiful bow is described step by step.
A pair of identical parts is cut from the braid. The cut areas are immediately scorched. Otherwise it will start to crumble. The wide ribbon is folded in half and its center is marked. After this, the strip unfolds. Initially, a wide workpiece is laid out on a flat surface, and a narrow one on top of it.
The parts are turned over, and their ends are folded inward at the marked point. They should be sewn using a basting stitch.
The thread is pulled together and thus folds are formed. After this, a knot is tied.
The basting seam is hidden using a membrane, which is created from a narrow strip. She just needs to wrap the narrowest part. It is fixed using threads or a heat gun.
Homemade accessories are ready.
How to make a simple bow from ribbon to decorate a gift?
You can make a strict version for a “male” present. It will look great both on the packaging and on a bottle of an expensive strong drink. You can read more about souvenirs for a men’s holiday in the article: “What to give a man.” Let's get started:
- Cut a piece of wide ribbon of the required size, roll it up, and glue the edges with glue. It should look like a ring.
- Flatten the resulting ring.
- Hide the joint under the same, but thinner cut.
- Carefully glue the edges and the simple decoration is ready.
The tradition of decorating cars with bows: a little history
In European countries, children have always played a special role in wedding ceremonies. Back in the 17th century, there was a custom when the bride was accompanied by boys as she walked to the altar. Multi-colored ribbons were tied to the sleeves of their clothes - the so-called “bride bows”. This decoration symbolizes the knot of happiness that is tied for the bride and groom on their wedding day. It was believed that the more bows that surrounded the newly-made family, the stronger and luckier their union would be, so such decor was present both in the reception hall and on wedding carriages.
There should be a lot of bows, that is, “knots of happiness” at a wedding: the stronger and luckier the union will be!
How to make a ribbon bow - a classic option
The classic version of the decoration is very simple to make, and at the same time creates an excellent frame for any gift.
With such a bow, a book, a box of chocolates or a service, as well as ordinary wildflowers will look great. This classic is performed according to the following steps:
- Take a long ribbon and fold it into two loops, as in the photo below. There should be one addition in each hand.
- Place the loop on the left at the back, crossing the two folds. It turns out to be a circle at the bottom.
- Pull the right loop through the formed circle and pull it off. The middle should be in the middle.
- Straighten the loops - the beautiful bow is ready! If necessary, you can cut the lower ends to the desired shape (oblique, triangle, etc.).
Video tutorial: how to tie a bow from a classic style ribbon to decorate a gift?
https://youtube.com/watch?v=kGQc4PSsxbY
What material is used for a gift bow?
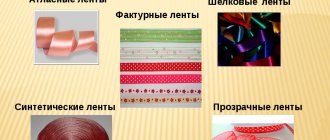
The most common option is to use a satin ribbon for a gift bow. Textile bows are famous for their durability and beauty, but in addition to the usual fabric accessories, the following are used:
- rapeseed tape;
- satin;
- nylon;
- organza;
- tulle;
- paper.
These are the most popular options from which you can make a bow for a gift.
How to make a Dior bow from ribbon to decorate souvenirs?
The Dior bow is used not only to decorate gifts. With its help, unforgettable decors are created for parties, weddings and other celebrations. By the way, take note of the rules of behavior at the table at such celebrations. They are described in the article: “Rules of etiquette at the table.”
To make such a bow, you need to follow these steps:
- Prepare four cuts of different lengths.
- Roll each of them into a circle and secure with thread or glue.
- Stack the circles incrementally one on top of the other.
- Tie the resulting structure of ribbons in the center, inserting the binding tape into the upper (smallest) circle, as in the photo below.
- Fasten the structure.
Where exactly should the bows be attached?
Decorating a car for a wedding with bows is popular among newlyweds. There are several options where such a decoration could be placed on the body of a vehicle:
- hood;
- radiator grille;
- trunk;
- door handles;
- roof;
- wheels on wheels.
It is not necessary to attach bows on all sides of the car. On the contrary: too much decor looks tasteless and unattractive .
Choose one place on the car for a large bow (hood, trunk or roof) and tie similar ones, only smaller in size, on door handles or wheels
How to make a ribbon bow on a fork?
Do you believe that you can tie a beautiful bow on a fork? No? Then let's learn, we suggest trying out two options for making such a decoration.
Option No1
Let's try to solve the following equation: Ribbon + Fork = Original bow. To solve, you need to do the following:
- Cut a narrow ribbon of the desired size. For ease of use, it should be at least 18 cm.
- Conditionally divide it into long and short sides. The short side will not be used.
- Pass the long part between the 2-3 teeth of the fork you are using.
- And bring its end up between these same teeth.
- After these steps you should get a small loop. Don't tighten it yet.
- Thread the remainder of the long end through the loop inward again.
- Pull this end out and tighten the knot.
- Trim the long ends as needed and singe them with matches or a lighter.
This cute decor is ideal for small boxes with jewelry and watches. By the way, you can also do it yourself. How? Read the article: “How to make a box out of paper.”
Option No2
To get a beautiful bow in the form of a lush flower, you need to use two different ribbons:
- thin;
- wide nylon.
Execution steps:
- Insert a narrow ribbon transversely into the center of the fork. You will need it almost at the end of the work.
- Use a wide piece of nylon to braid the teeth of the fork, as shown in the photo below.
- Use a thin ribbon to tighten the bindings and tie them.
- Remove the workpiece and straighten it.
- Scorch the edges with fire.
The decoration is delicate. It will ideally complement any souvenir intended for the fair half of humanity.
Video lesson: how to make a ribbon bow on a fork
Flower bows
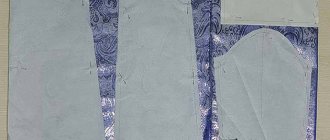
This option is suitable for decorating a gift cardboard bag or box. Before tying a beautiful bow, prepare:
- a piece of fabric 8 cm wide and 150 cm long;
- scissors;
- spool of thread;
- needle;
- beads or a set of rhinestones;
- felt material;
- glue gun
The seamstress folds the material like an accordion and ties it in the middle with plain threads. Then she turns each loop out and carefully straightens it. Beads or crystals are sewn between them.
There is another, but more complex way to make a bow with your own hands:
- The ribbon is cut into pieces (you should get 29 pieces), it is desirable that it has a tight edging. Otherwise, the flower will not hold its shape well.
- After this, take a piece and fold it in half. In this case, one edge is placed on the other and stitched from the edges. Next, repeat the procedure with the remaining segments.
- The details are used to create 4 flowers with 5, 7, 8 and 9 petals.
- A base in the form of a circle is cut out of felt, glue is applied and the flowers are glued one by one.
It’s worth starting big and ending small. The middle of small bows is decorated with beads.
Photo ideas for decorating gifts with bows
How to tie a thin ribbon on a gift box?
First you need to decide on the material from which you are going to make the bow. This can be a plastic ribbon, which is often used when decorating flowers, or satin ribbons. It all depends on what you have available. Bows that are tied on a box have a lot of options, from the simplest to the most complex. The design depends not only on your desire, but also on the style of the packaging. How to tie a ribbon on a gift box:
- Men should generally opt for modest bows made from thin satin ribbon. Double bows made from a thin harness, the width of which resembles a lace, are suitable. They look discreet, stylish and unusual.
- In order to make such a bow, you will need a piece of ribbon, the length of which is several times greater than the perimeter of the box.
- You need to pass the ribbon in the center, cross it in the middle and bring it forward, tying the corners together. As a result, you will get two ends, each of which needs to be folded into a loop, crossed together, and tied into a bow.
Gift If you want to add a note or tag to the box, then it makes sense to use thin ribbons or laces.
Only for this it is best to tie the box not in the center, but from the side. The bow is knitted in a classic way from two loops, similar to tying shoelaces. Only on the center of this bow is a tag with wishes or pleasant words attached. Option to tie a ribbon
How to tie a thin ribbon on a gift box:
- In order to make a double bow, you need to take two ribbons of different lengths. It is necessary that one segment is slightly shorter than the other.
- The greater the difference between the segments, the more contrasting the decoration will look. Rings are made from these ribbons. To do this, the ends are overlapped with each other and secured with tape or a stapler.
- Next, the rings are laid out on top of each other, and a smaller bow is placed on top. Next, you need to cut a short length of ribbon and wrap two rings in the middle on top. You can make ends for such a bow or not.
- To make ponytails, you need to cut ribbons of the same length diagonally. They are attached to the bow from the wrong side using tape and a stapler. This bow looks great on boxes that are tied on the side rather than in the center.
Gift bow
How to beautifully give symbolic gifts?
When you plan to give symbolic gifts, you need to think about how to do it beautifully. Whatever you come up with to give the opanent, it must be presented in an original way, which means making an original packaging. This is what we will do.
- If people are creative, they will appreciate a gift with this design.
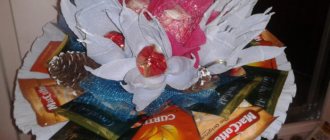
- If you give a bottle of strong drink, make clothes out of ribbons for her. Here are some ideas.
- When decorating a box of chocolates, a ribbon decoration might look like this.
How to roll a blunt
Blunt can be done using the following algorithm:
First you need to buy a few cigars; the more the better, because it may not work out the first time. It would be ideal, if finances allow, to buy original Phillies. But you can get by with products from other, but also famous, brands; it will be a little cheaper. Then the cigar should be cut lengthwise. For convenience and speed of the process, you can moisten it with saliva by running your tongue over the site of the future incision. There are special cigar knives designed just for this. It is better to use these devices, but many domestic smokers do a good job with a simple blade. Once the cigar is opened, you need to get rid of its contents and carefully fill it with your tobacco.
Usually, you can fit a maximum of 1 gram. Next, you should carefully roll up the rolled piece of paper, carefully holding it with both hands. Then moisten the “suture” line with saliva again. This action must be performed carefully so that the filling of the rolled-up cigarette is not damaged. After this, the homemade cigar should be dried
You can place it in the oven, however, you can get by with exposure to direct sunlight, this will be enough. Some smokers use a lighter for this purpose.
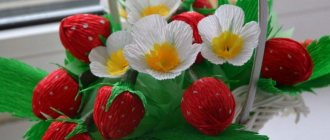
Master classes: how to make original gifts from ribbons for any occasion?
Going to visit friends, acquaintances, or colleagues without a significant reason, such as a birthday, housewarming or christening, involves giving a symbolic gift that you can easily make with your own hands from ribbons.
Video master class of an original flower made from rapeseed tape
Step-by-step master class on a ribbon bow tie
An unusual themed gift, can be made in the form of a bow tie. To do this, you need to prepare:
- main black satin ribbon 5 cm wide;
- organza ribbon 4 cm wide;
- narrow ribbon for ties;
- threads with a needle;
- scissors;
- candle or lighter;
- transparent glue.
The work steps are performed as follows:
- Cut 26 cm from the prepared ribbons.
- Place them one on top of the other and singe the edges.
- Fold the singed edges towards the center, as shown in the photo.
- Using a needle and thread, pull the bow together in the middle, securing the edges.
- It turns out to be such a preparation.
- Prepare a thin ribbon for ties and seams.
- Coat with glue and glue to the workpiece.
- This makes such an original gift.
Video master class on how to make an original hairpin
Step-by-step master class on a brooch-bow made from rapeseed ribbons
A souvenir in the form of a brooch-bow will be appreciated by representatives of the fair half of humanity, regardless of age. To make it you need to prepare:
- rapeseed ribbons in two contrasting colors;
- brooch pin;
- stone, large bead or other decor;
- scissors;
- needle and thread;
- a candle or lighter for scorching the edges;
- transparent glue.
Working on a brooch contains the following stages:
- Cut the ribbons and roll them as for a strict bow. Glue the edges. The blanks must be of different sizes.
- Fold the blanks into a beautiful bow (here you can improvise as you wish) and sew with a needle and thread. In our version, this is a multi-layered bow with long edges at the bottom.
- Glue the decor (pebble or bead) and a brooch pin.
Simple, original, and looks like a million. The best of jewelry that any woman will love.
Small bows made of wide satin ribbon
For bows we will need a ribbon 5 cm wide and 6 cm long - 4 such pieces per bow.
We singe the ends of the ribbon and fold the piece in half, bending the ends of one half inward.
We collect the resulting petal on a thread.
Read also: Why can’t you eat crab sticks?
Add the second petal to the first and pull it together.
We collect the other 2 segments in the same way. And now we sew them together.
Sew on the elastic band.
For the middle, take a piece of grosgrain ribbon, make a knot and glue it to the bow.
He turned out to be such a cutie)))
Back side.
Express design options
m&m's and kitkat
This is a very simple and effective way to decorate a cake. Bright chocolate dragees in sugar glaze will fit perfectly into a children's party.
Ready-made chocolate products can be a simple and effective decoration.
You will need:
- m&m's;
- KitKat.
The cake will look good if the height of the chocolate bars exceeds the height of the cake itself by 1.5–2 cm
.
Procedure:
- Place chocolate sticks on the sides of the cake. If the sticks are connected to each other, it is better to separate them.
- Cover the top of the cake with m&m's.
- Additionally, the cake can be tied with ribbon.
You can decorate the cake with others: Kinder chocolate, chocolate balls.
Photo gallery: how to decorate a cake with ready-made chocolate products
A square cake is lined with bricks of chocolate slabs and decorated with towers of cookies glued together with chocolate. Flowers can be laid out from white and milk dragees. In such an assortment of candies, any sweet tooth will choose a piece to suit their taste. Chocolate candies are laid out in a circle, and the composition is complemented by two-color chocolate tubes, which can be replaced with waffle rolls
Chocolate chips
You can sprinkle chocolate chips on both the top and sides of the cake. Making it at home is very simple: the chocolate bar is grated or cut with a vegetable peeler. In the latter case, curly curls of chocolate are obtained.
Chocolate shavings can be used to decorate the top and sides of the cake.
Depending on the grater you choose, you can get different chocolate chips - small or larger. The warmth of your hands softens the chocolate quickly, so it is better to grate small pieces of chocolate. You cannot cool the chocolate in the refrigerator beforehand or during the process; chocolate that is too cold will crumble and break.
Drawing using cocoa and stencil
The famous tiramisu is simply sprinkled with cocoa on top. You can decorate other cakes in the same way. The top of the cake should be smooth, then it will look neat. And with the help of cocoa and a stencil you can create a design on the cake.
Using cocoa and a stencil, you can decorate the cake with a design.
You will need:
- cocoa;
- sieve;
- stencil.
Procedure:
- Place the stencil on the cake.
- Sprinkle cocoa on top through a sieve.
- Carefully remove the stencil.
You can use a ready-made stencil or make it yourself by cutting out a design from paper. You can also use an openwork cake napkin, a fork, etc. as a stencil.
If the surface of the cake is covered with soft or delicate cream (whipped cream, custard, sour cream), then it is better to keep the stencil at a short distance from the cake so that it does not stick to the surface and spoil it.
What kind of chocolate can you use to decorate a cake at home?
Only those products that contain cocoa butter have the right to be called chocolate.
. The main components of chocolate also include cocoa mass and sugar. They also produce unsweetened chocolate, which contains 99% cocoa.
Real milk, white and dark chocolate must contain cocoa butter
The following types of chocolate are used when decorating cakes:
- bitter (dark) – contains at least 40–55% cocoa;
- dairy - contains at least 25% cocoa and dairy products;
- white - contains at least 20% cocoa butter, but does not contain cocoa liquor or powder.
Professional confectioners use chocolate, which is produced in blocks and dragees (drops). Chocolate bars can also be used for decoration at home.
Cocoa powder can also be used for decoration, but it should be of high quality; poor powder can squeak on the teeth.
Photo gallery: forms of chocolate suitable for decoration
Chocolate in the form of dragees is convenient for melting Chocolate in blocks is often used by professional confectioners Chocolate bars can be used for decoration at home
In addition to real chocolate, you can find confectionery chocolate (glaze) in stores, in which cocoa butter is replaced with vegetable fats. It is produced in bars or in the form of chocolate figures.
Confectionery chocolate is significantly inferior in taste to real chocolate, but, on the other hand, it is less capricious and can be used for applications, patterns, and glazes.
Painting on icing with liquid white chocolate
Drawings on glaze using a toothpick or bamboo stick have already become a classic. A pattern is applied to dark chocolate glaze with white melted chocolate, and to light glaze - with bitter or milk chocolate. You need to apply the chocolate while the glaze is still liquid.
.
An easy way to create a design on a cake is to cover it with chocolate frosting and then create a design on top using white chocolate.
You can also apply the design to a cake covered with cream if the cream has a soft consistency.
Options:
- Cobweb. Chocolate is applied to the glaze in a spiral from the center. Draw lines from the center to the edges.
- Chevrons. Chocolate is applied to the glaze in parallel strips. Draw lines perpendicular to the stripes in both directions.
- Hearts. Chocolate is applied to the glaze in small circles in a straight line or in a spiral. Draw a line through all the circles in one direction.
- Marble. Chocolate of different colors is applied to the glaze using chaotic movements. Mix the glaze using circular motions to create a marbled effect.
Photo gallery: options for applying patterns to glaze
To draw a web, the stick moves from the center to the edges. Drawing a pattern in the form of chevrons involves moving the stick alternately to the left and from left to right. Hearts are obtained by moving the stick along the center of round drops of melted chocolate. The marble effect is formed by a free, chaotic movement of the stick.
Butterfly
For decoration you will need two different colored ribbons. One of them should be wider and longer than the other. The smaller one needs to be carefully folded 4 times like an accordion so that the bends are located one above the other.
The second one is bent in the same way, but the turns are placed crosswise. The accordion from the first strip is placed on a figure in the shape of the letter “F”. The structure is tied in the center , the loops are carefully straightened and fluffed.
For decoration, you can use the same material that is used to wrap the gift. It will look as if it is the decorative knot that holds the ribbons surrounding the box. Combinations of contrasting colors look good.
ilikO › Blog › a real gift
Today I want to talk about an unusual profession, naturally in the automotive sector.
To be honest, for me this business, opened by my good friend and former colleague in the auto business, was a complete surprise! Of course, I knew from films about the existence of such a business, but I didn’t know that we had it in Russia! We're talking about gift wrapping for... A CAR!
But first, a little from my personal experience.
I have been working in car sales for almost 10 years. I sold everything - Lada, Ford, Daewoo, Greatwall, BMW... Naturally, from this entire list there were cars for my family.
One day I gave a car to my wife. It was a Ford Focus, a three-door white beauty. The car was custom-made, I waited for it for 4 months, I matched it to my birthday. The car arrived a little earlier. But I couldn’t miss the chance to present it on time and for it to be a real surprise! I won’t tell you all the various preparations, how I wrapped the key in gift wrapping, drove the car to the house early in the morning... I’ll only tell you how at the very last moment I decided to decorate the car itself with gift wrapping.
I bought the bow, ribbons and other stuff from a gift wrapping store. Naturally, everything there is designed for bouquets, boxes and other small items. They never packed any cars. The huge bow that I chose in the store and on the roof of the car turned out to be small and pathetic... The same situation happened with ribbons. In reality, on the street, all the pre-purchased decorations turned out to be out of theme, out of scale... Next, I tried to wrap, screw, and glue it all... I gave myself half an hour for packaging. How wrong I was!
As a result, the wife was naturally happy. But all my packaging was blown away by the wind, intertwined with clotheslines on a nearby site and wound up on the fences of the yard. In short, there was no photo of the birthday girl with the gift, and everyone ran around the yard together, collecting ribbons, and then peeling off the double-sided tape from different parts of the car.
All these sad misunderstandings occurred in 2008 and then I could not even imagine that all my suffering could have bypassed me altogether! And I wouldn’t have lost a lot of money and the wrapping would have been a match for the gift! But who knew...
I continued to work in the auto business and gave people joy... But I didn’t give anything! I was just stupidly selling cars. When you give out several pieces a day and work for many years, you completely forget that for customers buying a car is a REAL HOLIDAY! But no matter how sad it is, in Russia we, sellers, are killing this holiday in the bud... The whole process turns into a chore, our tired faces express nothing but the desire to earn money. Often when issued there are some minor imperfections and the like. I thought all sellers had forgotten about this and long ago forgot how IMPORTANT the moment of purchase is for the buyer. How solemn and pleasant it is.
During the short existence of his company BOWART (big bow or big BOW)), his small team gave a countless amount of joy to the newly made happy owners of a valuable gift. Agree, of course you can live without such packaging, and the joy from such a gift is enormous, but still, the overall mood thanks to the beautiful packaging rises significantly! And as they say at BMW, the most valuable thing is EMOTIONS! How nice it will be to remember later, look at photos, post it all on Instagram. A chic bow, ribbons matched to the color of the car and the mood, SCALE OF PACKAGING in the end!
I look at his work and understand that by bringing smiles and joy to others, you automatically cheer yourself up! Well done, Dimas! This is really the right thing to do. Live and make people happy! And I’m even more glad that you opened not some ordinary office, but a very interesting business that makes our lives brighter and more emotional!
ps I think your services will be very useful to me soon!) Just don’t say a word to your wife! It's good that she doesn't read my conclusions on the site!
Thank you for your attention, Friends! As usual, I look forward to any criticism, comments and suggestions! Everything will be taken into account!
I'm looking forward to seeing you on VKontakte
and also on
Instagram
. There's a lot there that you won't see here.
Source
Decorating the sides of the cake
The sides of the cake can be wrapped with chocolate ribbon, lined with chocolate teeth, tiles or tubes
. The most difficult way to decorate is with tubes. They will require not only a lot of chocolate, but also a lot of patience.
Lace (chocolate)
Graceful chocolate curls or a simple geometric pattern are not difficult to make from chocolate, but they look very impressive. A chocolate ribbon made of dark or milk chocolate looks great on a white background, and a white pattern will highlight a dark background.
You can also use confectionery chocolate. It is less capricious, but significantly inferior in taste to natural.
You will need:
- chocolate;
- pencil, scissors.
Procedure:
- Melt the chocolate in the microwave or in a water bath.
- From baking paper, cut out a rectangular strip with a length equal to the circumference of the cake plus 2–3 cm, and a width equal to the height of the cake plus 2–3 cm. Draw a pattern with a pencil and turn the drawn side to the table. You can print the pattern on a printer and simply put it under baking paper
.For a wide cake, it is more convenient to make a chocolate ribbon from 2 halves.
- Place the chocolate in a cornet or bag, cut a corner.
If the chocolate flows out too quickly, it should be allowed to cool slightly.
- Gently pipe the chocolate onto the paper strip in a pattern.
- Place the paper strip with chocolate on the sides of the cake.
- Place the cake in the refrigerator for at least 30 minutes.
- Remove the cake and carefully remove the paper.
After this, you can decorate the cake with a border of cream, berries, fruits or fresh flowers.
Video: how to make chocolate tape
Panels or crenellations
For this spectacular decoration you will need at least 400–500 g of chocolate, depending on the size of the cake
. You can use bitter, milk, white chocolate, and also combine them to create marble patterns.
You will need:
- chocolate;
- knife or spatula;
- parchment or baking paper.
Procedure:
- Melt the chocolate.
- Apply chocolate to parchment or baking paper and spread in an even layer using a knife or pastry spatula.
- Let the chocolate harden.
- Cut with a knife or break with your hands into pieces of arbitrary shape. The height of the panels should be higher than the cake
. - Place on the sides of the cake so that the panels slightly overlap each other.
For a raised texture, you can crumple the parchment before applying chocolate to it. To create a pattern, first apply a pattern on parchment with white or dark chocolate, and fill it with a contrasting color on top.
Photo gallery: options for decorating a cake with chocolate panels
A cake with chocolate panels can be complemented with fresh flowers. Chocolate panels can be made in unusual shapes. The combination of white and dark chocolate gives an interesting marble pattern. The embossed texture and irregular shape of the teeth give the cake a special charm.
Video: how to make chocolate teeth with nuts and dried fruits
Tubes
Ready-made chocolate tubes are sold in specialized confectionery stores. However, you can make them yourself, including using white chocolate or mixing white and dark chocolate.
You will need:
- chocolate;
- acetate film;
- thin tape;
- knife, scissors.
Instead of acetate film, you can use transparent corner folders for papers.
Procedure:
"Cigars"
You will need:
- chocolate;
- marble board or metal baking sheet;
- shoulder blade;
- metal scraper or spatula.
If you don't have a special metal pastry scraper, a new stainless steel spatula will do.
Procedure:
- Temper the chocolate.
- Cool the marble board or metal sheet and place it on the table.
- Spread the chocolate in a thin layer on the sheet using a spatula.
- Use a knife to mark rectangles on the chocolate layer.
- Let the chocolate thicken a little, but not harden.
. - Using a metal scraper or spatula at an angle of 45 degrees, remove the chocolate layer along the marked lines; it will roll into a tube.
Video: how to make chocolate “cigars”
Variant of New Year's decor made of chocolate
New Year's holidays are always associated with fairy tales, miracles, the smell of spruce and gifts. And here is a great opportunity to experiment with tempered chocolate decoration. To create a New Year's miracle dessert, all kinds of confectionery paints and sprinkles can be used. Colored plates are an excellent option for New Year's chocolate decor. Their preparation consists of the following steps:
- First you need to temper the white chocolate and prepare fat-soluble paints, which are sold in any confectionery store.
- Divide the entire tempered chocolate mixture into three parts and paint them in different colors.
- The base color of the chocolate mass was applied to the parchment paper, and the other two were applied to it alternately. Use a spatula to level it to a thickness of 3-4 mm.
- Immediately apply New Year's sprinkles on the resulting layer: beads, Christmas trees, balls. After just 20 minutes, the chocolate plate will dry and you can slowly “remove” it from the paper.
- Then everything depends on the imagination of the master. You can cut them into small pieces, shapes and decorate the cake with them.
Voila - a New Year's masterpiece awaits its guests at the festive table!
Craftsmen who have mastered making simple chocolate figures and elements can try their hand at making more complex shapes - roses. The answer to the question of how to make chocolate decor for a flower-shaped cake is contained in the following step-by-step recommendations:
- Heat 100 g of chocolate, adding 2 tablespoons of honey. The mixture should be plastic and thick enough. Transfer the resulting mixture into a plastic bag and leave in the refrigerator for an hour.
- Take out the chocolate mass and warm it with the warmth of your hands, which will make it more plastic and “pliable”.
- Pinch off small pieces and roll them into balls. Flatten each ball into a petal shape and wrap it around a toothpick.
- Having built 6-7 such petals, they can be folded into the shape of a flower and allowed to dry at room temperature.
As experienced culinary masters say, working with chocolate is not difficult, but on the contrary, exciting and interesting. In order to get the desired shapes, you just need to pay the necessary attention to the process.
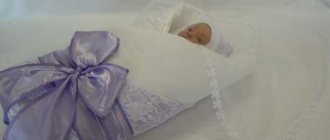
Packing children's gifts
Children are unpretentious to the materials from which bows are made
It is important for the little recipient to receive a present with a beautiful bow, but you can also use improvised materials for this. The children themselves can take advantage of the ideas below - they are not very rich people, but they are creative.
Sometimes you manage to save some of your pocket money for a gift for a friend, but it may not be enough for decoration. And if the box can be glued together from colored cardboard, then the bow can be made from waste materials, for example, from plastic bags
. All you have to do is take several multi-colored bags, fold them several times and cut out circles or stars from them.
Tempered chocolate decor: graceful leaves
Flora lovers will not remain indifferent to decorating with elegant leaves. Please note: this chocolate decor in the photo demonstrates its simple and at the same time sophisticated appearance.
Just a few simple steps and the perfect “sweet” leaf will be ready:
- First you need to select dense leaves of the desired shape, wash them thoroughly and dry them.
- Melt the dark chocolate in a water bath, allowing it to cool slightly. When creating the desired shapes, it should not be hot.
- Using a brush, apply the chocolate mixture to the “reverse” side of the leaf, trying not to go beyond the contours, but to strictly follow them.
- Leave this leaf in the refrigerator for 2-3 hours, then carefully remove the plant from the surface of the decorative chocolate element.
- Several of these leaves will allow you to decorate a cake, ice cream or other dessert.
For those who want to achieve optimal results in the decorative culinary arts, it is worth mastering the technique of tempering. This, at first glance, seems like something especially scary and incomprehensible. However, this process involves alternating heating and cooling of chocolate, which provides it with the desired consistency and acquires the qualities necessary for the cook. Tempered chocolate decor turns out crispy, shiny, with an unsurpassed taste, without the feeling of small internal particles.
For those interested in how to temper to make chocolate cake decor, the video below will clearly demonstrate the process:
In the style of minimalism
Sometimes a small detail on the hood can replace other delights. This style is called “simple and tasteful.” You can prepare a car in this manner using satin or regular ribbons.
As an option, the hood is decorated with three stripes: red, white and blue, and the result is a Russian flag. You can also choose a dominant tone and make a decoration from several ribbons, for example red. The size should correspond to twice the length of the hood.
It's easy to weave roses from ribbons. You need to wind a meter of length onto your palm, leaving the edges free, then thread them into the resulting circle and tie it. If the roses are made from red ribbons, then they will look perfect with black balls. A wedding car, decorated with woven ribbons and balls, looks stylish and tasteful.
How to decorate a wedding procession
There are many other interesting ways to decorate a wedding procession without using traditional stickers or balloons. Not only bows, but also other original decorations can be made from fabric. For example, a large heart made from kanzashi petals using the technology shown in the video below. You can make a large heart for the main car and small hearts in the same style for other cars in the tuple.
How to make chocolate decor for cakes: butterfly recipe
For many novice cooks, the question of how to make chocolate decor does not have a clear and understandable answer and is frightening with many imaginary difficulties. Tempering, creating a crunchy and at the same time flexible structure of chocolate elements, uniform coloring and many other processes that are incomprehensible to beginners make decorating with your own hands something unrealistic and out of fantasy. However, study the proposed recipes and recommendations of “experienced” confectioners, and everything will become much easier and clearer.
To make all the described methods of preparing decoration clearer, watch the master class “Chocolate Decoration for Cake”:
Knowing the main basics of making decorative chocolate figures, you can familiarize yourself with simple but effective recipes for decorating chocolate.
The first steps in decorative art must be taken with the execution of simple forms. A light butterfly, which does not provide for clear lines and consistent contours, can be just such an element. To prepare, just follow these tips:
- It is necessary to pre-prepare white and dark chocolate. Using a pastry syringe, apply the contours of the wings with a dark chocolate mixture onto a transparent file, and fill the centers with white.
- To make the “body” of the butterfly and fasten the wings, you should take thick paper and bend it into an accordion. Place a piece of foil in the recess and pour chocolate over it, inserting the frozen wings into it.
- Leave this graceful beauty until completely dry. Then it will perfectly decorate a cake or other dessert.
All kinds of bows look great on sweet treats.
Basic ideas for decorating car handles
Idea 1. Decoration with ribbons.
Ribbon jewelry - what could be simpler? Ribbons can be used both nylon and satin. The width of the tape can also be different. To create a fluffy bow you need a wide ribbon. A narrow ribbon is used as a main or additional decorative element if it is necessary to emphasize a certain color. The color of the ribbon is chosen to contrast with the color of the car being decorated. So, light ribbons look good on a dark car and vice versa.
Idea 2. Bow made of fabric (tulle, chiffon, satin, etc.).
Such bows look beautiful and magnificent on the car handles. Cut the fabric long enough (usually 40-80 cm), crumple it in the middle and tie it around the handle, make 2 knots and then tie a bow. Thick fabric should be placed under transparent fabrics, i.e. chiffon under tulle, etc.
By the way:
if you take 2 or more pieces of fabric, you get a more magnificent bow. You can combine tulle with chiffon or satin. A multi-colored bow is made from a combination of pieces of fabric of different colors.
Idea 3. Balloons.
You could say this is a classic car decoration. The most budget-friendly and simplest option, but the balloons quickly deflate, burst and come off when the car is driving, which is also the main disadvantage of this decoration. It is better to tie the balls to a ribbon; if you tie them to a thread, it may break itself or damage the ball. If there are several balls, then the best option is to weave them with tails, and tie them to the handle with a ribbon at the “main” knot, make several turns of the ribbon and a knot on the tail itself and then knit to the handle.
Advice:
inflate the balloons only halfway, or better yet a third, this will increase their “survivability.”
It is important to know: silicone glue will help glue the structure or make a flower arrangement, but it will not give it strength. Without proper reinforcement of the structure, flowers are likely to fall off when the car is moving.
By the way:
You should not make large butterflies, as they will not hold their shape and will look like a bow.
Idea 7. Rattan decoration.
Rattan jewelry is gaining popularity. They look quite unusual, striking the imagination with the thin rounded shapes of decorative rattan. Decorating the car handles with rattan is permissible only if the car is fully decorated with rattan decorations. They are attached to the hood, roof, and trunk using suction cups in the form of free-standing “flower beds” woven with rattan branches. The handles are made in the same style as the rest of the car's decor.
(An article is being prepared on this topic and will be published in the near future.)
Idea 8. Floristry.
In the art of decorating a car with floristry, there are many techniques and materials. However, the creation of designer jewelry is resorted to only at themed weddings or luxury weddings, when it is necessary to surprise and amaze everyone with luxury. The materials can be different, here are just a few of them: painted flowers (from paper, fabric and other materials), wickerwork, herbarium, tree branches (for example, spruce paw), beads, rhinestones, pearls and much more.
By the way, pens
cars
need to
at all
if: a)
the hood or roof of the car is decorated with large compositions;
b)
car windows are decorated;
c)
the side mirrors are decorated with a massive design.