Welcome to everyone on the blog today! It's winter outside, everyone is busy with New Year's worries. Perhaps you are reading this article at a slightly different time, but now 2016 is coming and many are terribly interested in: how to create a monkey with your own hands? I will answer this question today.
I couldn’t get over the New Year fever and that’s why I sewed the symbol of the year - a very unusual Mimi monkey as a gift for my husband.
He doesn’t read my articles often, thank God, he won’t see it in advance)) And you can make this sweetest creature and almost a couple dozen more cute monkeys.
Salty dough
Children love to sculpt with plasticine. However, you can have a little fun and sculpt as an adult. Wonderful crafts come out of salt dough. They are perfectly stored and do not spoil for a long time. Their shelf life is much longer than a plasticine figurine, which will leak if you accidentally leave it in the sun or near a battery.
Every housewife has the ingredients for plastic dough in her home:
- salt;
- flour;
- water.
For 100 grams of flour we take the same amount of salt and 50-60 ml of water. You should get a plastic mass. You need to choose very fine salt. If you only have coarse ones on hand, you can grind them in a coffee grinder. To improve plastic properties, some prefer to add a little vegetable oil or glycerin. This dough will stick to your hands less and will additionally provide skin care.
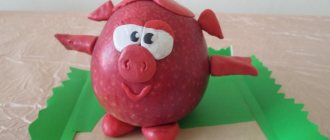
How are dough monkeys made? You can divide the mass into several parts and mix with dye. Most often, the finished product is painted.
Modular origami
Three-dimensional animal figurines are an interesting interior accessory. They are often used to decorate a home according to Feng Shui. According to this teaching, the monkey symbolizes dexterity, ingenuity and career advancement. Using the modular origami technique, the figurine will look impressive and also fit perfectly in style. After all, both Feng Shui and the assembly of similar triangular elements were invented and remain most popular in China.
Remembering childhood
Modeling is a very enjoyable activity that children love very much. A few tips for sculpting a dough monkey:
- To prevent the mass from winding during the process, it must be covered with cling film and taken exactly as much as is needed to create a certain element.
- The figurine will be baked, so you can sculpt it directly on foil or special paper.
- To make thin elements, you can use a regular rolling pin.
- Large parts are easy to sculpt. To create eyes or fingers, use a small penknife, and to create softer lines, use the back of a thin brush. Ideally, the work is done using a special stack.
- For example, take any picture of an animal you like, print it out and put it in front of you.
- Place the remaining dough in the refrigerator until next time. There it can be stored for several days.
The finished product is baked in the oven for an hour at a temperature of 100°C. Next, all that remains is to paint the product and varnish it.
How to create an image?
The first step is to determine the main details. A monkey costume must have a long tail and ears. And elements such as a muzzle on a hat, a bunch of bananas and appropriate makeup can already be classified as accessories and additional details.
For a boy it may consist of pants and a jacket or overalls. But girls can play up the image a little differently, using a beautiful tutu skirt, gloves on their hands and even a hat on their head. You just have to use your imagination a little and transfer all the planned details of the costume onto paper by drawing a small sketch. This will help you navigate the stages of work in the process of creating an outfit.
Wool souvenir
You can make a monkey with your own hands from wool using the dry felting technique. This is done using special needles, which can now be bought at any craft store. For work, prepare:
- Wool for felting – 2 shades of brown, as well as a little white and blue for the eyes.
- Special needles - take several sizes for large parts and for small parts.
- A foam sponge is needed as a stand so as not to stain the table.
- Framing wire – try to find copper wire, it is very flexible and can withstand a few twists.
- Dry pastel for tinting the finished work to highlight the cheeks and nose.
- Transparent superglue.
Monkey
Close relatives of macaques - marmosets - are distinguished by their smaller size, more elegant structure and predominantly arboreal lifestyle. They are smart and easily get used to people, which is why they are popular as pets. More often than others, the dwarf green monkey is kept - the vervet monkey; this tradition originated in ancient times. During excavations on the Greek island of Santorini, frescoes were found with scenes from the life of the highest nobility, dating back to the 2nd century BC. e. Scientists found several images of vervet monkeys on them, which Greek aristocrats probably imported from Africa.
Not everyone can keep a green monkey at home, even considering its unpretentiousness. Making an origami monkey of this breed from paper is much easier. Especially using a detailed manual and a clear diagram.
Step-by-step instruction:
- Fold the square in half diagonally. Combine the top point with the bottom.
- Fold the resulting triangle in half again.
- Expand the layer closest to us.
- We move it to the right, while aligning the leftmost point with the bottom.
- Press the fold and smooth it out. Turn the workpiece over.
- Repeat steps 3-5 on the back.
- Before us is “Double Square”. Fold the first layer along the dotted lines.
- Open the last three folds. Raise the bottom point up until it stops.
- Press the sides in the direction of the arrows.
- Turn the workpiece over.
- Repeat steps 7-9 for the other side.
- Fold the edges as shown in the diagram - both in front and on the back.
- We rotate the product 180°.
- Raise the bottom.
- Cut off the top of the figure along the line marked with scissors.
- Make a fold along the dotted line.
- We form the ears by making zigzag folds.
- Our upper acute angle is bifurcated. We lower its left half down, and select the brush from the right half using the outer reverse fold. Our monkey will use it to hold on to the branch.
- We make a similar brush for the lowered paw.
- Cut the bottom triangle.
- We spread its halves apart, bending them at an angle.
A couple of charming monkeys are suitable for a comic congratulatory picture. Add origami hearts and get a gift for lovers born in the year of the Monkey or simply with a good sense of humor.
The second model of a monkey jumping along the branches is presented in the video tutorial. Its author is the famous origami designer from Japan Tomako Fuse.
Such a monkey can act as a personal talisman. In addition, it looks impressive on cards and in New Year's garlands:
Felting technique
So, our task is a cheerful monkey. MK (master class) on manufacturing recommends starting work from the head. This is the main detail of the future product. Take a brown ball of wool, preferably a light color. During operation, the size of the workpiece will decrease by 2 times, so do not forget to take this into account. We form an even ball with our hands, rolling it like a snowball.
Let's proceed directly to felting. To do this, simply pierce the ball with a needle, placing it on a sponge. If you get a dense layer on the outside, but you feel empty inside, then you need to take a thinner needle and continue working.
Using a crown needle you can bring out small details on the muzzle. If you want to insert ready-made plastic eyes, use an awl to make indentations and glue the parts with glue. To felt the eyes, we apply first white and then blue wool to the head blank. Always do small work with the thinnest needle.
The body is made according to the same principle. The arms and legs are made on a wire frame. To do this, twist the metal base. We roll a flagellum from light wool, secure the tip with glue to the wire and gradually wrap all the elements.
Monkeys made of paper and on paper
Drawing postcards with children
Children should definitely be involved in preparing New Year's souvenirs - let them make at least simple crafts with monkeys, for example, postcards. They will probably like the process, because during the work they will literally have to fumble around in the paint with their hands and feet)
To make a card with a monkey hanging on a vine, all you need is a sheet of paper and watercolors. Help your child paint 4 fingers and a palm with brown paint, and then let him leave his handprint on the paper! The monkey's head and tail can also be painted with paints.
Or you can cut them out of colored paper:
These simple elements can be used to create a cute monkey face)
The authors of this idea added vines with hearts to their monkey) You can replace them with fir branches and Christmas balls!
In a similar way, children's footprints can be “transformed” into monkeys sitting under a palm tree!
Grandparents will especially like such sincere gifts, because the traces of the little hands and feet of their beloved grandchildren will forever remain on them)
Garland and paper gift wrapping
An interesting idea for decorating gifts with an applique with a monkey's face is offered by Sara Mattson-Blume. Look how easy it is to do it all!
Cardboard blanks
The finished muzzle is glued to a paper bag
These same funny faces can decorate a holiday garland and create the right mood at home)
Monkeys using Origami technique
You can make a slightly angular, but still cute monkey using the Origami technique by printing these colored blanks:
The templates have been processed and brought to a single size!
Here the process of assembling this monkey is described in detail. And it will turn out like this:
Teenagers will find it much more interesting to make a more complex paper monkey. Follow the step-by-step description:
Original instructions in English
Vytynankas and monkeys)
Vytynankas are openwork pictures cut out of paper, which have recently been increasingly used to decorate windows for the New Year.
If you like the suggested patterns for the monkey pattern, then print them out and start cutting them out! Read about all the necessary materials and tools for cutting in this article by Cross.
Remember that working with a stationery knife requires compliance with safety precautions! Do not leave children unattended if you trust them with the cutting process!
Soft felt
The mischievous little felt monkey looks beautiful and very cute. This is a very pliable material, so it is easy to work with. There are different types of felt: natural wool, synthetic and mixed. Each has its own characteristics and characteristics. Natural is softer, but deteriorates faster and requires special careful care. Synthetic fibers are often rejected by lovers of all things natural.
You can choose any image of a monkey you like. Trace all the details and select colors. Patterns can be easily transferred to the canvas using a marker or a regular pen. The animal can be made voluminous or flat. For the last option, simply sew all the parts together. Some people prefer to use a glue gun or clear superglue.
To make the figure three-dimensional, use the same patterns. The finished toy needs to be filled with any filler. Such a monkey can be part of a wall panel or used as an independent toy.
How to sew fur pants and a vest
How to make a monkey costume with your own hands? A simple vest consists of two front pieces and one back piece.
The pattern can be made following the example of a finished blouse, which is the size of a child. It is better to choose fabric with a fleece on one side. No buttons or snaps are needed, but you can sew ribbons onto the vest to tie in a bow at the front to secure it.
Shorts (or pants) can be sewn without a pattern. Carnival shorts are usually not planned to be worn in everyday life, so you don’t have to check all the sizes exactly. The video shows how to easily and quickly sew pants or shorts. For a monkey costume, you just need to take the right fabric.
The simplest skirt model, if you plan to make a suit for a girl, is the flared sun. How to sew a monkey costume? The pattern is very simple (example in the picture below). All that remains is to adjust the base to your size. To do this, you need to know your waist circumference and desired length. Separately, you need to cut out the belt - it's just a strip of fabric. After connecting all the parts, all that remains is to insert the elastic into the skirt.
Selection of fabrics
To make a monkey with your own hands, the first thing you need to do is choose fabric. The right material will last a long time, and the finished doll can forever remain your child’s faithful friend. Previously, toys were made from old things, but now stores offer a huge range of special fabrics.
- Plush is traditionally used for sewing toys. This fleecy fabric creates a special feeling of comfort, familiar to everyone since childhood.
- Cotton is a durable, versatile material, but be sure to take into account that it shrinks after washing.
- Linen is highly wear-resistant and has good elasticity.
- Fleece consists of synthetic fibers, is protected from all troubles with natural fabrics, and does not cause allergic reactions.
Now the range includes fabrics of various colors. But not all options are suitable for making toys. The only rule is to avoid large ornaments and prints. A soft monkey in a dress with large flowers will look inharmonious.
Headband with ears for girls
Sewing a headband for a girl is very simple. You will need durable stretchy fabric of a suitable color. You can take any old knitted T-shirt. A rectangle is cut out, then the sections are sewn inside. For reliability, or if the bandage is too big, you can insert an elastic band inside. If you initially plan to insert an elastic band, then the fabric may not be taut (so as not to cause discomfort to the baby), but looser.
The ears are made of the same material. You need to cut out four semicircles of a dark color (these will be the outer parts), two smaller parts and a lighter shade. You need to sew the light inner part to the outer side of the ear from the front side. Only then can the parts be placed face to face and stitched together. To carefully attach a decorative element to a headband, it is not necessary to make slits. You can sew the ears manually (with a hidden stitch) on the front side of the headband. It will look neat and is very easy to do.
Sweet couple
It’s easy to sew a monkey using a pattern. To work, you will need 2 shades of brown to create the animals themselves. For clothing, the fabric can be tailored to your taste.
The first step is to transfer the entire pattern onto thick cardboard - this will make it easier to cut out the material. We cut everything out and trace it on the fabric of the desired color. Needlewomen now often use a self-disappearing marker. You can use a bar of soap or chalk the old fashioned way.
Large parts are sewn first, then small ones. It is important to remember to leave a hole for stuffing. You will have to grind the arms and legs and close the holes on the front side. This may not work at first, but with experience you will get an excellent hidden seam.
At the end of the work, clothes are sewn. Check immediately to see if it can be removed. If not, then the finishing seams will have to be done directly on the doll. So the charming soft monkey is ready.
Master class “Fire monkey - symbol of 2016”
The Year of the Fire Monkey is approaching at an inexorable speed!
Let's create a symbol of 2016 together and plant this cute monkey under our Christmas tree 
We will make the monkey using the teddy technology, according to my simplified pattern with one-piece lower legs.
To work you will need the following materials and tools:
- Soviet plush of fiery color (approximately 35*40 cm).
- Plush of a contrasting color, for example yellow (approximately 10*10 cm).
- Sawdust of medium fraction (about 150 g).
- Glass granules (about 50 g).
- Glass eyes 7 mm black on a loop.
- Discs 25 mm - 2 pieces, 20 mm - 4 pieces.
- M3 washers - 6 pieces.
- T-shaped cotter pins - 3 pieces.
- Threads to match the plush and a needle for hand sewing.
- The threads are super strong in a plush tone and the needle is long.
- Awl, scissors, thin-nose pliers, wooden stick for stuffing or tweezers, bristle brush No. 3, oil paint (mars brown), felt, accessories.
I wrote about materials here, and about tools here.
I apologize in advance for the quality of the photo (because daylight hours are short, and I couldn’t always shoot during the day), and for the watermarks in the middle (because they drag everything that is not nailed down).
1. First, carefully examine the pattern - here you need to understand what’s what in order to cut everything correctly. I made the maximum number of marks and signatures so that it was clear what to sew with what. The pattern is on A4 sheet, without seam allowances. Cut out all the pieces from the pattern so that the 20mm disc fits freely into the top of the foot.
2. Lay out all the cut details on the plush and transfer them according to the guidelines and signatures on the pattern. Make basic marks. If it says 1+1, then this part is cut once normally, and a second time in a mirror image horizontally. One of the main features of working with plush is strict adherence to the direction of the grain thread (which ideally coincides with the direction of the pile). The slightest deviations from the axis (especially in paired parts) lead to the fact that the finished toy is completely skewed, and nothing can correct this. Don’t cut it from very shabby plush, throw it away without regret, because in the end, when stuffing it, it will tear anyway, and you will be sorry for the wasted time.
When cutting, leave about 10mm between pieces to allow for a good 5mm seam allowance.
3. Cut out all the pieces from both pieces of plush - red and yellow. While cutting, the lint can become very loose and fly around, so you can keep a damp cloth at the ready to constantly collect it or use a mini vacuum cleaner.
4. Let's start stitching the parts together. I always say that a well-made toy is one that does not have a single seam visible. Monolith. That is why it is important to choose the threads exactly to match and make all the seams very tight so that they do not move apart in the finished product.
If the base of your plush crumbles (and this will happen in 90% of cases), then before sewing all the seams, you need to sweep away the parts. Using a regular seam over the edge. What does this give? Firstly, the edges will fray less when sewing and, accordingly, the risk that the seam will become thinner and tear when stuffing will be reduced. Secondly, plush is a rather slippery material and basting will help keep the two parts together so that they do not move relative to each other.
First, sweep over the edge, and then sew the following sections with a very tight “back needle” seam (1-2 mm stitches):
Head: face: AC, DB, back of head: A-B1.
Hindquarters: BH, H1-I, IG.
Forebody: BG.
Upper legs: in a circle, leaving an unstitched section for stuffing L-L1.
Ears: in an arc, leaving the M-M1 section unstitched.
Tail: sew two parts together, leaving segment N-N1 unsewn.
Nose: sew darts E-E1, aligning points Eb, then fold with knit stitches and sew segment C-K-D together.
Sew the finished muzzle (nose) over the edge into the front part of the head, aligning the C-ED marks, then sew with a tight “back needle” stitch.
Now fold the front and back of the head together and sew them in a circle, starting and ending at point B. Marks A and F should match.
Turn the tail out.
Sew the front and back body parts together, aligning all the important points on the pattern. At point B, leave a small gap (under the head cotter pin).
Now pour some granules into the tail and insert it from the inside into the dart on the back of the body, aligning the points I.
5. Lightly coat the very edge of the plush base with PVA glue diluted 1:1 with water and tuck the open sections (places for stuffing) inward, stitch the needle with a contrast thread, not too often. You just need to fix the allowances so that they don’t become frayed when stuffing.
All parts are ready for stuffing.
5. Prepare sawdust. Remove large and hard shavings, let only very soft and small sawdust remain.
(Buy sawdust in pet stores, for rodents - they are clean, soft, have been tested for the presence of harmful substances and insects, do not take them from sawmills or furniture factories!)
Fill your head tightly with sawdust. Tight - this means that the head should not be deformed in any way when squeezing it with the fingers of one hand. At live master classes, everyone seems to have their heads stuffed tightly, and then for some reason three more portions of sawdust fit in there.
Prepare a 25 mm disc, washer, cotter pin.
Insert the structure into the head there so that the cotter pin comes out from point B in the head. Sew with a blind stitch. A hidden seam is a seam that no one sees - its name hints at this. Just in case, I’ll clarify, otherwise anything can happen.
When the head is stuffed, I use a stick to form (with great effort, but carefully so as not to tear the plush) the eye sockets and nostrils.
The eye sockets will be fixed in the future with eyes, but the nostrils... will have to be fixed with thread so that they do not straighten out.
I took a contrasting thread to make it easier to photograph, and you do it with a matching thread (yellow) - just a small stitch with thread to tighten the middle of the nose and prevent the hollow that we made with a stick from straightening out.
We select the size of the eyes, fasten them on a strong thread, make small holes in the eye sockets with an awl and use a long needle to insert the eyes into place. We bring the needle to the area of the cervical disc, at the very bottom, make knots there and hide them in the head.
You can trim the nose hair a little if the plush is too fluffy.
We embroider the mouth with a dark thread (all auxiliary threads can be fixed somewhere in the area of the cervical disc and brought out there, hiding the knots).
We fill the upper legs halfway, then insert 20 mm discs with washers and cotter pins, and finish them to the end. Make sure you have mirror paws and not two left paws. Remove the auxiliary thread and sew it up with a blind stitch.
We put the head in place (at point B), fix it with a disk (25 mm) and a washer. We tighten the cotter pin.
The washers are always placed on cardboard and wooden discs. The antennae of the wing-twisted cotter pin always lie on the washer. This prevents the disc from abrading and the paws from becoming loose.
We place the paws in the same way. We pierce the points - marks in the body for the paws, and also fix them from the inside of the body.
Now you can fill the lower paws with sawdust, pour more large glass granules into the monkey so that it sits confidently on its butt (after all, its head is large and heavy) and sew it up. For the convenience of sewing up parts filled with sawdust, I often use a piece of wool, which I place under the seam. This way the sawdust does not interfere with the needle.
The child is already sitting, waiting for his ears
We take the ears, turn the edges inward and sew them with several stitches over the edge. Then we sew it to the head, first from the inside of the ear (with a hidden seam, of course), then from the outside.
I told you how to sew on ears here. Only on the monkey they are sewn without bends, in a straight line, along the side seams.
6. Tinting. At first I wanted to age the monkey, but then I decided to leave its skin so bright and shiny. After all, that’s why she’s fiery, that’s why she’s New Year’s. Therefore, the tinting will only slightly touch her face to emphasize her natural beauty.
With the blunt end of a needle I apply oil paint to create the nostrils, and with a stiff brush I apply small shadows around the eyes to emphasize the depth of the look. I also highlight the triangle on the forehead.
We spent an hour rummaging through the lace and trying on skirts and bows, but in the end we settled on a vest. Apparently, a boy was born! I cut out a vest from a piece of felt and secure it with a piece of silk ribbon. Voila!
The monkey is ready! Or ready?
In general, we are ready for the New Year. And you?
Good luck and inspiration!
Reprint of the material only with the author’s signature and a link to this master class!
The use of the pattern is permitted, but subject to the author's indication.
Natalia Tolstykina
Knit a gift
Before the stuffed monkey can be knitted, you need to choose the right yarn. Decide how you are going to knit. How will your monkey be created - knitted or crocheted? For one method or another, you need to select the appropriate threads.
Let's look at the dyeing process. Synthetic compounds are cheaper, but natural ones are safer. Eco-style is now in fashion, and there is a large selection of natural threads dyed with natural dyes on sale.
The choice of fiber also matters. Yarn comes in many types, ranging from cotton and wool to bamboo. Allergy sufferers are still better off using synthetic threads.
When purchasing a skein of yarn, be sure to save the label. This way you can easily find the right color if you don’t have enough material for the job. In addition, there are always recommendations for caring for the finished product.
Monkey costume for a boy: instructions for creating
- Boys will look most authentic in a brown baggy jumpsuit, but they will also look good in a velor suit and cap.
- In order to make a pattern, open up an old unnecessary overalls or a jacket and pants, attach the prepared elements to a suitable fabric and outline them with chalk or soap.
Blouse for a suit
- Next is a matter of technique: cut the fabric along the outlined contours and stitch together the elements. The base of the costume is ready, but how to make the hat, ears and tail - read about it below.
It would be better in overalls
Knitting on knitting needles
To make a small monkey, you need to cast on only 20 loops for the body. The legs are made from the same fabric so that there are no unnecessary joints and seams. You can knit with five knitting needles in the round. It will be a little difficult for novice needlewomen to work with such a small number of loops. A good option is knitting on 2 knitting needles with a single fabric. In this case, you will only have to sew one seam at the back.
A voluminous muzzle will be obtained by tightening it in the eye area. This is done with a needle. It is preferable to use plastic needles for stitching knitted items. They are very flexible and do not damage the fibers of the threads.
A funny knitted monkey is made from fuzzy yarn. The effect of real wool is created. But for knitting the muzzle and paws, it is better to take a regular thread. This will help enhance the effect.
Amigurumi
Small amigurumi figures have rightfully won the love of all needlewomen and not only. The monkey pattern in this technique is very simple. To work, you will need 2 skeins of yarn: brown and pale yellow, as well as a hook of the appropriate number. Yellow will be used on the face, paws and ear trim.
The work is being carried out in stages. You need to make a ball head separately, and a little less than half of it is created using a yellow thread - this is the future face. The pear-shaped body and arms and legs are knitted in the round. You can also assemble all the parts together with a crochet hook or a needle for sewing hand-knitted items.
To finish the job, glue on the eyes. Their size is small, so it is better to take small beads. Select the fingers and toes. Lush hair can be easily made from leftover threads. Choose who you will have - a cute girl with a ponytail or a gentleman in a hat.
Knitted monkeys
There weren’t many monkeys knitted with knitting needles, but there are still a couple of interesting options!)
Well, you will also have a very cool “Naughty Monkey” if you purchase a master class from Olga Morgunova.
The master class “Monkey in a Pink Dress” from Tatyana Korobkova is on sale here.
You can buy the monkey Marinka from Olga and Svetlana (Butyavka-shop)
Where to put your socks
Nowadays no one would think of sewing a monkey out of an old sock. You need a whole pair of these products to work. In the store we choose the most beautiful socks, they will make a great monkey. MK describes production in detail.
Before work, carefully iron your socks - one along, the other across. The first one will be the torso. The toe area is the future head, the heel is the butt. We cut everything below the heel into 2 halves and sew them together separately. The result will be legs. Cut off the tail from the second sock along its entire length. We divide the remaining part up to the heel to make handles. The heel itself will be the protruding part of the muzzle. You will also need 4 semicircles for the ears.
We sew all the parts together using a sewing machine. If it is not there, you can do it manually. Carefully stuff the product. To ensure that the filler spreads evenly, just roll it in your hands like a sausage made of dough. Next we sew all the parts together. The description of the monkey is over.
Any homemade gift brings more impressions and gives you warmth. It’s easy to make a monkey with your own hands – just choose the method and design you like. Everyone can make a toy using their favorite technique and their own style. You can choose something that has been familiar for a long time, or try yourself in a new direction of creativity. Funny, mischievous monkeys will not leave anyone indifferent. Adults love them, and children are simply crazy about them. Making a souvenir will give a lot of emotions to the needlewoman herself.
How to make ears?
What's a monkey costume without ears? This is one of the most important details that makes the image recognizable. Making them is not difficult at all. To make it you will need cardboard and fabric in brown and beige or pink. It is better to make the ears large enough, but you should not get carried away, as Cheburashka will immediately appear. So, two semicircles are cut out of cardboard, then the template is transferred to fabric and four parts are cut out: two from dark matter, two from light. In this case, you should give a seam allowance of 1 cm along the contour of the elements. Next, the fabric parts are folded facing inward and sewn together. When a semicircle cut remains, the product is turned inside out, cardboard is inserted and carefully sewn up, tucking the cuts inward.
Such ears can be glued to a hairband, a hat sewn from two semicircles, according to the volume of the child’s head, or glued to the hood. For girls, a suitable option is to attach the ears to clip-on hairpins.