From circles
To create a volumetric umbrella, we will prepare
- colored paper
- scissors with ruler
- glue with a simple pencil
The first version of a paper accessory is ideal for children; even the smallest daredevil can make it.
To do this you will need:
- colored paper
- glue stick or double-sided tape
- cocktail tube or wire
- pencil
- scissors
Progress:
We take colored paper, draw circles with a diameter of 10 centimeters with a pencil, cut out 15 pieces.
Fold the resulting circle exactly in half, then repeat these movements again to make a quarter.
Thus, we repeat the same actions with all circles.
Now you need glue or tape, glue all the quarters together.
And if we complete the circle, and then insert a cocktail stick or wire wrapped in crepe paper into the base of the umbrella, then we will get this miniature umbrella.
In the form of an application
If you fold a piece of paper like an accordion and glue such a blank to colored cardboard, you will get an excellent children's applique.
I am sure that the child will be interested in such an activity. Thanks to this technique, logical thinking develops and fine motor skills are formed.
Classic model
An origami umbrella, assembled according to a classic pattern, looks good in garlands. Kami paper with a pattern will give the model a “real” Japanese flavor.
Step-by-step instruction:
- Fold a 21x21 cm square diagonally from bottom to top.
- We “close” the resulting triangle from right to left.
- Open the top part and flatten it into a diamond shape.
- We repeat the same action for the reverse side. We get “Double Square”.
- Fold the outer corners towards the center. We return to the original position.
- Open the right “pocket” to the left. Press and smooth.
- Flip the right edge to the left. Repeat step 6.
- We continue the same steps until we fold the entire model.
- We bend the upper triangles along the dotted line.
- And then we “tuck” it inside.
- Align the product so that there are four folds on both sides. Iron out all the folds again.
- Distribute the folds evenly around the circle. Cut off the bottom corner.
- Take a strip of paper 11x21 cm. Roll it into a tube. For convenience, you can use a knitting needle or bamboo skewer. We fix the tube with glue so that it does not open. We bend the bottom part, forming a handle. We cut the opposite end with a corner and insert it into the hole of the dome. Fill with hot glue.
- The origami paper umbrella is ready:
The video shows how to make the same model in a different way:
From modules
This voluminous umbrella can be classified as an origami model with some stretch. The modules of which it consists are connected with glue, which is not typical for classical technology. But any child can make such a spectacular decor. It turns out easy, fast and inexpensive. Umbrellas can be used to decorate not only a nursery, but also a kindergarten or a classroom in an elementary school.
You will need:
- colored office paper;
- scissors, pliers;
- glue, or even better, narrow double-sided tape;
- floral wire (fruit).
Step-by-step instruction:
- We cut out 10 - 15 circles, d10 - 15 cm. You can take a different size, taking into account the fact that the height of the umbrella will be equal to the radius of the workpiece.
- Fold the circle in half. And then twice more.
- Open the last fold. We paste a strip of double-sided tape diagonally so that the sectors of the circle do not diverge.
- This is what the finished module looks like. All that remains is to assemble the dome.
- We connect the modules using tape. If the umbrella does not seem voluminous enough, you can add a few more elements.
- Glue the beginning and end of the workpiece. You should get a hemisphere.
- Let's make a handle. Cut the wire twice as long as the height of the dome. Twist a neat loop at the end. Mask the wire with tape.
- We thread the handle through the dome and glue it with a heat gun or “Moment”. The loop will prevent it from falling inside the product. We bend the opposite end of the wire beautifully
You can make an origami umbrella from paper of different colors. And also add decorative drops of beads or paper.
Wall composition:
Unusual lamp
Using a broken umbrella, you can update your interior by making a chandelier out of it. An old umbrella in a cheerful color is perfect for a child's room.
If there are two identical transparent products, then by combining them, you can get an original lampshade in the shape of a ball for the kitchen.
The lamp can be hung by the handle by connecting the lamps to the spokes. You can remove the cover, leaving only the frame. When decorating the frame with colored beads, ribbons, and lace, you will get an unusually beautiful chandelier.
To build a chandelier you will need an umbrella and fastenings (chains, wire, twine). Fastening elements should not be visible behind the dome, suspended near the ceiling. If the chandelier is placed quite low, then more powerful mounts can be used. In this case, thick chains will serve as decorative elements.
The lamp is made as follows:
- Decorate the chandelier with selected decorative elements.
- Cut off the handle of the accessory.
- Measure the distance from the ceiling to the base of the dome.
- Attach chains whose length corresponds to the measurements taken.
- Hang the finished lamp from the ceiling.
When carrying out work, you must protect yourself by turning off the electricity.
Crafts volumetric umbrella
You will need three A4 sheets of any color, a disk, scissors, glue, a piece of wire.
1. Place the disk on the sheet and trace it. One sheet will make three circles. And the umbrella will take 9 circles. Cut it out.
2. Bend the circle in half and in half again. It turns out to be a quarter circle. Apply glue from the center of the circle to the outer edge and glue it together. One piece is ready.
We do the same with all the circles.
3. Glue the quarters together. We also apply glue only to the strip of the center of the circle towards the outside.
4. We connect the first and ninth parts of the ball, we get a hemisphere.
5. Attach a wire leg to the center. Our umbrella is ready.
Baroque style
Europeans began to actively use umbrellas in the 17th century, and they protected themselves primarily not from rain, but from the sun. Ladies from high society covered their faces while walking, fearing a “plebeian” tan. Decoration in the accessory of those times clearly prevailed over practicality. Lace, scallops, bows and ribbons turned the umbrella into a worthy extension of a magnificent lady's outfit. Just such a masterpiece of the “gallant century” can be made from modules using the origami technique.
You will need:
- 7 square sheets of paper 10x10 cm;
- mini cocktail straw;
- bead;
- heat gun.
Video on assembling an exquisite origami umbrella:
A brief excursion into history
Such an original accessory as a sun umbrella for the head was invented at the end of the 19th century. In 1880, a man named Robert Patten, who stood out from the crowd with his many oddities and extraordinary behavior, patented a new invention that was supposed to protect the head from all kinds of environmental influences. The design was made in the form of a hat with a sloping brim and contained a mosquito net. The latter was attached to the dome of the device.
The idea for the design came to Patten during a long trip to Mexico. Soon the man moved back to his homeland in the United States. Here in Seattle, he patented his unique head umbrella and began promoting the innovation on the market. However, the innovation never received favorable reviews from a wide audience. Therefore, Robert soon switched to making and repairing ordinary umbrellas, which became his main source of income.
The fascinating story became inspiring for American animators. At one time, an animated film was created, which was called “The Umbrella Man.” The prototype of the central character in it was the inventor Robert Patten.
The head umbrella became popular only in the mid-20th century. This was facilitated by the passion for a non-standard accessory on the part of the famous American baseball player Lou Brock. The athlete loved to appear in public wearing such a protective device on his head, and was one of the few fans of the invention. In fact, Brock owned an umbrella business in the city of St. Louis. Perhaps this is what explains this person’s increased interest in the accessory.
From cones
The next version of paper crafts will also be voluminous. It should be noted that his technique is also not difficult to perform.
A variation of this craft would look great for decorating a postcard or would be well suited for home interiors.
To do this you will need:
- colored paper
- scissors
- pencil
- glue stick
- cardboard
So how to do it:
Trace circles with a diameter of 20 centimeters with a pencil and cut them out.
Divide the circle into halves.
Next, glue the segments together to form cones.
Place the resulting cones evenly on hard cardboard (background color is optional) and glue their ends with a triangle of colored paper.
We make a handle for the umbrella from the sheet and glue it.
The resulting blank can be decorated as desired. Anything can be used: decorative beads and autumn leaves.
Large umbrellas
To make them, we will use the method of assembling large paper sheets.
To do this you will need:
Take a large sheet of paper and cut a rectangle.
Bend the resulting sheet into an accordion.
After the workpiece is completely bent, fold the workpiece in half and glue the first and last bend of the future umbrella. Connect several of these parts together.
Now you have a bright and fluffy umbrella; you can add bright accents if you wish.
As it turns out, making such umbrellas is quite quick. Such a bright attribute can fit perfectly into the interior of a home or be an integral accessory for a photo shoot.
Crafting from paper
All parents have encountered the problem that their child is asked to do a craft. For kids, an umbrella will be an excellent autumn option. The easiest and fastest way is to make it from paper. Even a 4-5 year old child can go through all the stages with the help of mom or dad.
For work you will need
- colored sheets of A4 format;
- compass, ruler, pencil;
- glue - paper or PVA.
We make 9-12 circles with a diameter of 6 cm from paper.
We fold each of the resulting parts in half, then in half again to form a “quarter” of a circle. We separate the quarter, grease it with glue and fasten it to create a three-dimensional element for assembling the dome.
We glue the parts of the dome together according to the same principle, we get an “accordion”, we spread it slightly, but not completely and do not connect it “in a circle”.
Let's start assembling the cane. To do this, you will need a square of matching paper or another color measuring 9*9 cm. We roll it diagonally into a tube, secure it with glue, and cut off the sharp ends with scissors.
In addition, one more part is needed - a retainer. This is a strip of paper 1*9 cm. Lubricate it with glue and wrap it around the upper end of the cane.
We attach the accordion-dome to the reed, placing it under the clamp. We bend the edge of the cane in a semicircle.
Model for a doll
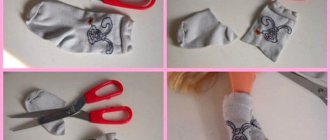
You can make your own accessory for a doll in the form of a closed cane umbrella.
This craft option is suitable for experienced craftswomen. Will be needed
- fabric, preferably dense;
- glue “second” (instant action);
- thick elastic wire;
- a piece of polymer clay to match the fabric;
- needle, thread, scissors, iron;
- sewing double-sided adhesive web;
- pliers.
We begin work by designing the cane. We bend the wire with pliers on one side, forming a handle. From polymer clay we form the braid of the handle and a sharp tip with a cap.
From a square of fabric with a side equal to 2 lengths of wire without a handle and tip, we fold a cone and cut off the protruding corners.
Without unfolding, iron the future dome to mark the folds.
The next step is to process the tissue sections with adhesive web. We bend the material, place the web inside the fold, and iron it.
We iron the edges of the umbrella so that the folds alternate - one “looks” inward, one outward.
If you want to decorate a craft, then it is better to do it until all its details have been collected together. The fabric can be embroidered with beads, lace, or a narrow braid or satin ribbon along the edge.
Let's start assembling. We remove the tip from the cane, pierce the center of the dome with it, and fix both the woven material and the polymer clay part with glue.
The folds, ironed inward, are pulled to the cane using a needle and thread, and secured.
We carefully wrap the folds, ironed outward, around the cane as if we were going to put the umbrella in its case. We fix the shape of the craft with a hot iron, trying not to touch the clay parts.
The work is finished - the original and unique accessory for the doll is ready.
You can make an open puppet umbrella, but this will require skills of a different level, and other materials and details. But you need to try, because without mistakes there will be no experience.
https://youtu.be/dWLk9BZBIo4
Fan circle umbrella
This craft can be made from either thin paper or cardboard. An umbrella can be made up of sectors of different colors. To work, prepare rectangles. To make an even “accordion”, you can draw parallel lines on the back side using a ruler and a simple pencil. Then make even folds of paper forward and backward alternately.
Fold the resulting “accordion” in half, as shown in the photo above, and glue the outer strips together. To make a complete circle, you need to make 3-4 identical parts, depending on the quality and thickness of the paper. Then all the elements are connected to each other. If the paper is thin, then you can use PVA glue for fastening, but if you are making a craft from cardboard or printed paper, then a connection made with a glue gun will be more reliable.
Minuses
Few inventions do not have disadvantages. This case was no exception. The main disadvantage is the not very attractive image that a person acquires who decides to protect his head with the help of such a device. The iridescent bright colors of the dome, characteristic of umbrella hats, can give the user a ridiculous and even somewhat clownish appearance. However, this feature can become an advantage in situations where it is necessary to amuse others.
The invention has another obvious drawback. The accessory does not do a very good job of protecting against rain compared to a traditional umbrella. Therefore, during heavy precipitation there is no point in using it.
Making an umbrella from colored paper step by step
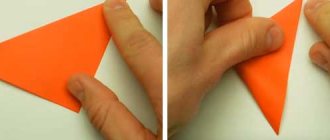
1. Let's start our craft by making individual elements for the future umbrella. First of all, for this we will prepare a square with a side of 8 cm.
2. Fold it diagonally.
3. Now straighten it and bend the sides to the resulting line.
4. The remaining corner at the top needs to be folded down.
5. We bend the sides, tuck this corner inward, and then bend it again.
6. Next we will use a glue stick. Apply glue to one half of the fold.
7. And then we connect it to the other half.
8. We got such a detail for the future umbrella.
9. We need to make 7 of these elements from paper of different colors.
10. Now you can start assembling the umbrella. For the background of the application we will use, for example, blue paper. First of all, glue the first central blank onto the sheet.
11. Then on the sides we add the remaining elements for our umbrella.
12. Cut out a handle from light green paper and then glue it.
13. Next we need to make the clouds for the applique. We draw the outline of the clouds on white paper with a simple pencil, and then cut it out with scissors. Glue a couple of clouds to the top of the blue sheet.
14. All that’s left is to make some drops. We cut them out of white paper and fix them with glue. We got such a voluminous “Umbrella” applique.
Mixing two techniques of appliqué and origami gave us an unusual craft. With such an umbrella you won't be afraid to get caught in the rain. Looking through it, even the most menacing clouds appear much friendlier.
Origami "Umbrella"
Origami is a complex art in general, but there are patterns that even a child can handle. One of these simple projects is a cute voluminous umbrella.
To work, prepare colored paper, scissors and office glue. Pre-cut a square with sides of 15 cm - this will be the dome of the umbrella, and a rectangle 15x5 cm - this will be the rod with the handle. Choose the appropriate paper colors for the blanks.
Instructions for creating origami:
- Bend the square along both diagonals.
- Then fold it in half vertically and horizontally. You will get 4 intersecting folds at the central point: two diagonal, two transverse.
- Turn the square into a diamond. To do this, bend one of the diagonal folds on both sides. You will get a rhombus, the two sides of which are formed by transverse lines in 2 layers.
- Bend the corners of the rhombus towards the center so that the edges formed by the transverse folds meet the intended center line. Do this for all 4 corners, front and back.
- Carefully wrap the resulting 4 narrow triangles inside the rhombus. You will get an umbrella dome with 8 spokes, and between them there are diamonds elongated at the top.
- Trim off the bottom protruding parts of the diamonds.
- Make a small hole in the top of the dome.
- Twist and glue the previously cut rectangle into a narrow tube, insert it into the hole, and secure with glue. Bend the free edge of the tube to form a handle.
The finished umbrella can be decorated by gluing multi-colored circles and stars onto the dome. The upper part of the rod protruding from the dome can be closed by gluing beads and seed beads.
How to make a multi-colored umbrella from colored paper - option 2
To make a multi-colored umbrella, you need colored paper, a drinking straw, double-sided tape, a pencil, scissors, a compass and glue:
- Make blanks for the umbrella in the form of circles. For a large craft, you will need to cut out 20 circles. If it is small, then 15 is enough.
- Fold each piece in half, then again, to form a quarter circle.
- Coat the upper part of the workpiece with glue so that the entire part does not open, and the lower half swings open freely.
- Then glue all the quarters together. Take 2 blanks and place them with their forked sides down. Lubricate these sides with glue and connect, with this the right angle is glued to the right angle.
Apply glue only to the top of the workpiece. Glue all the parts in this way, folding them in a stack and pressing down with your hand so that the glue adheres well. To complete the circle, glue the side of the first and final workpiece.
To make a handle from a cocktail tube, you need to glue double-sided tape to its upper section (the lower part bends in place of the accordion; this will be the handle). Remove the film and insert the tube into the hole in the center of the umbrella. You can use a glue gun instead of tape.
Craft from napkins
Crafts in the form of umbrellas are easy to make with your own hands.
An umbrella can be made from napkins in origami style and made with applique. If desired, you can add lace ribbon and other decorations to them.
In order to make a three-dimensional umbrella, you will need colored craft wire and just one napkin. It should be folded into a cone and glued. Thread the wire in the center and bend it from the bottom. Additionally, you can decorate the base of the umbrella with drawings, rhinestones or colored ribbons.
Umbrella with flowers
I bring to your attention another master class from me. Make a rainbow umbrella with flowers like this in a gift card. Look for step-by-step photos of the process itself in a special article on our blog here.
When making such gift work, you can choose different colors for making buds with candies, and the brighter the better.
This option will look perfect in your home decor and will increasingly attract the attention of the eye.
Decorative umbrellas
After making a fan circle out of paper, you will see a small hole in the center of the craft. Usually a thread or thin rope is inserted into it and the craft is hung from the ceiling or on a ledge near a window. But if you want to decorate the room with umbrellas, then you need to make a handle. For this purpose, you can use wire, but in this case it is advisable to use aluminum wire in a plastic sheath. This wire bends well and holds its shape.
A small amount of hot glue is dripped into the hole in the center of the circle and a piece of wire is inserted with the upper end. The lower part is arched in a semicircle.
As you can see, making paper umbrellas yourself is not difficult, and it is also a fun and creative process. Join the handicraft masters and you will quickly understand how to make an umbrella out of paper. You will definitely enjoy manual labor!
Closing umbrellas
“How to make them? Where to begin?" - Frequently asked questions when working. Calm, just calm. Really, there is absolutely nothing to worry about! Now you will see that not everything is so scary.
Watch a short interesting video for an example of how to make an umbrella that can open and close.
Autumn craft
It’s clear how to make an umbrella out of paper with your own hands, but how to create one from autumn leaves is not an easy task. This item is indispensable for an autumn festival or a crafts competition.
To create it you need an old small umbrella. Maple leaves of colorful autumn colors, properly dried. You will also need PVA glue.
Wash and dry the umbrella. Apply glue to the material and stick leaves on it in even rows or as your imagination dictates. Dry the craft in a ventilated area.
You can’t walk with such an umbrella in the rain, but in dry weather, surprising passers-by with an unusual umbrella is a great idea.
We give a second life to an old umbrella
Craftswomen do not throw away an outdated accessory with a broken handle or dome opening system or faded fabric. You can make anything from it - from an unusual flower bed to an original wardrobe item. Needlewomen create real masterpieces with their own hands:
- chandeliers, sconces;
- women's bags;
- hangers;
- fancy dresses;
- toys;
- interior decorations.
Skirt
The first step is to prepare the material for the skirt. We carefully disassemble the dome, freeing the fabric from the iron elements. The plastic tips of the knitting needles do not need to be removed - the skirt will look original.
You only need one measurement - waist circumference (WT). To the result obtained when measuring, you need to add 1.5 cm for the freedom of fit.
We iron the fabric removed from the umbrella, fold it in four so that the center becomes a right angle, and shape the waist line.
The value of R is calculated using the formula OT:6.28.
We sew a zipper into the back or side seam of the skirt.
The last step is to design the belt. You can sew a classic placket, a wide knitted strip, or finish the edge with bias tape.
Flowerbed
If you decide to make a landscape decoration, there is no need to disassemble the old umbrella. There are many options for its use in the garden, for example, protecting shade-loving plants, growing flowers with a compact root system.
Such decor will cheer up the local area, become the highlight of a children's or adult recreation area, and will definitely attract the attention of neighbors and guests.
Chandeliers, lamps
The accessory can be used as a lampshade for a floor lamp or to decorate a ceiling or wall light source. There are many ideas; you can draw inspiration from the experience of experienced craftswomen or fantasize on your own.
The main thing is to follow safety precautions when making devices powered by electricity. Textile parts should not come into contact with light bulbs; exposed wires (their connection points) must be carefully insulated.
In addition to the listed crafts, other useful things are made from old umbrellas. The dome fabric is durable, suitable for sewing a shopping bag, an organizer for small items, a children's raincoat, a cape for a dog. A black umbrella can become part of a bat masquerade costume.
Do not throw away an umbrella that is broken or out of fashion. Show your imagination, and it will become a useful thing or a cute decoration that will complement your wardrobe.
Origami. Volume umbrella.
An umbrella made using the origami method has the ability to open and close like a real one. To the joy and surprise of the children!
Materials for work:
- Ruler
- Glue stick
- Pencil
- Two sheets of different colors.
- Cut two squares with sides 13 cm from sheets of paper. and 15cm.
2. Let's start working with a sheet of 15cm. Fold the sheet diagonally in both directions and in half.
3. 4 squares are formed. Two of them remain on the surface, and the two side ones must be passed inside.
4. Place the square with the opening parts facing you. And we bend the edges of the square towards the center, as if we were making an airplane. Turn the square over and fold the edges of the square on the other side in the same way.
5.Thanks to these combinations, we divided the workpiece into 16 segments. Your task now is to redirect all folds diverging from the center. They should alternate one up, one down.
Fold the edges of the square. Airplane.
6. As a result, you will get something like this with a protruding corner.
7. We bend the corner and tuck it inside the workpiece.
The result is an umbrella dome like this.
8. Prepare the element responsible for opening and closing the umbrella. We do everything in the same sequence as the umbrella dome.
9. When you get an airplane, cut off the corners. And we make cuts as shown in the figure, departing 4.5 cm from the top of the triangle.
4.5 cm.
10. Unfold the workpiece. Now you will have to redirect the folds so that they alternate and take the shape we need.
11. Make a small cut in the green and yellow dome.
12. Combine two blanks so that the vertices look in different directions.
13. Bend the corners of the green blank and carefully glue them onto the yellow blank.
14. We twist the umbrella stick and glue it together using a wooden skewer.
15. The umbrella is ready to delight the dolls. And it can open if two parts are placed closer to each other. And close if the parts are moved apart.
Now our umbrellas are ready. May your autumn be bright!
Volumetric umbrella made of cones.
Prepare colored paper, glue, scissors, pencil and maple leaf templates.
Trace a circle on colored paper according to the template and cut it out. Divide the circle into six segments. For the umbrella we only need four.
Roll the segments into little balls and glue them together.
Glue the bags onto the base, bringing the sharp ends of the bags together at one point. We mask the top of the bags with a triangle. Cut out and glue the umbrella handle. Decorate the umbrella as desired.
Using the template, trace and cut out the maple leaves.
We decorate the umbrella with leaves, gluing only part of the leaf. This helps create volume and liveliness to the leaves. Our autumn umbrella is ready.
DIY umbrella: master class
One of the areas of application of umbrellas is decorative art. You can create a decorative element using any material: paper, fabric, wood, mesh, plastic, autumn leaves. Even out of money! A wedding or anniversary gift in the form of an umbrella of banknotes looks original.
Crafts made from various materials of natural origin are popular in kindergartens and schools.
Various accessories and crafts can be made from waste material. This kind of art has become popular because it costs almost nothing. For example, an old umbrella, unsuitable for its intended purpose, can be turned into an element of garden decor by decorating it with flowers, ribbons and figurines.
How to make such an autumn decorative accessory? Paint the old dome with acrylic paints in a water theme. You can also paste it over or trim it with bright maple leaves.
How to make a decorative umbrella with your own hands: decor
Crafts made from wire, hairpins or pen rods will be original. It is enough to fasten six to eight of these knitting needles together, wrap them with thread, and the decorative umbrella is ready.
The canopy with two positions is constructed from lightweight and flexible materials and is not decorated with volumetric elements so that it can be closed. Such a canopy can be easily designed and made from paper.