Irina Andrun (Glagoleva)
Good afternoon, guests of my blog!
The weather, unfortunately, does not please us and does not spoil us with snow
. And I really want winter-winter, sparkling and crunchy snow.
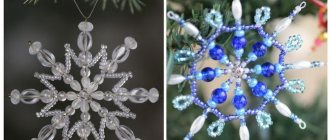
Today I will share with you the idea of creating colorful and bright snowflakes from wire and beads
.
A long time ago I had a creativity kit for creating snowflakes
.
Finally I made these wonderful snowflakes
.
And I decided that you can make such snowflakes yourself
, you just need to buy
some wire (floral wire, or some other thin one)
and
beads of different sizes
. These materials are sold in art and craft stores.
To create snowflakes you will need
:
* wire
(I already have
snowflake )
* beads
different sizes and colors
* pliers
* thread or ribbon for a loop
Let's act!
Cut the wire to the same size
, twist or fasten in the center with a ball of plasticine, for example, or a drop of super glue.
Stringing beads
by 1 ray and using pliers we bend the end
of the wire
so that
the beads
.
Gradually decorate all the rays of the snowflake
. We fix the loop.
I got these snowflakes
.
It's a pity that the photos don't convey all the beauty of these beautiful bright snowflakes
.
Happy New Year!
I wish us all winter weather and New Year's mood!
Publications on the topic:
In the first days of spring, we celebrate International Women's Day on March 8! Teachers and children really want to give it to their beloved women.
Materials 1. Sheet of paper (size according to the intended size of the product, marker 2. Wire of the required thickness (I took the thickest one).
Summary of a lesson on designing “Thumbelina” from waste material (beads and buttons) Objectives: 1. Teach children how to make a “Thumbelina” doll toy from plastic beads; 2. Develop fine motor skills; 3. Develop thinking.
New Year's snowflakes In preparation for the New Year and holiday matinees, I want to make new attributes for dancing, games and staging songs.
The very first holiday in winter is New Year. Every year all children and adults look forward to this day. But the most exciting time.
The real winter has come, dear colleagues! The snow has finally fallen and the frost has begun to draw its patterns on the windows. Well, we're not sitting either.
Winter has come. The most magical time of the year, when you are waiting for something mysterious and unique white stars - snowflakes - fall from the sky.
What is it difficult to imagine the New Year without? Of course, bezels, Santa Claus, and for us, residents of northern latitudes, it is extremely difficult to imagine the New Year without snow and snowflakes! If you want to create a truly New Year's atmosphere in your home, then don't be lazy and decorate everything around with snowflakes. Snowflakes can be flat or voluminous, carved or not. In addition, it is worth abandoning the stereotype that you can only make a snowflake out of paper. This is not so, and in this article you will find more than 50 master classes on making snowflakes with your own hands from a variety of materials!
Well, do you want to turn your home into a fabulous snowy kingdom? Then let's go!
Paper snowflakes
Simple snowflakes for kids
#1 From paper strips
The simplest paper snowflake that can be made with preschool children. Pre-cut paper strips need to be glued together with a star, and then each strip should be decorated. Anything will be used: felt-tip pens, pencils, stickers, paints, etc.
#2 From handprints
Here is another simple and original way to make a snowflake with children. Cut out 6 handprints from paper. Then you cut out patterns on them, glue them together and decorate.
#3 From twisted paper strips
Here's another simple way to make a snowflake. Screw 6 paper strips onto felt-tip pens and leave for several hours. Then remove them and fasten them together with a stapler. Decorate the center with paper circles. The snowflake is ready!
Snowflake cutouts
When it comes to snowflake crafts, the first thing that comes to mind is cutouts. A white sheet of paper or napkin is folded into a triangle in a special way, and then an intricate pattern is cut out of the triangle. Afterwards the sheet unfolds and we get a patterned snowflake.
Without some experience, carving a truly carved snowflake is quite difficult. Therefore, you can look at our ideas for patterns, and after a few self-cut snowflakes, ideas will come to mind!
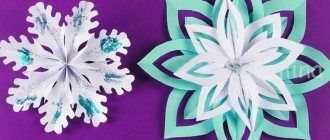
Volumetric snowflakes
Volumetric snowflakes look very beautiful, which can be made from plain paper. In terms of production, there is nothing complicated in such a craft. Just follow the master class and everything will work out!
#1 Volumetric geometric snowflake
To make such a snowflake you will need 6 identical paper rectangles. Fold the rectangle in half and make 4 cuts: two long and two short. And then look at the picture.
#2 Snowflake-flower
To make a flower snowflake, prepare 6 strips of paper. Roll each of them into a cone and secure with a stapler. Glue the cones with the tops to the base in the form of a circle, and place a bead in the center. The finished snowflake can be further decorated
#3 Origami
Here is a step-by-step master class on making snowflakes using the origami technique.
#4 Snowflake made from component parts
A voluminous snowflake made from component parts that has won the hearts of millions of people around the world. The craft is very simple to make, but looks very impressive. Try it too!
#5 Snowflake 3D
And another version of an unusual 3D snowflake, which is very simple to make, but looks no less impressive than the previous one.
#6 Snowflake-flower
And here is a step-by-step master class on making a flower snowflake. Watch and repeat.
#7 Snowflake made of stripes
And here is a variant of a voluminous snowflake made of narrow stripes. You will need 10 thin strips of equal length. Now place five strips in front of you on the table, and place the remaining five perpendicularly and thread them in a checkerboard pattern through the first five. The result should be a kind of wicker “rug”. Now we begin to connect the strips that are close to each other. To do this, first lubricate their ends with glue and then carefully fasten them together. As a result, you should get something resembling a leaf. Now, using the same scheme, we make a second snowflake and connect them: we glue the free strips of one snowflake into the petals of the other.
#8 Volumetric snowflake
And another diagram of a three-dimensional snowflake made of paper strips. The manufacturing scheme differs from the previous one only in details: the number of strips and the method of connecting them. All the nuances are clearly visible in the step-by-step master class.
#9 Composite snowflake
And one more MK.
#10 Snowflake medallion
You can make a voluminous snowflake medallion out of paper. Fold a rectangular sheet of paper like an accordion. Then draw a pattern on each accordion element and cut it out. Now the only thing left to do is connect the leaf into a ring and tie it with thread along the bottom edge. The craft is ready!
#11 Volumetric snowflake
And here is a simpler version of the previous snowflake. You can start with this MK, and then complicate it using the top option.
#12 Fluffy snowflake
And finally, a very simple tutorial for making a fluffy snowflake. Fold the sheet of paper according to the standard pattern, trim off the excess and cut the edges into thin strips. Repeat the procedure 2-3 times and glue the snowflakes together. Fast and beautiful!
You may be interested in:
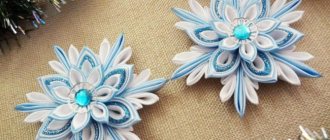
Snowflake using kanzashi technique
Snowflakes made from satin ribbons using the kanzashi technique are more labor-intensive, but they also look richer, invariably causing the admiration of others.
"Snowflakes as a gift" . The master class was prepared by Nadezhda Aleksandrovna Moskvitina.
Inspired by a post about snowflakes made of paper, and in general I like snow - there is some kind of magic in its cold whiteness... I don’t know about you, but I am still fascinated by these small ice crystals sparkling in winter like diamonds on our collars and hats, and if you bring closer the mitten on which these stars are falling, you can see how different and infinitely beautiful they all are... Still, nature is the most brilliant artist...
Today I invite you to become a brilliant artist! After watching and studying my master class, you will learn how to capture this beauty on anything, and it will not disappear. The most important thing is hard work and a good mood.
1. Prepare yourself, because this is a miracle, and it should be beautiful. Select all materials. You'll need:
- glue Titan, glue gun,
- lighter,
- ribbons of different sizes, hair bands,
- needle and thread.
2. I used blue, white, blue and silver ribbons 5 cm and 3 cm wide.
3. From ribbons I cut squares with sides of 5 cm. It turned out 18 silver squares and 6 blue squares;
4. From each square you need to make a petal. The square is bent diagonally and the resulting triangle is bent a second time. The lower part of the triangle is set on fire with a lighter.
5. The center of the snowflake is formed from six blue petals. Each petal is glued to a glue gun at the base.
6. The second elements are formed from silver petals. We glue two at the same level at the base, the third in the middle.
7. Triple petals are glued across one blue edge of the snowflake.
8. This is how a snowflake turns out. We glue a hair elastic on the bottom side, having previously stitched all the pieces of felt with thread.
9. Made snowflakes need to be beautifully packaged. New Year's gift is ready!
Watch a master class on these snowflakes here.
Hairpin for girls - master class
Snowflakes made from popsicle sticks
Healthy snowflakes are made from popsicle sticks. This craft is ideal for children's leisure time; older children will find it too easy. I think the essence of making snowflakes from ice cream sticks is clear even without our descriptions. The whole point here is decoration, and you can borrow ideas for decoration from us!
#1 Decor with thread
#2 Sequins, rhinestones and pompoms
#3 Colored tape, cotton balls, stickers
#4 Buttons
#5 Threads, tinsel and sequins
#6 Feathers and sparkles
#7 Giant snowflake made from popsicle sticks
#8 Multi-colored sequins
Snowflakes made of fluffy wire
Unusual snowflakes can be made from fluffy wire. Flexible twigs can be twisted together in different combinations, and the fluffy “coat” makes the craft voluminous, so you can do without additional decoration of the finished product.
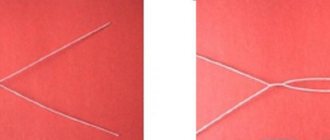
#1 Wire only
A beautiful snowflake can only be made from wire. To do this, you will need twigs of different lengths: longer (for the base) and shorter (for decorating the rays). You can come up with your own design, but use our ideas for inspiration!
#2 Wire and beads
Having connected the wires in the shape of a star, put several beads on each beam, and so that they do not fall, twist the end of the wire.
#3 Fluffy wire and crystals
We make a snowflake from fluffy wire. Then we prepare a saline solution for growing crystals (you can buy it ready-made in the store). Next, lower the snowflake into the solution and wait. In a few days, crystals will grow on the snowflake blank. This is such an unusual craft, and also educational.
#4 Fuzzy wire and salt
We assemble a snowflake from fluffy wire, coat the finished product with glue and sprinkle with coarse salt. By the way, you can first mix the salt for the craft with silver or white sparkles, then the snowflake will shimmer in the light, just like a real one.
Materials for creating snowflakes
- blue and white chenille sticks;
- hot glue or superglue;
- any beads or crystals;
- silver cord;
- wire cutters
Snowflakes from drinking straws
You can make a snowflake from drinking straws. The tubes play the role of rays, and you can make additional structural elements from other materials.
#1 Tubes and paper
For example, an additional design element of a snowflake can be made of paper. Cut out two circles, glue tubes to one of them, and cover with the second on top. The top of the circles can be further decorated.
#2 Tubes and pasta
And here is an example of a snowflake made from a tube and pasta. A snowflake is made in the form of an applique. You can come up with combinations of elements in the diagram yourself. By the way, you can safely make such a craft with kids, they will be delighted!
By the way, you can only make snowflakes from pasta. They make great crafts if you get a little creative!
See more pasta crafts:
Snowflakes from clothespins
If you have unnecessary clothespins in your home that have been hanging around idle for several years, then it's time to give them a new life! On the eve of the New Year holidays, absolutely everything goes into crafts, suitable for snowflakes and clothespins!
#1 Snowflake with bead
You can make such a snowflake from ordinary clothespins, decorated with beads, with your own hands. You need to remove the middle from the clothespins, then glue the wooden bases with the back side, fold them with an asterisk (secured with glue), and then paint and decorate with beads.
#2 Composite snowflake
And for this craft you will need clothespins of different sizes. Make two snowflakes: a larger one and a smaller one, and then glue them on top of each other with a slight offset, so that the rays of one star are in the spaces between the rays of the other star.
#3 Shiny snowflake
And this snowflake is very similar to the first one, only the method of decoration is different. As you can see, you can decorate a snowflake made from clothespins exclusively with sparkles. It looks very cool and stylish, and most importantly, no one will ever guess that these are ordinary clothespins!
#4 And more ideas on the shape of snowflakes from clothespins
Here are a few ideas for making snowflakes from clothespins of different shapes. Take note and give your clothespins a new festive life.
#5 Another way to glue clothespins
If there are only six clothespins, then pay attention to the way they are glued together. It can be useful!
Window
The first thing that comes to mind is to glue them to the window. In order not to block the glass and give yourself the opportunity to look out the window, you can decorate the corners of the window with snowflakes of different sizes, imitating a frosty pattern on the windows.
Snowflakes from toilet rolls
Original snowflake crafts can be made from toilet paper rolls. As a rule, the products turn out to be large and quite durable, so such a snowflake will decorate the Christmas tree or interior for many years!
#1 Prefabricated structure
A large snowflake made from ordinary toilet cylinders, decorated with sparkles. Cut the toilet sleeve into rings of the same size. Glue a flower out of six. Glue birds from other rings into each petal and insert one ring at a time between the main petals. After the structure has completely dried, decorate it with sparkles.
#2 A la quilling
Making crafts using the quilling technique is difficult and painstaking work. A beautiful snowflake using the quilling technique can be made from toilet paper cylinders. You will find a step-by-step MK below.
#3 Big snowflake
Here's a big snowflake made from toilet rolls. The bushings are cut into rings of equal sizes, and then glued together in the shape of an asterisk. The finished product can be decorated with paints and sparkles.
#4 Another big snowflake
And another version of a big snowflake. In general, it’s up to you to decide how exactly to glue the rings, in what order and according to what pattern. You can easily come up with your own unique snowflake from toilet paper rolls. Our MKs are designed only to inspire you to come up with cool ideas!
More toilet roll crafts:
How to make New Year's snowflakes?
Flat paper snowflakes for the New Year are the most popular among lovers of homemade toys due to the availability and ease of processing of the material.
To create a craft, just fold a square sheet of paper in half, and then into a triangle (one triangle is 1/12 of the entire square). After drawing a diagram on folded paper, cut it out. By changing the designs, you will get a new craft each time. Flat New Year's snowflakes are glued to windows in most cases. To make the design obviously beautiful, you can use ready-made patterns of New Year's snowflakes. The availability of paper as a material for creativity has led to the development of various techniques for creating three-dimensional toys. The simplest one is to cut 10 identical snowflakes and then glue them together (first, combine 5 and 5 snowflakes into one “sun”, and then glue the rays of such a “sun” to make an openwork ball).
But voluminous New Year's paper snowflakes can also be created from several layers of paper or from one, in which the edges are cut and glued together in the form of cone-shaped rays.
The origami technique, which is used to create snowflakes for the New Year from paper, does not require the use of glue or scissors: the toy will turn out voluminous by laying several layers of material.
Toys using the quilling technique look very original, but their creation will require a lot of patience. To work, you need to prepare long narrow strips of paper. Then these strips are twisted into tubes and, flattened at different angles, connected into an elegant ornate snowflake.
Felt snowflakes for the New Year are made very simply: first, the blank is cut out and additionally decorated with beads or beads. To make it easier to place such a decoration, you can sew a ribbon loop onto it.
If it is difficult to surprise your guests with knitted toys, use the machine technique of working with threads. To do this, insert 12 needles into a soft surface (for example, a large pillow) (the number of needles is equal to the number of legs of the future snowflake). Before work, the thread must be moistened in PVA glue. From needle to needle, pull the thread in random order until an openwork pattern is formed. When the glue has dried, you can remove the finished New Year's snowflake from the improvised machine.
Another technique that deserves attention is polymer clay filigree. To make beautiful New Year's snowflakes with your own hands, you need to roll out the clay into thin long wires or “spaghetti”, and then form them into “stars” of any design and size. This technique produces snow-white one-color snowflakes well. But if you want to decorate your Christmas tree with colorful crafts, you can use the polymer clay injection technique.
While creating three-dimensional origami jewelry using knitting needles, a crochet hook or an extruder requires learning highly specialized creative techniques, working with glue does not require any specific skills. In order to make a New Year's snowflake with your own hands, the printed template must be placed in a plastic file or tightly covered with a transparent bag. Trace the template onto the polyethylene using glue. Before the substance dries, sprinkle everything generously with glitter. When the glue has dried, carefully scrape the snowflake from the plastic file and, having organized the pendant, attach it to the Christmas tree.
The same technique can be used when painting directly on the window. It's easiest to work with gun glue, but you can experiment with PVA or silicate glue.
The number of ways to make snowflakes for the New Year, of course, is not limited to those listed above. In order to find your favorite technique, you need to try at least a few of them.
Beaded snowflakes
Difficulties do not frighten real needlewomen, but on the contrary, they provoke and spark interest. Easy snowflake crafts for wimps! A true creator wants complexity and sophistication. If you are one of these people, then you definitely need to make a snowflake from beads!
#1 Snowflake two-color
You can weave snowflakes of the most unusual shapes from beads, but we will start, perhaps, with the simplest one. For training, so to speak. The detailed diagram is presented below. Explore and try! You can come up with the combination of colors and their order yourself.
#2 Beads and bicones
But here is a slightly more complex design, in which, in addition to beads, beads in the shape of two folded cones are used - bicones. The step-by-step master class is described below.
#3 Beads and round beads
And here is a snowflake made of round beads in combination with beads. You can choose the color arrangement yourself, and see the picture for a step-by-step scheme for making a snowflake.
#4 Beads and bicones
And here is another pattern for weaving snowflakes from beads. Please note that in addition to beads, this product also contains beads of another shape - bicones. Instead of bicones, you can use round beads, cathedral beads, barrel beads, etc.
#5 Beads, bicone and bugles
To make these snowflakes you will need: beads, bicone and glass beads. Of course, you can use beads of other shapes, but in any case, follow the pattern, then the snowflakes will turn out to be truly curly.
#6 Beads, bicone and round beads
To make such a snowflake you will need not only beads, but also beads of other shapes: round and bicone. You will find a step-by-step weaving diagram below.
#7 Bead embroidery
You can not only weave with beads, you can also embroider with beads. An excellent example of bead embroidery is a snowflake. You will need a felt flower, each of the petals of which will be embroidered with beads. The center can be decorated with a button, bead or glass bead.
See more bead craft ideas:
Beautiful snowflakes-ballerinas for a garland - DIY templates
How to make a Christmas tree with your own hands from tinsel
Many people know how to cut out New Year's snowflakes from paper, but not everyone would think of making them in the shape of ballerinas, and then stringing them onto the rain and decorating a window in the home dining room at home or a stage in a school assembly hall with this unusual garland.
To create an elegant mini-masterpiece, you will need white or colored (optional) paper and a ready-made dancer template. And then a few deft movements with scissors and voila! The garland is ready and pleases the eye with its spectacular and attractive appearance.
Necessary materials for a beautiful ballerina snowflake
- high density white cardboard
- white thin cardboard
- paper (white or colored as desired)
- simple pencil
- eraser
- scissors
- glue
- compass
- New Year's rain about 2 meters long
- scotch
- buttons
Step-by-step instructions for a master class on making your own snowflakes using a template
On a sheet of thick white cardboard, make a sketch of a dancer with her hands clasped above her head in a semicircle and carefully cut out the figure with scissors. This is a template for future ballerinas. Attach the template to a thin cardboard sheet and cut out the required number of figures. There can be 20 of them if you want to make a very lush garland or 10-15 for more rare stringing. To make a ballet outfit - a beautiful openwork tutu-skirt - draw a circle on a white sheet using a compass. Its size depends on your desire. If you take a small diameter, the skirt will turn out to be short, and if it is large, the ballerina will be wearing a real ballroom outfit. Carefully cut out the circle and fold in half three times
On the outside of the resulting sector, draw any suitable pattern, and then cut it along the contour with scissors. Unfold the skirt and carefully smooth it out. Cut a small hole in the center of the circle and insert a cardboard figurine of a ballerina, made using a template with your own hands, into it. Using tape, secure the outfit around the dancer's waist so that it does not fall off. When all the snowflakes-ballerinas are dressed, take a thread of rain and thread it through the dancers’ arms closed above their heads
To prevent the figures from dangling, carefully attach them to the rain with a small piece of tape. Using pushpins, attach the garland to the place you plan to decorate.
More ideas
The ideas for making snowflakes don’t end there. You can make a winter craft from any available materials, you just need to use your imagination a little and success is guaranteed. Here are some more original ideas for making DIY Snowflake crafts.
#1 Bead applique
A snowflake can be made in the form of a painting. To do this, take plywood of a suitable size and cover it with fabric or tape. Applique a snowflake from beads on top of the finished “canvas”. The craft is ready and looks very impressive!
#2 From candies
Another original idea for a snowflake is to make a craft from candies. For this design you will need New Year's candy canes in the form of a cane. Glue them according to the MK template below. Such a snowflake will not only please the eye, but also the taste buds!
#3 Cotton balls
If you want to make a New Year's snowflake craft with your kids, then take note of this master class. By the way, grandparents will appreciate such a gift. For this craft you will need: cotton balls, PVA glue, a sheet of colored paper.
#4 Candy wrappers
This idea is suitable for those with a sweet tooth. There are still benefits from sweets! You can make wonderful snowflakes from wrappers. The wrapper needs to be folded in four and then cut out into an intricate pattern. You can decorate your interior, Christmas tree, and even gifts with these snowflakes.
#5 Plastic bottles
Well, this idea will fit perfectly into the interior of those who care about the environment. You can make wonderful snowflakes from plastic bottles, which will become an excellent element of New Year's decor. Cut off the bottom and paint it with paints. The snowflakes are ready, and most importantly, the bottles do not pollute the environment and are pleasing to the eye!
#6 Crispy sticks
Who didn't eat snowflakes as a child? I think there are no such people! Well, since the kids eat them anyway, we need to make some delicious snowflakes for them! You will need crispy sticks (salted or unsalted), white chocolate and decorative sprinkles.
#7 Mosaic details
It's hard to find a child who doesn't have a mosaic. And it’s even more difficult to find a child who has all the details in the mosaic. They are always going somewhere. Well, if you have a set in which there are not enough parts and assembling the picture is not interesting, do not rush to throw it away. From the remaining parts you can make a New Year's snowflake. Well, shall we create?
#8 Thread and paper plate
You can also make snowflakes from ordinary paper or plastic plates. By the way, even kids can cope with such a craft, but mother’s help will, of course, be needed. You will find a step-by-step MK below.
#9 Salty dough
Another available material from which you can make a snowflake with your own hands is salt dough. Make the dough (1 tbsp salt, 1 tbsp water, 1 tbsp flour), roll it out, cut out snowflakes, and then decorate them. Dough snowflakes can be painted, covered with glitter, beads, or left just white.
#10 Eco snowflake
Lovers of eco-decor can make a snowflake from twigs. You can find sticks on the street or in the forest. All that remains is to come up with a pattern and glue the sticks together. Good luck!
Crocheted snowflakes. Step-by-step instruction:
If, on the contrary, you have a lot of time and want to make creative decorations that no one else has, then simply knit the decorations. Knitted work is perfect for decorating a Christmas tree.
You will need: hook, thread.
Scheme:
Manufacturing process:
If you are not new to this business, then it will be quite easy for you to understand the patterns and knit the product.
So grab ready-made crochet ideas.
And symbols for the above diagrams.
Also, do not forget to give them shape after knitting patterned snowflakes with cotton threads. I'll tell you about one such method.
You will need: potato starch 2-3 tbsp. spoons; hot water 1 cup.
Actions:
1. Pour a small amount of water over the starch and stir it.
2. Then add boiling water in a thin stream, while continuously stirring the mixture.
3. The solution is ready. Place the knitted decoration in it and leave it for a while.
4. Then squeeze and straighten the product well on a flat surface using pins. Wait until completely dry.
5. After drying, the product will keep its shape perfectly.