How often have I used it and didn’t even suspect that due to its property of being liquid at first and not losing its elasticity after hardening, you can do something unusual! And today I really want to share with you five interesting ideas for creativity and inspiration that I found on the Internet. The main thing is that everything will be made only from hot melt glue or, in other words, hot glue.
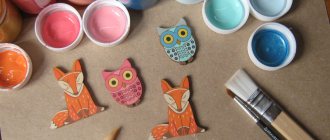
1. And the first thing I’ll start with is, of course, beautiful vases, snowflakes and all possible decorations :
(Colored glue sticks have already been used here)
And here are the snowflakes! They are so easy to make, but at the same time they do not lose their originality and beauty!
If you the snowflake with sparkles, even before the glue has completely cooled, you will get a wonderful Christmas tree decoration:
Using hot glue, you can even make a crown for your favorite little princess for the New Year's ball or masquerade!
Or make a cute decoration :
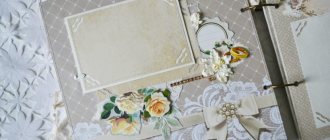
And these hairpins look so beautiful and neat that you won’t even immediately believe that they are made of hot-melt glue (this ideal shape is achieved by using a silicone mold, i.e. the glue is poured into a silicone mold, after cooling, the workpiece is pulled out of it and then covered with paint ):
2. A phone will also look good. But first they advise you to wrap the phone in parchment paper, draw a design you like on this paper with a simple pencil, and then run hot glue over it. Next, you need to wait for the hot-melt adhesive to cool completely. As a result, we can get this:
If you want a more cheerful look, then after the glue has cooled, you can paint the case with a multi-colored varnish or immediately use a colored glue stick. It will turn out very unusual and beautiful!
3. home slippers from this glue ! I really don't know how long they will last
4. But most of all I was inspired by the “ Waterfalls” made from hot melt glue, look how realistic they look!
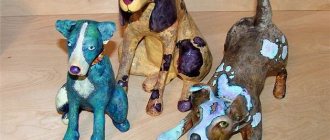
5. And finally, wonderful 3D figures that can also be made with hot glue!
An “ice” chair covered with liquid hot glue also looks original and fabulous! It certainly won’t be cold for Santa Claus to sit on
By the way, if you want to try making such figures yourself, but don’t know where to start, then a detailed master class from one Portuguese craftswoman will help you with this! The video below is in Portuguese, but it is quite possible to understand the process itself without knowing this language:
I hope you liked my selection of ideas and I think you will definitely try to do something yourself
Like, add to favorites, rate the publication on a star scale, share with friends on social networks and don’t forget to write comments!
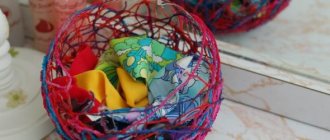
How to make a candy bowl
A candy bowl made with your own hands together with a child will decorate the interior or become an exclusive gift.
The principle of creation is reminiscent of the papier-mâché technique, when paper strips are glued to some kind of base.
For work you will need the following tools and materials:
- hot glue gun;
- durable paint (preferably aerosol);
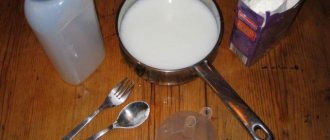
- cup (will serve as a base);
- any cream.
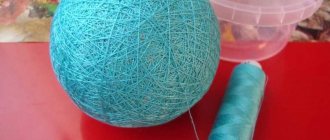
The work progress is as follows:
- The outside of the cup is coated with cream - this is necessary so that later the glue can be removed well, maintaining the shape of the base container.
- After heating the gun, glue is applied to the bottom of the bowl to create a stable base.
- From the bottom you should move up, creating a pattern. Patterned figures are made depending on your imagination.
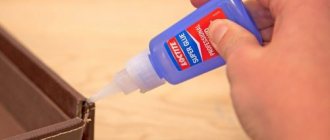
- Wait for the glue to dry completely and carefully remove the adhesive base from the cup.
- A ready-made mesh base is obtained, which is then painted over with paints.
Other containers can be made in this way.
Thermal glue candy bowl
Looking at photos of crafts with a glue gun, you involuntarily feel the desire to create such ideas yourself. The manufacturing features of the candy bowl resemble papier-mâché style.
To create it, you need materials such as glue, colorful products, a base for a future candy bowl, and cream. The outer side of the base for the future workpiece must be coated with cream to further separate the product from the base.
After the glue has warmed up, you can start creating the candy bowl. Glue is applied to the bottom of the base and thus a stable base is formed.
From the bottom you need to move to the top, thus creating a pattern. Patterns are made at your discretion. After the glue has dried, remove the candy bowl from the base.
Afterwards it should be painted and varnished. Thus, you get an original craft using a glue gun.
How to make a bracelet
You need to prepare the following items for work:
- metal drink can;
- glue gun;
- various decorations that can be used to decorate a bracelet.
Sequence of work:
- Glue is applied to the jar in horizontal stripes (the width of the bracelet will depend on the number of stripes).
- After drying, the glue is removed from the jar, and the base for the bracelet is ready.
- The bracelet is decorated: it is painted, rhinestones and other decorations are glued on it.
Updating the glue gun
The unpredictable behavior of the heating element in a Chinese glue gun has become the talk of the town. The service life, according to information from Internet users, varies from a few seconds after switching on to five years of proper operation.
About the power of the heating element, we came across statements ranging from “virtually does not heat at all” to “heats quite satisfactorily.” This was the reason for the curiosity that arose, which prompted me to buy, first, an inexpensive Chinese glue gun for the purpose of “opening it and looking.”
That is, thoroughly familiarize yourself with the design of the device, and that’s all. I didn’t take any glue sticks; I probably won’t need them.
Glue gun diagram
And now the melting chamber with a heating element installed on it appeared to the eye. Looks like a small jet turbine.
The clamp and thrust pad have been removed. Here is the heating element itself. I note that at the installation site it lay flat, in the center and was in direct contact with the body of the melting chamber with only one of its planes.
I unwrap the rather careless packaging - an insulator. Inside there is simply a miniature ceramic heating element and two contacts for supplying 220 volts to it.
I took a closer look at the heater and rang the two sides with a multimeter. They call, but not everywhere. The darkening visible in the photo at the bottom is present on all sides and completely covers the adjacent end side. It doesn't ring. This is a ceramic coating on top of the heating element.
Designed for direct contact with the body of the heating chamber and transfer of heat generated by the heater, without placing a dielectric spacer between them. This spraying is the dielectric gasket. It became clear that the heater was installed incorrectly by the manufacturer. He was lying on his side, and was also wrapped three times in insulating material.
According to the existing dimensions of the heaters, 4 of them will fit on the installation site.
Guided by common sense (as far as God has given), I began to correct the manufacturer’s “jambs”. The dimensions of the contacts were brought into line with the dimensions of the ceramic heater. Exactly in length, and 1 mm less in height.
I made a millimeter-long bend at a right angle to prevent the contact from sliding down onto the body of the heating chamber.
Shoes for dolls
Doll shoes are often lost; you can make them from hot glue. To make shoes for a doll you will need:
- hot glue;
- scissors;
- felt-tip pen;
- paint brush;
- watercolor or nail polish;
- cling film;
- pointed stick;
- doll.
Step by step steps:
- Wrap the doll's legs with foil (if the material does not hold, you can secure it with an elastic band).
- First, glue is applied to the sole; you should not rush and squeeze out a lot of glue.
- Gradually, constantly comparing, the right and left shoes are formed.
- When the base is ready, take a toothpick and divide it into two parts, each of which is glued to the heel with a drop of glue - this is the future heel.
- A layer of glue is applied to the toothpicks, after which the excess part is cut off. The heel is formed.
- Without removing the workpiece from the legs, draw a cut line, after which the base is removed.
- After this, the shoes are cut along the line using nail scissors.
- After correction, the shoes are painted with paints and nail polish.
DIY wood glue
This is the best glue for wood. It effectively glues paper, cardboard and other materials. But it has several features:
- it cannot be stored for a long time in liquid form, as it deteriorates very quickly (it becomes moldy and gels),
- it has a disgusting, pungent smell.
Therefore, it is pre-boiled and a gelatinous mass is prepared, which has a longer shelf life. If necessary, pieces of the required size are cut and dissolved, heating over low heat. There are several ways in which you can prepare high-quality wood glue at home. The most accessible are the following.
Method No. 1. Take regular wood glue. Grind and soak it in a container of water until completely swollen. It should become soft, resembling jelly. This jelly is placed in a melting container called a gluebox. You can make it yourself from an ordinary tin can. The oilcloth with the gelatinous mass is placed in a water bath and placed on very low heat. The mixture must be constantly stirred with a wooden stick. If it burns, the glue will turn yellow and lose some of its adhesive properties. After the gelatinous mass turns into a liquid state, it is diluted with vodka in the ratio: per 720 g of glue - 950 g of vodka. And for every hundred grams of glue, twelve grams of powdered alum are added. Wood glue obtained by this method provides high strength to the bonded surfaces and water-repellent properties.
Method No. 2. Boil wood glue and water in a 1:1 ratio in an oilcloth. After boiling, when it begins to thicken slightly, pour the mixture into a porcelain mortar and grind with a pestle until a gelatinous mass forms. After this, place this mass on a special plate, cool and cut into pieces. If necessary, dissolve 720 g of the resulting workpiece in a solution consisting of 720 g of water and 360 g of vodka. Bring the mixture to a boil.
Method number 3. In a water bath, boil 1 kg of wood glue and 1 liter of 9% table vinegar in a liter of water until it is completely dissolved, then add a liter of vodka with constant stirring.
Method number 4. Dilute wood glue with water in a ratio of 1:1. Heat in a water bath until completely thickened. Then add one weight part of glycerin equal to the originally taken weight part of the glue. Heat until the water evaporates completely. Place in molds and dry. For use, dilute with water (1:1).
Decorative heart made of shells and hot glue
For this craft from shells and glue you should prepare:
- cardboard;
- shells of different sizes;
- burlap;
- tow;
- leg-split;
- glue gun;
- scissors.
The sequence of creating crafts from hot glue and shells:
- A heart is made from cardboard.
- In the upper part of the template, 2 holes are pierced, through which the craft will then be hung.
- Where the front part will be, sisal or tow is glued.
- After this, the same heart is cut out of burlap, only slightly larger, and glued to the back of the cardboard heart.
- A small piece of twine is threaded through the mounting holes and the top is tied with a knot.
- Shells are completely glued onto the front side with sisal.
- You can glue a starfish to the central part and fill the voids with small shells.
- Edge the edges of the heart with twine.
The wall decoration is ready.
Boiler gun
The first way you can build your own gun is to use a small household water heater . To create it you will need some supplies and tools.
What is needed:
- wooden block;
- a piece of tin;
- non-stick or Teflon tape;
- copper wire;
- small boiler.
Having prepared the materials, you can start working:
- At the first stage, a comfortable and safe handle is made. To do this, take a wooden block onto which the contours of the lower part of the boiler are transferred. The dimensions are copied twice, since the handle will consist of two halves.
- After transferring the dimensions along the contour, a recess is made in two parts of the block equal to half the thickness of the lower part of the device. By folding the halves around the device, you get a finished handle. For convenience, it can be rounded and processed with sandpaper. The halves of the handle are connected using small self-tapping screws or wrapped with insulating tape.
- Before installing the handle, the middle part of the heating element is treated with Teflon tape or other non-stick material. This is necessary in order to protect the wood from excessive heat during operation of the device.
- The next step is to make a heating chamber in which the glue stick will melt. To do this, take an ordinary can of lemonade or beer. It is necessary to cut two rectangular blanks from it, each about 80x150 millimeters.
- A cylinder is twisted from the first plate, the outer diameter of which should be equal to the inner diameter of the boiler. A cone with a small outlet hole is twisted from the second blank.
- To work with metal, it is better to use pliers, round nose pliers and a hammer. The cone must be attached to the cylinder, crimping the edges, and this structure must be inserted inside the spiral. To securely fasten the part, you can use copper wire.
The device is almost ready. To begin operation, a glue stick is inserted into a cylinder made of copper or tin and the boiler is connected to the network. Just wait a few seconds to start working. To do this, you need to lightly press on the glue rod so that a liquid mass comes out of the outlet hole.
A gun from a household boiler must be used with extreme caution. Without water, it heats up very quickly to a critical temperature. This can lead not only to its failure, but even to an explosion.
To avoid these troubles, it is better to use a wire with a regulator to turn it on, which will allow you to control the voltage supplied to the device and its heating.
Decor of pots made of stone and hot glue
When gluing a flower pot with glue, it is better to take pebble stones, because they are flat and will not create additional volume.
Boxes, vases and other containers are decorated in this way. Pots covered with stones are covered with paint and varnish. For decoration, you can take shells, colored beads, decorative stones, etc.
This finishing made of stone and hot glue will help hide the flaws of old pots, and you can save on buying new ones. Don't forget to involve your child - this activity develops creative thinking and fine motor skills.
Traditional flour paste recipe
In some cases, this is resorted to when there is an urgent need to perform any work related to the use of glue. For example, if the amount of adhesive is incorrectly calculated, and it runs out in the midst of wallpaper renovation work. In order not to give up what you started and not rush to the store, you can make homemade glue, the quality of which will be much higher than purchased glue. In addition, when using it, you can be completely sure that it does not contain substances harmful to humans. It’s not difficult to prepare, and the material can always be found in the house. This is wheat flour. Flour glue is prepared at the rate of 1 liter per two or three rolls of wallpaper.
To prepare it you will need:
- container, the volume of which depends on the required amount of glue,
- flour – 6 tbsp. spoons per liter of water,
- water – 1 liter.
Cooking method:
- Heat water to boiling.
- In a separate bowl, dilute the calculated amount of flour in a small amount of cold water until a homogeneous mixture (without lumps) is formed and liquid sour cream is thick.
- Pour the resulting mixture into boiling water in a thin stream, stirring constantly.
- Bring to a boil again and leave to cool.
When finished, it should have the consistency of thick jelly. Similarly, you can make glue from starch, which is no different in quality from flour paste. In terms of gluing efficiency, both flour and starch pastes, in some cases, even surpass ready-made industrial adhesives. Wallpaper glued with them adheres perfectly to any wall surface. They can glue all types of paper and cardboard.
Decorating a vase or candlestick with hot glue
To work you will need:
- a vase without any special decorations or a candlestick;
- glue gun;
Sequencing:
- Hot glue is applied around the entire perimeter of the vase, creating wavy transparent rims.
- For straight lines, you will need the help of another person: he will twist the vase, and you need to squeeze out the glue strips evenly.
Foam glue
Currently, foam and polystyrene plates are often used for insulation and soundproofing of residential premises. They are glued to the load-bearing wall. When choosing glue for polystyrene foam, you must take into account that solvents, such as acetone, can melt it. Therefore, the ideal option for it is the above-mentioned wood glue.
But, at home you can make another waterproof glue for polystyrene foam - from cottage cheese:
- To do this, mix lime (slaked) with cottage cheese in equal proportions until a homogeneous mass is obtained. It is advisable to use this glue immediately after preparation, as it hardens quickly.
New Year's snowflakes
To work you will need:
- glue gun;
- acrylic-based paints or nail polish;
- parchment;
- snowflake template.
Work is carried out in the following areas:
- A snowflake is drawn on a sheet of paper, and a parchment sheet is placed on top of the drawing.
- Now hot glue is applied along the lines and the contours of the snowflake are drawn.
- After cooling, the snowflake-shaped glue is carefully removed from the parchment.
- The product is painted on both sides.
Anti-slip shoes without pads at home - life hack
You bought your daughter or son beautiful shoes, but they slip. The unscrupulous shoe manufacturer did not worry about the main thing - their safety. The sole turned out to be so slippery that you have to constantly catch the baby as he walks and worry that the child does not get injured. This story is familiar to many mothers. What to do if your child constantly slips in new shoes?
We recommend the fastest and simplest solution to this problem. No preliminary preparation is needed, you will need hot glue. Description of work: take slippery shoes and apply glue to the sole in the form of several transverse lines. If you want to interest your baby, use a pistol to draw an inscription or a funny picture. Additionally, you can glue rhinestones to the edges of the soles. We guarantee that in this case the boots will become the child’s favorite shoes. Wait for the glue to dry. Shoes with anti-slip coating made from hot-melt adhesive are ready.
Excellent dextrin based paper adhesive
For origami, quilling, and paper appliqué, dextrin paper glue, which you can prepare at home, is ideal. And for this it is not at all necessary to look for dextrin in stores. It is easily prepared from starch. You need to take it in the required quantity. Place in a heatproof bowl into a slightly heated oven. After which, gradually increase the temperature to 160ºС and maintain at this temperature for about an hour and a half. Under the influence of hot air, starch is broken down, and it turns into dextrin. Now you can start preparing the glue.
Ingredients:
- dry dextrin – 3 tbsp. spoons,
- water – 4-5 tbsp. spoons,
- glycerin – 1 tbsp. spoon.
Preparation:
- Mix dextrin powder with water. Heat slightly until the dry substance is completely dissolved, stirring continuously. Then add glycerin.
Additional options
Less often, users try to make other types of glue that serve as an alternative to store-bought products.
Glue stick
The glue stick is made from PVA. For the case, you need to take an old antiperspirant deodorant package that closes tightly. Make laundry soap (2 parts), add water (1 part). Dissolve in a water bath, pour in 4 tablespoons of PVA, cool. Then put the mixture into packaging and let it harden.
Super glue
Of course, it is impossible to make real super glue - it is prepared from cyanoacrylate with the addition of a number of complex chemical components. But you can still create a very reliable composition with your own hands. For this you will need:
- 125 g wood glue;
- 100 g sugar;
- 35 g slaked lime;
- 450 ml water.
Sugar is dissolved in water, lime is added, and heated for 30 minutes in a water bath. Next, crushed wood glue is placed into the solution and boiled until the mass is homogeneous. The product can be used for gluing metal, ceramics, porcelain.
Foam glue
Wood glue is best suited for gluing foam plastic. Casein glue is also suitable, which is mixed in equal parts with slaked lime. This product is ideal for fastening polystyrene foam when insulating a house.
Foam glue
Glue is made from acetone and polystyrene foam to join elements of glass, metal, and wood. The foam is crushed into crumbs and poured with acetone to completely cover it. A viscous mass is obtained almost immediately; it can be used like regular glue, after mixing well.
When making adhesives with your own hands, you can save a lot of money, especially if you are planning a major renovation of your house or apartment. The quality of the finished product may be somewhat inferior to the store-bought product, but it will definitely be safe for health and affordable!
Recommendations for storing glue
Each type of glue, prepared by hand, has its own storage characteristics:
- It is recommended to store the remaining PVA after work in a tightly closed glass container. The optimal storage temperature is 10-15 degrees. If the conditions are met, the mass will remain for up to six months.
- Rubber compounds require dark, cool rooms.
- Joinery compounds are dried before storage. Before use, the part is immersed in water to swell.
- Casein mixtures are prepared in portions, as they are not intended for storage. Maximum use time is 3 hours.
- Hot types are not stored, but are used immediately, also when laying slabs.
Casein glue for leather, wood and even puzzles
A good option for gluing wooden and leather products, as well as other materials, is casein glue. It can be successfully used in surface treatment for puzzles.
Stage 1: isolation of casein from cottage cheese
To prepare it at home, the cottage cheese must go through a defatting process. To do this, you need to soak it in a soda solution (1-2 tablespoons of baking soda per liter of water) for 15-20 minutes. Then it is thoroughly washed with running water, wrung out and dried until hard. Next, a powder is prepared from it. This is dry casein.
Stage 2: prepare glue from dry casein
dry casein
To prepare glue from casein, you need to pour the powder into any container (preferably flat) and add water in a thin stream, stirring constantly. Take two parts water to one part casein powder. You should get a thick mass. The most crucial moment in preparing casein glue is its further mixing until it becomes homogeneous. The better the mass is mixed, the higher the quality of the glue. This procedure will take at least 30 minutes. But the process can be speeded up if you use a regular mixer. This is an excellent wood glue. It has excellent leather bonding properties and is well suited for shoe repair. The disadvantage of this glue is that it must be used within two to three hours, after which it hardens and becomes unsuitable for further use.
Cooking methods
Some formulations are prepared by simply mixing the ingredients. Others require heating, cooking or long-term aging of substances to dissolve in each other. In any case, it is important to strictly observe the proportions of the components, otherwise the finished homemade glue may not be of good enough quality.
Wallpaper glue made from flour
Of course, buying ready-made wallpaper glue is much easier. But sometimes it happens that it ends at the wrong moment, and it is quite possible to re-glue the material with a paste of your own making. The same composition is suitable for working with papier-mâché. The recipe is:
- Take a container and heat a liter of water in it until it boils;
- Dilute 6 tablespoons of flour in a small amount of cold water to obtain a homogeneous mass without lumps;
- Carefully pour the flour mixture into the boiling water in a stream;
- Stirring continuously, let the mixture boil;
- Cool the glue until it reaches the consistency of jelly.
You can start gluing the wallpaper immediately after the product has completely cooled. This amount is enough for 2 rolls of canvas. The glue is best suited for simple paper, lightweight non-woven wallpaper on a paper base. For vinyl and other heavy materials, it is better to buy ready-made glue.
PVA at home
Domestic PVA and imported Elmers are water-based products containing polyvinyl acetate and plasticizers. Depending on the purpose (office, household, universal, construction), other substances can be added to the PVA composition. The product has a white or beige color and is distinguished by its ability to freeze and defrost without loss of quality. Using PVA in diluted form you can prime walls, and in its pure form it is used for gluing heavy wallpaper.
You can make PVA using this method:
- soak 5 g of photographic gelatin in a small amount of water for a day;
- after 24 hours, take a metal bowl, pour in a liter of distilled water, and place in a water bath;
- Separately dilute 100 g of wheat flour with cold water, pour the flour mixture into the water, stirring regularly;
- send soaked and stirred gelatin there;
- bring the mixture to a boil in a water bath, but do not allow it to boil;
- As the mass reaches the consistency of thick sour cream, remove it from the heat;
- pour in 4 g of glycerin, 20 ml of alcohol;
- mix well again;
- You can use the product only after it has completely cooled down.
If necessary, glue that is too thick can be diluted with cool distilled water and mixed thoroughly. The finished composition should be stored in convenient jars, under a lid, at a temperature of +10...+15 degrees for up to six months.
Epoxy adhesive
It cannot be prepared from improvised means. In any case, you will need liquid epoxy resin and a hardener, which must be mixed together in certain proportions. Epoxy is a transparent composition that is sold immediately with a hardener. As mixing proceeds, the polymerization reaction begins, before the end of which it is necessary to apply the composition to the desired surface. Due to its reliability and excellent adhesion, epoxy adhesive is most often used:
- in shoe production, repair;
- for gluing plexiglass, plastic, woodwork;
- metal connections;
- filling of various products;
- in electrical engineering.
Typically, 4 parts of hardener require 6-8 parts of resin; more precise recommendations are always indicated in the instructions. After combining the material, it is used immediately or heated slightly by placing the container in hot water. Then use the product to repair various products. It glues the most durable ettrol-based plastics, PVC, glass and metal products.
Rubber glue
This product is used for gluing rubber products. Some people try to do it this way: they cut up pieces of an old car tire and fill them with gasoline. In fact, cross-linked tire rubber does not dissolve well in gasoline and other organic solvents because it contains sulfur. Therefore, the ideal option is to take raw rubber, which is used in tire repair with further vulcanization. Gasoline should also not be ordinary, but aviation grade, then the glue will be of excellent quality.
The procedure for creating a tool is as follows:
- finely crumble the rubber into a glass jar;
- pour a small amount of gasoline into it so that all the crumbs are covered;
- after swelling and dissolving (from 15 minutes to 1-2 days), add gasoline until the glue reaches the desired consistency so that it is not too thick or sticky;
- Store glue in a dark, cool place.
Instead of raw rubber, black soles of old shoes are suitable as filler. It is only important that they are made of TEP (thermoplastic elastomer), which is used for the production of so-called molded shoes.
Wood glue
This adhesive composition is used to fasten wooden products. It can also be used for gluing paper, cardboard, fabric, and a number of other materials. Its downside is that after long-term storage it will begin to gelatinize, become moldy, and become covered with a hard crust. The finished product does not have a very pleasant smell, which is also its disadvantage.
Wood glue is a gelatinous mass, quite dense in consistency. Pieces are cut from it, which are heated and used for gluing parts. It is important to heat the mixture over low heat to prevent it from boiling. There are several options for making the product. For any of them, you need to purchase dry wood glue, which is sold in the form of granules or yellowish tiles. It is prepared from tannery waste, bone meal, animal horns or fish remains.
Popular cooking recipe:
- Grind the glue tile, you can break it with a hammer. Fill with water and leave until it swells.
- Place the mixture in a tin can or other container and place in a water bath. Heat while stirring constantly with a wooden stick. Do not allow the mass to burn!
- After thickening, remove the composition from the heat, add 950 g of vodka for every 720 g of mass. Also add 12 g of powdered alum per 100 g of finished glue.
This product has water-repellent properties and gives the glued products high strength. Wood glue is also made according to a different recipe:
- pour 1 kg of glue granules into a container;
- add water, leave until it swells (usually 1 liter is enough);
- after the product acquires the texture of jellied meat, place the container in a water bath;
- bring the mass to a liquid state, without letting it burn, stirring constantly;
- add 1 liter of vinegar (9%) to the mixture removed from the heat, stir, and the glue is ready.
You can also dilute the glue with water 1:1, then add the same amount of glycerin as dry glue powder was taken. Then you need to heat the mass in a water bath until the liquid evaporates. Afterwards you can immediately use the glue. For storage, it is dried, and before use it is simply allowed to swell in water.
Casein glue
Casein is a complex protein that is obtained from caseinogen during the curdling process of milk. Casein glue is used for gluing leather, wood products, paper, and cardboard. To make such a substance, you need to isolate casein from cottage cheese by defatting:
- pour cottage cheese with water (1 l) with soda (2 spoons);
- leave for 20 minutes;
- rinse the cottage cheese from the tap, let the water drain, and dry the product;
- let the mixture harden, then grind it to a powder.
Dry casein can be used to make glue. Place the powder (100 g) on the fire in a saucepan, add 200 ml of water in a thin stream. The heated mass should become thick and homogeneous, for which it must be mixed very thoroughly. If necessary, the product can be well broken up with a blender. After the glue has cooled, it is possible to connect different products. It is advisable to make small portions, because it does not last long - up to 3 hours, then it hardens.
Dextrin paper glue
Dextrin glue is well suited for cardboard and paper, which is why it is widely used in handicrafts, children's art, origami and quilling. Instead of store-bought dextrin, regular starch is quite suitable. It is placed in a container made of heat-resistant material and put in the oven for 1.5 hours (at +160 degrees). After it is split and converted into dextrin, glue can be prepared:
- take 3 tablespoons of dextrin;
- add 5 tablespoons of water;
- heat until the powder dissolves;
- add 1 spoon of glycerin;
- the glue is ready.
Thermally conductive glue
Similar products are sold in radio parts stores. You can also make thermally conductive glue yourself. You need to take glycerin, heat it to a temperature of +200 degrees to evaporate the water. In the oven, heat the zinc oxide to maximum temperature. Combine both ingredients equally, mix and cool. Glue should be used to connect quickly heating parts where it is not possible to use another type of fastening.
Glue for gold leaf
Potal is an alloy containing precious metals in the form of thin sheets. They are used for gilding and silvering ceramics, stucco, metal, wood or glass. Typically, adhesives based on alcohol, oil, acrylic or water are used to process products. You can replace them with a homemade composition:
- combine 100 ml of heavy cream and cognac;
- apply the product to the surface to be treated;
- After 30 minutes, start gilding.
You can also use a different recipe. Dissolve 70 g of sugar in 200 ml of warm water and let it boil. Pour in 1 teaspoon of vinegar essence, cook for 30 seconds. Remove from heat, add 1/3 cup starch. The consistency of the product should resemble sour cream. When the glue has cooled, you can use it for gilding. After hardening it will become transparent.
Old linoleum and acetone for glue
The finished product from these components can be used for gluing ceiling blocks, PVC products, and glass. It is enough to find scraps of old linoleum and chop them into small pieces. Afterwards, the linoleum is poured with acetone, and the latter should be 2 times more.
The jar with the future adhesive composition must be tightly closed. Store it in the dark for 12 hours. During this period, the linoleum will dissolve in acetone, and the glue will be ready. It can be immediately used for the above materials, as well as for gluing leather, wood, and ceramics.
Making hot glue
Hot glue is useful for fastening wooden surfaces and repairing products made of chipboard and fiberboard. To make it you need to take 35 g of drying oil, 100 g of ready-made wood glue. The latter must be heated in a water bath until it becomes liquid, then add drying oil. The product can be used immediately, including for laying tiles.
Silicate glue
It is difficult to make silicate glue at home. It is prepared by combining quartz sand, potassium or sodium silicate, and at a constantly high temperature. The production of the substance is available only in industrial conditions; it is less often done by builders, again with the availability of equipment.
Edible glue
The so-called food glue is used to decorate cakes - attaching figures and other heavy decor to their surface. There are 2 options for preparing glue:
- Mix 4 tablespoons of starch, 1 glass of cold water. Boil thick jelly, cool to form a viscous mass.
- Take 250 g of sugar, 100 ml of water. Make caramel that has sticky properties.
Bonus from builders for cooks: food glue
Nowadays, many people are fond of home baking and decorating it with sweet figures and various flowers made from edible mastic. But in order for all this beauty to retain its shape and stick to the surface of the cake, special food glue is required. Of course, you can buy it at the store, but before you go looking, try making glue at home. There are several recipes for this.
Recipe No. 1: based on starch
Components:
- starch - 4 tbsp. spoons,
- water – 1 glass.
Preparation:
- Prepare a thick starch jelly and leave it in a warm place for several hours. It should turn into a viscous mass.
Recipe No. 2: sugar glue
Components:
- 250 g granulated sugar,
- Glass of water.
Preparation:
- Prepare a slightly undercooked caramel toffee. It should remain in the form of a stretchy liquid.
Glue for needlewomen
Today, needlework is one of the most common women's hobbies. Women are increasingly interested in making flowers, using various types of fabric. Flowers whose petals are glued to each other look most impressive and elegant. For this, a special fabric glue is used, which can be prepared in several ways.
Method one
Components:
- 3 tbsp. spoons of wheat flour,
- one glass of water.
Preparation:
- Dilute the flour in a small amount of cold water and pour in a thin stream into a glass of boiling water. Boil.
Method two
Components:
- one tbsp. spoon of wheat flour,
- one tbsp. spoon of potato starch,
- one tbsp. spoon of granulated sugar.
- one glass of water.
Preparation:
- Mix all ingredients thoroughly so that there are no lumps and bring to a boil.
Method three
Components:
- gelatin packet,
- 2 tbsp. spoons of flour,
- granulated sugar - one tbsp. spoon,
- water - one glass.
Preparation:
- Soak the gelatin overnight by adding water (1/3 cup). In the morning, in the remaining water (2/3 cup), stir the swollen gelatin, flour and sugar. Boil.
Fabric glue should be stored in the refrigerator in a hermetically sealed container.