Autumn is a fruitful time for creative experiments, because nature itself dictates beautiful color combinations, as well as unusual motifs to use in your handmade masterpieces. This collection contains 9 master classes for children and adults on the theme of autumn, reflected in postcards.
There can never be too many postcards, because you always have to congratulate your dear and close people on some holidays - professional, personal, or simply wish them a good mood. There is no better compliment than a card into which you can put your soul, make it with your own hands, and also sign it.
How do autumn crafts differ from spring ones?
Autumn crafts are dedicated to Mother Nature, who at this time pleases people with a harvest of vegetables and fruits.
The trees are painted in bright colors. Fallen leaves create the impression of an elegant carpet or a bright dress. The autumn forest is especially beautiful. It has a special, mushroom smell. Birds flock together and prepare to fly away to warmer countries. Squirrels and other rodents stock up for the winter. The plot of autumn crafts is based on all this. Postcards, layouts and applications emphasize the significance of autumn and help preschoolers learn more about the season. The theme of spring is radically different from autumn. It shows the awakening of nature after winter: melting snow, flooding rivers, swollen buds, the first flowers and the warm spring sun.
The peculiarity of autumn crafts is the use of natural materials.
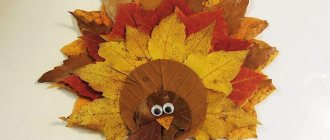
Postcard “Rich Autumn”
All the richness of autumn is collected in this wonderful card. It looks appropriate, elegant, bright, and is suitable for any occasion, be it Teacher's Day, the beginning of the school year, a harvest festival, a birthday, an anniversary, or just a motivating gift with wishes of prosperity and good mood.
You can call this composition “Rich Autumn”. To perform it, figurines of vegetables and fruits were used, as well as the gifts of this time are shown in the central picture. You can create a similar masterpiece using the scrapbooking technique, and the result will be a rather voluminous and unusual composition.
To make a rich card, prepare:
- thick paper;
- decorative paper;
- yellow lace;
- an autumn-themed picture depicting the gifts of autumn;
- small figurines of vegetables and fruits in the form of cabochons or made independently from light or polymer clay;
- leaves, twigs made of plastic, fabric or foamiran;
- stamens of yellow, green shades;
- golden details in the form of cutting - flowers, leaves or fragments of lace;
- scissors;
- glue;
- kraft cardboard;
- small diamond sequins;
- cabochon in the shape of an owl or another;
- small fluffy pompoms;
- a small piece of mesh or bandage.
How to make an autumn card step by step
- First, cut out a rectangle from white paper. Fold it in half. Height approximately 18 cm, width 9 cm, or choose your size. Cut rectangles from kraft cardboard the size of half the white piece, but cut off another 1mm on all sides.
- Glue kraft cardboard onto the front part as a backing, and then decorative paper. For example, you can make a face out of two halves; here we used yellow and lilac, which will look beautiful, that is, this postcard is in the color block style.
- Disguise the attachment points of the two front decorative backings with beautiful lace.
- Cut out the picture. Glue it onto a piece of cardboard and trim it so that a contrasting brown border remains. Glue it in the center, lifting it slightly using a layer of cardboard.
- In the lower right corner, start creating a composition. First, glue on the leaves and twigs, then attach a piece of bandage or mesh to later glue on the parts and raise them a little.
- Use different vegetables, fruits that you have. Here we used figurines of plums, eggplants, tomatoes, and peppers made from light clay, but you can use your own.
- Next, start attaching the golden parts created using an embossing machine or ready-made ones purchased in the store.
- Add such details in different places.
- Also fill the composition with bunches of stamens and pompons to hide all the places that are visible from the inside and make the composition richer.
- A rich card depicting the gifts of autumn is ready.
Pumpkin
Halloween is coming, and even the little ones can get involved. Even a kindergartener can make a pumpkin from colored paper. If you need a fall-themed paper craft for kindergarten, this is a great option. It can be used either independently or as part of a larger composition.
Take yellow or orange colored paper. Line it every 1-2 cm (depending on the size of the craft). Make 2 strips the same length, the other 2 – 0.5-1 cm shorter, the next 2 – even shorter, etc.
We fasten 2 strips each. Weave in the center and secure with a stapler or glue. Add the following 2. Do this until the end until you have assembled the entire craft. Add a green leaf cut out using a stencil on top.
If you make several of these small pumpkins out of paper, you can put together a beautiful autumn garland and take it to school for the holiday.
Autumn motivational card
In the fall, you want to create, enjoy your favorite handicrafts, not be sad in any way, but simply rethink your approach to your favorite pastime. Perhaps you like to make appliques, paintings from paper, and, for sure, these include beautiful postcards, because they are always relevant for congratulating someone, they are a wonderful unique addition to even the most banal gift.
You can make such a wonderful masterpiece with your own hands, and here we show you how to make an autumn-themed card with a motivational message written on it. For example, “may all wishes come true.” And this is truly a call to action, because you need to support your loved ones and friends, especially if they are starting to feel the autumn blues.
To complete the postcard you will need:
- paper and cardboard;
- beautiful pictures depicting yellowed leaves, flowers, twigs;
- golden leaf sequins;
- round sequins;
- scissors;
- glue;
- a decorative flower made of fabric, paper, or made independently from light clay;
- stamens of green, yellow shades;
- yellow or orange lace.
How to make a motivating autumn card step by step
- You will need to make a base, backing, and central part from paper. Here it is proposed to put a bright stripe in the center of the card and frame it with pieces of lace. It will look harmonious and beautiful, especially if you choose lace in yellow, orange or other autumn shades.
- Cut a rectangular white base from construction paper and fold it in half. Glue the backing on both sides.
- Additionally, cut out a bright strip along the height of the card and about 3 cm wide. Also prepare lace along the length of this strip, for example, use a runner.
- Glue lace to this strip on both sides so that the result looks neat and symmetrical.
- Now paste this lace strip in the center on the front of the card.
- Cut out the inscription. For example, motivate a person by telling him: “May all wishes come true.”
- Then start sorting through your supplies, choosing leaves that you can print and cut out, buy in craft kits, or make yourself from foamiran using a template and pencils or pastel crayons. Choose a flower. It’s not difficult to choose a color scheme, the main thing is that you have yellow, orange, beige, brown and red shades in your arsenal.
- Stick a picture with an inscription in the center of the lace track.
- In one corner, create a composition of several leaves and a bouquet of flowers.
- On the other side, also attach leaves, for example, rowan branches, in proportion.
- Then, at the bottom, stick several leaves and bunches of stamens around the circumference, and in the center there will be a flower in the future.
- Use gold sequins in the shape of leaves. They will perfectly complement and decorate the postcard. Stick a flower in the center.
- Stick a few round sequins in golden shades in bulk to make the card sparkle even more.
- Add more details if you wish, because it’s impossible to stop when it comes to such a bright autumn-themed gift.
- A beautiful autumn motivational card is ready. Anyone can do it; you just need to look into a craft store and buy everything you need.
Hedgehog
Hanging paper decoration goes well with autumn leaves. You can decorate your child's room with this craft.
First you need to draw or print a stencil of a hedgehog. Use this or any other template.
It is best to draw a hedgehog on cardboard and then cover it with colored paper on both sides. In the central part of the craft we glue bright autumn leaves: paper or real. It is best to pre-paint these leaves with bright oil paints.
Make the hedgehog's paws out of beads and cardboard and hang them on threads. If the breeze blows, your autumn hedgehog will seem to run.
Autumn paper crafts
Autumn crafts do not necessarily have to be made from natural materials. If you have a child, he will be interested in making them with his own hands from bright colored paper. We have prepared for you a selection of ideas on the theme “autumn” that can be taken to school or kindergarten for a holiday or competition.
We have selected some of the most popular, as well as a number of unusual ideas. Some of them are so simple that even a preschooler can handle them without your help. There are also more complex, labor-intensive crafts that can be entrusted to a responsible and diligent student.
We advise you to immediately take a look at our selection of leaf stencils, because they may be needed in almost every master class. Save pictures of fall craft ideas to your computer or print them on paper as examples, then get to work. Step-by-step instructions will help you not get confused.
Pumpkin
Halloween is coming, and even the little ones can get involved. Even a kindergartener can make a pumpkin from colored paper. If you need a fall-themed paper craft for kindergarten, this is a great option. It can be used either independently or as part of a larger composition.
Take yellow or orange colored paper. Line it every 1-2 cm (depending on the size of the craft). Make 2 strips the same length, the other 2 – 0.5-1 cm shorter, the next 2 – even shorter, etc.
We fasten 2 strips each. Weave in the center and secure with a stapler or glue. Add the following 2. Do this until the end until you have assembled the entire craft. Add a green leaf cut out using a stencil on top.
If you make several of these small pumpkins out of paper, you can put together a beautiful autumn garland and take it to school for the holiday.
More Halloween ideas here
Fly agarics
It’s so easy to make cute fly agaric mushrooms from paper that your child can handle this job on their own. Just show him exactly how to put them together, make sure he understands, and then you can just watch.
It is best to use toilet paper rolls as a fly agaric stem - collect them in advance for this autumn craft. If this is not possible, simply roll similar tubes out of cardboard and coat the edge with glue so that it holds tightly.
Cover the entire leg with white paper. Then cut out a strip approximately 3-4 cm wide. We make a kind of fringe on it. We attach it to the leg. Next, we’ll use red paper and roll up the cap.
You don’t have to glue the hat - it will fit perfectly anyway. We will make spots for the fly agaric from cotton wool. Tear off a small piece. Dip it in office glue and attach it to the paper.
You can make several of these fly agaric mushrooms, place them on colored cardboard, and scatter real or paper autumn leaves nearby. You can safely take such a craft to a competition in kindergarten.
Hedgehog
Hanging paper decoration goes well with autumn leaves. You can decorate your child's room with this craft.
First you need to draw or print a stencil of a hedgehog. Use this or any other template.
It is best to draw a hedgehog on cardboard and then cover it with colored paper on both sides. In the central part of the craft we glue bright autumn leaves: paper or real. It is best to pre-paint these leaves with bright oil paints.
Make the hedgehog's paws out of beads and cardboard and hang them on threads. If the breeze blows, your autumn hedgehog will seem to run.
Autumn forest
Volumetric birches or oaks can perfectly complement a large autumn craft for a kindergarten or elementary school. It will also be fun to play with them - children usually like to do this.
We use toilet paper rolls as a basis. If there are none, just roll up the tubes and glue them along the edge. The future trunk should be covered with colored or white paper. Add some strokes with a felt-tip pen.
We cut out tree crowns from cardboard. Then there are two options:
- We paint them using oil paints. We take the brightest ones, make a few strokes, wait for them to dry, and repeat. Do this until we fill the entire crown.
- We tear bright colored paper into small pieces (no more than 1 cm). We coat the crown with PVA glue and attach our paper “leaves” in random order.
Make two small cuts on the sleeve so that the crown can be securely fixed. If you make a few trees and put them on a cardboard box, and then add a few animals from pine cones or chestnuts, you will get a great autumn composition.
Garland
Garlands of autumn leaves are very popular in kindergartens and schools. If you decide to take on such a craft, make a few threads to decorate your home - they will immediately add coziness.
The first step is to prepare a lot of paper leaves. We recommend printing the finished stencils on a color printer. You can also print or draw just one sheet of paper on white paper, and then transfer it to colored paper.
It is very convenient to fold 5-6 sheets in a stack and cut out several leaves at a time. True, sometimes it doesn’t work out very smoothly with maple trees. In a word, practice and find the best option, since you will need a lot of leaves.
For this craft, it is best to take double-sided colored paper, since the leaves will constantly spin - the white side will ruin the picture. You can replace the paper with cardboard or shiny packaging foil.
The leaves need to be attached to the threads. You can sew them on (it’s very convenient to sew them on a machine if it’s cardboard). Or just make 2-3 stitches along the length of the sheet. If you want to make the garland not a “rain”, but a continuous hanging thread, make one hole at the base of the sheet. Insert a fairly thick rope into it.
The more threads and paper sheets there are, the more beautiful the autumn craft will be. If you don't have that much colored cardboard or paper, you can paint each sheet with watercolors and add veins with a felt-tip pen.
Tree
A beautiful cardboard tree can become part of a large craft or an independent accessory. It can be made very tiny or even meter long - it all depends on what your goal is.
First you need to draw a tree on the blank. We recommend using a ready-made stencil to simplify your task. Print it out or draw it. Then cut it out of cardboard in duplicate.
We should end up with two identical trees. Fold one of them exactly in the middle (lengthwise). Then we make a cut along this fold so that the workpiece can be placed on the second tree from above. If the silhouette of the tree does not allow this, the cut can be made from above the crown.
All that remains is to cut out a lot of leaves from paper and glue them to the branches. If necessary, use paints.
By the way, this is how you can make cardboard trees for various performances or performances in schools and kindergartens. Take this idea to heart.
Bright print
The little ones will definitely love this craft. It is very simple, but it is so fun to make that any child will be delighted.
We advise you to cover the table with newspapers or sheets of paper, because paints may splatter. We need real autumn leaves: dried or fresh. It’s better to take several different ones to make the craft more interesting.
Take gouache and coat the sheet with a thick layer. Mix colors, make one half yellow and the other half red. Or play with them even more. You can paint over the entire sheet or apply several dots. It is advisable to pay attention to the edges and veins so that the print is more distinct.
Then simply press the workpiece onto white or colored paper. Do this with several sheets to paint a beautiful picture. If something doesn’t work, just add what’s needed with a brush or markers.
Using this technique, you can draw very beautiful pictures that will be excellent autumn crafts for school.
Application
You can make excellent voluminous postcards on the theme “autumn” with your own hands from colored paper. In addition, they can become part of a larger picture for a kindergarten competition.
We suggest you understand this technique using a simple example. To make such fly agarics, you need to cut out a minimum of parts. The leg is shaped like a pear. For the hat you need to cut out a rectangle. Mentally fold it in half: this length will correspond to the size of the hat.
We begin to bend the rectangle with an accordion every 0.5 or 1 cm (depending on the size of the desired craft). Then we fold it in half, secure it with a bracket or glue it along the butt edge.
We attach the leg to the cardboard first, then the cap. Let's add circles (speckles on the fly agaric) and make green grass.
The same technique is suitable for other autumn applications. For example, you can make a picture in the form of umbrellas and add leaf fall.
Autumn panel
The whole essence of leaf fall in one picture. This autumn paper craft is simple, but even an older child, for example, in 3rd or 4th grade, can safely take it to school. The point is that it has a special meaning, and the teacher will appreciate it.
We need a large cardboard sheet. Color it in with watercolors or colored pencils. Not too bright, but a little muted.
We cut out several small leaves using a stencil. The same ones look the most beautiful, but variety will not spoil the picture.
Add a saxophone. You can cut it out using a stencil or draw it yourself.
Now we need a regular hole punch. With its help we make a lot of holes in colored paper. We will need the circles themselves. We fix them with glue. Let's add a few strokes with colored pencil.
This is what autumn music looks like. Your craft made from plain paper turned out very beautiful, cozy and warm, didn’t it?
Origami
For those who like to use their brains, we suggest doing an autumn craft using the origami technique. Little kids can’t handle this, so this kind of work is only suitable for schoolchildren. Previously, we already told you what origami is and how to work in this technique.
The step-by-step technique is quite difficult to comprehend in the text. Therefore, we advise you to watch this detailed video instruction. Take the sheet in your hands and start folding it after the author. Such leaves can be attached to a large craft or just made for fun.
We hope you are inspired by this collection of ideas. As you can see, you can make a beautiful autumn craft with your own hands even from plain paper - just use your imagination a little. Your child should enjoy these works. He will most likely have fun doing it.
Other fall ideas
Garland
Garlands of autumn leaves are very popular in kindergartens and schools. If you decide to take on such a craft, make a few threads to decorate your home - they will immediately add coziness.
The first step is to prepare a lot of paper leaves. We recommend printing the finished stencils on a color printer. You can also print or draw just one sheet of paper on white paper, and then transfer it to colored paper.
It is very convenient to fold 5-6 sheets in a stack and cut out several leaves at a time. True, sometimes it doesn’t work out very smoothly with maple trees. In a word, practice and find the best option, since you will need a lot of leaves.
For this craft, it is best to take double-sided colored paper, since the leaves will constantly spin - the white side will ruin the picture. You can replace the paper with cardboard or shiny packaging foil.
The leaves need to be attached to the threads. You can sew them on (it’s very convenient to sew them on a machine if it’s cardboard). Or just make 2-3 stitches along the length of the sheet. If you want to make the garland not a “rain”, but a continuous hanging thread, make one hole at the base of the sheet. Insert a fairly thick rope into it.
The more threads and paper sheets there are, the more beautiful the autumn craft will be. If you don't have that much colored cardboard or paper, you can paint each sheet with watercolors and add veins with a felt-tip pen.
Postcard “Hello, autumn”
Once you try to create unique masterpieces with your own hands in the form of postcards, you probably won’t be able to stop, because you can come up with many options, and all the products will turn out unique, filled with your emotions and will be pleasing to the eye. The next postcard is shown in this lesson, and anyone can make it.
To make a bright postcard using scrapbooking technique, prepare:
- white Whatman paper or watercolor paper;
- decorative paper with images of leaves, twigs or berries, and so on;
- bright fabric flower;
- plastic branches of a suitable shade;
- sheet with pictures for cutting out;
- half beads in warm colors;
- figurines of acorns, mushrooms or chestnuts;
- sprigs of berries;
- lace.
How to make a beautiful card step by step
- Beautiful paper with images of autumn leaves will become the background for the proposed postcard, but one layer will probably not be enough, and it is better to use 2 or even 3 cardboards, sealing the front and back parts.
- Glue cut-to-size sheets with beautiful decor onto the prepared folding bed and begin working with it. Where can I get these thematic sheets? The easiest way is to buy them individually or in sets at a craft store, print them on a color printer, or use some clippings from magazines. Often there are similar sections on internal spreads. And the option of drawing backgrounds is not excluded, because the drawings are simple, and you can depict something on ordinary watercolor paper with paints or gel pens.
- Fold the card again and glue bright lace at the top and bottom. On the reverse side you can duplicate this lace.
- From the printable sheets, cut out a beautiful autumn card with the word autumn written on it or print it out.
- Paste this inscription on src=»https://rukodelielux.ru/wp-content/uploads/2021/09/5-21.jpg» class=»aligncenter» width=»700″ height=»393″[/img]
- Use plastic or fabric leaves, twigs with berries, and also get a beautiful flower.
- In the lower part around the circumference, begin to attach leaves and twigs.
- Lift up the long yellowed stems, if you have any.
- Stick a beautiful autumn flower in the center.
- The composition will also be perfectly complemented by an acorn and a mushroom.
- To support the main composition, you can stick more twigs and leaves from the opposite corner of the picture. And also distribute half beads of a suitable color over the surface of the card of the same or different sizes.
- A bright postcard welcoming autumn is ready.
Bright print
The little ones will definitely love this craft. It is very simple, but it is so fun to make that any child will be delighted.
We advise you to cover the table with newspapers or sheets of paper, because paints may splatter. We need real autumn leaves: dried or fresh. It’s better to take several different ones to make the craft more interesting.
Take gouache and coat the sheet with a thick layer. Mix colors, make one half yellow and the other half red. Or play with them even more. You can paint over the entire sheet or apply several dots. It is advisable to pay attention to the edges and veins so that the print is more distinct.
Then simply press the workpiece onto white or colored paper. Do this with several sheets to paint a beautiful picture. If something doesn’t work, just add what’s needed with a brush or markers.
Using this technique, you can draw very beautiful pictures that will be excellent autumn crafts for school.
Materials for creating an autumn card
To complete this craft, prepare:
- thick red cardboard;
- scissors;
- creasing or knitting needle in order to bend the base sheet;
- scrap paper and paper from a magazine or sheet with an inscription;
- lace;
- golden colored half beads;
- artificial acorns with leaves;
- painted leaves or die cut;
- stamens – complex and ordinary;
- golden or orange flower;
- hot melt adhesive.
Autumn panel
The whole essence of leaf fall in one picture. This autumn paper craft is simple, but even an older child, for example, in 3rd or 4th grade, can safely take it to school. The point is that it has a special meaning, and the teacher will appreciate it.
We need a large cardboard sheet. Color it in with watercolors or colored pencils. Not too bright, but a little muted.
We cut out several small leaves using a stencil. The same ones look the most beautiful, but variety will not spoil the picture.
Add a saxophone. You can cut it out using a stencil or draw it yourself.
Now we need a regular hole punch. With its help we make a lot of holes in colored paper. We will need the circles themselves. We fix them with glue. Let's add a few strokes with colored pencil.
This is what autumn music looks like. Your craft made from plain paper turned out very beautiful, cozy and warm, didn’t it?
Master class on how to make an autumn card in scrapbooking style
Scrapbooking is a type of handicraft that represents the design of albums: both for family and personal use.
Nowadays, not only albums are made in this style, but also diaries, notebooks, and much more. Including postcards. And now we will see with you how to learn this. We will need:
- Sewing machine;
- Ruler;
- Scrapbooking paper;
- Twine;
- Breadboard knife;
- Ribbons, pictures and inscriptions for decoration;
- Brads;
- Colored cardboard;
- Corner hole punch;
- Scissors;
- Glue;
- Artificial leaves;
- Burlap ribbon.
Subsequence:
We cut out the base for our future postcard from cardboard.
We cut the scrapbooking paper into several pieces of the specified size.
Turn the base over and glue 1 or 2 pieces of twine to it. We put paper on top. We stitch it.
Next, we create a composition from the existing decor so that we can do this outside of work.
It is important to remember the order in which you will then pin the elements
We sew the decor to the base of the work.
If desired, decorate with brads.
The front side of the future masterpiece is decorated. Now you can do the inside.
We punch one of the cards with a corner hole punch so that you can insert a photo into it.
We fix it with glue inside the card. We will have two cards in total. One for photos and the other for congratulations.
A great gift for a birthday, Mother's Day or any other autumn holiday is ready.
Real miracles are created in scrapbooking style.
As a rule, those who engage in this type of creativity successfully sell their products. And you can try it too.
I think that anyone would be pleased to receive such a gift.
Making an autumn forest, trees and nature
But the most important advantage of autumn is the colorful trees. They just brighten up this slushy time. Therefore, we cannot do without images of forests and nature.
Let's start first with single trees.
Master class on making this curly tree.
You need strips 15*1 cm long. They need to be fanned out on the base. And having fastened one end to the trunk, begin to twist the strip so that it looks like a wave. We also fix the second end.
Glue pieces of colored paper onto them.
There is still a forest in front of you. Absolutely any texture and color of blanks will do.
Below is an applique postcard.
Try to depict the forest and nature with leaf prints. To do this, you need to apply gouache to one side of it. Press the painted side onto the paper, transferring the pattern of veins.
The same technique can be used for the “Autumn Outside the Window” master class.
Autumn will swirl you in these applications. And gouache will depict the wind.
Leaves glued in rows on top of each other are very similar to a forest of birches and fir trees.
Look at the variety for creativity.
Birch trees also look beautiful with their own yellow birch leaves.
The trunk can be drawn or glued from cardboard.
Next, the work “Wind”. It's also not difficult to repeat.
Also create an abundance tree with your own hands!
Use candied fruits, nuts, dried fruits, seeds.
The crown of the pumpkin seed tree is very iridescent and bright. The kids will love it.
Did you like the ideas? Below are diagrams and templates that you can use as a basis.
Autumn leaf made of thread and cardboard
In today's master class we propose to make an original autumn craft using threads and cardboard. From these materials you can make an autumn leaf, all the steps of creating which are presented in step-by-step photographs.
To make such an autumn craft, we will prepare:
- orange and white cardboard;
- scissors;
- transparent tape;
- threads of red, green, orange, yellow;
- a simple pencil with PVA glue.
The basis for the craft will be an orange sheet of cardboard. First, fold it in half.
Then we need a leaf template. We first made it from plain paper. To make the leaf even, it is better to cut the blank from a piece of paper folded in half. After this, we apply the template to the wrong side of the orange cardboard.
We trace it along the contour with a simple pencil.
Now you need to use scissors. Cut a hole in the cardboard in the shape of a leaf.
This is what our blank looks like from the front side.
Next we need white cardboard. We cut out a rectangle from it, which will be slightly smaller in size than half of our workpiece. There should be an allowance of about 1 cm along the edges.
We will wind threads on this white rectangle. Let's start with red yarn. We secure the end of the thread with transparent tape on the wrong side, and then wind it onto cardboard.
After this, we continue to wind the red thread in the other direction. We cut the thread and secure it again with transparent tape.
Next, take green yarn and repeat the steps.
After this, we will use orange and yellow threads.
We put the resulting blank into an orange cardboard base.
Lubricate the edges with PVA glue, then fold it in half and fasten it. This is an autumn leaf made from thread and cardboard.
Postcard “I love autumn”
This handmade postcard once again proves that everything ingenious is simple. There is no need to buy any expensive materials in order to make a unique gift with your own hands.
The card is made in bright colors to support the autumn motifs. The main stages are similar to other similar master classes. Let's look at how to make a beautiful message and declaration of love for autumn.
Materials for making a postcard:
- thick Whatman paper;
- scissors;
- ruler;
- glue;
- decorative cardboard with autumn drawings;
- kraft cardboard;
- leaves are fabric and in the form of sequins of golden, reddish shades, in the form of reddened twigs;
- pieces of green or yellow tulle;
- paper or fabric bright flower;
- cabochon bell;
- a picture with the inscription “I love autumn.”
How to make an autumn card step by step
- Take all the necessary materials for work. In addition to white, you need to take at least 2 types of cardboard to make the backing, and the inner filling was of a contrasting color. But be sure to maintain an autumn theme.
- Cut out the main parts according to the size of the backing.
- Lay out the card that was folded in the previous step and glue 2 or 3 backing sheets on both sides. You can make the back parts in the same color scheme.
- Lay out all the decorative elements that you would like to use, but may not need some. Before attaching paper, fabric or other materials, be sure to try them on. See how this fragment will look in the overall composition.
- Attach 3-4 large maple leaves to the front part, lowering it slightly downwards.
- Add reddened twigs and sequins.
- From small pieces of tulle you can make balls and attach them to different places. Continue adding sequins.
- At the bottom of the composition, attach a flower that will crown this entire bouquet, and select a suitable cabochon from below.
- Cut out the inscription. Here it is proposed to show affection for the golden age. Stick it at the bottom and frame it with gold sequins to support the top composition.
- A beautiful and unusual autumn-themed postcard is ready. What else can you add? Everything that reminds you that a wonderful time has come, including natural materials.
Maple leaf using origami technique
We will need: a pencil, a ruler, a glue stick, paints and a brush, we choose colored paper in autumn shades:
He boasted about a maple leaf: I was like everyone else - green, And now this is what I am - Yellow, red, gold, And ruddy, and carved - Well, a handsome painted man. Everything about me shines like the sun, And anyone will notice me! He didn't boast for long. Suddenly he broke away from the branch, dived down into the clearing, lay down more comfortably... and... fell asleep.
E. Grudanov
Our origami will be assembled from the “trefoil” module. Scheme of its assembly:
Option 1. Assembled trefoil
Option 2. Solid trefoil
Based on such modules, we assemble our maple leaf. Look at how stylish and sometimes completely unimaginable maple leaves you can get:
You can assemble a leaf from multi-colored modules, combining them with a pattern of veins:
You can decorate plain paper in the most interesting ways: color it with colored pencils or paints (for example, using a cotton swab), make an applique, leave imprints and imprints of leafy monotypes, crumple a leaf, decorate it with folk ornaments, make a “mound” design from cereals or tea leaves , glued with glue.
You can make a rainbow from a maple leaf:
You can make an autumn calendar leaf from an old wall calendar.
Or decorate the leaf with original lacing.
The composition called “Autumn Waltz” deserves special attention. It is made of music paper.
You can create the effect of a bright autumn leaf under transparent ice using glitter and stretch film.
From multi-colored autumn leaves using the origami technique you can assemble a bright wreath that will decorate any interior.
Autumn card using scrapbooking technique “Let your dreams come true”
This lesson shows how to make a beautiful autumn card with your own hands, which you will probably need to congratulate a teacher or educator, for a dear and loved one who has a birthday or some other holiday.
All you need to do is place the desired inscription on top or write a suitable congratulation inside. The card is made entirely in autumn colors using autumn materials such as yellowed leaves, ears of corn, gold sprinkles and wildflowers.
To make a postcard, prepare:
- paper – thick Whatman paper, kraft cardboard, decorative paper;
- cuttings and pictures: yellowed leaves, spikelets, bouquets of flowers;
- central picture with a wish;
- beautiful braid in the form of yellow or orange pompoms;
- decorative berries of yellow or orange color;
- golden half beads;
- scissors;
- glue.
How to make an autumn scrapbooking card
- Prepare the necessary materials for work. An important part of handicraft for creating postcards is the creation of multi-layer models. You must not only make the base of the card, but also attach two, or maybe more, backings on top. The cardboard for the base should be thick. Whatman paper will do, or take thicker paper, and also use scrap paper and craft cardboard on top.
- Prepare the base, fold it in half, cut out the backings.
- Glue the backing paper onto the 2 halves of the postcard. Use a layer of cardboard and attach decorative paper on top.
- For a central inscription with a motivating and appropriate autumn theme, some kind of picture would be better suited. It can be framed in a beautiful, cozy frame. Use ribbon with pom-poms of a suitable color for this.
- Glue the frames into a layer of braid (it can be replaced with lace).
- Select pictures - bouquets, spikelets, leaves, and so on.
- Attach a framed picture to the center of the front of the card. Place these illustrations that you prepared while creating the compositions in the corners.
- Make similar decorations in different places.
- You can also use beautiful yellow berries to create autumn masterpieces.
- If it seems to you that the bottom part of the card is empty, then also attach any picture or inscription here, for example, an autumn clipping.
- Add a caption below. Secure it with golden half-beads, add more golden precious glitter using the same half-beads in other places on the card.
- You can create such an unusual, beautiful creation, and a minimal set of materials is used here.
Postcard on the theme “Autumn has come” made of paper and cardboard with templates
In order to make a postcard with an autumn theme, it is not at all necessary to take natural materials. You can limit yourself to plain paper. See for yourself.
Materials we will need:
- Scissors;
- Colored paper and cardboard;
- Gouache and brush;
- Glue;
- Stationery knife;
- Markers.
This is the kind of postcard we should get:
Subsequence:
We make a base out of thick cardboard. We cut out a rectangular hole in the left side, leaving a margin of 3 cm wide. On the right inner part we glue the background - a blue rectangle 10x15 cm.
We cut out birch tree trunks from white paper and draw bark on them with a black felt-tip pen.
We prepare all the other details of the composition: here these are mushrooms, grass, the trunk and crown of a large tree. You may have other elements.
Glue the sun (a circle of yellow paper) and birch tree trunks onto the blue background.
Then weed.
We complete the composition with mushrooms.
On the front side of the work we glue the tree and the inscription. There is no need to completely coat the tree trunk with glue, otherwise it will stick to the inside of the postcard. Lubricate only the necessary parts.
Use felt-tip pens or gouache to complete the details: birch branches and leaves on them. Ready!
Here are a couple more ideas for autumn cards and appliques.
And of course, I can’t help but give examples of products using my favorite technique – quilling. Look how wonderful it is!
DIY autumn greeting card
Looking out the window in autumn, you can see nature of incredible beauty. These include yellowed trees, beautiful bright carpets on the ground, and reddened berries that glow against the background of a gloomy sky. Some plant varieties still bloom in autumn.
In general, it is this picture that you can see from your window that can inspire you to create a beautiful masterpiece. Frame it in the form of a postcard, and it will become a wonderful congratulatory option.
What you need to prepare for an autumn card:
- thick paper;
- beautiful paper with a pattern;
- decorative fabric leaves, golden;
- half beads on a string;
- golden sequins;
- all kinds of twigs, berries;
- satin ribbon in yellow and orange shades;
- golden lace;
- scissors;
- glue;
- a picture of a cute animal or any other that suits the theme;
- stamens;
- other materials upon request.
How to make a beautiful card step by step
- The first stage is creating the foundation. Use a ruler, creasing machine, scissors. First, measure and then cut the sheet to the desired size, punch it so that you can bend it in half without creases.
- Here it is proposed to use a base in the form of a clamshell, narrow and tall. The first layer of substrates are sheets of kraft cardboard. Use either double-sided tape or glue to secure it.
- In addition to craft substrates, also use beautiful decorative paper. If there are leftovers, you can stick it in the center on the front part, since in the future it will still be decorated.
- Make the front and back walls exactly the same or different in sound. This will make the postcard look even more interesting.
- Additionally, attach another narrower strip to the front part.
- Place several satin ribbons horizontally in matching colors, such as yellow and orange.
- Start creating your application. First glue on the large fabric leaves. Then attach a picture between the leaves. A beautiful cute picture of a husky puppy was used here.
- Place additional decorations under the picture, for example, golden leaves, bunches of berries, tied with a satin bow.
- Find twigs, leaves, stamens, and half-beads on a string of golden flowers in your supplies.
- Use all the details to frame the picture beautifully.
- Finally, sprinkle on some gold sequins to add some sparkle.
- A beautiful greeting card that you can give to someone in the fall is ready.
Application with cotton pads
It is necessary to invite the child to take cotton pads and color them in the desired color. Take into account and prompt the child that the final application will look most impressive if the cotton pads are painted with several shades of the same color at once.
Cut out a trunk from colored paper and glue it to the main sheet. Now start gluing cotton pads around the trunk and on top of it, forming the crown of the tree. Keep in mind that if they are placed one on top of the other, with a slight overlap, you can achieve greater volume of the composition and its effectiveness.
Make several of these trees, preferably painting cotton pads in different colors.
Autumn leaves
You will need: double-sided colored paper, scissors, glue stick, ruler.
Master Class
- Prepare 10 squares of colored paper measuring 8x8cm.
- Take one square and fold it as shown in the photo instructions. It should look like a rhombus.
- In this way, fold a total of 6 blanks.
- Take 3 squares and fold them to form triangles.
- Glue 2 rhombuses together and one triangle in the center.
- Do this process with all the parts.
- Glue the blanks together to form a leaf.
- Make a total of 8 leaves of different colors in the same way.
- Glue the leaves together in a circle, then decorate a couple of them by making a face.
Bright autumn leaves made from colored paper are ready! I recommend watching this video!
Openwork AUTUMN LEAF made of paper / Simple CRAFTS
Composition of rolled strips of paper
In this case, a colored sheet of paper needs to be cut into thin strips of short length and glued into rings. Cut out the trunk and glue it to the base.
Drop a drop of glue onto the rings, preferably in the place where there is a seam on the paper. And fix it around the trunk in this way so that a crown is formed.
Please note that the rings can be glued both vertically and horizontally. This will result in completely different wood looks. Therefore, you can combine several methods on one application to get more texture.
Using methods for creating an autumn forest appliqué, you can arrange a real master class for your child, both at home and in classes in the garden or at school. Although, there are other ways that the teacher must also take into account when drawing up notes for the relevant classes.
Craft “Tree with palms instead of leaves”
I can't get past this tree. Very beautiful. It's very easy to do.
You will need:
- colored cardboard (paper)
- glue
- pencil
- toilet paper roll
- good mood
Progress:
We trace a child's hand on white paper with a pencil. Then we cut it out. Next, using the template, we will make them from multi-colored paper. Cover the sleeve with a brown sheet.
Let's make cuts in it. Then we will insert improvised branches into them. Let's put him on the grass. Make a whole forest of mixed trees. Let's not forget about the animals.
Another design option for this product.
Volumetric paper hare for crafts with children
For crafts with children, we need to get creative and spend some time for the children. Colored paper is an affordable material.
Don't forget to come up with a game or a fairy tale with the toys you created!
You will need:
- colored cardboard
- colored paper
- simple pencil
- scissors
- glue stick
- glue moment
- ruler
- pencil (felt-tip pen)
Progress:
First, let's draw a hare figure template. We take the white paper. Fold it in half lengthwise. With a pencil we draw half of the body, the head and one ear. Then we'll cut it out. We take any colored cardboard of your choice.
Cut it in half lengthwise. Then we transfer the template to each half. Ears and head we connect two parts together. Glue the eyes, nose and mustache onto the muzzle.
We bend the part inward at the bottom.
These are the legs. Cut out the front legs and glue them on the inside. We bend them to the animal’s tummy. We give him carrots.
To do this, we will draw or immediately cut out 4 parts of the vegetable from orange paper. Fold each piece in half. Glue them together along the edges. Don't forget to make tops out of green paper. We connect the parts together. All is ready. Let's set the craft on the grass.
Master class: application on the theme of autumn - “Mushroom picker”
You will need: cardboard, colored paper, colored pencils, glue, scissors.
How to make the “Mushroom picker” applique with a child:
Step 1. Draw elements of an autumn picture on sheets of colored paper: tree trunk, mushrooms, mushroom picker costume (cloak, basket, boots). Cut and glue.
Step 2. We make voluminous foliage on the tree and on the ground: glue crumpled squares of colored paper onto a cardboard base.
Step 3. Color the picture.
Here is the picture that Marina and little Vika came up with.
Bright autumn card with wishes
If you are a creative person and do handicrafts, then you can handle any job. You can gift your acquaintances, relatives and friends with handmade products. This is precisely the lesson shown in this article.
You can make a bright autumn card from completely affordable materials, which you can also make with your own hands. Such an autumn masterpiece would be appropriate for congratulating an adult or child, as a present or a motivating gift. Let's look at how to make such a bright card.
To make a postcard, prepare:
- thick paper;
- decorative paper;
- a picture with a motivating congratulatory inscription;
- voluminous autumn-themed stickers, for example, with images of squirrels, nuts and other motifs;
- cabochon bell;
- stamens, bought in a store or made independently from light clay;
- decorative fabric leaves;
- scissors;
- glue;
- satin ribbon in orange and yellow shades;
- PVA glue or acrylic varnish;
- golden glitter;
- stamps in the form of flowers;
- black ink;
- watercolor paints in yellow and orange shades.
How to make an autumn card step by step
- Prepare sheets of paper for the base, for the backing, as well as a picture that interests you, taking into account the recipient of your gift.
- On a regular clamshell base, which you cut out in any orientation, you will need to glue the backing on both sides. To do this, use thick cardboard and beautiful scrapbook paper or craft cardboard, you can simply replace it with other cardboard.
- Stick 2 backing sheets on both sides of the base. Be sure to design the back of the card, because people pay attention to it too.
- Prepare the picture you want, for example, with the image of a fox.
- Glue a fox on the front wall of the card. Start gluing autumn motifs to the picture from two corners opposite to each other. Make large fabric leaves, such as maple leaves, as the base.
- You can also buy or make your own cuttings from foamiran or thick paper and line them on all sides. Using black ink and stamps, stamp flowers onto orange watercolor paper, then cut them out. This is a self-made cutting, also suitable for decoration.
- Continue to complement the picture with various animal figures. If you also use an image of a fox or someone else in the central picture, then these details will be quite appropriate.
- Islands of satin ribbons in autumn shades will look beautiful in the composition.
- Attach the central flower and place the stamens under it.
- Lubricate some parts with acrylic varnish or PVA glue and sprinkle generously with glitter, wait until dry. Then chicken out the excess.
- Glue the cabochon bell, small pom-poms, nut figures and other details as you wish.
- It makes a wonderful postcard. She is exclusive, unusual and very elegant.
Simple autumn applications for kids
It is always more difficult to work with the youngest children and you need to find an approach to them. They cannot be forced to sit on one job for a long time. Therefore, the craft should be as simple as possible. How to make an interesting autumn-themed craft in just a few minutes to inspire your child to continue.
It seems that nothing simpler than this application can be found.
Take one beautiful yellow leaf. Turn the wide part down. Glue it onto cardboard. You can finish drawing the arms and legs, and insert the drawn umbrella into your hand.
A leaf like this with eyes will look funny. They can be made from plasticine or cardboard, or maybe you can find small buttons and glue them on. Don't forget to make it cheerful by drawing a smile.