School years are the most unforgettable!
School gives us knowledge, teaches us to communicate with people around us, at school we make our first friends, sometimes they remain our friends for life. In a word, school gives a person a start in life. What can a student give to the school? There are many different reasons to make a gift to the school. School anniversary, graduation, first of September, teacher's day...
The best gift is a gift made with your own hands. But you need to give such gifts that you won’t be ashamed to give them. We offer you several DIY school gift ideas.
Stylish DIY birthday card for your aunt
A handmade greeting card for your aunt’s birthday, given from the heart, will not only be remembered for a long time, but may well become the highlight of the holiday day . It is quite simple to do, and it does not require large material investments or great physical effort. The result will be interesting, original in its own way and, of course, memorable.
Simple paper card
To make a paper card for your aunt’s birthday with your own hands, you will need the following tools and materials:
- colored paper with a beautiful, “festive” texture;
- scissors and a stationery knife, as well as a simple school compass;
- PVA glue and a little simple double-sided tape;
- small beads;
- an artistically attractive ribbon;
- small wooden stick.
First of all, several circles of different diameters are marked and cut out on colored paper with a compass. Then, using scissors, moving them from the edge of the paper circle to its center, a spiral is cut out - the basis of future flowers. For greater beauty, you can use scissors with curly blades.
Using a wooden stick, which can be an ordinary pencil, the spirals made are twisted from the edge to the central part - you get a kind of flower. To prevent it from unwinding, the center of the twisted spiral is fixed with a small drop of glue. It should be taken into account that the splendor of the finished “bud” depends on the density of the twist.
For students
What gifts to choose for schoolchildren, and what can you make for them with your own hands? A lot of interesting and original things! We will offer ideas for students of different ages, from first-graders to graduates, and all you have to do is choose and do it.
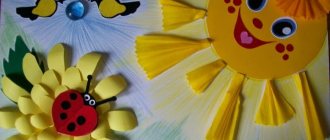
- You can make beautiful holiday medals for first graders. This will be an excellent gift for the first of September, or for another holiday event, and will greatly delight children. Such gifts for schoolchildren are the best option, and it’s easy to make yourself. For example, from beautiful ribbons and cardboard.
- If you want to make memorable souvenirs for schoolchildren, then you can’t find anything better than a photo folder. You can make a photo folder yourself from decorative cardboard and paper. Be sure to paste school photos into it and it will be a great souvenir. A handmade photo folder cannot be compared to the one you can order - you will certainly make it better, more original and more beautiful, and not a standard thing that has no soul. So give it a try!
- Another creative option for a memorable souvenir for schoolchildren is a photo cube. It looks very beautiful and cool, and will definitely appeal to students of any class - both kids and high school students. Making such cubes is not at all difficult, you just need to spend a free evening on it. Print out photographs, make cubes from thick cardboard and cover them with photographs. It will turn out great!
- You can give original passport covers to high school students. They become adults and get their own ID, and that's always a joy for teenagers. Please them even more by giving them handmade covers! You can make a cover in an individual style for each student.
Gift ideas for school
Before you make your final choice, you should ask your class teacher for advice. Sometimes there are problems that the teaching staff cannot solve on their own. In this case, a gift to the school from graduates may be an ideal solution to the problem:
- Repair
. It is not always the case that the budget of an educational institution can allocate funds to lay linoleum, replace plumbing, or install plastic windows. - Furniture
. Interior items wear out a lot and fail. In a large school there is always a need for new blackboards, book shelving or other types of furniture. Today there is a large selection of teaching aids, interactive whiteboards with a touch surface, or mobile boards with wheels on sale. - Technique
. The educational process requires the use of the latest technologies. Not every educational institution can afford to purchase a video projector, video camera, or other necessary equipment that can be used in the educational process. Even a simple copier or printer will always have a use.
Equipping a computer science class with new computers or laptops is a truly great gift.
This is interesting!
New Years is soon? See what the best New Year gifts are for teachers: what to give and how to choose
- Teaching aids
. You can purchase posters, microscopes, a model of a skeleton, and musical equipment for public events. All these items will be used for their intended purpose and remind of graduates. - Accessories to create coziness
.
An appropriate gift option would be a set of lamps
, a large
floor-length
mirror aquarium
.
An excellent gift option would be curtains
, which will transform the room and make the educational institution more comfortable. All these items will be used, and the graduates will have warm memories.
Fabric and knitted items for school
The skills acquired by schoolchildren in labor lessons are widely used by them in creating original objects. The photo of DIY crafts for school shows a lot of things knitted or crocheted, embroidered, woven using the macrame technique, and sewn from scraps.
On the Internet you can find a wide variety of samples, simple diagrams, patterns and step-by-step descriptions for all types of needlework. Based on them, you can learn basic working techniques, and then develop your own creative projects.
This section contains a variety of pillows, oven mitts, towels, doll accessories, knitted and sewn toys, patchwork quilts and embroidered rugs.
DIY cards with flowers inside
Even a child can make a heart-shaped card with a three-dimensional flower inside:
A lush flower for the inside or outside of the card can be made from colored or even plain paper painted with watercolors or pastel crayons. You can cut flowers using this template:
Print out the flower template and color it with paints. Fold it according to the marked fold lines and glue the resulting flower onto the base of the card.
Such a lush and bright card with flowers inside, made with your own hands, will undoubtedly delight the recipient.
She explains how to make it in her master class TheJulianaHappy :
The option with delicate, pastel colors looks very cute.
Flowerbed with flowers in the window
The original master class is in English, so for your convenience we offer a brief translation of the process of creating this flower card.
Standard materials and tools: colored paper, cardboard, scissors, glue, plastic to imitate glass in a window.
Take thick colored paper and fold it in half. Cut out a square window in one half.
We make a frame from colored paper of a different color. The glass for the window can be made from a protective film for your phone or transparent plastic. Glue the resulting window frame to the base of the postcard. You can do without “glass” at all.
Glue it into the hole
We glue a flower pot out of cardboard and glue it in the middle of the card on the fold line. Glue the sides of the resulting pot together so that when you close the card, the pot folds up.
Next, from colored paper we cut out green stems and all kinds of bright flowers: crocuses, hyacinths, daffodils and tulips. Perhaps your bouquet will not be spring, but summer, which means that cornflowers, daisies, pansies, etc. will appear.
Then we cut out the flowers
Glue the flowers into the pot
The height of the flowers should be such that they do not stick out from the card, but are visible through the window!
Gluing flowers into a pot
This is how they stack up
The window can be decorated with a cozy curtain.
Using the same principle, you can make a card with flowers from felt or painted cotton pads. Additionally, insert a laconic but warm congratulation along with the flowers!
In addition to flowers, balloons, stars, and bows may appear from the card.
TheWorkshop shows how to make a panoramic flower card along with a greeting envelope in his master class :
Postcard with a pot of flowers inside
We take thick paper - the basis for our postcard. Create a rectangle in the center of the fold line of the card. The width of the rectangle is 3 cm, length is 7 cm.
We make cuts along the pink lines with a stationery knife. Then we fold the resulting rectangle inside the postcard. We attach the base of the card to another sheet, larger in size than the original base.
Then we make a floral design: a flower pot, the flowers themselves, fluttering butterflies and grass. We combine all this and glue it to the front of our postcard.
Making a floral design
Using the same technique, you can make an original vase postcard. You can also make flowers in such vases with your own hands from paper or other available materials.
Postcard-vase for flowers
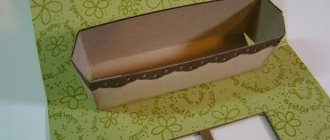
Volumetric children's card
We bring to your attention a master class on making a very delicate three-dimensional card, which will not only congratulate the recipient, but will also fit perfectly into the interior of, for example, a children's room.
First we make a box frame. To do this, take thick blue paper and cut out a template for the box from it. We fold the edges of the template 4 times, 5 mm on each side, thereby forming a frame. Glue the resulting frames together.
On top of them we glue colored or scrap paper in a color that matches your composition.
Next, we will prepare the elements of the future composition. Glue together a balloon from paper circles. We fold the circles in half and glue them together. A waxed cord is glued into the base of the basket and directly into the circles, forming a ball.
We cut out clouds from scrap paper and a sun from yellow paper. Glue the elements of the composition into a frame. We glue the balloon as follows: we glue the base of the balloon with bulk tape, and the balloon itself with glue. We glue the clouds using the same principle: one with glue, the other with bulk tape.
We make green grass from a simple napkin. First we cut it, then glue it. On the right side of the box we glue a tree made using a hole punch for Scrapbooking. The final touch is to glue serpentine, butterflies and a congratulatory inscription into the empty spaces! We glue a ribbon with embroidery or lace to the bottom of the box. The original three-dimensional postcard is ready!
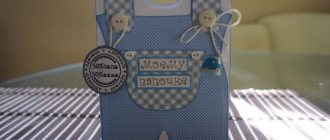
The simplest version of a paper card for a teacher
What is necessary:
- Designer cardboard
- Rectangle of colored paper
- The inscription “Happy Birthday” (I printed it from the Internet)
How to make a postcard:
1. I have a designer cardboard with a cake, balls, stars, in a word, festive. A4 format. I bent it in half.
2. Cut out a rectangle from yellow paper.
3. I printed out the inscription “Happy Birthday.” I glued it onto yellow paper.
4. I glued all this onto the card, and voila, the simplest paper happy birthday card is ready!
The card is beautiful, very simple. It couldn’t be simpler, one might even say so. Even a child can cope. You can make it together with your baby and give it to a teacher or kindergarten teacher.
Here is another version of the postcard, in my opinion, it is simple and original. Delicate card with butterflies. This is a version of a simple postcard. I’ll say right away that this idea is not mine, it’s from the Internet, but I really liked it.
Accordion postcard (diagrams and templates)
Another type of voluminous postcard is the accordion postcard.
To create such a postcard you will need: thick scrap paper for the base frame, a die-cut scrap knife or stationery knife, transparent plastic for the internal parts, stamens, semi-pearls and other materials for decoration.
We take the template and make blanks for the postcard. We cut out 8 blanks for the base frame from thick scrap paper and 4 from transparent plastic.
Thick paper blank...
...and transparent plastic
We glue the plastic blanks to a paper base. To make the card fold, we make a double crease of about 2 mm on the outer folds. We connect the resulting 4 parts - glue them with glue or use 2-sided tape. Glue the remaining 4 frames on the opposite side.
Next, we connect the internal plastic parts. The easiest way to do this is to use transparent tape. We get this basis for an accordion postcard.
We connect the parts with tape
Basis for an accordion card
Now you can begin the most creative part of creating a card - decorating it! Glue fluttering butterflies and twisted greenery to the plastic. The postcard is ready!
Let's start decorating
Ready!
See below for various templates for making the bases of such postcards:
Using your imagination, you can create all sorts of variants of such folding postcards. For example, with a predominance of children's themes. The number of components may vary.
Clock for the night owl
Asterisks for the astrologer
Birds, flowers, butterflies always look very light and airy on postcards!
Ah, France, Provence!
The Bird of Happiness
For the most beloved!
How do you like this original clock mechanism?!
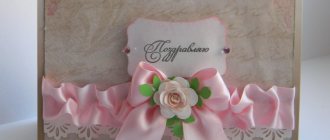
Card for mom
Mom is the main person in everyone's life. And on her birthday I want to congratulate her by giving her something beautiful, unique and from the bottom of my heart.
How to make a card for mom's birthday? We invite you to consider one of the gift options.
A postcard made using the quilling technique looks very interesting. For this craft you will need colored contrasting paper, ribbons and standard tools.
Next, let's get to work:
First, you need to cut out small circles of different sizes from colored paper. After this, each part must be cut from the outer edge to the middle. It is best to do this with curly scissors, then the resulting flowers will look more sophisticated.
Next, you need to form the flowers by twisting the blanks with a special stick in a spiral. Each resulting flower must be secured with glue.
You need to prepare the base of the postcard. To do this, you should bend a sheet of cardboard in the middle, placing the resulting flower heads and determine where they will be located.
Form a phase for flowers by cutting out its configuration from dark-colored paper. Attach the blank to the future postcard with double-sided tape.
From cardboard of any color you need to cut out a rectangle slightly smaller than the card itself. Next, you need to make a bouquet from the flowers you made earlier. It is necessary to glue the flowers closer to each other to create the effect of splendor.
The last stage is decorating the vase. Using a satin ribbon, you need to tie the card with a bow, and glue a strip of paper with words of congratulations in the desired place. The postcard is ready!
Gifts for girls and women
The weak half of humanity loves to decorate their home and create comfort in it. Decorative elements that will help make your home more original and interesting will be a good gift for women. Coffee lovers will appreciate a cup decorated with coffee beans. A coffee heart in a jar looks great (it will also need to be decorated with decorative materials).
Indoor clocks look beautiful, which you can make yourself or decorate purchased ones. Older women will gladly accept a wallet as a gift (especially if you cover it with photographs of people dear to the recipient), a case for glasses, or an original bag. Keychain with family photo.
It's easy to please little birthday girls - you can sew or knit a soft toy, create a wardrobe for it so that the girl can change her clothes. You can make furniture for a doll and a house from cardboard.
Memorable gifts
You can give the school memorable gifts, because the memories of our school years are all that remains with us from the school. You can leave pleasant memories of the class at school. This can be any homemade memorable gift for the school’s anniversary: usually wall newspapers, posters, postcards, volumes with memorable inscriptions, and videos are made. Present ideas:
- Poster or wall newspaper . This could be a themed poster for a school anniversary from the class, for example, “One day in the life of 10A,” or it could be a commemorative poster with photographs of classmates.
Wall newspaper from school graduates
- Album with photographs . A similar gift is an album with photographs. You can find many master classes on creating photo albums: these can be albums with poems and photographs, voluminous albums with various decorative elements.
- Medals, cups and certificates . You can make a souvenir with your own hands for the school's anniversary, for example, a cup with a congratulatory inscription, or a large medal in which photographs of school teachers will be placed. The medal can be made from polystyrene foam covered with gold paper.
Figure of a crow made of plasticine
The process of creating a crow figurine from plasticine will appeal to both the child and his parent. Plasticine is a material that helps develop the dexterity of a child’s fingers, and a crow can symbolize a character from a popular fable. To do this, mold a piece of cheese from yellow plasticine and hand it into the crow’s beak. So, to create a figurine you will need:
Let's start the creative process:
- Roll a small smooth ball from black or dark blue plasticine.
- Make a smaller gray ball.
- Make cutouts in a circle on the gray ball. Parts of gray plasticine need to be cut to form a star.
- Stick the black ball to the gray “star”.
- Make two dimples on the ball using a spatula.
- Make an oval out of dark plasticine and stick it to the star so that the oval forms the body of the bird.
- From dark plasticine, make two elements resembling a drop in shape. Flatten it and cut out feathers on it. Stick it to the body: you get wings.
- Make paws from gray plasticine and stick them to the bottom of the oval. Make a beak and stick it to the bird's head.
- Make several thin “sausages” from dark plasticine and stick them to the bird’s head. They will form a raven hairstyle.
- Using black and white plasticine, make eyes for the crow and place them in the prepared holes.
- Using a spatula, draw hairs on the gray part of the raven.
- Attach a small tail made of black plasticine to the crow.