Elegant ribbon bows have become indispensable accessories at any special occasion. Strict and frivolous, simple and magnificent - they set a special festive mood. They are used as decoration for toys, gifts, hair or everyday wear.
We bring to your attention a selection of interesting options for creating bows using various techniques.
How to create a miracle?
No magic wand required. All you need is a needlework kit. You will need ribbons of all calibers and varieties, braid and cords. There should be a lot of thread (including floss and iris). Shiny pebbles, glass beads, and sequins are vital. Sew-on snowflakes, stars, sparkles and other decorations are definitely included in the list. Always keep needles, a stapler, and multifunctional glue at hand.
Advice from the Snow Maiden: add a good mood, Christmas music and helpers from among family members to the above. Inspiration and flights of fancy are strictly required.
What you need to know to master the kanzashi technique
Beginners need to know several principles of operation and style. The kanzashi technique for beginners looks something like this. There are a lot of varieties of kanzashi flowers, you can make the simplest ones, and then move on to larger ones, or immediately try to take on something more complex, but you still need to know a few simple principles and rules.
Do-it-yourself kanzashi technique is an excellent solution to spend time usefully and interestingly. It's especially nice to give a gift to a loved one. After all, a work of art made with your own hands is always a pleasure to give. And it’s nice for a loved one to receive a handmade gift.
One, two, three... let's make bows!!!
Anyone can make DIY Christmas tree bows. True, you will have to spend a little time and be perseverant. First, decide on the color scheme. Then with the configuration.
Bows for the Christmas tree can be made to match the color of its decoration or, on the contrary, play with contrast. Styles can also be different: classic, Provence, avant-garde or ethnic. Here, as they say, whatever your darling pleases. The main thing is that the crafts are in harmony and pleasing to the eye.
Prepare your workspace and feel free to get to work.
Classic bow for the Christmas tree
A classic DIY Christmas tree bow is the most common option with two loops and two tails. For it, you can take satin, rapeseed, guipure or any other ribbon with or without metallized threads. If you take a ribbon with a rigid structure, you can form wide, voluminous loops, and unusual flat ones will look even more interesting on the branches of the Christmas tree. You can do this step by step:
- Create three loops from the ribbon - two that face up and one in between that faces down.
- Cross the right one over the left one so that the lowered tails are facing outward.
- Drag the right loop down through the center one.
- Pull tightly, adjust the shape of the bow, the length of the ribbon and enjoy a simple, beautiful decoration.
How to make bows for a Christmas tree
The rules are simple. The material is fragile and requires thermal or mechanical treatment. Twists and creases are unacceptable. “By eye” will not work; measurements cannot be avoided.
The thinner the material, the more invisible the thread.
Knots are possible only on the wrong side. The brace points require camouflage.
Beginner designers are advised to follow the diagrams. Regular viewing of master classes will also make the task much easier.
How to tie a bow from a satin ribbon on your fingers
Master Class
So, put the ribbon on the fingers of your left hand, as shown in the photo, and hold it with your thumb.
Wrap the satin ribbon around your fingers twice, like this:
We stretch the end of the ribbon between the middle and index fingers:
We continue to hold the end with our thumb.
Next, pull the end of the tape towards you and slip it under the loop:
Carefully pull it out and tie a knot. Remove the bow from your fingers.
All that remains is to cut the ends diagonally and set them on fire with a lighter so as not to fray.
Standard forms
There are not so few of them:
Note!
DIY wall clocks - the best clock designs for children
- Crafts on a military theme: how to make a tank, a soldier, various patriotic models of military equipment
- What is a Candy bar - decorating a sweet table for a girl or boy for a birthday and New Year
- four-pointed
- pentagonal and hexagonal
- eight
- dahlia
- socket
- triangles
- tie
In addition, they can be simple and composite, multi-layered and of different textures. Fastening - on a knot, clip or elastic band. Choose what you like, combine and share ideas.
Peculiarities
Most people traditionally associate bows with school years and smart first-graders, but these decorations have a much wider application. They complement shoe buckles and decorate headbands, and are tied to the newborn’s “envelope” upon discharge. Bows using the kanzashi technique are no exception. They are made from grosgrain, silk or satin ribbon, hold their shape well and look attractive.
The art of kanzashi is suitable for artists with different levels of training. There are very simple bows that can be made in 1 hour, they are ideal for beginners. More complex products require patience and skill, but the result will look much more impressive. The kanzashi technique is very similar to another popular form of Japanese art - origami, only pieces of fabric are used for folding, rather than paper. Once upon a time, scraps of natural silk were used for these purposes; today, blanks are also made from grosgrain or satin ribbon.
Kanzashi bows differ from ordinary ones in the way they are attached. They are not tied, forming a tight knot, but folded and fixed with an adhesive connection. Depending on the type of product, it can take the form of traditional bows or decorations in the form of applied flowers - miniature or large.
100% chic
A Christmas tree with satin bows looks gentle and elegant.
Here's a classic example. Take a scarlet ribbon 5 cm wide and a white ribbon -2.5 cm. Make 4 scraps of it 15 cm long. Cut the white one into five pieces of the same length. Place the narrow blanks in the middle of the wide ones, and melt their edges with a match or lighter. Bend the fused strips in half to create petals or droplets. Pass the needle through the edges and assemble onto the thread using the usual “forward needle” method. Secure the thread in the middle, and decorate the stitching area with the remaining strip and a large bead.
A more complex version of New Year's bows is like this. Lay a wide brocade (30cm) in the shape of a butterfly. Secure the core with a stapler or safety pin. Narrow ribbons or ribbon (green and red), tie them into a lush multi-layer bow with a loop. Using a basting stitch, attach the loop to the base. Place a Swarovski crystal on the finished product.
A secret: satin makes light and elegant products. If you have conquered it, try making a Christmas tree using satin ribbons using the “kazanshi” technique.
Herringbone
Let's start our crafts according to tradition with the symbol of the New Year - the Christmas tree. Some people prefer to put up a large Christmas tree, while for others such a pleasure is an unaffordable luxury (pets or small children consider it their duty to knock over a forest beauty decorated with lanterns and New Year’s garlands). It’s okay, you can decorate your apartment with a miniature Christmas tree, which can be made from satin ribbons.
#1 Making a Christmas tree from ribbons with children
If there are small residents in the house, they must participate in the decorating process. Plus, creating together is a great time! Every child can make such a simple Christmas tree from a dry stick and various ribbons.
#2 Miniature Christmas tree made of ribbons
And here is a more complex version of the Christmas tree made from ribbons. This craft can be used to decorate not only your home, but also, for example, your desktop. To make it you will need ribbons, a foam cone, a lot of safety pins and a bow for the top. See the picture below for a step-by-step master class.
#3 Christmas tree made of ribbon and beads
You can make a Christmas tree from ribbon, combining it with large beads. This craft can be hung on a real Christmas tree or given to someone as a souvenir. See step-by-step photo instructions below.
#4 Christmas tree in kanzashi style
And here is a mini Christmas tree made using the kanzashi technique. You will have to tinker with such a craft, because Japanese technology is for patient needlewomen. This craft will take a lot of effort and time, but the result will be truly impressive! Petals made from satin ribbons are glued onto a paper cone using glue. Additionally, the finished tree can be decorated with beads. By the way, the Christmas tree does not have to be monochromatic; you can combine colors to your taste.
#5 Christmas tree made of flowers using the kanzashi technique
But here is a very similar craft to the previous one, but there is only one difference: Christmas tree No. 4 is made from individual petals, and this Christmas tree is made from flowers. First you need to make petals from ribbons, then glue the flowers (5 petals each), and only then glue the flowers to the paper cone. See step-by-step instructions with photos below.
#6 Christmas tree hairpin using kanzashi technique
Using the kanzashi technique, you can make various decorations, in particular hair clips. For such a hairpin you will need: hairpin, ribbons, beads. See below for how to make a hairpin.
#7 Herringbone ribbon hairpin
Here is another original way to decorate a hair clip with ribbons. The result is a miniature Christmas tree that will perfectly complement the New Year's image. How to make a hairpin, see the picture below.
#8 Herringbone hairpin
You can also decorate a hairpin in this simple way: with an ordinary narrow ribbon and a star-shaped bead. It’s so easy to make ordinary hair accessories truly festive, and our step-by-step master class will help you with this.
#9 Kanzashi Christmas tree made from ribbon - a souvenir for the New Year
#10 Christmas tree made of ribbons
Look for more Christmas trees:
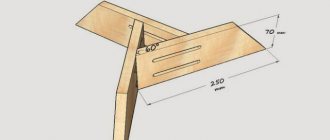
Masterpieces from rep
These tapes are denser and heavier.
However, they hold their shape well and are often used in decoration. Here is the diagram: Pay attention!
DIY New Year's gifts - interesting New Year's ideas for crafts. Master class on creating New Year's souvenirs
- Easter eggs made of beads (interesting weaving patterns) - how to weave an egg with beads with your own hands?
- What to give to a classmate: how to make an unforgettable surprise with your own hands (Video + photo master class)
- Prepare a skein of 20-25 cm (preferably in a non-standard color, for example, polka dots or snowflakes).
- Fold it three times and tie it with monofilament.
- Use cuts of the same texture, 15 cm and 10 cm (for example, orange and light green), do the same actions with them as with the first.
- You will get three layers. Place the large one underneath, behind it, the middle one, and the small one on top. Sew and add swirls from colorful scraps or fringe.
Tip: These DIY ribbon bows can be placed not only on twigs, but also on gift wrapping. It looks bright, original and practically does not wrinkle.
What is kanzashi
Surely, you already guessed that “kanzashi” is a Japanese word (by the way, representatives of the land of the rising sun insist on the pronunciation “kanzashi”) and its literal translation is not known (how similar it is to interesting and mysterious Japan!).
Thus, it is generally accepted that the word “kanzashi” is a composite of two: “kami” means hair and “sasu” means to stick. By adding two terms we get hair accessories. However, such a concept in the world of handicrafts would be too subjective, and the craftswomen decided that kanzashi is much broader, an entire movement of applied art, which involves the creation of unique beautiful jewelry from ribbons, beads and other things.
It is interesting to note that initially accessories using this technique were made by none other than geishas. An invariable attribute of their image, in addition to the chic silk kimonos, were also the unique exquisite flowers they made with their own hands, which strewn the entire head of the captivator of beauty. By the way, in Japan it was generally accepted that these jewelry were used not only for their intended purpose - as decoration, but also to protect their owner from evil spirits.
Nowadays, the kanzashi technique makes much more than beautiful things for hair: accessories for clothing items, interesting home decor elements, and more.
Velvet charm
He is always in fashion. More often it is combined with beads or ornamental stones. Velvet on a flexible base will suit every coniferous fashionista. So, bend the ribbon in half and cut the ends diagonally. (Repeat this twice).
Fasten the resulting elements in the middle, sew them together using a buttonhole stitch, and pass a wire between them. Form a classic butterfly from 10-12 cm and plant it at the bend. Place rhinestones or beads across the canvas.
It's a fact: a Christmas tree decorated with velor bows does not tolerate many toys. In this case, European minimalism will save you.
Tools and materials
When creating bows using the kanzashi technique from satin, silk or grosgrain ribbons, Felt is also needed to create the base: rounded parts are cut out of it, to which the remaining elements are attached.
Additionally, organza or lace can be used for decoration . Among the necessary materials you can also note all kinds of beads, buttons, rhinestones, buckles, holders for beads and centers in the form of cartoon characters.
Here is a list of tools needed to create kanzashi bows.
- Scissors for cutting materials.
- Ruler for measuring segments.
- Thread and needle for assembling elements. To obtain a more accurate and presentable connection, it is better to replace them with a hot glue gun.
- Pins for chopping parts. Experienced craftsmen can cope without them, but beginners cannot do without this auxiliary tool.
- Lighter, matches, candle or fabric burner. Thermal sealing of the edges of the material is mandatory for satin and silk, otherwise they will crumble and unravel. For large volumes of work, it is better to purchase a burner - it cuts off the edge evenly and can be used during cutting. In this case, the metal ruler will act as a stencil.
- Tweezers. It is necessary to hold small parts during operation.
In the kanzashi technique, it is not the external decorations that are important, but the impeccability and purity of the execution of the fabric elements. That is why it is better not to use too many decorative elements.
Air nylon
Nylon tapes are durable, but at the same time weightless. It's a pleasure to work with them. They are especially good in volumetric models. We recommend taking blue or lilac ones, folding each ribbon into a figure eight (6-7 pieces). Then you need to assemble them with a rose and sew them onto the supporting structure.
Note!
How to make a snowman with your own hands from cotton wool for a window, for a kindergarten, from scrap materials
- How to make a snowman from plastic cups: step-by-step photo/video instructions + master class
- DIY wedding decorations, crafts and accessories: photos of original wedding decor
This is important: sew the parts together with monofilament or nylon.
Photo of a Christmas tree decorated with bows
The tradition of decorating a Christmas tree with bows came from Europe and has not lost its relevance. Using this decorative element, you can give your New Year's talisman an unusual, elegant look. But at the same time, you need to adhere to moderation and select suitable tones that will organically combine with each other.
In the photo you can see how to decorate a Christmas tree with bows and balls to make it look elegant and festive.
Golden color creates a feeling of magic that always accompanies the New Year
The combination of white and red remains relevant, but it is important that the decorations are approximately the same size and do not stand out from the general background
The Christmas tree will also look beautiful if you use only bright large bows and garlands
How to decorate a Christmas tree with organza ribbons
Bend the tip of the tape half a centimeter and carefully process it. Thread fishing line or whalebone inside and fold it (so that the edge becomes wavy). Flounces and ruffles can easily replace traditional tinsel. And multi-colored light bulbs will emphasize its brilliance and grace.
Note: you can make a serpentine from small pieces, just hang it vertically, like rain.
Tips for performing the kanzashi technique
You can use fabric for training kanzashi petals. Silk bends and takes shape better than satin, but wallpaper makes stunning pieces.
For the first parts, it is better to choose dark fabrics, because light ones can darken when fired. If the technique consists of sharp petals, it is better to bend everything in one direction to preserve the effect of a living flower.
The best thickness of satin ribbon is thick. Kanzashi made from ribbon, the technique of which is very simple and interesting, is liked by both children and adults. Do not cut ribbons with a knife or dull scissors.
Note!
DIY gifts for February 23rd - a large selection of ideas for creating unusual gifts for Defender of the Fatherland Day
- What to give a 2-year-old boy - a list of the best options for an interesting and useful gift (120 photo ideas)
Papier-mâché - TOP 120 photo reviews of original products. Detailed instructions for beginners on creating beautiful crafts
In this case, the edges will be uneven, which will make the craft not very neat. It is necessary to melt the edges only with fire, since heating on a stove or other method is dangerous.
Decorating the Christmas tree with bows
So, the style has been chosen. It's time to try it on. If spire and star isn't your story, start at the top. Place a voluminous bow on it with falling ends. Next, move from top to bottom in a circle or spiral. Catch and knit on the edges. It's better if it's not colorful. Place the decor evenly: do not concentrate them in any one part. The picture must be complete.
How to decorate a Christmas tree with ribbons
Ribbons are effectively adjacent to the bows on the spruce tree. They can match or differ. The easiest way is to go down diagonally, in a circle or in a zigzag. Diamond weaving will require dexterity and skill. Small ribbons are often knitted at one end, and natural materials such as pine cones, cinnamon and nuts are attached to the other. Small trees are often decorated with ruffles and lace.
There is one “but”: beloved pets, as a rule, are not indifferent to such luxury.
Bow for a girl using the kanzashi technique
In order to make an elastic band with a bow for a little princess, purchase the following components:
- satin ribbon of the main color (choose one whose width is from one to one and a half cm);
- satin ribbon contrasting with the main color (the width should be half a centimeter);
- threads to match the ribbons;
- sewing needle;
- scrunchy;
- tailor's measuring tape or regular stationery ruler.
So, from a ribbon 1-1.5 cm wide, cut two pieces of 20 cm each. Next, fold both edges of the ribbon in the middle with the wrong side inward, let them overlap each other by half a centimeter. Now we sew these edges, but immediately sew them to the middle. Without cutting the thread, we sew another 20-centimeter segment using the same pattern. Pay attention to the seam pitch - the stitches should be neat and small. Then you need to make a couple of stitches along the edge - the thread will be in the middle of the front side.
We continue to work with a thinner tape (the one that is half a centimeter). We also cut off a piece of 20 cm from its total length. We sew it together, as in the previous case with a wide satin ribbon.
At the end of the work, tighten the working thread. Carefully straighten the edges of the resulting bow. And then, while working, try to touch them as little as possible so as not to wrinkle them.
To make the bow look neat from the reverse side, take a piece of thin ribbon, cut about two to three cm and wrap it around the middle of the back side of the product, and sew the ends. You don’t have to do this work, sew the bow to the elastic straight away, but if you still process the back side, it will look neater. Your decoration is ready!
Having tried your hand at such simple works, fantasize and complicate your products, create unique exclusive items. By the way, these will be wonderful gifts or hand-made sales items. May everything work out for you!
New Year's crafts from ribbons
The possibilities here are endless. Turn on your creativity at full capacity.
The obligatory minimum for a self-respecting artist is a Christmas wreath. The rods can be covered, pasted over or intertwined. Then hang pompoms or an openwork snowflake, a beaded bunch of rowan berries and a felt bullfinch.
Embroiderers will surely love the idea of ribbon embroidery. You can create a winter panel, boots for gifts, a festive dial for a clock mechanism.
New Year's bows made of ribbons are a traditional addition to table setting. You can decorate with napkins, cutlery, glasses and, of course, champagne.
Satin bouquets and compositions will bring comfort and a bright atmosphere. Well, a DIY ribbon Christmas tree will become a source of pride for any housewife.
Useful tips
To make your own Christmas tree decorations from ribbons the first time, you need to follow some useful tips:
- When buying tape, you need to take it with a reserve. This is especially true for newcomers to this business.
- There is no need to squeeze the material too much when working, this will lead to unwanted dents on the finished product.
- When working with a glue gun, you must be careful, as glue may drip onto an almost finished decoration, and it will not be possible to remove it.
- The needle must be sharp to avoid tearing the material.
- When processing the edge of the material with a candle or lighter, you need to bring the edge quickly and evenly to avoid unevenness and blackness.
We recommend watching the video:
Recipe from Santa Claus
"Express Christmas tree":
- Thread bias tape onto faux pearl wire.
- Behind each turn there is a pearl, the loops lie alternately in opposite directions.
Ribbon figures will compete with template factory ones. There is plenty to roam here: weightless angels, twisted icicles, strange flowers and miniature umbrellas. Even boring glass balls come to life on a ribbon hanger.
How to decorate a Christmas tree with bows in the year of the metal ox
Preference should be given to heavy textures, as well as gray, golden and silver tones. Metallic reflections and metallic fittings will be in trend. Accepted with artiodactyls is also worth buying. But red, of course, is not held in high esteem: it is better not to tease the totem animal. Also avoid purple, pink, crimson, burgundy and other derivatives.
Fashionable accessories will include chains, buttons, rivets, and especially bells, horseshoes, rings and other attributes of the owner of the year.
Model 2022: photo examples
To conclude the theme of “bows for the Christmas tree,” we present the hit of the season. You will need: massive metallic, glue gun, bell. Divide the ribbon in proportions: 23x2, and 21 cm. Form petals from the first two, and from the smaller one - a knot and bow tails. Gather the petals together and place them on glue, attach the tails. Sew a bell in the center. This accessory is suitable not only for the evergreen guest, but also for the living symbol of the year.
Please repost
0
Festive bow
You will need: red transparent tape with a 5 cm wide pattern, thin red nylon tape, thread, needle, scissors.
Master Class
- Fold the ribbon to form a loop.
- Make a loop on the other side to make a figure eight.
- Straighten the ribbon into a bow shape as shown in the image.
- Pull it in the center with a thread.
- Prepare a thin red ribbon 24 cm long, wrap one end around the center of the bow, and fold the other into a loop.
- Secure the ribbon with stitches.
The festive ribbon bow is ready! I recommend watching this video!
Lush ribbon bow 2.5 cm DIY kanzashi bow