Applying a stained glass pattern
Important reminder: Before starting work, do not smear your hands with cream, wash them well with soap so that fingerprints do not leave marks on the glass or ceramics, depending on what product you are going to paint.
Wipe off any dust if there is any. Degrease the surface of the teapot - wipe with alcohol.
First, the outlines of the image are applied to the teapot. Try not to lean the tip of the tube against the glass itself, but keep it at a distance of several millimeters; your hands should not shake, then the black “worm” will lie exactly as it should.
I don’t always do this, sometimes it turns out unevenly, but I even like it, it turns out to be such artistic carelessness.
This requires skill - try it and judge for yourself how you do.
The white teapot was bought in a store. I wanted to buy a beautiful teapot as a gift, but, to my regret, the one I wanted was not there. I talked to the sellers and asked if they had a bright colored teapot.
There were white or bright, but monochromatic, different sizes, but everything was wrong. Then one of the sellers (there were already two walking around me, as a potential buyer!), seeing that I most likely wouldn’t buy anything, joked: “Buy a white one and have it painted!”, and disappeared from sight.
He had no idea that I would take his words literally! Although, I must admit, this idea came to my mind a long time ago, I did not voice it for the simple reason that they (German sellers) would have taken it as nothing more than a joke.
I think that in Russia I would not have left without a kettle, there are different tastes and preferences designed for the Russian mentality, but when I left for Germany, I did not change my tastes, that’s the whole problem. But let's not get distracted. The shape of the white teapot seemed ideal to me, and the color was perfect for applying a stained glass outline design.
When the black (or other color) outlines of the design are dry, start working with a brush. Work carefully, first applying one color throughout the image where it is needed, then another. Sometimes rest, have a snack, drink some tea, meanwhile the drawing will dry out and you won’t have to worry that it will smear accidentally when you take the teapot (or whatever you have made of glass, for example) in your hands.
When your stained glass painting is completed and the surface of the teapot (or glass object) has finally dried (read on the jars of your paints how long it takes to dry), you can proceed to the last stage - we will subject our drawing to heat treatment.
First, put everything in a cold oven and turn it on (check the temperature and duration on the jars). After the time has passed, turn off the oven and... don't touch anything yet! Go about your business - during this time the oven will cool down, as will the painted items. Only then can you get it. That's it, from now on your stained glass pattern is in no danger, you can wash it by hand or in the dishwasher - whichever is convenient for you!
You can paint white cups, a sugar bowl, and a milk jug with the same pattern as the teapot - then you get a whole set.
You may be interested in:
While at the exhibition, where the work of various masters was presented, I found very interesting works in the enamel technique. Such simple in execution, but at the same time unusual patterns are perfect for glass and ceramic products, be it a bowl, dish or flat panel. Among other things, these motifs can be successfully used to create an applique.
Here you will find ideas for motifs and subjects for drawing using stained glass technique. Mostly the pictures show round glass vases or candlesticks - I photographed this during the holidays at the Christmas market in my city where I live. This is not glass painting, but the photos give an idea of the variety of possible motifs for stained glass painting.
This is a small flat picture framed on square glass, painted with stained glass contours and do-it-yourself paints. These paints can be used to paint any objects made of glass and ceramics; to fix the applied design, the object is placed in the oven for a while.
Ideas for the design and decoration of houses
Try to create a tea house with your own hands - a masterpiece of small architecture, arranging the buildings in a row, making them different in height and width. Decorate the lower parts with high arches, cut out the windows in the shape of hearts - you will get a wonderful gift for your loved one. Play with styles, depicting a Gothic castle, a palace with columns or a fairy-tale house for gnomes. There can be two or even three floors, the façade can be decorated with balconies, the windows can be decorated with patterned shutters or brickwork around the perimeter.
For external design, use acrylic color painting, according to selected templates, or simply impromptu, as your hand suits you. Take traditional designs, blue and white “Gzhel” or “Zhostovo” flowers, oriental ornaments or Japanese hieroglyphs as a basis. In the latter case, first make sure that they are spelled correctly and correspond to the desired meaning in order to avoid embarrassment. You can stick beads and pieces of glass on the walls and get a real stained glass panel, or use grains, beads, woolen threads, felt, even colored sand for prefabricated applications. Almost all materials are perfectly fixed with PVA glue and varnish on top, the technology is simple, go ahead and create the most beautiful and original tea houses with your own hands.
Unusual gifts - a box with a surprise. You will learn how to choose tea as a gift from this article.
How to make a teapot
Usually, the bags come in a standard size. Let's take one as a sample template. And we will make pockets for the bags based on its size.
Teapot cover. The gap between pages is 2 cm.
In order for the folds to be even, before bending, draw along the line either with a knitting needle or with the blunt end of scissors.
In order for the cover to be denser and aesthetically white on both sides, we will glue the inside with cardboard.
The first pair of pockets unfolded. A – pocket height, B – pocket width.
We glue the pockets together as follows:
Glue the first pair of pockets.
We make the second pair of pockets in the same way. The only difference is that the gap between the pockets is not 2, but 1 cm.
We cut out the outer corners of the pockets with a figured hole punch.
To decorate the cover and pockets we need two identical cards.
Let's cut out the template, it is slightly smaller in size than the cover.
Using the template, tracing it, we cut out identical fragments from the postcards.
We cut them along the edges with curly scissors.
Glue to the outside of the cover using a glue stick.
We also paste a fragment cut from a postcard onto the crust.
From the leftover postcards, we cut out rectangular and square fragments with which we will decorate the inside of the cover. If we intend to make an inscription, then for it we also cut out from whatman paper, not necessarily a rectangular fragment, but also a triangular one.
To make it convenient to remove the bags from the pockets without denting the pockets, we will make triangular cuts. To make them the same, we will use a template.
Our teapot will be tied with a ribbon. For this, use a regular hole punch to make one hole in the cover from the edge in the middle.
If desired, you can write inscriptions, sayings or aphorisms about tea and tea drinking on the pockets. You can write them with a helium pen or print ready-made texts, adjusting them to the desired size.
We pass a ribbon through the holes and tie it into a bow.
Another design option for a teapot:
The holiday is approaching - March 8th. And for every acquaintance, relative or friend you can prepare such teapots. Original, practical and beautiful!
Don’t forget to make a teapot for yourself!
| Comments to the news “Master class “Teapot. Scrapbooking"" is already 1:
Interesting on the web:
E-book “The best handicraft master classes.”
After that, click the “Get book” button.
"Masterclasses" 2011-2017
. All articles on the site are copyrighted, copying is strictly prohibited. In case of partial citation, a direct indexed link to the “Masterclasses” website is required.
Attention! It is forbidden to use expressions in the form of obscene and insulting. HTML tags and URLs are not allowed
Three models with separate handle
It is more convenient to make an origami mug from two parts. If the handle is made separately, the container is more durable due to the closed contour. The most popular model of this type is based on a hexagon. For it you will need two squares of paper of the same color: 15x15 and 6x6 cm. The first is used to make a cup directly, and the second, a smaller size, is used to make a pen.
You can “revive” the cups by drawing funny faces on them. Let them create a good mood with their appearance.
A square-shaped mug is an unusual phenomenon, but in origami anything is possible. In addition, this model is best for storing office supplies; it is spacious and stable.
Step-by-step instruction:
- Divide a 6x6 cm square into 5 on one side and into 3 on the other. We cut out a blank for the handle for the mug. We divide the second square, measuring 15x15 cm, into 9 parts.
- Apply diagonal folds as shown in the diagram.
- We assemble the mug along the marked fold lines.
- We distribute the folds along the inner walls.
- We fix them with glue so that the product does not fall apart.
- We fold the blank for the handle in three.
- Glue both parts together.
For the third model of a mug, or rather, a cup, you will also need a sheet of 15x15 cm. The model is folded on the basis of a “Double Square”. The handle is made from a rectangle measuring 15x7.5 cm.
https://youtu.be/UeIqCtwQ-p4
Pattern of a heating pad for a teapot
Here is the pattern of my heating pad (without seam allowances) for a life-size teapot, so to speak:
heating pad for a teapot life-size pattern
It should be noted that there is no universal heating pad pattern for all teapots. Because such dishes are sometimes produced in completely different sizes and bizarre shapes. Everyone has their own. The goal is for the cover to cover the entire brewer and fit on without tension, freely. At the same time, it should not be too large.
So if you have two teapots, one small and the other large, very different in size, then it is better to sew a heating pad for each. Since I have several, but almost the same, only the height is different, I sewed one for everyone; if necessary, I simply bend the bottom inward and the cover becomes shorter.
To sew the simplest one, we’ll make a pattern in the form of a rectangle, possibly with rounded edges to make it look nice. To estimate how much fabric will fit and how it will need to be cut, you need to take two measurements with a centimeter.
The best way to do this is described a couple of paragraphs below, and a formula for constructing a pattern taking into account seam allowances is also given.
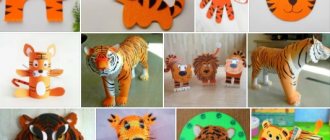
If you want to get an interesting, original kitchen heating pad and are willing to spend extra time, then you can make a heating pad for the teapot in the shape of an animal - chickens, kitties, cows, lions, owls - the scope for imagination is great. You just need to make an additional head (sew to the body, i.e. to the heating pad itself at the top side) and a tail (sew into the seam). This shape is suitable for a cow, cat, dog.
Chicken warmer for a teapot made of fabric with a pattern. If you have time and desire, you can sew such a chicken (or cockerel) with your own hands on a sewing machine. It consists of many small double-sided parts, inside each, even very small element, there is an insulating lining, some parts are simply filled with synthetic wool or whatever you found at home - finely cut unnecessary shreds, insulation from an old jacket, etc. . (no one will ever look inside these fragments, everything will remain inside).
The size can also be reduced or increased depending on the size of the brewer.
If you want to make a slightly different shape of the body, you can, for example, increase the height of this pattern - make the top round or elongated towards the top - this is how you can make a chicken or a sitting cat, the head will be in the middle. If desired, you can sew on the paws or just mark them with a stitch.
Cow hot water bottle under Khokhloma
My first thought was to sew myself a heating pad in the shape of a cow, but then I got lazy, and in the end I decided to make this very simple version of a heating pad for a “medium” teapot.
Warmer for a teapot - a simple pattern made from Khokhloma fabric
First, let's measure our teapot with a flexible centimeter, one measure (X) - from the bottom vertically upward through the highest point (along with the lid!) to the bottom of the opposite side, the second (Y) - a horizontal measure of "diameter" (equator), along the most prominent parts – on one side there is a spout, on the other there is a handle.
Next, draw a rectangle with sides:
X/2 + 2 * 1.5 cm + 2 cm Y/2 + 2 * 1.5 cm + 2 cm.
I have two different kettles. I made the heating pad of such a size that it would be possible to use both teapots. One teapot is taller, so when I use a small one, I turn the bottom a few centimeters (about 5) inward.
On the rectangular pattern, round the two upper corners. You need two such parts.
Master class 4: painting on ceramics and glass with markers
Drawing with markers and felt-tip pens is familiar to all of us from childhood. With the help of special markers for painting dishes with your own hands, you can quickly and easily decorate a ceramic plate with inscriptions, as well as depict a graphic and very detailed picture. We look at examples of such decor in the following selection of photos.
To work you will need:
- Any degreaser and cotton pads;
- Felt pens of different colors and thickness of the rod.
Painting technique
- Before you start painting on dishes, do not forget to degrease the surface.
- The main rule is to try to draw the lines and contours of the drawing with small, frequent strokes - this way you are less likely to make a mistake.
- Also try to draw from the general to the specific.
- Preliminarily outline the contours of the drawing; if necessary, use a template or stencil.
- Most markers dry in 24 hours, do not require burning, and are dishwasher safe.
Friends, today we invite you to make a teapot for tea bags using the scrapbooking technique. Such a teapot can become an original gift card, because you can put tea bags and sweets in it.
Making a teapot is very simple. Now we will show it.
We will need:
- cardboard, thick box or scrapbooking paper,
- scissors,
- pencil,
- sandpaper;
- acrylic paint,
- materials for decoration,
- glue.
1. Print and cut out a template (there are two to choose from) of a paper teapot. Now let's look at two manufacturing options. First: we place the paper template on thick scrapbooking paper (it is colored and double-sided), trace it, and cut it out. The kettle parts are immediately ready for assembly. Don't forget that we need to make one piece for the bottom and two pieces for the sides.
Second option: cut out the teapot parts according to a paper template on ordinary thick cardboard or from a box (then you need to paint them with white acrylic paint after sanding), sand them using sandpaper.
2. If you are making a teapot according to the first option, all you have to do is glue the parts, tint the edges of the paper with acrylic paint to taste, and glue the decorative elements.
If you are making a teapot according to the second option, then now you need to cut out the parts from colored paper or thin paper for scrapbooking again using a template, glue them to cardboard blanks, dry them, sand the edges and tint them with acrylic paint to taste. Add decorative elements.
Tinting is not necessary, but it gives a special effect to the paper. You can decorate the edges in other ways, for example, by gluing ribbons.
3. A little trick: if you attach ribbons to the lid of the teapot and tie them, the tea bags will not get lost while the gift card is on its way to the recipient.
Happy creativity.
Publications on the topic:
"Parrot". Master class on making toys from paper circles Hello, guests of my page! Today I would like to present to your attention a master class on making toys from paper circles.
Santa Claus made of paper cones. Master class on making New Year's crafts Interesting, varied crafts are made from cones. Today I propose to make a funny Santa Claus from cones. The craft is simple.
Master class on making the Snow Maiden from paper napkins with Grandfather Frost. I live in the wilderness of the forest, Behind the distant birch tree, Our house is icy. All forest animals have been my friends for a long time. Dear Snow Maiden.
Master class on making snowflakes from paper strips Winter has come and I immediately wanted to organize a winter holiday in my group. In Kuban, winter is unique and therefore we try artificially.
Master class on painting stones “Strawberry” Nowadays there is more and more diversity in creativity. So I decided to try painting rocks with my children. Stones are natural.
Master class on stained glass painting Stained glass painting has attracted people for a long time. Colored glass, brightly playing in the sun, fascinates both children and adults. Stained glass painting.
Master class “Christmas angel from decorative paper napkins” (middle group) Goal: Creating a three-dimensional figure of an angel from paper Objectives: - continue acquaintance with the traditions of celebrating the holiday of Christmas;.
Master class on fabric painting Napkin for mom. Material: • one piece of white fabric (calico or thick chintz) size 30x30; • stencil “Flowers” (you can choose any...
Teapot stencil for painting
What is dot painting?
Do you know what dot painting is or, in other words, point to point?
This fascinating type of needlework is called creating a pattern on the surface of an object by applying dots of different colors, sizes and shapes. To work in this technique, it is not at all necessary to have artistic talent. It’s easy to get involved in this interesting type of creativity by using stencils for which any design is suitable.
The finished work will cause admiration among others for its unique color transitions, sophistication of ornament and composition. The contour painting technique can turn an ordinary bottle into a beautiful vase or give new life to an old worn cosmetic bag.
Today you will learn how to make a stencil for decorating a round clock. To make it you will need paper, preferably thick. You can also use oilcloth or transparent stationery film. In this case, it turns out to be reusable. Today we will make a template with our own hands from paper.
Decoupage technique
The decoupage technique is a popular and simple system of applying paper or material with a specific pattern to a specific object. Everything you need to get started:
- Glue for decoupage. For some, it may seem too expensive, so you can replace it with regular PVA.
- The base is an object for decoration.
- Material or paper. There are also different types. For example, decoupage napkins are very difficult to use, but are inexpensive - about 20 rubles per pack. Cards on rice or mulberry paper are the most expensive option (on average 70 rubles per package), but are easier to use due to their elasticity and density. And the third option is drawings on plain paper. They will cost approximately 30 rubles. Not stretchy at all, but durable.
- Tassels. It is worth noting that different types of work will require brushes of different materials and sizes. Sometimes it will be more convenient to use even sponges.
- Scissors.
- Acrylic varnish to fix the design. There are many options. It all depends on the material of the product, the future design and the desired amount of financial costs.
- Primer or putty if wooden products are used.
You can take any thing as the main element. What materials is this technique suitable for:
- Wooden crafts. In this case, it does not matter how processed the wood is. Only the time spent and the amount of force applied will change.
- Regular or treated plywood.
- All types of plastic.
- Earthenware or porcelain.
- Glass and its derivatives.
Master Class
Materials
- Pasta of several types: 1) round, similar to flowers or wheels 2) shaped horns 3) spirals 4) shells 5) spaghetti
- Two balls;
- Glue (you can use a glue gun or instant glue, super glue);
- Dye.
Kettle
To do this, you first need to inflate the balloon and tie it tightly. Pay close attention to the size of the balloon you are inflating, because the size of the product itself in the future depends on this.
We choose round pasta in the form of a wheel, for example, we use, of course, raw and dry.
We glue each piece together with glue, completely covering the ball. We leave only the top part - we will close it, like in a real teapot, with a lid.
Let the glue dry so that the entire structure is tightly secured. When everything is ready and the glue has dried, take a needle and pierce the ball. We take out what is left of the ball from the teapot. It turns out this is the design.
For greater density, you can make a stand under the teapot from pasta, which you can glue to the bottom of the teapot.
Lid
Inflate the second balloon and create a shape more like a pear rather than a ball. This is necessary so that the lid is slightly elongated.
We look at the image and repeat the steps of gluing the parts. We try to arrange the pasta so that it forms a uniform shape.
Now we take two figured shells and glue them together, and then glue them to the top of the teapot lid. This will be our handle, by which you can grasp the decorative lid with your hands.
Cover the contour of the lid evenly with spiral vermicelli.
The result that should be obtained at this stage.
Left just a little bit! Patience and desire and everything is already working out! And it will be even more beautiful and delicate! Unusual gifts such as a pasta tea set will decorate any kitchen and bring a touch of coziness to your home.
This is the simplest thing. You need to glue the handle to the teapot and cup from figured shells.
saucer
Before creating the saucer, it is advisable to wrap the ceramic saucer in foil. This will at least help you avoid staining the saucer itself with glue, and will also create the original shape of the part.
As before, we glue all the pasta together in the shape of a saucer.
We frame the contours with shells. The openwork saucer for the cup is ready! Soon the entire DIY gift, made with great pleasure, will be ready.
Cup
The principle of creating a cup is similar to that described above. Therefore, watch and simply repeat.
Now you need to glue the finished and already dried handles to the teapot and cup. And move on to the next final stage of the tea set master class.
Tray
The tray is created as follows. You need to lay something on a flat surface, maybe newspaper, so as not to stain the table with glue.
You can draw clear outlines of the size of the tray on paper and lay out round pasta following the contours, connecting each piece with glue.
You can decorate the edges with shells. Let the glue dry. And then all that remains is to paint everything and the service is ready!
A very beautiful and delicate tea set made from pasta, made by hand as an original gift for a woman! This master class clearly showed how to make interesting decorative things for the home or as a gift for your mother, and will also be useful as an idea for creating similar products with your children or on your own.
Most read:
Christmas tree craft from pasta. Video master class
Pasta crafts for children
DIY crafts for the New Year - snowflakes made of...
How to color pasta for children's food activities...
Organizer for tea bags - what models are there. 10 photos
Every housewife tries to decorate her kitchen both for herself and for her guests. In this article you will see an organizer for storing tea bags. Moreover, some of them are worthy of real praise and a good assessment for their work.
Such beauty with small details.
A good house for tea bags, and you can store different teas in different compartments.
This is something you can do if you want.
For rose lovers, you can add various pictures for beauty.
Round and beautiful box.
An organizer in the shape of an antique stove is a good job.
And many small details were added to this stove.
A beautiful and cute house for tea bags.
The tea wheel is an original work.
Great job on this mill shaped organizer.