Wood is an affordable material that is used in construction, repair and furniture making. Craftsmen offer to make cutlery, household items and various accessories from wood. A good block of wood, from which you can make a beautiful decorative item, is not cheap, but wooden boards, as a rule, are available to everyone and can be found in almost any country house and in any barn. We decided to devote this article to the topic of useful crafts and interior items from boards that you can make with your own hands.
Birdhouse
Please your child with leisure time together or help make a craft for kindergarten or school. Make a home for birds from slats. This could be a feeder or a house to attract birds of different species to the site. The simplest option is a titmouse with a gable roof. You will need rectangular pine boards, screws, nails and putty, a jigsaw, a drill and a hammer. Use a pencil to draw out all the details on the boards. Cut a hole on the front wall - the front door. On the facade and back of the house, make a cut for the roof. Assemble the house by connecting all the parts using self-tapping screws. Seal the cracks with putty. Do not fix the roof “tightly” so that it can be lifted and cleaned by the titmouse. Don't forget to glue the pole inside. Nail the birdhouse onto a long, narrow board and hang it on a tree.
birdhouse
External cladding
We have an article in which we talk about how to build a bathhouse entirely from boards. It mentions this method of external finishing, in which a cleaned and treated board is taken and attached to the frame of the future bathhouse.
In this case, of course, no tongue-and-groove joints are assumed, and in order to prevent cracks from forming and water not flowing into the joint, the boards are mounted overlapping, the first is attached from below, the second above it, overlapping the first. This connection is also called “herringbone”. It is quite suitable for external cladding.
There is a video on the Internet, the author of which talks in detail about his experience of building a bathhouse from a board, and he used wet
lumber because there was no time for drying. The result was not catastrophic. See his methods for yourself (he talks about fastening somewhere in the middle of the video):
Suitable wood species for exterior decoration
Yes, in principle, anything can be used outside if it is thoroughly treated with an antiseptic and impregnated with something water-repellent.
Conifers in the sun, of course, will ooze resin, but this is the inevitability of conifers. Before the invention of antiseptics, these species were preferred because the resin is a natural antiseptic and protects the wood. Now this advantage is equalized with deciduous ones using chemistry.
Deciduous outside, you can also use any that you find or consider necessary.
In addition, the outside of the bathhouse can be painted in any color, or covered with transparent varnishes or azures with any color. So the color of the original wood, and even its texture, may fade into the background.
Pallets
What can you make from boards with your own hands for household needs? For example, pallets, which are great for transporting goods. To do this you will need 6 strong slats. It is necessary to connect them using self-tapping screws, creating a base for the pallet. 4 bars will become the frame, 2 additional ones will serve as a base that will prevent the structure from cracking. The width of the slats will determine the height of the product. Fix several boards, the function of which is to hold the load, across the base to create a structure reminiscent of a bed frame. If you add wheels to the product, you will get a convenient mobile platform for transporting large items.
Some craftsmen create furniture from pallets. The board is sanded, varnished and 2 structures are connected to form a coffee table or bench. This is a great option for a summer house or veranda, children's recreation and games in the garden.
pallet
How to apply lining trim
After any repair, some of the finishing materials remain in any case. Should I throw them away? What if these are clapboard scraps? What can be done with this material, how to apply it, let's look further.
Scenery
Namely, a decorative decoration of the finish. You can make interesting solutions on the walls using leftover wood. For example, these can be decorative additions in the form of planks, baseboards, but the main thing is to join them correctly. You can also make simply interesting accents. For example, if there are a lot of scraps left, adjust them to one size (square if possible), paint them black and white, and decorate one of the areas of the room in the form of a chessboard in which such an element is most acceptable. You can also make other compositions from clapboard scraps by painting the wood in a variety of colors.
You can also decorate certain interior elements. A simple example is a flower pot. You can cut out planks, and they do not have to be the same size. Use glue to plant these planks on an ordinary, nondescript plastic pot. Thus, it will be a wonderful addition to the interior, especially if the flower pot is located in the same room as the clapboard wall decoration.
By and large, it’s enough to turn on your imagination and you can apply the remains in a variety of interpretations. For example, you can make tiny shelves from the leftovers, arranged in the form of a ladder or some set of individual steps. On these shelves you can place small figurines, flower pots and other pleasant interior little things that decorate life.
Another interesting move: you can make a large wall clock from the leftovers. To do this, you will need hands with a mechanism; they can be taken from any old quartz watch. Cut uniform sticks from the clapboard scraps. Conventionally, draw a circle of the required diameter on the wall. The mechanism with the hands is placed in the center, and then the dial is made. To do this, uniform strips are cut out and placed on glue or liquid nails, directly on the wall in the form of Roman numerals. In general, such clocks can suit any interior, since the panels can be painted, making the useful decor unique and interesting.
Now about the baseboards. Using scraps, if they are, of course, more than 10 cm, you can make a plinth. This could be an element of the floor, ceiling or middle of the wall, for example. At the same time, thanks to the composition of such an element, you can also make an unusual solution by painting the parts in different colors. Moreover, if we are talking about a good class lining, which matches each other as much as possible in width. And if there are scraps of eurolining, then even small planks can be laid perfectly thanks to a special lock.
But what if there are very few slats left, and you don’t really want to throw them away, but there is no use for them in the house? It’s okay, you can use them on the balcony, for example, using them as planks for organizing drying clothes. Especially if the entire balcony is lined with clapboard.
And in conclusion: in general, it is better not to throw away decorative elements that remain after finishing work. All you need to do is show a little imagination and it will be a good way to add some zest to your interior. Make it more fresh, organic, interesting.
Ceiling
The ceiling on an open veranda at the dacha is a great idea for using old boards. It is not necessary to pre-sand them and coat them with primer or stain if there is an additional canopy that protects them from moisture (rain, snow). It is enough to fasten them in an even layer end-to-end under a canopy (for example, nail them to a frame fixed around the perimeter of the room) and the rustic ceiling is ready! Complete the design with interesting pendant lamps and wall decor.
ceiling
Using old polyethylene
It is unlikely that the film will be used to equip a new country greenhouse or even a small greenhouse, but individual plants can be placed in spring protective structures - film cubes.
In addition, you can cover anything with old film... the same piles of sand for construction, stacks of bricks or decorative tiles for arranging a summer house, bulk materials, feed. You just have to fold it several times, and even old and worn plastic film will become a good protection against moisture.
Article on the topic: How to make a drywall frame from timber
It will also find excellent use in major construction projects. The film can be used to cover foundations and only poured areas so that the concrete does not dry out and crack in the sun.
In the issue of film, we moved a little away from the main topic of crafts and leftover building materials, but now we are returning to it.
Wall decor
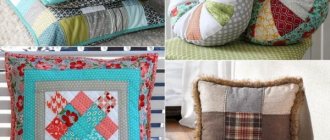
Transform your apartment with a mosaic made from scrap boards. An original panel, laid out on the wall from slats of different sizes, sanded and painted with varnish or paint, will transform the look of your home and give it a zest. The scraps, joined end-to-end in the shape of a boomerang, look beautiful. Creative owners can independently draw a sketch of the panel and lay out the scraps according to color or shape according to the diagram. Be sure to attach the material to a plywood base, and only then to the wall.
panel on the wall
Shelves
The most obvious option for “recycling” old boards. Turn them into a variety of shelves for souvenirs, photo frames, paintings, flowers. Make sure you have a reliable base for fixing the product to the wall. It is better to prepare the slats in advance. Go over them with a sanding machine and coat them with varnish. This way the shelf will look aesthetically attractive, and the likelihood of getting a splinter will be reduced to zero.
shelves
Types and advantages of material
It perfectly smoothed out all the shortcomings of its predecessors and retained the best characteristics, including its attractive appearance:
- Anyone can handle the installation of lining, and the price has become much more affordable.
- This material has become widespread due to its excellent characteristics.
Note. The name “lining” comes from the fact that this type of lumber was originally used to close the gaps between the boards of freight cars.
Now this type of material is so widely used that there are already several basic types of lining:
- Regular or eurolining.
- Block house.
- American.
And in order to start making anything from lining with your own hands, you need to know the main characteristics of each of these types.
Characteristic
In the photo you can see crafts made from the remains of classic lining:
When laid, the house block imitates round logs:
The last type, the American one, resembles a wooden beam:
Note. But in some types and styles of interior, American is also used. However, you need to know when and where it will be best to install it indoors.
Canvas for painting
How to please a creative person or a child with the makings of an artist? Make a stretcher out of the boards for an original painting. Connect 4 slats to form a square base. Fix other blocks on top of them end-to-end, so that the product becomes a canvas for creativity. It can be turned into a 3D picture from plasticine, felt, buttons, twigs, beads - any available volumetric materials.
stretcher for painting
Candlesticks
If you have old wooden planks lying around, turn them into candle holders. Simply attach a small piece of wood to the sanded strip at a 90-degree angle, large enough to fit the candle in the cup holder. We do not recommend using this piece of furniture for practical purposes; wood is highly flammable. As a decor, the product will fit perfectly into an interior in a loft or Provence style.
candlesticks
Towel holders
Attach hooks to a good, strong, thick board, sanded and varnished. Fix the product on the wall, hang towels on the hooks. Complete the design with the inscriptions “Her/His” or “For hands/For face” so that there is no confusion about the purpose and identity of the accessory.
towel holders
Signs with inscriptions
Recently, it has become incredibly popular to decorate homes with various signs and signs. If you have an old wood burning machine in your arsenal, creating your own version of the decor will not be difficult. Cut out signs of the desired shape from the board, and use the machine to make inscriptions on them, for example: “WC”, “Spices”, “Daughter’s room”. Apply varnish and let dry. Attach twine to the back and hang it on a hook on the door or wall. Make signs for your friends, they will surely be delighted with the gift.
welcome sign
Wine shelf
To make a useful accessory, choose a thick board at least 0.7 m long. Cover it with varnish or stain and let it dry. Drive two large nails into the base, opposite each other, so that they hold the wine bottle in a lying position. On top there are two more and so on to place 3-4 bottles on the base. Figure out how to attach the strip to the wall. This is an excellent decor for both a country house and an apartment where hospitable owners live, to whom friends often come for a glass of wine.
wine shelves
Wallpapering
The technology itself is no different from conventional technology. The difference is the preparatory process.
- The surface is cleaned of dust and dirt. The seams should be cleaned especially carefully. If the material was coated with varnish or wax, the top layer will have to be removed. To do this, the lamellas are cleaned with sandpaper.
- Plastic slats are simply wiped with a damp sponge.
- It is recommended to putty the seams between the slats. This ensures at least relative durability of the finish.
- Both wooden and plastic surfaces are primed in several layers. Typically an acrylic latex primer is used.
- Then they begin gluing in the usual manner: apply a layer of glue, start working from the corner from the window, and so on. The photo shows a working moment.
Application of liquid wallpaper
This material is a cross between plaster and wallpaper. The similarity with the first is ensured by the method of application, with the second - a higher decorative effect due to the addition of various components: silk fibers, metal threads, mica and others.
The idea of covering the paneling with liquid wallpaper turns out to be even worse. The material really resembles plaster and fills small gaps, cracks and chips, as it is quite voluminous. It can fill the seams between the lamellas, but the material consumption will increase sharply, and this kind of finishing will cost more than dismantling the lining and preparing the base surface.
The seams between the lamellas can be filled with regular plaster. Then the total cost will not be so high.
The surface of the lamellas must be sanded and treated with a primer that increases adhesion.
How to hang wallpaper on lining is covered in detail in the video.
Repair is an important undertaking that must be approached with all responsibility. And so that the process of interior renovation does not drag on for many years, it is important to carefully think through all its stages, from choosing a style to purchasing suitable building materials. This applies even to such seemingly insignificant corners of the apartment as the balcony.
The importance of quality repairs on the balcony should not be underestimated. After all, this room can be used for a variety of purposes - as an office, storage for seasonal clothes or seams, a recreation area or an apartment mini-garden. In all cases, you can carry out proper insulation and beautiful cosmetic repairs easily and with your own hands, without the help of professionals.
As for the choice of materials for the interior decoration of the balcony, you will have to think carefully. The fact is that not every material is able to withstand the conditions that are usually created in this room. But is it really that complicated? Is it really impossible to take the simplest route and buy a couple of rolls of ordinary wallpaper? This is what we will talk about in today’s article.
Watch
An original watch will become an interior decoration or a wonderful gift for family and friends. To make a wooden slatted clock, cut a circle or square base from plywood. Calculate how many planks will be needed to secure them to the base parallel to each other. If you are making a round clock, fix the longest board in the middle, two smaller ones on either side, and so on until you reach the edge of the circle. The thinner the slats, the more of them you will need. For aesthetics, we recommend pre-processing the material with a grinding wheel and varnishing it. Once finished, the edges will have to be trimmed to give the product the correct shape. It’s easier to work with a square base; there’s no need to “adjust” the outline, and the slats are generally needed to be the same length. Paint the numbers using a stencil and secure the clock mechanism in the center. You can purchase or order it in specialized stores.
original watch
Wood preparation: what work will need to be done
If a person was building a house, then he would definitely have a hand saw at hand, and ideally a circular saw. With its help, you can quickly cut the remaining boards to a single size. In our case, the size 120×120 mm² was chosen, but this is not important.
Folded smooth planks already look good, but you need to give the appearance more color, highlighting the texture more clearly. You don't need any serious tools for this. An ordinary ax and hammer are enough.
Former waste is already beginning to take on a noble appearance PHOTO: youtube.com
Highlighting the structure: a torn surface looks more interesting
Now you can sit comfortably on a chair in front of the block of wood and create the perfect material for decoration. To do this, you need to cut each plank in half along the plane. Having inserted the ax, you need to lightly hit the butt with a hammer. The wood splits quite easily. It is the inner sides of the halves that will be the front sides when finishing.
It is necessary to split each plank in half along the plane PHOTO: youtube.com
Firing and varnishing the structural side of the material
When splitting wood, it is advisable to divide it into several parts. For example, you can separate oak elements from pine. Another group needs to highlight those that have the most beautiful structure.
Pine wood makes sense to enhance the look of the structure with a gas torch.
Article on the topic: How to make a base for a greenhouse from timber
After firing, the drawing began to stand out much more clearly PHOTO: youtube.com
Oak planks should be put aside altogether; there is no need to emphasize their structure. But with the third group of elements it is worth working more intensively. They should be burned with the same burner until they turn black.
Charred wood will add contrast to the wall PHOTO: youtube.com
All elements must be varnished. This will further emphasize the direction of the grain and protect the wood. It is best to choose acrylic varnish - it is safer.
Frames
For mirrors
Decorating a mirror frame with old boards is not difficult for a man familiar with the basics of carpentry. Measure the dimensions of the reflective surface. Attach thin plywood to the base, draw a circle to fit the size of the future frame. Fix the mirror on a plywood board, and fill the empty spaces from edge to edge with saw cuts of various shapes. We recommend that you first sand the surface of the wooden decor, since household members will touch the piece of furniture.
mirror frame
For the chalkboard
Using the algorithm described above, you can make a frame for a chalkboard. An authentic piece of furniture is suitable for those who decorate their home in Provence style and like to write reminders and notes. You can diversify the product's functionality by providing a shelf for chalk.
slate
Cutting board
A kitchen accessory for cutting must be made of a perfectly flat board with a thickness of at least 20 mm. If the surface has bumps, it needs to be sanded with circles of various grain sizes, then the product can be cut out according to a template (you can use cardboard for a pattern). Use a jigsaw to make precise cuts. Sand the edges thoroughly. Treat the finished product with Vaseline oil, allowing it to absorb and dry. Repeat the procedure 2-3 times.
cutting board
Collection by Elena
Rustic Memo Board Paper Included-Reclaimed Wood Memo Board-Message Board-Farmhouse Memo Board-To Do List-Kitchen Organizer
Rustic Memo Board/Command Station/ My sticky notes don't stick and I am always losing my list of things that I need, or forgetting what errands I have to run. This rustic reclaimed wooden memo board is perfect for your kitchen or office to help keep you organized. Details: *Made from reclaimed pallet wood *Black iron pipes *Includes ☆ paper roll ☆ pen *Hanging hardware included *Stained Provincial unless you tell me otherwise Since this is made from reclaimed pallet boards, no two pieces…
DIY Stained Wood Tray
Do you ever see something in a store and think to yourself: I could totally make that... for a lot less than it costs. Well that was me a couple weeks ago. I saw this
Get a key holder that keeps you organized AF.
DIY Vegetable Storage Bin with Dividers – Anika's DIY Life
Great idea for DIY Vegetable storage bin with divider. Perfect beginner woodworking project for kitchen organization! #AnikasDIYLife #woodworkingprojects #woodworking #woodworkingplans #diy #organization
This item is unavailable
Beautiful children tent with black and white ornament. Both sides of the curtain. Stable and reliable. Personal space for your kid. Very stable and reliable childrens tent. Even the most mobile and active children will not be able to break! Children tent can be assembled and disassembled in a matter of minutes. Bring a tent and Your baby will be cozy anywhere. Adjustable angle tents for kids – 6 of the regulations. Right installed one window that you can open or close. It is a real...
From the 'Jordan Dresser Knock-off' to the 'Pottery Barn Knock-Off File Cabinet' here's 20 stunning Pottery Barn décor knock offs and hacks that will save you loads of cash, and give your home that sense of rustic style and expertly crafted chic that you could only ever dream of – until now! (PS – We've...
Decor for Garden on Instagram: “Functional! Boxes for storing vegetables or other things! #storage #storage boxes”
gardendecor: “Functional! Boxes for storing vegetables or other things! #storage #storage boxes”
Sydney Mail Organizer and Key Rack with Slotted Bin – Painted Version
The Home Decor: Sydney Mail Organizer and Key Rack with Slotted Bi…
This item is unavailable | Etsy
Amazing Uses For Old Pallets Love it.
15 Cute Outfits Ideas To Wear This Summer – VivieHome style Simple kaos
New Year's figures
If you have thick small bars, turn them into New Year's decorations. Paint with white paint, draw the face of a snowman or Santa Claus with acrylic paint. Knit a hat for your head and tie a scarf around your “neck”. These bobbleheads will bring a festive atmosphere and fun to your home.
figurines for the new year
Cup coasters
One of the simplest and most useful accessories that can be used in every kitchen. Take a strip 1 - 1.5 cm thick and cut several identical shapes from it. Apply varnish and let dry. The products look beautiful and natural, correspond to the latest trends in the world of interior design and will definitely be used for their intended purpose, and will not end up as a burden in the closet.
cup coasters
Choosing the type of wood for making benches and deck chairs
To determine suitable raw materials, consider the following:
- The use of softwood lumber is contraindicated. Otherwise, when heated, resin begins to release, which sticks to the body.
- The wood must be resistant to conditions of high humidity, constant temperature changes, and have high-quality antiseptic protection. Otherwise, the shelves will rot and quickly become deformed.
- There should be no chips, burrs or other defects on the surface.
- Low thermal conductivity of the material is necessary so that the benches do not heat up and this does not cause discomfort for vacationers.
Let's look at the properties of the most popular breeds that are suitable for shelving in a Russian bathhouse.
Aspen
Very popular among residents of the private sector due to the availability of raw materials and low price.
Other benefits of aspen include:
- resistant to moisture;
- does not rot;
- does not deform;
- has healing properties;
- cleans the air of bacteria and germs;
- does not require maintenance.
It is generally accepted that products made from aspen restore strength, give vigor, and act as a neutralizer of negative energy.
From constant exposure to moisture, aspen can change its shade to grayish.
Thermal aspen
Thermal aspen is wood that has been treated with high temperatures (over 200 degrees) and steam.
Resulting in:
- The humidity of the raw materials has decreased.
- Essential oils evaporated from the structure, which means the material became more resistant to fire.
- Density has increased. Therefore, thermoaspen absorbs less moisture.
Thermal aspen does not swell, does not rot, and lasts a long time. This material is considered a reliable decorative option for finishing bath rooms. Thermal aspen shelves and furniture look very beautiful.
Disadvantages: fragility and high price.
Larch
It is characterized by increased resistance to moisture. Has a strong solid structure. It is chosen for the manufacture of furniture, decoration in saunas, open verandas and gazebos.
Larch is an expensive species, so bathhouses are not often decorated with it.
Alder (black alder)
Alder is the optimal raw material for making steam room benches yourself.
- high strength;
- low thermal conductivity;
- durability;
- wear resistance;
- does not deform;
- does not change color even after years;
- perfectly tolerates temperature changes and constant humidity.
More expensive than linden. The structure is uniform.
To contrast the colors in the steam room, you can assemble racks of light and black alder.
Linden is often used to decorate steam rooms. It has a pleasant aroma that has a relaxing effect on a person.
garden path
To lay out a decorative path on a personal plot, you will need a minimum of time and effort. Select slats of the same length and file if necessary. The path will fit perfectly into a large Japanese-style flowerbed, combined with stones and low plants. Choose a place on a hill so that the tree does not get wet from puddles. Of course, from time to time the material will have to be replaced if it is not treated with special water-repellent agents.
garden path
Making the right wooden bath shelf
If the owner of a summer cottage is a skilled builder, then the construction of the bathhouse and interior decoration is usually carried out himself, according to his own taste.
Since the main place in the room is the steam room, special attention is paid to its design. Regardless of the size of the room, it is important to correctly install the shelves for the bath, choose a convenient shape, reliable material for assembly, and think about the placement of each part.
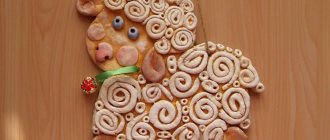
Photo: the walls in the steam room are lined with pressed blocks of sea salt
To simplify the selection of raw materials and avoid manufacturing errors, we suggest reading this article.
Country figures
Boards are an excellent choice for creating garden sculptures for your garden. The products will be simple, but expressive and colorful. Initially, you will need to cut out a frame base from plywood in the shape of the figure you want to create. A good solution would be a snowman or an owl. The simpler the shape (square, circle, triangle), the better the sculpture looks. Saw the planks to the size of the circle (depending on how many you chose for the body) and secure them to a long wooden beam using a screwdriver in layers, in order. Paint with colored paint and decorate with buttons. Don't forget about a secure stand to prevent the figure from falling.
figurine in the country
Remains of plastic, polycarbonate, acrylic
After installing a fence, greenhouse, canopy or even a partition in the bathroom of a country house, such materials may remain, even in the form of scraps. You shouldn’t throw them away, because they are useful decorative elements.
- First of all, various flashlights come to mind. We have studied with you many lighting options for the garden and dacha area, and therefore it will be easy for you to come up with lanterns and lamps made of plastic and polycarbonate, especially if the scraps of materials are colored;
- Colored plastic and polycarbonate with shades in the decor of the fence look very good. Once we already raised a similar topic and even showed you photos of similar fence decorations;
- From small scraps of acrylic you can make boxes and chests, which can perform both decorative and household functions;
- In addition, these materials can fully participate in the production of garden figures. By combining wood, steel, plastic and other materials, you can make garden gnomes, fairytale castles, and various animals with your own hands.
Covering for beds
4 planks fixed along the perimeter of the base of the bed will help to raise the beds at the dacha and make them neat and comfortable. Use metal pegs for secure fastening. Nail old wooden hinges to the boards and connect them to the pegs in these places using a screw. The original and functional lining will be the envy of all your neighbors! It will allow you to keep boundaries in order and easily move around them.
covering for beds - option one
covering for beds - option two
Storage boxes
You can solve the problem of storing potatoes once and for all by putting together boxes for vegetables from old planks. Even a schoolchild can cope with the task. Creating a storage system for an apartment is a more labor-intensive task. The material will first have to be processed with a grinding wheel, sanded and varnished so that the product looks neat and cannot be injured.
box
You can make many functional items from boards. To create some, you will need carpentry skills, but to make the simplest accessories for the kitchen and interior decoration, you do not need specific knowledge, just a handy tool. We hope that a review of our article will help you decide how to use slats to your advantage.
What in the end...
Anything is possible if you implement your ideas carefully and with soul. But knowledge should not be neglected. The main rules that I have identified for myself for working with scrap boards are as follows. The most important thing, of course, is to take accurate measurements. Make holes for fasteners before assembly. It is better to use carbide blades for cutting boards. Well, if you have the opportunity to choose what the self-tapping screw is made of, it is better to give preference to stainless steel, then time will not affect the appearance of the product in any way.
Article on the topic: Which wooden house is better to build from timber or logs
Write in the comments what you think - is it worth spending time tinkering with old materials?