Range of saw chain repair machines
A special machine for riveting chainsaw chains is included in the list of working equipment of specialized workshops. The offered range includes several budget and branded imported models
Riveting machines from the STIHL, Husqvarna and Champion brands are characterized by increased capabilities and a comfortable level of work.
Technically advanced devices ensure high quality riveted joints, saving working time and material resources.
Mowing reel with chainsaw chain for Trimmer Petrol mower attachment beast
When should you sharpen your saw?
The first sign that the blade needs to be checked is increased feed. A good chain fits into the wood even with just a little pressure. The second signal is a decrease in chip thickness.
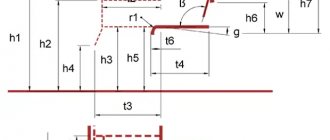
Proper sharpening of a chainsaw chain with your own hands involves maintaining optimal tilt angles:
- rear corner of the top edge – responsible for cutting into the material;
- rear corner of the end blade – cuts chips from the side;
- rake angle - determines the performance of the chain.
The size of the rake angle is formed by changing the slope of the trailing edge. The efficiency of working with different materials depends on the ratio of these indicators:
The initial stage of repair and restoration work
All known methods of shortening a saw chain require criteria for the rejection of damaged cutting and connecting links and a technology-defined sequence of work operations. The cutting and connecting links are mounted with factory rivets, which in all respects comply with current standards.
The use of homemade components is not recommended in any case. Special rivets for chains are extremely rare on sale, so in most cases the problem is solved by installing the necessary parts removed from the dismantled section of the chain.
The feasibility of self-repair
Experts advise riveting and repairing a damaged chain using the technical potential of a service workshop. Despite manufacturers' assurances about the problems and difficulties of self-repair, a significant portion of users prefer to learn techniques for restoring the functionality of saw sets on their own.
- the owner lives at a great distance from service and maintenance points;
- high cost of repair services provided;
- lack of necessary equipment.
Compensating for natural chain wear by shortening is neither advisable nor safe. Operating a saw set with a stretched chain is inevitably accompanied by:
- forced wear of the tire and drive sprocket;
- increased load on the engine;
- increased risk of injury from sawing work of various levels of complexity.
Possible causes of spontaneous saw chain breakage
If the chain on a chainsaw breaks, it is necessary to find out the cause of the malfunction and determine the feasibility of repairing the damaged part or installing a new one.
Typical causes of saw chain breakage are unfavorable external factors:
- excessive tension;
- wear of the guide bar or discrepancy between the shanks and the width of the working groove;
- operation of the saw set with large constant loads;
- overheating of the headset due to lack of lubrication;
- the chain does not match the type of tire and the configuration of the drive sprocket crown.
Chain sharpeners
To restore the functionality of the chain saw tool, a device for sharpening the saw chain links is required. Devices are classified as follows:
- By installation method: mobile;
- stationary;
- factory;
- manual;
Stationary models of sharpening equipment have a rigid mount and are placed in close proximity to the workplace or on a workbench. They are mechanically driven by an electric motor. Mobile devices are distinguished by the fact that the work is done manually, they can be taken with you to a place of work remote from a source of electricity, and also by their small size and weight.
Repair standards and restrictions
Recommendations for fixing ground rivets by electric welding do not take into account changes in the structure of the metal due to even short-term high-temperature effects of the welding arc.
Grinders stuck by welding or heated by an abrasive wheel, the connecting elements of the chain are less wear-resistant, which significantly affects their reliability.
- A tight connection of adjacent links is accompanied by additional loads on the engine and kinematics of the chainsaw.
- The lack of a smooth movement of the chain makes it difficult for the headset to enter the cut; the possibility of kickbacks and other traumatic moments cannot be ruled out.
- “Over-tightened” and loose connections of a repaired chain are more susceptible to breaks when there is a sudden change in load.
The simplest machine in design for repairing chainsaw chains justifies its cost by being able to completely rivet a damaged chain in a short period of working time and restore its performance to a level of up to 90%.
Chinese-made chainsaw chains are essentially copies of European models, so the above repair recommendations are valid for the entire Chinese chain range.
Post-repair restrictions
The problem is that the hastily repaired part contains one or more “weak links”. In this state, the operating time of the headset under heavy loads is significantly limited, and increased demands are placed on the full operation of the lubrication system.
It is possible to use the restored chain in operating mode, provided that the repair was performed by an experienced riveter who has a riveting machine and other special equipment at his disposal.
How to remove a rivet
To change the elements of the chain or shorten it, you will need to disconnect the links as follows. Fix the chain element in a vice and grind off the rivets, namely their protruding parts. To do this, you can use a file or needle file. Make sure that the side parts of the link are not ground down.
This is truly a completely indestructible fishing line for a lawn mower.
It is not recommended to use a grinder, as there is a risk of overheating the links, which will lead to a change in the physical properties of the metal.
Using a beard (what it looks like is shown in the photo below), knock out the rivet.
There is another option for disconnecting the links. This does not require grinding off the rivet heads. Place the link, namely its rivet, over any hole in the metal or over the slightly set jaws of the vice. Next, you should place a tool bit on the head of the rivet and hit it several times with a hammer.
READ Which Oil Can You Use For The Echo Trimmer
Continue to knock out both rivets one at a time, as they are firmly secured by the opposite part of the link. Gradually the rivets will start to come out of the top of the link and it will come apart.
The advantage of this method is that the rivets can be reused as they do not wear off.
Why does the chain slip off?
Many, even the most experienced users of chainsaws, have encountered in their lives a situation where the chain jumped off the guide bar during operation. The most common cause is insufficient chain tension or wear.
In 80% of cases, stretched chain links slip off the teeth of the drive sprocket, and it flies off the guide under the influence of centrifugal force. Although sometimes the problem appears due to the incorrect position of the sprocket relative to the axis of rotation or a loose saw bar on the chainsaw.
Tire installation on STIHL and Husqvarna
Models of chainsaws from the manufacturer STIHL may differ during the assembly process. Step by step guide:
- Open the wing nut and remove the protective cover of the chain sprocket. Turn it on the tire all the way to the right.
- Place the chain on the bar, starting from the top, with the cutting tooth on the top side pointing straight ahead.
- Place the assembled tire on the chainsaw and pull the structure onto the sprocket. Slide the guide onto the shoulder bolt. Close the lid by inserting the pins into the holes provided by the manufacturer.
- Turn the wing nut until the sprocket cover touches the engine housing.
- Turn the clamp bolt forward until the drive links fit into the grooves in the bar. Fully tighten the wing nut.
At the end of the work, check the tension; if the headset does not move well, adjust the tension with the nut. The chain brake must be engaged before starting.
The algorithm for installing a bar with a chain for Husqvarna saws is almost identical. The main difference is that in most models, the tension and adjustment of the location of the headset to the body is controlled not by one, but by two wing nuts. It is rare to find a separate adjustment lever on the outer sprocket guard housing, so tension adjustments should only be made with bolts.
Important! Before starting to work with the chainsaw, you should carefully read the user manual. It describes in detail all stages of setting up and assembling the instrument.
Nowadays there are many models of chainsaw chains on sale. First you need to know which size is suitable for your chainsaw and not make a mistake in purchasing. The second step is to correctly install it on the chainsaw. This is a somewhat labor-intensive process, but if you know how to independently put on and adjust the chain to the saw bar, then the careful owner should not have any problems. We tried to describe in detail the process of installing a saw blade on a chainsaw.
We hope that after reading this article you will succeed the first time. But to minimize the occurrence of problems with your chainsaw and chain in the future, do not forget 3 basic rules:
- If the chain is worn out and sagging, replace it with a new one;
- If vibration occurs during sawing and the cut is poor, monitor the chain tension on the chainsaw;
- Never use saw blades that are defective or repaired by dubious specialists; the health of you and those around you is much more important than saving a little money on buying a new and reliable chain.
Homemade folding saw. Folding travel saw at no cost | Zabroska.rf
Throughout my hiking life, I have tried various saws.
In my opinion, a saw is more important than an ax on a hike. It is easier to fell a tree and cut it into logs with a saw; only it can be used to cut through a blockage or bushes on a river for a kayak to pass through. I mainly used a bow saw made from a bent branch, a chain saw and a hacksaw. The last one is my favorite. I carry a hacksaw in a fire hose case and I seem to like everything about it. But there is a desire to try something new and I have my eye on a folding saw. On the Internet, such folding models are also called folding hacksaws. And there are a great many of them on sale.
Any folding hacksaw has one drawback - it is difficult to cut a log lying on the ground due to the length and angle of the handle. You need to lift the log off the ground.
But the folding saw has a lot of advantages:
- quick readiness (unlike a bow saw, it does not need to be tensioned)
- it is safe for a backpack and boat, does not require a separate cover
- the length of the handle allows you to saw off branches growing high
- It is possible to saw with both hands.
I don’t like the length of the folding wood hacksaws that I’ve seen on sale; they’re all a bit short, especially the cheaper ones. They are called that - loppers or garden hacksaws. Maybe they will work for knots in the garden, but on a hike you will have to cut logs.
There is, however, one worthy model of a folding tourist saw - Fiskars SW 75... I wanted to buy it, but then the prices jumped up. So the idea came to me: why not make a folding travel hacksaw yourself.
Useful articles:
My folding saw "from what was"
I, like many of you, have various Soviet tools, and I usually don’t throw away various pieces, trimmings and remnants of building materials - maybe they will come in handy.
And this is what I used from my supplies.
- Blade from a “Soviet” hacksaw
- A small piece of plywood, 10 mm thick
- A piece of plastic, 5 mm thick
- Bolts (with nuts) M5 – 4 pcs.
- Bolt for clamp M5, 12 mm – 1 pc.
- A piece of a metal ruler, 40 mm long
- Nylon lids for cans – 2 pcs.
- Wood varnish
Tools:
- Bulgarian
- Jigsaw
- Drill
- Sandpaper (40)
- Piece of block
- Brush
Folding hacksaw: manufacturing process
Step 1 I cut off the handle from an old (Soviet) hacksaw using a grinder and rounded the edge of the hacksaw blade.
Step 2 I laid the canvas on a piece of plywood, outlined the outline of the future handle with a pencil and cut it out with a jigsaw. I cut out a second similar part. Here they are - the two “cheeks” of the handle of the future folding travel saw.
Step 3 I inserted a saw blade between the plywood and drilled through them where the future hinge bolt would be installed.
Step 4 I removed one cheek of the handle, brought the canvas into a folded state and outlined it. For the space unoccupied by the folded canvas, I cut out a complex figure from plastic.
Step 5 I put all the parts together and made three holes, through which I temporarily tightened the folding hacksaw structure with bolts.
Step 6 I took coarse sandpaper (40), wrapped it around a block and sanded the edges of the plywood, caulking them.
Step 7 I disassembled the structure and coated the plywood cheeks with varnish. When the varnish was dry, I started working on the latch.
Step 8 As a material for the clamp, I used a piece (40 mm long) cut from a steel ruler.
I made two holes in it, inserted a bolt (12 mm long) into one of them and tightened it with a nut. I placed another hole on the central bolt and marked the place where this bolt will secure the blade.
I drilled the cheek and the hacksaw blade in this place. The latch-lock of the folding travel saw works.
Step 9 I glued thin plastic to the inner sides of the cheeks (cut from jar lids) so that there was no play, because the distance between the cheeks is wider than the thickness of the hacksaw blade.
Step 10 Assembled the structure, tightened it with bolts and nuts. I checked the operation of the folding locking mechanism. Once again, I varnished the outside.
The folding hacksaw is ready. Its folded length is 420 mm, the length of the hacksaw blade is 325 mm and, importantly, it has coarse teeth. I went into the forest to test it!
Dmitry Ryumkin, especially for Zabroska.rf
Basic chainsaw chain problems
Chainsaw users often encounter problems with saw chain tension. It either weakens spontaneously or stretches and falls off. As a rule, these troubles are caused by unit breakdowns. Therefore, before proceeding with the procedure for tensioning the chain links, you should check and eliminate possible causes that could lead to adjustment problems.
The reasons that the chain on a chainsaw stretches may be heavy loads or insufficient supply of lubricant to the bar. Because of this, the saw overheats, the metal expands, the size of the saw element increases, and it flies off the tire. The flow of oil may be disrupted if the pump breaks down, the channels become clogged, or the oil hose breaks.
If you have replaced the chain on your chainsaw with a new one, then be prepared for the fact that it will stretch a little during the break-in period. It is only necessary to check the tension in time so that the element does not fly off the tire.
A chain made from low-quality steel is also quickly subject to stretching.
When the driven or driving sprocket wears out, the effectiveness of adhesion to the chain links decreases, causing the saw element to fly off. In this case, you will have to unscrew the chain drive and change the sprocket. Also, the saw blade of the unit may fly off due to its stretching or deformation of the tire.
If the chain on your chainsaw weakens, then this malfunction may be caused by a failed tension mechanism.
How to sharpen a chainsaw correctly
Timely and competent sharpening of a chainsaw chain with your own hands will not only extend the time of use of the device, but also save effort and time on wood processing. Signs of a sharp chain are the formation of sawdust of the same size and regular geometric shape. To ensure the required level of sharpness of the teeth, any device for sharpening chainsaw chains, for example, any sharpening tool, is suitable. These are a file, a grinder and a machine.
Sharpening with a file
This method is valued for its ability to perform work in any, even field, conditions, the simplicity of the procedure and the absence of the need to use expensive tools. A tool with an exclusively round cross-section will help to properly sharpen a chainsaw chain with a file. To determine the file parameters, you need to know the dimensions of the saw itself, in particular, you need to determine the pitch of the teeth. To process the sawing depth limiter of the guide tooth, the use of a flat variation is allowed.
Templates or patterns will give the desired direction to the tool and can make the work easier. They must be attached to the treated area. After completing the preparatory work, you can proceed directly to the procedure according to the recommendations of specialists:
- Secure the chain to the clamp.
- Align the file for sharpening the chain according to the template.
- Grind the teeth directed in one direction at the selected angle. The latter should not change. The working tool itself should be held so that its tip protrudes only a fifth of its thickness. You need to move the file as smoothly as possible, the movements should not be forceful. The reverse stroke must be done at idle. It is recommended to rotate the tool periodically, which will reduce the risk of wear on the sharpening side.
- The angle of inclination of the tool must be straight, and the sharpening angle of the chainsaw chain horizontally must be sharp, and its changes are allowed in the range from 10 to 30°. The smallest tooth in the row should be taken as a basis.
- Turn the tire over and do the same work for the teeth that go in the opposite direction.
This method also has some minor drawbacks. In particular, a large investment of time is required. But you won’t need to purchase expensive equipment or special tools.
How to sharpen an angle grinder using an angle grinder
When sharpening a chainsaw chain with a grinder, you must constantly monitor the level of sharpness of the chain and treat the drive sprocket with machine oil. At the same time, this method has one significant advantage - you do not need to remove the chain set from the saw, you can visually select the sharpening angle.
Although many owners of chainsaws and motor saws believe that this tool can damage the cutting teeth of the chain, if the work is performed by an experienced specialist, then the risk is minimal.
Only a special disc for working with metal is suitable. Its diameter must be at least 2.5 mm. It is recommended to choose an already used disc with rounded edges.
Before you start sharpening, you need to insert a wedge of wood between the chain and the bottom of the bar to prevent the headset from moving.
Sharpening on a machine
A do-it-yourself chainsaw chain sharpening machine also copes with the task without any problems. There are various options for using such a tool - automatic sharpening or manual sharpening. In addition, you can make a homemade chain sharpening machine.
Electric sharpening machines involve installing a saw into a special hole in the device, after which you will need to select the optimal angle for sharpening the teeth and turn on the chainsaw. After this, the chain teeth self-sharpen on the emery stone. But the best sharpening machines are not cheap, so they are rarely purchased for home use.
Using the machine to sharpen chains by hand is easy. Actions will have to be performed in the following sequence:
- Loosen the screw that secures the chain.
- Set the appropriate level of sharpening, in this case it is necessary to determine the maximum degree of sharpening after visual inspection of the most blunt tooth. The sharpening angles are also selected on a manual machine. You can use special tables that are presented in the instructions for the saw.
- Perform sharpening according to all selected parameters.
- Treat the chain with clean machine oil.
There are 2 ways to use a manual machine for this purpose:
- Sequential involves acting on each tooth one after another, and it is necessary to periodically change the polarity.
- Sharpening every second tooth, that is, the right tooth is sharpened first, and then the left. In this case, no polarity change is required.
Front chain tensioner
Now we’ll tell you how to install a chain with a front tensioner.
- Place the individual components of the chainsaw: engine block, chain , bar, combination key on a surface covered with a soft mat.
- As in the case of the side chain tensioner, we bring the engine block into a vertical position and unscrew the nuts with a combination wrench. Now you can remove the chain sprocket cover.
- The chain tensioner must be turned to the left so that the clamping element moves back from the sprocket.
- Next, we put the chain on the bar, starting from the top of the bar.
- Turn the chain so that the bar is completely on top of it.
- We check that the chain is positioned correctly on the bar. It should be positioned so that the teeth on the top of the tire point forward.
- Next, take the chain and bar, and put the chain on the sprocket, sliding the guide bar onto the shoulder bolts.
- The sprocket cover must be put back on the engine block and the nuts must be tightened by hand. Now the bar and chain are secured and the chain tension can be adjusted.
- When turning the clamping screw to the right, the chain links fit into the groove of the tire.
- Lift the top up and turn the chain clamp screw a little more. As a result, the links should fit into the groove.
- Now you need to tighten the nuts with a combination wrench.
- We check the slack of the chain and the location of the chain in the groove.
- Next, we check to see if our chain is overtightened. To do this, release the chain brake, pull the chain along the mowing line (do not forget about protective gloves). If the chain does not move, then you need to unscrew the nuts again and repeat the above-described manipulations.
- The saw is ready for work. All that remains is to activate the chain brake.
READ How to Put on a Trimmer Strap
A timely and correctly installed chain on the saw will help make the process of cutting wood quick and safe.
Advice from experts
In order for the tool to last longer, it is recommended to listen to the advice of experts on how to properly care for your chainsaw and sharpen the chain. To increase the service life without sharpening, you must follow the following rules in relation to the tool:
- It is necessary to regularly monitor the oil level in the reservoir that lubricates the chain. You need to use a high-quality product that is diluted with gasoline in a ratio of 1:50.
- When sharpening, it is recommended to alternate methods with a grinder and a machine; this will avoid nicks on the metal and then the chainsaw will last longer in working condition.
- Always ensure that the chain is well tensioned while cutting.
- Sometimes you need to change the position of the tire by turning it 180 degrees. This will avoid one-sided erasure.
Quick chain tensioner
To install the chain, you need to use the installation wheel. There is no need to use other tools.
- We prepare the surface for work. It should be comfortable and level. In order not to spoil the surface and the instrument itself, we cover it with something soft, such as a rug. Now we lay out the tire, chain and motor block separately on the surface.
- The next step is to open the wing nut, and then remove the chain sprocket cover.
- Turn the tension sprocket attached to the tire to the right until it stops.
- Gradually place the chain over the bar, starting from the top of the bar. It is important to ensure that the chain is directed correctly. Don't forget about protective gloves.
- Now the chain must be turned over so that the bar is on top of the chain.
- We re-check the accuracy of the location and direction of movement of the chain. The cutter located on the top of the tire should face forward.
- the chain assembled with the tire on the sprocket. In the process, the guide bar is pushed onto the shoulder bolt.
- Now we put the chain sprocket cover back on the engine block, it is important to make sure that all the pins fit into the corresponding holes. Turn the wing nut until the chain sprocket touches the engine housing. The sprocket cap does not need to be fully tightened.
- Next, turn the clamping screw in the direction of the top of the tire. The drive chain links must fit into the tire groove.
- We tighten the wing nut so that the chain sprocket cover sits tightly on the engine block. Close the wing nut until it locks.
- We check visually that the chain is not sagging.
- Next, we check whether our chain . To do this, release the chain brake, pull the chain along the mowing line with your hand (do not forget about protective gloves).
- After this, the saw is ready for use and only the last step remains - activating the chain brake.
Thus, installing a saw chain and bars with a quick chain tensioning device has its clear advantages, namely, that tensioning the chain is not difficult and does not require additional tools.
Signs of wear on a chainsaw cutting edge
The performance of a chainsaw largely depends on the condition of its chain. To use a chainsaw effectively and safely, its chain must be sharp.
The importance of properly sharpening a chain is greater than the importance of using a powerful motor. Intensive use of this tool leads to rapid wear of the chain
In some situations, the need to sharpen a chain occurs several times during one day. The more often blunt teeth are sharpened, the less metal has to be removed during sharpening, thereby extending the service life of the saw chain.
To determine the moment when the angles cease to meet the most effective parameters, it is necessary to take into account several signs:
- The chain begins to stretch and sag slightly. As a result, the functioning of the tool deteriorates and the sawing process slows down. To achieve the desired result, you have to put in extra effort.
- Sawing workpieces of the same size is slower than before. There is a significant decrease in productivity. The work that used to take two hours now takes four hours.
- The type of sawdust changes. They become smaller, sharper and uneven. When the chain is in proper condition, the sawdust appears as rectangular elements that are indistinguishable from each other.
Installing a chainsaw chain on a trimmer: increasing efficiency
First, preparatory work is carried out and the washer is processed. To do this, using a ruler, mark the diameter of the straight line on it. After which the washer is clamped in a vice. In this case, one of the markings should be located upward.
It is advisable to mark the location of the holes with a core in advance, then the drill will not slip while drilling. Holes are created on both sides. It is important to first make them thinner with a drill, and then thicker. As for the diameter of the hole, the chain from the chainsaw should fit well into it.
Next, the chain is threaded through the hole. It is worth placing it inside the washer so that it does not interfere with the drive axis of the trimmer.
You should approach the choice of chain size as responsibly as possible. It needs to be measured accurately. It is important that it is no larger than the required size. Otherwise, the protective shield will fragment, and then a new problem will arise. From the inside, the chain is welded directly to the washer.
At this point, work on installing the chain in the trimmer can be considered complete. A flat washer and a modified washer are put on the trimmer axis, and all this is secured with a nut.
Converting the trimmer head to fit a chainsaw chain
Installing a chainsaw chain on a trimmer
However, there is one thing. When working with a trimmer, some people encounter certain problems. For example, only grass does not always grow on the site. In most cases, there is also a growth of trees, which also grows quite rapidly.
Eliminating it using a fishing line, even a thick one, is usually problematic. It is possible to remove only the tops and then finish the job with pruning shears. Of course, you can rearrange the knives. But everyone wants to do everything quickly and not bother with reinstalling nozzles every couple of meters.
And why do all this if you can use chainsaw chain the trimmer This will require a little effort. You need to prepare a welding machine, a drill and a set of metal drills, a vice, a ruler and a black marker. You also need a concave cup that secures the trimmer blades, a nut, a flat washer and, of course, a chainsaw chain.
Important information
It is always necessary to understand that such work should be performed extremely carefully. This is for your own safety. This article is from the construction magazine samastroyka.ru. is intended purely for informational purposes.
If in doubt, it is better not to use this tool not according to the instructions. All this can lead to dire consequences. But at the same time, some craftsmen still dare to upgrade their trimmers and, as a result, achieve an improvement in their efficiency.
READ No Spark on Trimmer
With such a trimmer, not only will there be no grass and weeds on the site, but also small bushes will no longer seem like an obstacle.
We prepare components
We take out the components of the lawn mower: a metal cap, a nut, a washer and a combination wrench.
Making the markings
We take a metal cap and, using a ruler and a marker, mark diametrically opposite points on it.
DIY chain from a chainsaw for a trimmer
The basis of almost any homemade chainsaw is its implementation as a universal drive that can be used for a large number of different devices. The scope of their use is very wide: cutting stone and metal, pumping water, removing snow, drilling wells and holes, driving, moving various objects, swimming and also flying.
Realize the potential capabilities of a chainsaw using various devices and attachments. Any modification is based on the usual principle of engine power take-off: the device needed by the master is connected to the output shaft. The presence of a massive motor, small dimensions and relatively light weight of this tool, autonomy and the ability to work in virtually extreme conditions make its capabilities truly endless. Of no small importance is the convenient design of the clutch, which protects the components and complex of the saw’s accounting programs from breakdowns and overload. A tool made from a chainsaw is distinguished by its own density, which is why it is used in virtually any position.
Our client is left with homemade products that can be divided into 2.7 groups:
- more ordinary devices (grinder, ice drill, pump, winch, walk-behind tractor, outboard motor, bike, moped);
- more complex mechanisms and objects (sawmill, snow blower, snowmobile, snowmobile, power station, helicopter, solid forged knife).
To produce all available devices, different brands of chainsaws are used. When choosing them, you should take into account the required power for normal rework work. In most cases, the following brands of chainsaws are used for the production of various devices: Druzhba, STIHL, Ural.
Below are different options for devices made from chainsaws. Anyone who wants to can use such ideas in their own household. Using a chainsaw with a small amount of additional materials, perform the following:
WARNING Unsafe! Endless line for TRIMMER. Experience
How to Choose a Handheld Circular Saw for the Home
Good hand-held circular saw. How to Choose a Circular Saw: Tips and Tricks Previously, only the circular saw was seen in sawmills. Today, many private craftsmen are thinking about which model of such equipment to choose. If you also decide to purchase such a device, it is important to consider the main characteristics, including, for example, the power supply. Business date, meeting Most saws are powered from the mains, [...]
Circular saw Whirlwind DP 160
Review: Hand-held circular saw Vortex DP-160/1300. Good household saw This saw is essentially the second one, I left the first one about the first one (this is Zubr ZPD-186-1600 https://otzovik.com/review_3382949.html), but I used this one for the first time. I liked this drink. Comfortable main handle (the handle itself, together with the additional one, is not an integral part of the engine body), rubberized, the rubber layer is not superficial (as […]
Bulgarian. The main system of such a device is a bearing assembly with a shaft. A driven pulley is installed at one end of it, which rotates via a V-belt. A mandrel for cutting wheels is attached to the other. Depending on their brand, such an angle grinder can of course cut stone, metal, brick and other building materials.
Ice drill. For good operation of the device, a high auger speed is not desirable, so you need to use a gearbox made in the form of a worm or V-belt drive. Such a device can be used for the construction of a foundation from helical piles and also for other earthworks.
Water pumps are used for watering the garden, emergency water supply, draining reservoirs, or flooded basements. This attachment is a regular centrifugal pump, equipped with a bracket for attaching to a saw and a pulley that drives the pump turbines.
A winch that uses a chainsaw drive. The traction force of such a device directly depends on the power of the saw motor. With the use of an additional block, of course, it can be significantly increased. This device is equipped with additional parts such as a tap block, hooks, belts, and anchors.
A boat motor made from a chainsaw is a good candidate for purchasing an expensive motor. To ensure movement of 20 km/h, it is enough to install on the boat a homemade outboard motor with a gearbox (gear ratio 2.4:1) and a 3-bladed propeller with a diameter of 210 mm. At the same time, fuel consumption will be only 1 liter per hour of engine operation.
Sources:
https://moy-instrument.ru/instrumenty/kak-pravilno-ustanovit-tsep-na-benzopilu-shtil.html https://samastroyka.ru/ustanovka-cepi-ot-benzopily-na-trimmer.html https: //krrot.net/cep-ot-benzopilu-na-trimmer/ https://mercabadom.ru/cep-ot-benzopily-na-trimmer-svoimi-rukami/
Types of teeth
The most common tooth shapes in hand saws are:
- dagger tooth It is used in classic wide and narrow hacksaws, as well as in bow saws. The tooth is made in the shape of an isosceles triangle, therefore, such hacksaws can work in both directions. The tooth spread is most often equal to 1/3 of the blade thickness per side. The teeth are set apart by the same amount in different directions. This type of setting is intended for cross-cutting, as it is aimed at breaking the wood fibers. A longitudinal cut is almost impossible, since the tooth does not destroy, but splits the fibers, which means it gets stuck between them
- chisel tooth. Made in the shape of an asymmetrical right triangle. Most often, such teeth have axle saws and hacksaws. A saw with such teeth only works in one direction. The top of the tooth is sharpened across the blade, for this reason it acts similarly to a chisel. Used exclusively for cross-cutting, because when cutting longitudinally it clings to the fibers
- oblique universal tooth. It is something in between the two types described above. The shape is an asymmetrical triangle, which is inclined in the direction of the cut, but at a smaller cutting angle. The leading edge is sharpened at 60° to the blade. This sharpening makes it possible to use the saw for both longitudinal and transverse sawing. Circular saws are equipped with these teeth.
- tooth with a sharpened top. It is obtained as a result of additional processing of a dagger or oblique universal tooth by partially grinding down the top of the triangle. As a result, three additional cutting edges are obtained, which make the saw more versatile for implementing different types of cuts.
- Japanese tooth Created in the form of a reverse wedge, that is, the thick part of the saw blade is closer to the workpiece, which means these saws do not need setting. The tooth has a sharp sharpening angle and a sufficiently high height to ensure maximum sawing efficiency
- Jet-cut. Dagger saw teeth are combined into groups of eight, with six of them set apart and the last two not
- wolf tooth A very interesting form, which is used for working with raw wood, the fibers of which are difficult to break.