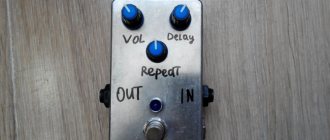
Required Resources
- Actually, the pedals.
Some difficulties immediately arose here due to the fact that I could not come up with a name for such a pedal.
All I knew was that similar things are used in sewing machines. In general, at the request of electric pedal,
I still managed to find what I needed on Aliexpress, and without thinking twice, I ordered 3 pieces. - Controller.
The pedalboard should emulate the operation of a keyboard and, possibly, a mouse to be able to connect to a PC without unnecessary drivers. The Arduino Pro Micro board is perfect for this, which, although it does not have some pins, is made as compact as possible. We go to the same Aliexpress and buy the Chinese version of this miracle. - Wires.
To place 3 pedals under the table, you need at least a four-wire wire at least a meter long. Here, I think, there should be no problems. - RGB LED and button.
The first one is needed to indicate modes, and the second one is needed to switch them. - Well, of course, we need an Arduino IDE, a soldering iron and straight hands.
Steering wheel reupholstery at home
It is quite possible to reupholster the steering wheel yourself. With patience and time. Today in any store you can buy a special set consisting of a piece of leather, a needle and strong thread. This kit for re-upholstering the steering wheel costs around a thousand rubles and is very easy to use.
Braid stitching
- First, we put a piece of leather on the steering wheel.
- We take out a needle and thread a thread with a knot at the end through it.
- The leather from this set already has small holes along the edges of the fabric, so there is no need to pierce anything with a needle. We simply “lace up” the leather steering wheel. The easiest way to “lace”: crosswise. But you can come up with something more creative (“butterfly”, “herringbone”, etc. It all depends on your imagination).
- To ensure that the leather for reupholstering is as elastic and pliable as possible, it is better to warm it up.
Full source code
He's right here
#include #include #include #define modeButton 6 struct pedal { unsigned char type; //0 — real-time mode, 1 — trigger mode, 255 — pedal not assigned unsigned char act1[16]; unsigned char act2[16]; }; struct pedals[7][4] = { { { 255, {255}, {255}}, {255, {255}, {255}}, {255, {255}, {255}}, {255 , {255}, {255}} }, { { 255, {255}, {255}}, {255, {255}, {255}}, {255, {255}, {255}}, {255 , {255}, {255}} }, { { 255, {255}, {255}}, {255, {255}, {255}}, {255, {255}, {255}}, {255 , {255}, {255}} }, { { 255, {255}, {255}}, {255, {255}, {255}}, {255, {255}, {255}}, {255 , {255}, {255}} }, { { 255, {255}, {255}}, {255, {255}, {255}}, {255, {255}, {255}}, {255 , {255}, {255}} }, { { 255, {255}, {255}}, {255, {255}, {255}}, {255, {255}, {255}}, {255 , {255}, {255}} }, { { 255, {255}, {255}}, {255, {255}, {255}}, {255, {255}, {255}}, {255 , {255}, {255}} } }; char ports[4] = {8, 16, 15, 14}; char pos1[4] = {0, 0, 0, 0}; char pos2[4] = {0, 0, 0, 0}; char state[4] = {0, 0, 0, 0}; char oldState[4] = {0, 0, 0, 0}; char wait[4] = {0, 0, 0, 0}; void pedalAction(); char mode = 0; char curPedal; Thread pedalThreads[6] = {Thread(pedalAction, 10), Thread(pedalAction, 10), Thread(pedalAction, 10), Thread(pedalAction, 10), Thread(pedalAction, 10), Thread(pedalAction, 10)}; void setup() { pinMode(2, 1); pinMode(3, 1); pinMode(4, 1); pinMode(modeButton, 2); if (!digitalRead(modeButton)) { //Programming mode Serial.begin(9600); while (!Serial) { PORTD = 0b00000000 + (PORTD & 0b11101100); delay(250); PORTD = 0b00010000 + (PORTD & 0b11101100); delay(250); } Serial.println(F("***Programming mode***")); Serial.println(F("Write the command as ")); Serial.println(F("m - number of mode, one digit")); Serial.println(F(“p — number of pedal, one digit”)); Serial.println(F("c - command, it can be:")); Serial.println(F("\tr - read pedal info")); Serial.println(F("\tw - enter to writing mode and change pedal programm")); Serial.println(F("\te - erase pedal programm and delete it")); Serial.println(F("There are up to 7 modes and 6 pedals per mode can be configured")); Serial.println(F("Mode will be incative if there is no pedal configured in it")); while (1) { while (Serial.available()) { Serial.read(); delay(1); } PORTD = 0b00000001 + (PORTD & 0b11101100); Serial.println(""); Serial.println(F("Enter command")); while (!Serial.available()); PORTD = 0b00000010 + (PORTD & 0b11101100); delay(3); if (Serial.available() == 3) { int curMode = Serial.read() - 48; int curPedal = Serial.read() - 48; char cmd = Serial.read(); if (curMode > 6 || curMode < 0) { Serial.print(F("Mode must be in 0-6. You entered ")); Serial.println(curMode); continue; } if (curPedal > 3 || curPedal < 0) { Serial.print(F("Pedal must be in 0-3. You entered ")); Serial.println(curPedal); continue; } Serial.println(); if (cmd == 'r') { int beginAddress = sizeof(struct pedal) * (curMode * 6 + curPedal); Serial.print("type: "); int curAddress = beginAddress; Serial.println(EEPROM[curAddress++]); Serial.print("act1: "); for (int i = curAddress ; i < curAddress + (sizeof(struct pedal) - 1) / 2; i++) { Serial.print(EEPROM ); Serial.print("\t"); } Serial.println(); curAddress = beginAddress + 1 + (sizeof(struct pedal) - 1) / 2; Serial.print("act2: "); for (int i = curAddress ; i < curAddress + (sizeof(struct pedal) - 1) / 2; i++) { Serial.print(EEPROM
);
Serial.print("\t"); } Serial.println(); } else if (cmd == 'w') { Serial.println(F("Enter type:")); PORTD = 0b00000001 + (PORTD & 0b11101100); while (!Serial.available()); int beginAddress = sizeof(struct pedal) * (curMode * 6 + curPedal); int curAddress = beginAddress; PORTD = 0b00000010 + (PORTD & 0b11101100); EEPROM[curAddress++] = (char)Serial.parseInt(); PORTD = 0b00000001 + (PORTD & 0b11101100); Serial.println(F("Enter act1 in DEC divided by space:")); while (Serial.available()) { Serial.read(); delay(1); } while (!Serial.available()); PORTD = 0b00000010 + (PORTD & 0b11101100); while (Serial.available()) { EEPROM[curAddress++] = (char)Serial.parseInt(); delay(1); } PORTD = 0b00000001 + (PORTD & 0b11101100); curAddress = beginAddress + 1 + (sizeof(struct pedal) - 1) / 2; Serial.println(F("Enter act2 in DEC divided by space:")); while (Serial.available()) { Serial.read(); delay(1); } while (!Serial.available()); PORTD = 0b00000010 + (PORTD & 0b11101100); while (Serial.available()) { EEPROM[curAddress++] = (char)Serial.parseInt(); delay(1); } PORTD = 0b00000001 + (PORTD & 0b11101100); Serial.println(F("Finished, don't forget to verify written data!")); } else if (cmd == 'e') { int beginAddress = sizeof(struct pedal) * (curMode * 6 + curPedal); Serial.println(F("Disabling pedal...")); PORTD = 0b00000010 + (PORTD & 0b11101100); EEPROM[beginAddress] = 255; PORTD = 0b00000001 + (PORTD & 0b11101100); Serial.println(F("Pedal disabled")); } } else { Serial.println(F("Incorrect command, please read help above")); } }; } for (int i : ports) pinMode(i, 2); pinMode(17, 1); for (int i = 0; i < 7; i++) { for (int j = 0; j < 4; j++) { struct pedal *p = &pedals [j];
int beginAddress = sizeof(struct pedal) * (i * 6 + j); int curAddress = beginAddress; unsigned char type = EEPROM[curAddress++]; if (type == 0 || type == 1) { p->type = type; for (int k = 0 ; k < 16; k++) { p->act1[k] = EEPROM[curAddress++]; } for (int k = 0 ; k < 16; k++) { p->act2[k] = EEPROM[curAddress++]; } } } } Keyboard.begin(); } int last = 0; void loop() { int current; if ((current = digitalRead(modeButton)) != last) { if (!current) { if (++mode >= 7) mode = 0; while (pedals[mode][0].type == 255 && pedals[mode][1].type == 255 && pedals[mode][2].type == 255 && pedals[mode][3].type == 255) if (++mode >= 7) { mode = 0; break; } } last = current; digitalWrite(2, (mode + 1) & 0b001); digitalWrite(3, (mode + 1) & 0b010); digitalWrite(4, (mode + 1) & 0b100); for (int i = 0; i < 4; i++) { pos1 = 0;
pos2 = 0;
state = 0;
oldState = 0;
wait = 0;
} delay(50); } for (int i = 0; i < 4; i++) { if (pedalThreads .shouldRun()) { curPedal = i;
pedalThreads.run (); } } } void pedalAction() { struct pedal *pedal1 = &pedals[mode][curPedal]; if (pedal1->type == 255) return; unsigned char *prg; char *pos; if (pedal1->type) { int current; if ((current = digitalRead(ports[curPedal])) != oldState[curPedal]) { if (!current) state[curPedal] = !state[curPedal]; oldState[curPedal] = current; } if (!state[curPedal]) { //act1 pos2[curPedal] = 0; pos = &(pos1[curPedal]); prg = pedal1->act1; } else { //act2 pos1[curPedal] = 0; pos = &(pos2[curPedal]); prg = pedal1->act2; } } else { if (!digitalRead(ports[curPedal])) { //act1 pos2[curPedal] = 0; pos = &(pos1[curPedal]); prg = pedal1->act1; } else { //act2 pos1[curPedal] = 0; pos = &(pos2[curPedal]); prg = pedal1->act2; } } while (1) { if (wait[curPedal]) { wait[curPedal]—; return; } else if (prg[*pos] == 250) { wait[curPedal] = prg[++*pos]; } else if (prg[*pos] == 254) { //Hold the key next to *pos Keyboard.press(prg[++*pos]); } else if (prg[*pos] == 253) { //Release the key following *pos Keyboard.release(prg[++*pos]); } else if (prg[*pos] == 252) { delay(10); //"Skip move", do nothing ++*pos; return; } else if (prg[*pos] == 251) { //Move in the program to a position in cell *pos+1 *pos = prg[*pos + 1]; return; } else if (prg[*pos] == 255 || prg[*pos] == 0) { //End of program, just a stub return; } else { //Send the keystroke Keyboard.write(prg[*pos]); } //Cyclically move forward to the cell after those commands after which this is necessary if (++*pos >= 16) pos = 0; } }
User reviews
After analyzing the reviews from happy owners of gaming paraphernalia, we can come to a clear conclusion: installing equipment in most cases does not cause difficulties. Not only adults, but also children cope with it. It is only important to follow the instructions given and install the appropriate driver. And, of course, stick to a proven model that has collected a lot of positive reviews.
So we figured out how to connect and configure gaming steering wheels and pedals. You now know that this is a simple procedure: connecting devices, installing drivers, making settings in the game menu, adding an attribute to gaming equipment, calibrating the device.
Magnetic sensor
The principle of operation is as follows: a diametrically magnetized magnet is taken, which is securely installed in the moving part of the housing, in our case this is the steering wheel itself.
The sensor itself is attached directly to the fixed housing, which processes the values of the rotation angles of the magnet.
Due to the fact that smart electronics are able to work with a magnet at some distance from it, there is no mechanical wear as such. There is also nothing to break - there are simply no small fragile parts.
The second fly in the ointment is the highest accuracy that is obtained with this approach - the electronics are capable of recording turns of hundredths of a degree! Well, the third no less pleasant bonus is the small size of the magnet and sensor, which makes it possible to install them either in the steering wheel or in the pedals. Actually, that's what they do.
Pros - Contactless operation, no friction and mechanical wear; — High accuracy and registration of the slightest deviations of the steering wheel or pedals; - Small sizes.
Cons - More expensive than resistors and optical encoders.
Finishing the text about the third type of sensors, a feeling of pride involuntarily arises for “ours” - until recently, no one except the domestic company Gametrix
I don’t think I’ve used this technology in affordable gaming devices.
Their sensors are named MaRS
(Ma
gnetic
Resistive
Sensor
,
Magnetic
Resistive
Sensor
) . _ _
Wiring
A little about how a potentiometer works. If you remove the cover from it, you can see that it consists of a curved conductive path with contacts A and C at the ends and a slider connected to the central contact B (Fig. 11). When the shaft rotates counterclockwise, the resistance between A and B will increase by the same amount as it decreases between C and B.
The entire system is connected according to the scheme of a standard joystick, which has 2 axes and two buttons. The red wire always goes to the middle contact of the resistance, but the purple one (3) can be connected to any of the side ones, depending on how the resistance is set.
With pedals it's not so simple. Turning the steering wheel is equivalent to moving the joystick left/right, and pressing the gas/brake pedals is equivalent to up/down. And if you press both pedals at once, they will mutually exclude each other, and no action will follow. This is a single-axis connection system that most games support. But many modern simulators, such as GP3, F1-2000, TOCA 2, etc., use a two-axis gas/brake system, allowing the practical application of control methods associated with the simultaneous use of gas and brake. Both diagrams are shown below.
Single-axis device connection diagram
Connection diagram for a two-axis device
Since many games do not support dual axis, it would be wise to build a switch (pictured below) that allows you to switch between single and dual axis systems with a switch mounted in the pedal module or "dashboard".
Crafts and paper machine applications
Applications are always relevant, and especially relevant when the family has a son or grandson. At any moment, you can sit down and make a cool craft with your child, which can interest him and make him even more inquisitive. There are a huge variety of options for machines in all kinds of techniques. This can be either an applique or a craft; accordingly, the applique will not be a voluminous work, but the craft will become a three-dimensional figurine and can even serve as a toy for the baby.
The peculiarity of such a craft is that it will become a call to get the child interested in the activity that he usually sympathizes with. It is all kinds of models of cars in different techniques that will make it possible to interest a child. Below are several options for machines in different techniques.
Selecting the required devices
Turning a modern PC into a gaming center today couldn't be easier. But how to connect the steering wheel and pedals to the computer? Let's start analyzing the procedure from the very beginning. Namely, from the acquisition of the necessary equipment.
- In order not to rack your brains over connecting a too “abstruse” device, before choosing a specific model, be sure to read independent opinions about it on the forums. If a large number of users note that they had problems connecting a device, then this is enough to change their choice to one with similar characteristics.
- How to connect the steering wheel and pedals to the computer? Your PC must have ports to which you can connect your purchase. The most commonly used are universal USB. If the type of port is different, then it is worth purchasing a suitable adapter along with the gaming equipment. If a webcam, mouse, printer and other devices are connected to the computer via USB, then you need to purchase an additional USB hub (splitter in other words). This will increase the number of free ports so that you can play comfortably.
- And one more important condition - the operating system and characteristics of your computer must support the acquired gaming attributes.
master class with photo and video lessons
On the eve of any holiday, every woman thinks about a gift for her beloved man and wants to please him. Particular attention is always paid to handmade gifts. A candy bar would be a great option at the moment as it is a masculine gift that every woman can give. And delicious sweets will be a pleasant sweet bonus, since it is from them that this wonderful, beautiful and very tasty masterpiece will be created.
Master class: DIY candy steering wheel
This master class is quite simple and will show you how to make such a steering wheel from candies and other materials in a short time. It is enough to arm yourself with everything you need and be patient.
Materials and tools
- Penoplex 2 cm wide and 35 cm in size;
- Black paper;
- Chocolate candies 500 gr;
- Beautiful braid 2 cm wide and 2 m long;
- Stationery knife;
- Scissors;
- Pen;
- Ruler;
- Hot glue gun;
- Cardboard;
- Double sided tape;
- Audi logo sticker;
- Dishes.
The process of making a steering wheel from candies with your own hands
- Start work with the workpiece. To do this, you need to take penoplex, place a large round wide plate of large diameter on it and circle it with a handle. The result is a circle.
- Take a smaller plate, apply it to the center of the circle and trace it with a pen. The width of the indent strip should correspond to the size of the candies, so the size of the plates must be chosen carefully. Often, not only plates are used as a template, but also pots and other containers that are round in shape. The approximate distance between circles will be 2 cm.
- Again, take a larger plate and apply it to the workpiece in such a way as to outline a figure that forms a crescent. It will be located in the middle of the steering wheel. A similar action is performed with the plate, moving 2 cm down.
- A few more details are drawn by hand with a pen so that the blank looks like a real steering wheel.
- Using a stationery knife, cut out a blank from penoplex.
- When the blank for the steering wheel is completely cut out, it needs to be glued all over. To do this, take paper, scissors and a glue gun.
- The entire surface of the workpiece is covered with hot glue, but you should work in stages, because heated silicone glue hardens quickly. The glue must be applied in a thick layer.
- The paper is glued to the workpiece so that at least 1 cm remains at the edges, which will be used for folding. This is done so that the seams are not visible. Excess paper is cut off with scissors.
- Turn the workpiece over to the reverse side and cut the paper 1 cm larger than the size of the steering wheel.
- The ribs of the steering wheel are coated with hot glue and glued one by one with the paper that was left when cutting, 1 cm in size.
- Using scissors, cut out individual pieces of paper in the middle of the steering wheel, leaving 1 cm for the fold.
- After cutting out all the parts from the paper, glue the remaining pieces of paper for folding in the middle of the steering wheel using hot glue. To do this, coat the inner ribs of the steering wheel with hot silicone glue, fold the paper and glue it. All edges must be covered with paper so that the penoplex is not visible. At this stage, one side of the steering wheel is already ready.
- Turn the steering wheel blank over to the opposite side and glue it with paper in the same way as the front part.
- When both sides of the workpiece are glued, you need to pay attention to ensure that all seams and joints are in the middle, because you need to glue the ribbon on top. Thanks to this tape, all seams will be closed after gluing. The tape should also be glued to a glue gun.
- The inside of the steering wheel is taped in the same way.
- When the blank for the steering wheel is completely ready, proceed to the stage of gluing the candies. It is recommended to first place all the candies on the steering wheel blank in order to create the desired composition and visually distribute all the candies on the steering wheel.
- Before gluing candies, it is worth considering that the candies themselves melt from hot glue. Therefore, before gluing the candy to the steering wheel, you need to cut out a small strip of double-sided tape and a strip of cardboard. A piece of double-sided tape is glued to each candy, onto which a piece of cardboard is attached. And only after this can the candy be glued with hot glue by dropping a drop of glue onto a piece of cardboard that is glued to the candy.
- The entire steering wheel is covered with candies, after which a sticker with the Audi logo is glued in the center of the steering wheel.
- The result was a wonderful and tasty candy steering wheel.
You can use various photos that will allow you to recreate such a steering wheel from candies of any brand and model. Any man will like such a sweet gift and will not go unnoticed. You can use any candies for such a gift, preferably those that are preferred by the person for whom this sweet gift is being created.
Leather steering wheel
This is the best option for tuning the steering wheel. A leather steering wheel is stylish, durable, reliable and modern. There is little room for creative thought here: usually they choose black or beige material; recently, colored threads have increasingly been preferred, which give the classic steering wheel the look of a sporty, designer steering wheel. If you really want, you can order your own design on the steering wheel, but it will cost a pretty penny. Reupholstering alone in a car workshop will cost five to six thousand rubles, but you can do such reupholstery yourself, saving significant money.