When empty glass bottles have accumulated, you should not immediately take them to a glass container collection point, or even throw them away.
You can make a real work of art and a useful thing .
For example, it’s easy to use bottles to create a beautiful glass, chandelier or flower vase.
Summer residents and owners of private houses can use them to build fences and flower beds.
There are so many options for where you can put your empty glass bottles. Most of them are quite simple and do not require much effort or special skills .
In this article we will talk about what you can make from glass bottles with your own hands.
Vase and flower pot
A wine and champagne bottle can be turned into an excellent flower vase.
How to make it? Let's proceed as follows:
- Cover with acrylic or regular white paint in several layers.
- If desired, glue some beautiful thin fabric or lace to the glass container.
That's all, nothing complicated. The beautiful vase is ready.
You can also create something like a flower pot .
For this:
- Using a glass cutter, we divide our glass containers in two.
- We seal the upper part with a cork, turn it over and insert it into the lower part of the bottle.
- We pour the soil onto the mesh and we can plant our plant.
How to make glass?
Glass is produced by cooling molten components at temperatures between +300 and +2500 °C, at a rate sufficient to prevent the formation of visible crystals. Sand alone is enough to make glass, but the temperature required to melt it will be much higher.
Interesting materials:
What is the name of small smelt? What is the 180 degree meridian called? What is the name of the meridian from which geographic longitude is measured? What is the name of a month that has 31 days? What is the name of the place where the heroes of the story lived in bad society? What is the name of the place through which all people will pass on the Day of Judgment? What is the name of a place where there are a lot of plants? What is the name of the place where the mountain and hill begin? What is the name of the place where they print money? What is the name of the place where Gagarin landed?
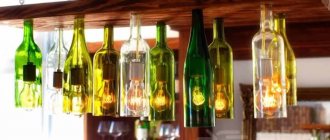
Chandelier and lamp
It’s easy to create an “antique” handmade chandelier from glass wine bottles. Here you will have to tinker a bit.
We can’t do without a cutter, a glass cutter, a lamp with a long wire and several light bulbs:
- We take three bottles and dry them.
- We put on protective gloves and a mask, fix our container in the cutter and begin to operate the glass cutter. During cutting, be sure to rotate the glass container so that the cut is as straight as possible.
- Alternately pour cold and hot water onto the container. This will help to detach the bottom part.
- Place the top part on the sandpaper and scroll for a couple of minutes to even out the edges.
- We begin to tinker with the lamp - we unscrew it with a screwdriver in order to “get” the wires with individual light bulbs.
- Then we insert the wires into the neck and assemble the lamp.
The chandelier is almost ready. To make it even more unusual, you can wind it with wire .
It’s easy to make lampshades from a beer bottle.
Just like with a chandelier, you need to cut off the bottom and then screw the neck into the lamp socket.
To make the lampshades look stylish, they can be painted with acrylic .
Crafts for interior decoration
This group includes all crafts that are intended to decorate the interior of a room. If you want to make your home cozy and beautiful, you don’t have to buy expensive things. You can make them yourself, the main thing is that they look original and beautiful.
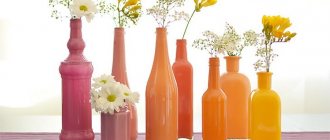
Vase from a bottle
What else can you use an empty glass container for, if not for a vase? Such an alteration will not only decorate the interior, but also a useful thing in the house, and there will be practically no cost for its production. The ways to turn a bottle into a vase yourself are quite varied . For example:
- Paint with special glass paint. This method is well suited for expensive alcohol containers, which initially have an unusual shape: then it will be almost impossible to recognize the bottle in it.
- Crochet, then add the head and paws (they can also be knitted or sewn). You will get an interesting toy in the shape of an animal. You can store small things inside it if the head is removable.
- Cover the glass surface with shiny paper, add decorative beads, and a beautiful vase of flowers is ready. To make the product look like it was purchased, you can coat it with varnish.
We recommend: How to create a wood chipper for heating with your own hands
Original candlestick
Making glass candlesticks has been practiced all over the world for quite some time.
But why shouldn't candles burn in glass bottles? Crafts of this type will not only decorate any interior, but will also protect your home from fire. In order to make a candlestick, you will need to cut off the bottom of the bottle. This can be done using a glass cutter or a burning rope. Many people know how to use a glass cutter, but one problem often arises: it is very difficult to make an even cut, even if the tool is sharp.
It is much more convenient to tie the bottle around the bottom with a rope soaked in gasoline or alcohol. It needs to be set on fire. When the thread burns out, place the bottle in cold water. The bottom will fall off on its own, and the cut will be smooth and neat. All that remains is to clean the edge with sandpaper so that you can’t cut yourself on it, and the exclusive candlestick is ready. You just need to put a candle inside it. The bottle can be decorated with stars cut out of foil, then instead of the usually dim candle light, stars will twinkle in the room.
Furniture supports and legs
Oddly enough, bottles can be used as load-bearing supports or legs for the production of original furniture. Despite its apparent fragility, empty glass containers can withstand quite a heavy load. It can be used in the manufacture of such interior items as:
- coffee table;
- shelves and racks of various types;
- tabletop rotating dishes-trays.
In order to construct a coffee table, you should cut out round holes for the legs in a pre-prepared tabletop. There can be three or more, depending on the size and shape of the table. You need to insert the bottles with their necks up into the holes, and the mini-table is ready. Shelves and racks are made in a similar way. If desired, they can be made multi-tiered, using bottles as supports.
A round dish-tray, which all guests will surely enjoy, can also be made using a regular bottle. To do this, a soft limiter should be attached to its neck (where it begins to expand). It can be an elastic band or simply a beautiful thread wound in several layers. The bottom should be glued to a stable round surface.
A hole is made in the middle of a round dish (you can make it yourself or buy a ready-made one). The dish is placed over the neck and secured with an elastic band or decorative rope at the top. You can place fruits or sweets on it and place it in the center of the table. Since the tray will rotate, it will be convenient for any guest to take everything they need from it. To achieve a greater effect, the entire structure can be painted in the same style.
We recommend: The content of precious metals in microcircuits or how to mine gold
Candlestick
A candlestick is romance and comfort.
Making it from glass containers
is not difficult :
- We cut the container evenly.
- Take a piece of paraffin and melt it in a water bath.
- We put a piece of wick in the neck, fix it there with dry paraffin, and then fill it with melted paraffin.
- We leave it untouched for a couple of hours until it dries, then we attach it to the wall, and we can light candles and immerse ourselves in the romance of a bottle.
Garden lamp
You can make a garden lamp with your own hands. For this you will need a tin can. It is necessary to carefully cut off the lid and secure the container to the pole. Next, the structure should be painted with black paint and installed in the chosen location. The bottom of the bottle needs to be cut off and the part attached to the overall structure. You should put a candle inside and light it.
Candles
Champagne and wine bottles make excellent scented candles:
- Pour several bags of decorative balls into the container.
- We pour fuel for the burner into it. It should be liquid and alcohol based.
- Pour in a little essential oil (maximum 10-15 drops).
- We attach something to the neck to fix the wick. A regular ring of the right size will do just fine for this.
Now all that remains is to insert the candle, light the wick and enjoy the view and aroma.
Menu plates made from bottles
Set for salt and pepper from a transparent glass bottle. Can be used for spices. Can be purchased separately. The cost of 1 piece is 700 rubles. Can be purchased as a set or in larger quantities. I came up with a set for barbecue. Surprise your friends with an original country table setting. Plate length 14 cm, width 6 cm.
Show your imagination! It can also be used as an original basis for a mini-garden, filled with pebbles, decorated with cacti and succulents. Or you can put candles to decorate a romantic dinner! Delight yourself and your loved ones with new culinary discoveries and exquisite table settings!
Menazhnitsa plate with bottle divider
Menazhnitsa-plate made of champagne molten glass bottle of dark green color with a partition. For cheese, cookies, rolls, cakes and other sweets. Plate length 30 cm, width 12 cm. Show your imagination! It can also be used as an original basis for a mini-garden, filled with pebbles, decorated with cacti and succulents. Or you can put candles to decorate a romantic dinner!
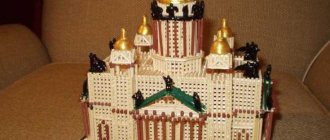
Christmas tree and toys
Using a champagne bottle, you can make a New Year tree that will decorate the interior of your apartment during the holidays.
To do this you will need:
- champagne bottle;
- green satin ribbon 2.5 cm wide, 9-10 m long;
- green satin ribbon 5 cm wide, 1 m long;
- red satin ribbon 5 cm and 1.5 cm wide;
- silver brocade linen 2.5 cm wide for decoration;
- scissors;
- 1 sheet of plain white A4 paper;
- scotch;
- candle;
- matches;
- heat gun.
Next we proceed in the following order :
- Wrap the bottle in paper. The height along the width of the sheet will be approximately up to the beginning of the narrowing of the bottle. Secure with tape.
- Make cuts on top until the bottle expands, lay them carefully, securing them together with tape.
- Cover the wide part of the bottle with five-centimeter tape (we also glue it to the paper base with hot glue), and then glue it in several rows until the narrow part of the bottle begins.
- We cut sections from a thin green ribbon: the first is about 18 cm, and the next ones with a slight increase, as necessary. First glue them to the paper into the bottles. We let the ends of the tape overlap at an angle.
- Now let's start creating Christmas tree branches. To do this, we cut 10 cm sections, there are a lot of them and the quantity depends on the size of the bottle (about 7 rows of 10 pieces each). To prevent the ribbon from fraying, the edges can be sealed on a candle.
- Glue the first row of branches, retreating 2 cm from the edge of the bottle. Attach the second and all subsequent rows in a checkerboard pattern, retreating up 2 cm each time.
- Cover the area where the top row is glued with a silver brocade ribbon and decorate.
If there are a lot of bottles collected for the New Year, you can use another way to make a New Year tree:
- We place the first glass container round tier on the floor.
- We place a thick round cardboard or thin plastic tray on the bottles. The diameter of such a stand should be slightly smaller than the diameter of the bottle tier.
- We put the second tier. And so on.
You see, it’s nothing complicated, but the Christmas tree looks grandiose.
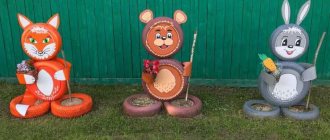
to create interesting, funny figures from small glass bottles .
A light bulb or plasticine can serve as the “head” for such a figure. We attach it with superglue, and then paint or draw a face with a pencil or acrylic.
An airplane is another toy that can be easily made from glass containers.
But it is still better to use plastic for this, so that there is no danger that the child will get hurt.
Master class No. 2: Painting a bottle with contours
Now let's move on to a more complex and time-consuming, but very beautiful way of decorating bottles with your own hands - painting with contour three-dimensional paints. With their help, you can draw patterns and ornaments in an ethnic style, apply complex and simple designs, or write beautiful inscriptions, monograms, initials (photo below).
You can also draw with contour paints using the dot painting technique as in the photo below.
And in combination with stained glass paints, contour painting will turn into stained glass.
Materials: any alcohol-containing degreaser, cotton pads and swabs, a needle and contour paints. If desired, the painting can be supplemented with sparkles, as well as acrylic and stained glass paints, as in this master class.
Tip: if you don’t have contour paints or drawing with them seems difficult to you, then you can paint with the help of improvised means: a toothpick, a needle, a cotton swab or a thin brush.
Technique:
- First we need to come up with an idea and prepare a supporting sketch. You can find it on the Internet and print it in a suitable size or draw it yourself. You can also use a homemade or ready-made template or stencil.
- If you are confident in your sight drawing skills, you can skip this step. If you are a beginner, then it is better to transfer the desired picture onto the glass, that is, outline the main details and lines of the picture/pattern. To do this, you need to: draw or print a picture, cut it out (you can roughly), then tightly paint over its reverse side with a soft pencil, and then attach the picture with the shaded reverse side to the glass and trace all or only the main parts of the drawing with the same pencil. There should be barely noticeable but useful lines on the bottle. If the image is not too complex, then it is enough to outline the main details directly on the bottle.
- Now you need to degrease the glass and wait until it dries.
- If you wish, you can cover the entire bottle with colored acrylic paint and wait for it to dry completely.
- Let's start painting: we trace all the contours, from time to time cleaning the tube spout with a needle and, if necessary, correcting flaws with a cotton swab moistened with water. It is better to start drawing with large details.
- If you draw with a contour using the stained glass technique, then the contours should be closed, and the stained glass paint should be in contact with them. Also make sure that all parts are painted completely without overpainting, otherwise the coating will not last long. Filling the contours with stained glass paints is possible only after 2 hours, but you can speed up their drying with a hairdryer;
- In the technique of dot painting with a contour, the main thing is to maintain the same and minimum spacing in one line of the drawing and maintain the same diameter/volume of dots (in one line).
Tip: Practice drawing outlines or dots on paper first. Remember that you need to press the tube with equal force.
- When the drawing is ready, all you have to do is dry or wait for the paints to dry, following the manufacturer's recommendations. Most often, painted glass is baked in the oven at a temperature of 170 degrees for about 30 minutes or left to dry naturally for a day.
We invite you to watch the following video tutorial, where you can see how to decorate a bottle with your own hands using contours using a chiseled technique.
Here are other interesting ideas for painting bottles with contours for your inspiration.
Decor
With the help of an ordinary glass bottle you can transform the interior of your home beyond recognition .
Containers of a non-standard shape, standing several in a row or assembled together, will decorate a dining or coffee table.
Bottles of different colors, displayed in a row on the kitchen windowsill, will add an unusual note to the ordinary design of the environment.
All this in itself complements the apartment interior. However, there is a great variety of DIY bottle decoration.
You can pour salt colored with crayons inside. It looks unusual and elegant.
Another way to decorate an empty bottle is to cover it with twine or burlap . If desired, you can also use beads and other decorative elements.
You can decorate a glass bottle using decoupage and acrylic paints. Here a limitless field opens up for the flight of your imagination.
In this way you can create beautiful vases, dishes for bulk products and candlesticks.
Natural ingredients
Handmade wine or lemonade dishes deserve some interest. The first thing that comes to mind is a vase for a modest bouquet. A simple transformation using painting and lace will suffice. By inserting several of these transparent or multi-colored flowerpots into a wooden frame, you will get a non-trivial object of decorative art.
A variety of types of kitchen utensils, from mugs and plates to cans for bulk products, will ensure repeated circulation of glass containers. The best ideas will come from imagination and a selection of examples.
A fragrant candle with the scent of coffee, spices, or whatever you want is an easy to implement idea. The main thing is to know simple solutions for dividing such inventory into components.
The most basic is using acetone, rope and cold water. If you follow the instructions provided in the video step by step, everything will certainly work out.
Get a chic chandelier made from glass bottles for a brutal room. It will take some time to collect and store containers of different shades, but the result is worthy.
If in the garden, instead of paradise nightingales, crows tear at the throat or the cherry tree is attacked by insolent sparrows, the situation will be corrected by the music of the wind from blue glass.
Durable wooden shelves will serve as appropriate equipment for the garden. And for their reliable existence, former wine storage facilities will work as a fastening support. It is enough to make holes slightly larger in diameter than the neck itself.
When building a house, this raw material is sometimes used as decoration. It is important to remember that a bottle placed horizontally in the masonry must be filled or have a stopper. Otherwise, there will be a wild whistle during the wind.
And also, there is a trend in naturalistic architecture, where small round houses are built entirely from this raw material. And some artists build fences and residential cottages, but using cement and frame structures. Such components are cheaper than bricks, and the cost is much lower.
You can not only save the environment, but also, at a minimum, get functional little things or add zest to the local area, and, at a maximum, get living space or additional structures.
Terrarium
Almost any glass bottles are great for creating various original flower beds, including a home terrarium.
It can be made hanging. Then it will seem as if the bottle is part of a flower that grows with him.
Making a terrarium is not difficult. You just need to cut a little glass along the bottle, add soil and plant a plant in it.
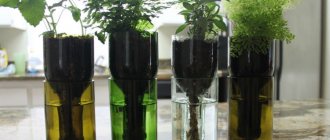
Automatic watering system for plants
It turns out that glass bottles are useful for caring for plants. You can use them to make an automatic watering system. To do this, you need to fill a container with water, turn it over, and stick it into the ground next to the crops. Within a few days the soil will be moist and the plants will receive the required amount of liquid.
Glass bottle house
Another use for empty glass containers, which at first glance seems impossible, is the construction of bottles, including an entire house. After all, if you think about it, such a structure is not only environmentally friendly, but also cheap.
In addition, glass is a durable and strong material , and thanks to the cavities in the bottles, the house will have a favorable temperature regime.
Of course, such construction is possible if you have a very large number of bottles and time to build the walls yourself.
The bottles are laid out horizontally, similar to laying bricks. Considering that the bottles have a smooth surface, to increase the strength of their adhesion to the cement mortar, it is recommended to lay a polymer mesh every 2-3 rows.
The walls of the bottles should not touch each other. As the height of the wall increases, the thickness of the mortar is gradually reduced .
It is important to note that it is better to make the foundation in the traditional way - from concrete or brick, and starting from the first floor, use bottles. You can also try the tire foundation , which we talked about here.
A house made of such material will not collect dirt and dust on the walls, and inside it, thanks to the transparency of the walls, will be incredibly beautiful.
Decoupage bottles
To decorate a bottle using decoupage technique you will need:
- - bottle;
- — three-layer napkins with the desired pattern;
- - white acrylic paint;
- - acrylic transparent varnish;
- - scissors.
Progress:
- 1. It is necessary to wash and degrease the bottle well.
- 2. Paint the entire bottle with white acrylic paint and let dry.
- 3. Divide the napkins into layers.
- 4. Cut out the desired piece of the napkin or you can use it entirely.
- 5. Carefully apply the napkin to the bottle and cover with acrylic varnish.
- 6. Let the bottle sit and dry.
When covering a napkin with acrylic varnish, you should act carefully but quickly so that bubbles do not form on the surface. You can also use various ribbons, lace, sparkles for additional decoration...
Fences and flower beds
A flowerbed made from glass containers looks very original. But you'll have to sweat a little.
We warn you - you need a lot of glass containers:
- The basis of our flower bed will be car tires. The lower part of this base is filled with cement mortar.
- Place the first row with the necks towards the center. We do the same with the rest of the rows, but gradually we shift the bottles so that they are laid diagonally vertically. All voids must be filled with cement.
- We fix the necks of the very last row from above with the same cement.
Now we add soil and create our unusual flower bed.
From glass containers it is easy to create a fence that separates the garden from narrow paths or one plant from another:
- We dig a ditch.
- We place the bottles next to each other.
- We compact the soil around them.
Useful devices
Homemade items made from glass bottles can be not only beautiful, but also useful. There are several options for useful devices where this cookware is used. For example:
- unbreakable thermos;
- mug;
- bird feeders.
We recommend: Wood chipper: DIY chipper
Homemade thermos
To make a thermos, you will need a rectangular block of polystyrene foam and some foil (you can use food foil).
The bottle must have a screw cap. The foam is cut into two parts. A hole is cut out in the lower part to the size of the bottle without taking into account the neck. The upper half will be the lid; you should also cut a hole in it for the neck with a stopper. The bottle is covered with several layers of foil, then fixed inside the foam using the same glue. The properties of foil have been known for a long time: it retains heat well, and the foam lid enhances the effect. The outside of the foam can be painted with paints to give the craft an original look.
Of course, a homemade thermos is in many ways inferior to a purchased product, but it is simply irreplaceable in situations where there is a risk of breaking it. Even if this happens, you can always make a new copy at no extra cost.
Transparent mug
A homemade mug can always come in handy.
If you decorate it beautifully, it will not only serve its intended purpose, but will also help create a unique style in the kitchen. In order to make it, you need to cut off the neck (the upper round part) and the bottom about ten centimeters high from the bottle. The cuts should be cleaned well. The round part of the neck should be glued to the resulting glass instead of a handle. To decorate a mug, you can only use special paints that will not harm human health, but even without decoration, the product looks very original.
Dining room for feathered friends
To make a convenient feeder for your feathered neighbors, you should attach a bottle of food to a wooden base with the neck down. You need to place a saucer almost right under it. Thanks to this design, the grains will always remain dry and be added to the saucer as needed.
Such feeders can be hung in your garden. It’s good if children take an active part in making and placing them. Such crafts will not only help birds survive the harsh winter, but will also be a good visual aid for instilling in children a sense of responsibility for a living creature.
If you show a little diligence and use your imagination, then any glass bottles can be turned into designer items. And if you do this professionally, it will provide you with good additional income.
bottle fence
A fence made of glass containers - what could be more unusual?
We create this wonder like this:
- We dig longer wooden poles into the ground.
- We make holes in the bottle bottoms. They should be 1 cm wider than the pole.
- We put the bottles on the poles and secure them with a strap on top.
For the fence, it is better to use containers with different colors and shapes - this way everything will look even better and more interesting, as in the photo:
Borders and borders for flower beds
Just stick the bottle into the ground, neck down, and your unusual flowerbed edging is ready! This way you can make zoning in the flower garden and “split” the territory into several parts. Just don’t let children and pets run around at breakneck speed in the “bottle” area. A strong impact can break the glass and cut the limbs of pets and restless children.
Furniture
Bottles are quite suitable for creating shelves . We make holes in the boards and connect them with bottles.
You can hang coats and hats on glass containers .
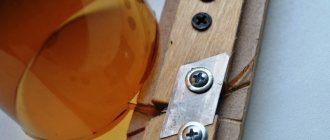
It will look great as a hanger:
- Take a container with a neck as long as possible.
- We cut at the desired angle.
- Glue the neck to the base nailed to the wall.
To make a table from glass containers, we drill holes in the board that will serve as a tabletop for necks of the required diameter. We insert our bottles into them.
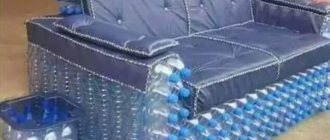
Glass containers even make a good chaise lounge.
We glue the beer bottles to the metal frame with industrial glue and we can relax.
Unusual decor
If there is a lot of free space on the site, you can decorate it with interesting decorations. To do this, stick a wire into the ground and hang bottles on it. To make the composition more attractive, the containers should be painted in advance with bright colors.
Note!
Such decorations will last for many years and will always look original and fresh.
Winter New Year decoupage
Decoupage is the creation of a beautiful composition from glued paper with interesting images on the surface.
We will “decoupe” the bottles in the New Year’s style like this:
- Take a special napkin with your favorite image on the theme of the New Year holidays. We cut out the picture and glue it to the glass container with PVA. For bottles you need to use a three-layer napkin.
- Apply droplets of glue to the top of the glass container with a pistol.
- Take a sheet of paper and wrap it around where the napkin is glued. Secure the sheet with tape. We do this so that our New Year's plot does not get splashed with paint.
- Spray some spray paint on the top.
- Remove the sheet of paper.
All is ready.
Bottle decor with craft paper
If you decide to give a bottle of alcohol as a gift, there is a very quick and economical way.
- Take craft paper.
- The length should be 10-15 cm longer than the bottle. The width of the sheet should wrap around the bottle at least 2 times.
- Wrap the bottle.
- Fold 5 cm of kraft paper along the bottom of the bottle.
- Tighten a ribbon or jute rope around the neck of the bottle.
- Use the same rope to tie a tag with wishes or a flower.
- Form a bow from the rope.
Nicely straighten the paper above the tied rope.
How to cut a bottle at home?
You can trim the bottle yourself, cut off the neck or bottom in several ways:
- Use a special glass cutter or machine designed specifically for working with glass bottles.
- Use heating with boiling water or flame.
- Use a burning thread or nichrome wire.
To cut the bottle crosswise, you can use the most ordinary thread . Just soak it in alcohol.
You need to do everything like this:
- Wrap the cut area with a thick layer of thread.
- We put on gloves and safety glasses. We wet the resulting winding in alcohol and ignite.
- Let it burn for a minute, and at the same time twist the bottle 2-3 times around its axis. At the same time, hold the glass container horizontally.
- Simmer and place in cold water.
All. Due to the sudden change in temperature, one part of the bottle separated from the other. the cut with sandpaper .
Cutting a bottle lengthwise is a little more difficult, and it is advisable to use a special glass cutter for this purpose.
It may not work out right away. You need to be patient and the work will go like clockwork.
If you need to make a hole in a bottle, a drill and a diamond glass drill bit will help you. You can purchase it in specialized departments of stores. When drilling, be careful so that the smallest fragments do not injure you.
20+ Amazing Glass Bottle Ideas You Can Make Yourself
If you have a lot of glass bottles at home, then you can use them to make amazingly beautiful things for your home.
Attention, if you are under 14 years old, do not attempt this without parental supervision!
Be careful when working with glass!
3 ways to cut a bottle shapely
1) Use special glass processing tools
If you can buy special glass cutting tools, then use them! And if you don't want to spend the money, there are some clever ways to cut glass using other methods.
2) Glass cutter + cold water
Mark a line along which you will cut on the glass and draw along it, pressing lightly with a glass cutter.
Heat the bottle. Heat the line you made with the glass cutter. You can use a small candle or a small butane torch. Focus the heat directly along the score line and rotate the bottle constantly to achieve even heating.
Place the bottle in cold water. After heating the bottle for 5 minutes, place the end you want to break off in cold water. Add extra ice as the water will heat up.
Repeat the process. The bottle may not break on the first try, so repeat the heating and cooling process until the bottle is cut.
Sand the edges. To clean the edges of the glass, use stiff sandpaper and sand until you are sure you won't cut yourself on the resulting edges.
2) Cutting a bottle using thread
Wrap the bottle with thread. Select a cutting line and wrap the yarn around it 3-5 times to ensure an accurate cut.
Soak the yarn in acetone. Soak the yarn in acetone or nail polish remover (flammable).
Wrap the bottle again. Make sure the yarn is in the correct position and very tight to get a clean cut.
Light the yarn on fire. Light the yarn and slowly rotate the bottle to distribute the fire evenly.
Dip the bottle into cold water. Place the bottle in the water after the fire has gone out, add ice. The bottle should now break perfectly.
Desk lamp
A quite common item in a bedroom or living room is a table lamp . In most cases, this is simply a functional element of the interior, so it is rarely paid attention to. But for the lamp to also perform a decorative function, it is enough to choose a beautiful bottle base and an original lampshade. In this way, harmony of materials of completely different textures is achieved.
Dispenser
Do you use liquid soap? Make an unusual dispenser and place it in the bathroom or kitchen. The main thing is to choose a noticeable bottle. And the nozzle can be purchased at any store.