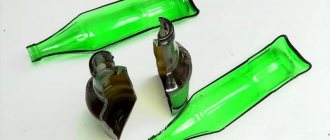
From empty glass bottles (for example, wine, whiskey, champagne, etc.) you can make various decorative decorations and crafts for your home with your own hands: shades for lamps, original candlesticks and much more (there are a lot of ideas for decor).
However, the bottles will first need to be cut straight, since some crafts require a lower part with a bottom, while others require an upper part with a neck. And just for cutting glass bottles at home you can use a mini machine.
The design of the device is very simple, without any bells and whistles - anyone can repeat it if they want. However, despite all its simplicity, with the help of such a simple device you can make even, almost perfect cuts.
1
Glass cutter for bottles
A bottle glass cutter is a great tool for those who like to make things with their own hands. You can make many things from a glass bottle: a transparent glass, a handmade vase, a candlestick, a lampshade, a chandelier and much more.
But how to cut it? All the more carefully. Of course, you can cut the bottle with thread or heated wire, but the cut will not be very beautiful. And if you consider that the composition of the glass of different bottles is different, then you can’t expect good repeatability of the cut.
And then the moment came when I needed to cut several bottles in half. In this article I will try to explain how to make a glass cutter for bottles from what you have on hand.
I wanted to make the glass cutter universal and therefore, after measuring several bottles, I accepted the distance between the supports as 12 cm (with the possibility of increasing to 17 cm). This is enough to cut almost all bottles, from 0.33 liters to 1 liter.
For the base, I chose a regular cutting board (14 by 25 cm). In addition, I needed 4 furniture wheels, a small piece of cable duct, a blade made from a regular glass cutter and several pieces of wood.
It is advisable to choose wheels with a rubber surface, diameter - up to 4 centimeters. The cable channel must have a removable cover (25 cm long and 2 cm wide). You will also need some glue, some screws and rubber feet.
Here are the dimensions of the wooden parts:
- Base 25x14 cm;
- Limiter 11×4 x 2 cm;
- The bar on which the glass cutter rides is 25×4 x 2 cm;
- A wooden strip from which the glass cutter arm will be made, 25 × 1 x 2 cm.
All the holes in the manufacture of the glass cutter were made by hand, but if you have the opportunity, it is better to use a drilling machine to ensure better perpendicularity.
I secured the bottom part of the cable channel with three screws, in principle this is enough, but for greater stability you can add two more. Then I made four holes in the top cover of the cable channel (its length is 8 cm).
I deliberately made them off-center so that the heads of the bolts between the upper and lower halves would not collide.
To provide mobility to the arm that would hold the glass cutter, I decided to secure it with two long screws that would act as hinges. Cut two identical pieces from the rail, 3x2 x 1 cm, step back about 7 mm from the edge and drill a hole along it. Lay the parts on a flat surface and mark the drilling locations using the cable duct cover as a template. Then drill four holes for the screws.
Now you need to attach the knife to the lever. I tried to avoid drilling and used the knife as is. It is held in place thanks to a small recess and a screw that presses it. Later, I slightly changed the angle of the blade for greater convenience. You can see exactly how in the photo.
At first I attached two wooden blocks directly to the cable channel, but later abandoned this. Due to the fact that the plastic cover is not rigid and strong enough, and also because the two parts have less bending strength, the lever was not very stable. So I added an extra wood spacer between them for added stability and strength.
Then I started gluing the parts together. I used epoxy resin, but you can use regular wood glue and you won't have to wait long for it to dry.
While the parts are being glued together, drill holes for the wheels. I used very short screws so they don't stick out from the other side of the board. The last two rows of holes are needed in order to be able to rearrange one pair of wheels for cutting large bottles in the future.
Then I attached the wheels and cable duct, and added 4 rubber feet for added stability.
It's time to try out the bottle glass cutter. After I corrected the shortcomings that I wrote about above (added a wooden spacer between the cable channel and the lever and changed the angle of the knife), the cut turned out to be very accurate.
A photo of the cut bottle is attached:
Source: https://top-samodelki.ru/article/steklorez-dlya-butylok-20131209/
How to cut a bottle: cutting master class at home (90 photos)
In the last few years, in creative processes for making various decorative elements for interior decoration, empty bottles, which can be found in every home, are very often used.
But not everyone knows how to cut a glass bottle and what can be made from it. Let's look at some ways to transform bottles from unwanted trash into original works of art.
- Many people know how to cut a plastic bottle, but they have not yet done this with glass bottles.
To start creating a handmade masterpiece, you need to master the techniques of cutting a glass bottle into two parts. After which you can quite easily make a flower pot for indoor plants or a convenient plate for sweets.
Necessary equipment and materials
In the process of cutting a bottle, you will need: a diamond blade for cutting glass, a chuck, a strip of copper foil, powdered silicon carbide, a vice, vacuum suction cups for attaching the vice, a compact drill with rechargeable batteries.
Step-by-step procedure
The workflow for cutting a bottle with a diamond glass cutter can be divided into several stages:
Step 1: Take a clean, dry bottle and glue a strip of copper tape along the center of it, this will be the cut line. Instead of copper tape, you can use a marker or do without basting at all.
In addition, bottles with factory seams on the sides are often found. But for convenience, copper adhesive tape is usually used.
- Stage 2: Dip the bottle in water and cool slightly.
It is recommended to carry out the work in a workshop or kitchen. Using vacuum suction cups, fix the position of the vice inside the sink and secure the bottle in it.
- Stage 3: install a diamond blade for cutting glass in the drill and proceed to the main process, cut the surface of the bottle carefully, periodically rinsing the cut area under running tap water.
To prevent splashes from flying around, it is necessary to cover the work area with plastic film. The bottle is cut first on one side, then along the bottom, and then on the other side.
- Step 4: Once the bottle is cut, you need to sand its edges to make them even and smooth.
- For grinding, use powdered silicon carbide mixed with water and a piece of cut glass, moistened sandpaper or a drill with a glass grinding attachment.
- Step 5: You now have two original bottle halves that can be used for different purposes.
- For example, in one you can germinate wheat sprouts or ornamental grass, and the other can be used as a dish for ice cream, candy or fruit.
- But if you don’t have a glass cutter, it won’t hurt you to find out how to do without it and cut the bottle into halves.
Cutting a bottle with nichrome wire
In addition to the main method, it doesn’t hurt to know that you can cut a bottle using other methods, using oil, thread, or, for example, using nichrome wire.
For work you will need: water in a bottle with a spray, asbestos or paronite (resistant to high temperatures), stationery packaging rubber bands, a coil of nichrome wire, a mini power station for 30-40 V (3-4 A), a glass bottle.
- To accomplish your plans, follow the steps in the following order:
- take the nichrome wire and straighten it (the straighter the piece, the smoother the edges will be);
- wrap the wire around the bottle in a circumference and secure with rubber bands. Essentially, the wire is the boundary of the cut;
- cut or break the asbestos into several middle pieces, and slide them under the elastic at the intersections to protect them from the heated wire. Instead of asbestos pieces, wooden planks or chips can be used;
- fix the edges of the wire inside the neck of the bottle using an asbestos stopper;
- to fix the wire in the bottom part, it is necessary to install the bottle on an asbestos piece; in general, the neck and bottom are considered the most problematic places in the bottle when cutting;
- the preparatory work is completed, connect the power station to the wire and turn on the current (no more than 3-4 A);
- the wire will heat up and turn red, wait about 1 minute and turn off the power, instantly spray the heated wire with water around the perimeter of the bottle. It should crack, accompanied by a characteristic click.
- carefully remove the rubber bands and get two halves of the bottle.
- Knowing how to cut a bottle evenly, this method can be applied to other glass products.
Cutting a bottle in half using oil
You can cut the bottle with regular vegetable oil. Moreover, on the eve of the New Year, it is easy to create beautiful holiday candlesticks-caps or candlesticks-glasses from cut parts of bottles.
How to cut a glass bottle straight
How to cut a glass bottle straight using a glass cutter. The resulting blanks can be used in the manufacture of various things, such as: a lamp; Street light; vase; ashtray; wineglass; lampshade and much more.
The cutting technology includes two successive stages of impact on glass:
• mechanical • thermal
- MECHANICAL IMPACT
- Using a homemade glass cutter, which consists of five parts:
- The proposed design can cut glass bottles (GOST 10117.2-2001) of the following sizes:
- The figure shows the cutting length (Δ)
and how the fixture works.
• stand (plywood ten millimeters thick) • horizontal platform • metal stop (vertical adjustment) • adjustable angle (horizontal adjustment) • glass cutter - minimum diameter 33 (mm); - maximum diameter 90 (mm); - maximum length 310 (mm)
The bottle is fixed with wing nuts, depending on its geometric dimensions:
vertically
horizontally
Operating principle of the device:
1.
We place the bottle on a stand that is attached to a horizontal platform.
2.
We install the metal stop in the neck of the bottle (vertical) and secure it with a wing nut.
3.
Place the metal stop (horizontal) on the cutting line.
4.
Remove it and secure the metal stop with two wing nuts.
5.
Place the bottle in its original position.
6.
With one hand, press the roller or diamond glass cutter onto the cylindrical surface.
7.
With the second hand, we carefully begin to rotate it relative to its axis.
8.
We make three full turns relative to the axis. How to cut a glass bottle smoothly - the first step has already been completed.
THERMAL EXPOSURE
We lower the bottle for a few minutes into hot water heated to a temperature of 80...90 °C, then into cold water (15...18 °C) and it will break off exactly along the cut line.
Design advantages:
• stable repeatability of the cut • accuracy of the installation size • you can easily, quickly and efficiently cut any number of workpieces Additionally, you can watch a video on how to cut a glass bottle evenly
Order a drawing
Source: https://kak-cdelat.ru/prisposoblenie-i-instrumenti/169-kak-razrezat-steklyannuyu-butylku-rovno.html
Plastic bottle on stripes
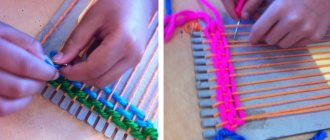
Among the craftsmen there are real innovators, and those who thought of cutting bottles into strips are certainly one of them. The width of such a tape can be even one millimeter. And the length of each bottle is several meters.
You can use the strips to create crafts, weave ropes, or make durable heat-shrink fastenings. At first it is difficult to understand how it is possible to cut a bottle into ribbons, however, like everything ingenious, it is very simple.
The device for cutting a bottle into strips consists of the following parts
- Board serving as a base
- Two bolts
- Two nuts
- 10-20 metal washers
- Replaceable blade of a construction knife.
The assembly order is as follows:
- Two holes are drilled in the board.
- Bolts are inserted from below.
- Washers are put on the bolts.
- A blade is inserted between the washers.
- The nuts are screwed on top.
There should be a gap of about one millimeter between the washers. You can loosen the nuts and move the blade to different heights - the width of the resulting strip will depend on this.
The bottom of the bottle is cut off and a “tail” is made that can be inserted under the blade.
DIY world
Rating: 5 / 5
The question is often asked: How to cut a bottle evenly. I suggest using a simple glass bottle cutter.
This device will allow you to cut a glass bottle strictly perpendicular to its axis.
With this cutter you can make a glass from a glass bottle, a lampshade for a homemade chandelier, or cut glass rings from it for your crafts. The tool is easy to make and use.
Let's start making the cutting mechanism. We cut two 3 cm long blocks from a 25x1x2 cm block. We drill through longitudinal holes in them at a distance of approximately 7 mm from the edge.
We make a groove on the lever for the glass cutter and drill a hole for the screw. To fasten the glass cutter to the lever, a screw with a nut was used, because In the original version, a screw was used, but it did not hold the glass cutter well.
Assembling the base of the cutter for glass bottles.
We glue the side beam for the sliding carriage and the stop for the bottle to the base board.
We screw furniture wheels, the distance between them is 12 cm for small bottles up to 0.75 liters and we provide holes for screwing the wheels at a distance of 17 cm for large bottles from 1 liter and above.
We screw the base of the cable channel to the side beam; it will serve as a rail (guide) for sliding the cutting tool.
- To prevent the cutter from sliding on the working surface of the table while cutting the bottle, glue rubber feet to the bottom of the base.
- Cutting a glass bottle.
We place the desired bottle, having previously washed the label, on the wheels, press the bottom against the stop, install the glass cutter in the right place, press the cutting part against the glass and evenly rotate the bottle along its axis 360 degrees. The beginning of the cut must coincide with its end, i.e. the circle must be closed. We make the cut once; if you do it again, the bottle may split unevenly.
Then we take a container of hot water (boiling water) and pour it over the cut area, then quickly lower the bottle into ice or very cold water. The characteristic crack of broken glass should be heard and the bottle should split exactly along the cut. If this does not happen, you will have to repeat the water procedure (from hot to cold).
We process the separated part on a flat surface with medium and fine sandpaper to remove sharp edges. We get a small coffee cup. The entire test was successful.
Source: https://mir-samodelok.ru/instrument-i-prisposobleniya/rezak-dlya-butyilok
BOTTLE CUTTER WITH YOUR HANDS: PHOTO
BOTTLE CUTTER WITH YOUR OWN HANDS – ANOTHER DESIGN OF MY
Since crafts made from bottles have not gone out of fashion among summer residents and owners of private houses for a long time, I propose a simple method for making a device for cutting glass containers.
You needed: scraps of chipboard plywood 15 mm thick, threaded rods M 12 and nuts for them.
I cut out a base measuring 360x180 mm from chipboard. I screwed two plywood walls measuring 180x180 mm to it with self-tapping screws. On one side from above I connected the latter with an M 12 threaded rod, having previously screwed two nuts onto it (photo 1)
Then I cut out two pieces of the required size from chipboard and secured them to the base at an angle relative to each other. To do this, I used self-tapping screws and wedges with a 30 degree apex, made from bars - this is a bottle holder. From M 12 nuts I made a clamp (photo 2) for the cutter holder and placed it between two nuts on a threaded rod (photo 3)
I used a glass cutter head as a cutter. To secure it to the holder, I made an adapter from three M12 nuts, a strip of sheet metal and a screw (photo 4)
I screwed another pin into the latch on the pin (it should be positioned strictly perpendicular). I screwed an adapter onto it with a glass cutter head. The device is ready.
DIY bottle cutter
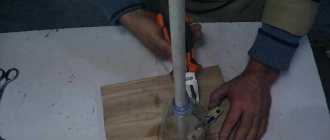
The principle of operation is simple: I place the bottle on the holder, rotating the nuts on the stud between the walls, and adjust the required distance between the holder and the cutter from the bottom or neck (depending on which part of the bottle will be used for the craft).
I press the cutter to the body of the bottle and begin to rotate it, pressing it to the base (photo 5). I make several turns around the axis, then break the container at the cutting site (as when cutting ordinary glass with a glass cutter). If the edges of the cut turn out to be uneven, I remove the excess with a needle file.
Can cutting machine
Manufacturing difficulty: ★★★☆☆
Manufacturing time: About an hour
Available materials: ██░░░░░░░░ 20%
Preface
One day, for another homemade project (a Stirling engine), I needed a glass cylinder, which could not be obtained except by cutting it out of a glass jar or bottle.
Having searched the Internet for ways to carry out this act, I came to the conclusion that I need a machine for cutting cans, since the classic method with thread and alcohol (turpentine, gasoline, acetone) and cold water does not give a completely flat surface for cutting a can. And I did it.
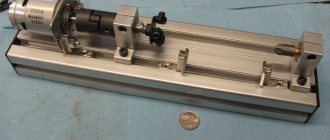
The tailstock of the machine will be movable, which will allow you to choose the length of the cut section of the bottle or can. The groove of the lining is 20 mm wide, and our block is 19x19, so in this groove it will move perfectly along one line.
A block with a cross section of 20x20 mm will be attached perpendicular to the lining
And inside it there will be a glass cutter, the most important cutting part of the future machine.
Materials
- Plywood scrap
- Bar 19x19 mm, literally a couple of centimeters long
- Glass cutter
- Large and small steel angles
- A pair of M6 screws, wing nuts and washers for them
- Tin can scrap
- Self-tapping screws
Tools
- Drill
- Jigsaw
- Hammer
- Screwdriver
- Glue gun
- Scissors
- Step 1 Cut a piece of the block about 30-40 mm long
- Step 2 Drill a hole in a large block for the glass cutter
- Step 3 We disassemble the glass cutter itself. By the way, the glass cutter is oil-based, I saw it in many stores
- Step 4 And hammer it into the hole. Be careful not to bend it!
- Step 5 We reassemble the glass cutter, but this time in a block
- Step 6 Saw off the excess part of the block
- Step 7 In the lining you need to cut a longitudinal groove with a jigsaw. The groove should be wide enough (6 mm), so you will have to cut in two passes.
- Step 8 The M6 bolt (or screw) moves freely along the groove. This is what we need!
- Step 9 Cut out a rectangle from a tin can the same size as a piece of a small block. Mark and drill two holes in it and in the bar itself
- Step 10: Assembling the tailstock. Here are all the necessary elements
- Step 11Bottom side: tin can-washers-screws
- Step 12Top side: block-washers-wing nuts
- Step 13 We attach the block to the lining on a large corner
- Step 14 The machine needs legs, since the corner sticks out on one side and the whole thing swings on the plane. We screw 4 self-tapping screws into the bottom corners. The self-tapping screws can be coated with hot glue so that the machine, in addition to everything else, does not slip on smooth surfaces.
- Step 15 Screw a small corner onto a small block
- Step 16 That's it, the machine is assembled! Next I’ll tell you how to use it
- General step There will be two ways, but the initial step is common for them. Place the can or bottle on the machine, resting its bottom against the corner of the rear can and pre-adjusting the size required for cutting. FIRMLY
against the glass cutter and begin to rotate it slowly. There should be a loud, nasty scraping sound and a deep scratch should begin to appear on the glass. Drive slowly and make sure that the scratch does not interrupt and “wiggles” as little as possible. If you carry out several times in one place, in this place the plane of further cutting will most likely wobble and bulge a little. - Method one: You will need a container with hot and cold water. Lower the jar into hot water up to the cut line, hold it for a while, and then sharply lower it into cold water to the same depth. There should be a crack, and you will be left with two halves in your hands.
- Method two This method is classic, but thanks to the machine it becomes better. Wrap the jar around the scratch with a thick thread, soak the thread with a flammable liquid (alcohol, gasoline, acetone, white spirit, turpentine, absinthe), then set it on fire. Let it burn, and then sharply lower it into cold water (preferably under running water, under a tap)
- Result: As a result, you will again get two halves, but this time very even around the edges. I have in my hands a section of a can, cut off on one side using the first method and on the other side using the second method. The differences can be seen quite clearly. Thank you for your attention, good luck with your projects!
Making a machine for cutting cans
How to cut a glass jar or bottle
Easy to Make Circumference Cutting Machine for Glass Bottles
Sometimes, when making crafts, craftsmen are faced with the need to have a cylindrical glass part. Finding it is often problematic. They try to obtain a blank from glass products (jars, bottles) using different technologies, for example, a rope that is moistened with gasoline, lit, then the container is lowered into cold water.
The method allows you to “cut” the bottle. But its accuracy leaves much to be desired. The problem can be solved by making a special machine. Its tailstock is made movable, which allows you to adjust the length of the cut cylindrical workpiece.
A block of wood with a cross section of 1.9x1.9 cm is prepared. Its length is enough to be a couple of centimeters. They use a piece of lining, which has a 2 cm wide groove on the back side. The block placed in the latter moves freely forward/backward in a strictly specified direction. Another block is placed perpendicular to the piece of lining, but with a cross-section of 2x2 cm.
An ordinary glass cutter is used as a cutting tool in this craft. One of the most important parts in the machine. In addition to bars, lining and glass cutters, they use in production: M6 screws; a piece of plywood; washers; large and small metal corners; wing nuts; a scrap of a tin can. Tools used: scissors; glue gun; drill; screwdriver; jigsaw; with a hammer.
First, a clamp is made in which the glass cutter will be placed. You need a piece of timber. A through hole is drilled in it with a diameter slightly smaller than the cross section of the tool. The axis of the hole is inclined to the axis of the block.
A glass cutter, for example an oil cutter, is disassembled and driven into the hole, being careful not to bend it. Then they assemble the tool that will be in the block. The excess from the timber can be sawed off.
The tailstock is being prepared. A groove 6 mm wide is cut into the lining with a jigsaw - the location is longitudinal. The M6 screw should move freely along it in the future. Take a piece (3...4 cm) of a block and make a plate from tin according to its dimensions. There are two holes in both parts.
Assembling the tailstock: from the bottom side of the lining, through the groove, screw two long screws into the block (the tin plate is placed on the side of the lining). Place washers on the free ends of the screws, and then screw on wing nuts.
The parts are fastened with a large corner. It sticks out to the side, which is why the machine is equipped with legs. These could be, for example, self-tapping screws screwed into the corners of the lining. A small block is provided with a corner. The machine is ready.
They use the machine like this: place the jar on the machine, rest the bottom against the corner; adjust the cutting length according to the size of the required cylinder (vessel); press the glass cutter against it and turn it. As a result, a light stripe forms on the glass.
Next, the jar is lowered into hot water until it scratches, then quickly into cold water. The container will split along the line. The split is obtained better than when using other known methods.
Source: https://izdoski.com/prostoj-v-izgotovlenii-stanok-dlya-rezki-steklyannyx-butylok-po-okruzhnosti.html
MANUFACTURING
From multilayer plywood 10 mm thick, I cut out a base measuring 350×20 mm (photo 1, item 1). A block (2) measuring 350x80x20 (length, width, height) was attached to it close to one of the long sides.
In the block, strictly in the middle, I cut a groove for a hand glass cutter (3). The latter was fixed in the groove with a bracket (4) made of a metal tube of suitable diameter and a tin plate. Thanks to the bolts on the bracket tube, the glass cutter can be moved back and forth relative to the base.
I made a movable stop (5) from scraps of boards and plywood. which will prevent the bottle from moving when cutting.
Opposite the block with the cutter, stepping back about 10 cm from the edge, I screwed a plank (photo 2 p. 1) measuring 120x80x20 mm (length, width, thickness) to the base with self-tapping screws. I drilled a hole in the center and pressed an M8 nut into it. I screwed the fixing screw (2) into the last one.
Between the slats I installed a movable clamp (3), which I made from a block measuring 200x80x20 mm and two tin plates with grooves. I fixed it on the base with screws and wing nuts MB. To make it convenient to work on the bottle cutter, I screwed the legs in the form of wedges from the bottom to the base (photo 3)
Bottle cutter for glass bottles
In my homemade projects, I often use a bottle cutter I assembled with my own hands. The design is based on a sliding platform and two furniture conveyors.
Bottle cutter
It turned out to be universal: you can use it to cut from a small bottle to a large glass jar.
Materials for making a bottle cutter.
Making a bottle cutter
Basically, it was assembled from simple unnecessary things: wooden planks and sticks, except for two conveyors purchased at a hardware store for moving furniture and an old glass cutter.
I thought for a long time about how to assemble a sliding platform, and eventually settled on a simple and very convenient design of two halves. A conveyor is attached to one of them, and the second remains movable until the object to be cut is placed on the conveyor.
Then, when cutting the bottle, the hand presses on the conveyor, which in turn presses the already stationary part of the platform. But for convenience and to maintain the size of the cut, you can use simple paper tape, which will fix the position of the two halves.
I did this when making a candlestick, “Candlestick with Pyrography Elements” where I had to cut two identical glass bottles.
In the bottle cutter I used a simple Soviet glass cutter, which I attached to a lever made of beech sticks. And when working with long bottles, I add a second conveyor.
How the bottle cutter works
The desired size is set using the platform, the bottom of the bottle rests against the limiter, we press the lever with the glass cutter tightly to the bottle, rotate the bottle in a circle, while pressing on the lever from above, a cut is formed, which I then tap from the inside of the bottle (this is how glass jars break easily). And thick bottles can be split by dipping them alternately in cold and hot water.
That's all I have. Be careful when working with glass! Good luck!
Source: https://www.freeseller.ru/5872-butylkorez-dlya-steklyannyh-butylok.html
Do-it-yourself watering and flower bed from plastic bottles (step-by-step instructions)
In this design you can grow vegetables or herbs at home.
- 2 liter plastic bottles
1. Cut a plastic bottle in half.
2. Using a screwdriver, make a hole in the cover.
3. Cut a piece of thread 3 - 3.5 cm long, fold it in half and tie a knot at one end.
4. Thread the thread through the hole in the lid so that the knot is located in its inner part. This thread will carry water directly into the ground, giving the ground as much water as it needs.
5. Screw the cap back on and insert the top of the plastic bottle into the bottom, neck down.
* Monitor the amount of water and replenish the container if necessary. However, first, pour water on the ground and only then use the structure from the top of the bottle for watering.
Watering with your own hands at home (video instructions)
Homemade machine for cutting glass bottles
Today it is very popular to make various decorative crafts from glass bottles.
Well, why not? The material for work is accessible and one might even say free. And finished products made from transparent or tinted glass are very original and durable.
The only problem is cutting the glass bottles neatly and evenly into pieces. And a machine for cutting glass containers will help you with this.
We also recommend reading: how to make a set of glasses from empty glass bottles.