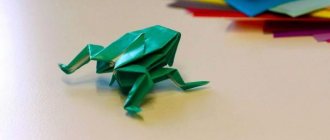
Do you want to go on a trip? It's time to fold an origami train out of paper. Psychologists advise visualizing your dreams so that they become reality. Trains are especially popular among romantic types - you can not only move from point A to point B, but also admire the views flashing outside the window, communicate, and experience a keen sense of anticipation of adventure. These exciting moments will involuntarily be remembered when creating a paper origami model. And there it’s already a stone’s throw from a real train.
Cardboard train template. How to make a train from yogurt cups with your own hands
- Many people have probably seen or even bought trains for their children, or maybe even entire railroads as toys for their beloved children.
- What if you try to make a train with your own hands?
- Materials for making a train:
- Wooden block 50*50 or 100*100 at your discretion. length from 50 cm;
- Pieces of wood (we use pine, oak) details below;
- Sanding paper;
Tools for making a train
:
- Electric drill + preferably a milling machine or engraver;
- Clamp or vice;
- Set of chisels;
- Grinding machine or grinding machine;
- Drills + feather drill + cutters;
Making a train
- The initial stage of manufacturing a steam locomotive
- Prepare a wooden block measuring 50 * 50 mm or another larger size.
- Using a compass, mark a semicircle along the end of the block on both sides.
How to make a DIY Christmas train craft
When choosing an option to create such a craft, it is important to consider your level of skill. Beginners should start with simple things.
DIY Christmas train made of cardboard
It's easy to make a DIY Christmas train toy out of cardboard. The algorithm is like this:
- Assemble a cabin from cardboard, not forgetting to cut out windows on both sides. The blank can be made from a box of a suitable size.
- Trim the toilet paper roll a little, attach a plug on one side, and glue the resulting cauldron to the cabin.
- Make green stripes around the circumference of the cauldron - paint with acrylic paint, cut out of colored paper, use a narrow satin ribbon.
- Cut and glue wheels from cardboard or polymer clay - roll the white mass into a sausage, wrap it diagonally with a red stripe, twist it in a spiral, forming wheels.
- Make decor - you can paint the locomotive with acrylic paints, glitter, decorate with beads, sequins, and ribbons.
A detailed master class is presented in the video:
The locomotive can be coated with acrylic paint. The task will be simplified by using initially colored cardboard; the sleeve is then covered with paper.
Advice! The carriages for such a train can be made open - you can put fairy-tale characters in them, put sweets or other little things in them.
A train for Christmas can be made entirely from scrap materials - boxes, jars, lids
Christmas felt train
You can make such a Christmas train with your own hands for a Christmas tree or to decorate a wall. Any suitable cutting templates can be used as a basis. The general operating algorithm is as follows:
- Cut out the necessary parts using a template from multi-colored felt.
- Process the edges of the blanks manually using an overcast or buttonhole stitch.
- Fix the decor - openwork ribbons, beads, sequins.
- Assemble a steam locomotive by sewing together parts.
Advice! The workpiece can be stiffened using cardboard. Two parts are cut out of felt, gluing or sewing them to the frame inside.
In addition to steam locomotives, carriages are also made as Christmas wall decorations.
DIY Christmas train made from salt dough
This DIY Christmas train can be made in different sizes and levels of complexity. A detailed master class is clearly presented in the video:
The basic work algorithm is as follows:
- Prepare the base for the locomotive from a box of a suitable size or glue it together from cardboard.
- Cut out the window.
- Glue the glass from the inside - you can make it from two pieces of tape, connecting the sticky sides, or from a thick book cover, a thin plastic folder.
- Take a toilet paper roll and cut out four wheels of the same diameter, and four more smaller ones.
- On each wheel, attach a edging made of decorative cord (you can use it for shoes), knitting needles made from toothpick halves, and mark the axis with a bead or pea.
- Trim the toilet paper roll a little, cover one side with a plug made of foil or cardboard - you get a steam locomotive boiler.
- Cut a tube of food foil, film or paper towels in half, and glue the resulting tubes together.
- Fix the base box on this blank.
- Cover the resulting part with salted dough - it is more convenient to roll out the layer, place it on a cardboard base and shape it, removing the excess.
- Attach the pipe - make it from a suitable lid or cardboard.
- Cover the base box for the locomotive with the dough, not forgetting to leave a window.
- Connect the parts - to fix, moisten the surface with water, seal the joints with dough.
- Make figures from the dough for decoration - make them yourself or use suitable cardboard templates.
- Glue the decorations to the locomotive using PVA.
- Cut strips from the dough and cover the perimeter of the window.
- Glue the wheels.
- Make a New Year's wreath on the front of the cauldron - make a drawing of pine needles on a sausage made of salted dough in a stack. Decorate with colored beads or rolled balls.
- Paint the craft with acrylic paints and gouache.
- After complete drying, coat the locomotive with varnish.
Comment! Convex parts can be formed from foil as in the video or made from salt dough.
Christmas locomotives are also made from edible gingerbread dough - the parts are baked separately, then joined together with icing
Ready-made templates for cutting
This technique for making crafts has its advantages - it saves time, plus you don’t need experience, the ability to draw and work with folds and modules. The disadvantages are obvious - the lack of opportunity to personalize the craft, to show creativity, and such a locomotive is unlikely to be appreciated at an exhibition or competition.
However, ready-made templates can come in handy. All you need to do is print it on a color printer, cut out the parts and glue them in the correct order. And for creativity, you can circle these parts on a white sheet and draw your own version on it.
How to make a paper train step by step with your own hands: practical application
A paper train is a fragile thing, unstable to deformation, and it is almost impossible to adapt it to active games. But such a thing also has practical applications in the nursery. For example, a photo train, in the form of a train carrying photographs of a baby. This could be a composition with photographs from the first month of life to a year, or simply favorite and touching family photos. Such a paper craft will not only be appropriate, but also useful in the nursery - bright colors and voluminous details are very useful for the development of the baby.
To make such a train yourself, you will not need any special skills or tools. All you need for work is: a stationery knife, a glue stick and scissors. In order to hang the train on the wall, you will additionally need a suitable braid or thick thread, two paper clips and two buttons that can be driven into the wall.
Templates are printed on a color printer, the inner windows are cut out with a stationery knife. A little advice - it’s better to print not on office paper, but on drawing paper. It works well with the printer, but is denser and is not so deformed by the glue.
On the reverse side, photographs are glued into a frame. If you wish, you can further decorate the train - for example, stick buttons on top of the wheels, or add printed cute details to the photographs themselves - animals, stars, flowers - depending on the gender of the child and your imagination.
To hang the composition on the wall, you must first assemble it on a thread.
On the back side of each car, glue a thread along the entire train, secure paper clips at the ends, and hang the entire structure on buttons driven into the wall. Educational craft.
There is a reason why artistic work is included in the primary school curriculum. There they teach and show the main and most common areas of manual labor. Working with plasticine, clay, appliqués, and the like. However, the school curriculum is very limited both in hours and directly in topics. And the number of people in classes is not conducive to an individual approach to each student. Another thing is to start at home, without rushing or rushing anywhere, to independently create a train from scrap materials, and often even waste materials.
For such a train you will need:
- white or colored cardboard - 2-3 sheets
- chenille wire (fluffy wire is sold in office supply departments)
- glue, scissors, ruler, pencil
- caps from plastic bottles and 2 caps from five-liter bottles.
Progress. Cut each piece of cardboard into two equal parts - these are the future carriages. Roll each piece into a pipe and glue the joints. Glue wheels - plastic bottle caps - to each carriage. The lids must be glued in such a way that half is glued to the cardboard, and the other half is free.
Make holes at each end of the trailers, cut the wire into small pieces, roll up double-sided loops - one edge clings to the hole in the trailer, the second interlocks with the same loop of the other trailer. Thus, the cars are connected into a train.
The train must have a lead locomotive. It will differ from other trailers in that it will have not only small wheels, but also large ones, as well as a pipe. Cardboard, by the way, is replaced with toilet paper rolls, but then they need to be decorated with colored paper or stickers.
Aerobatics.
Paper modeling has existed as an applied art for a very long time. More than one generation of boys has been enthusiastically gluing together models of airplanes, ships, tanks and trains. The result of such efforts directly depends on the skills of the master and his diligence. The scheme according to which the model is assembled also plays an important role in this. There are actually a great variety of such schemes, and their complexity is designed for a wide range of ages - a child can handle some of them - this is, in fact, the layout of a box that just needs to be cut and glued correctly.
Some are more complicated - there are an order of magnitude more parts, they are numbered and labeled, and assembly requires a certain amount of care and effort.
However, the first two options cannot be compared with those patterns, or even patterns, that real professionals do. These diagrams present real models of real trains, from the first steam locomotives and locomotives to ultra-modern and high-tech models.
It would seem that an art long gone into oblivion has received a new impetus with the new capabilities of modeling programs.
Videos about which models are made of paper on a scale of 1: 87, etc., are not uncommon, and are very popular among fans of this type of creativity.
DIY application “Locomotive” made of paper for children step by step with photo. Templates
Description: making crafts from paper and cardboard using the applique technique is a very exciting activity. In this type of creativity there is room for your imagination to run wild! Three-dimensional applique expands the creative possibilities of children's works, helps teach a child to think spatially, three-dimensionally; children perceive three-dimensional images better than flat ones. The word applique comes from the Latin “applic”, which means attaching or joining. The appliqué technique is very simple and accessible even to the smallest children, because gluing the parts onto the base is not difficult at all.
Purpose: this master class is easy to perform, intended for teachers, educators and parents, as well as for children of preschool and primary school age in classes in kindergarten, school and summer camp. Creative work can be used to decorate a school office, a group in a kindergarten, a home room, for participation in exhibitions and competitions, and also as a gift.
Metro
This drawing is quite quick and easy if you follow these instructions:
- First of all, mark the working surface of the paper, and then you can start sketching the locomotive;
- Next, start working on the front side of the train. This includes the headlights and lower part;
- From the vanishing point, draw several rays that also indicate the trailers. Doors, windows and other elements should be drawn in them;
- After this, again from this point draw several rays to draw the road and station platform. The train that travels in the metro is not separated from the station, which means it is worth paying more attention to it;
- At the very end, after all the above steps have been completed, you can think through the surroundings, carefully draw everything, and then decorate the resulting creation.
Now you know how to draw a train and you can teach it to your child. By drawing together, you will get a lot of positive emotions and have fun.
Option
We offer a second option for making a paper locomotive. Take a sheet of A4 paper and bend it one cm on both sides. Place the ruler with its left edge on the bend and bend it one more time. A total of four folds need to be made.
After this, we cut off the excess part of the sheet, then fold the edge of the paper, stepping back from the left edge by one cm, then fold the paper on the opposite side of the ruler.
Cut off the excess paper. Then we cut the edges as shown in the photo.
We glue the side parts of the square together, and then cut off the main part of the booth to the width of the ruler on the right side.
Then glue the edges of the long strips together. We glue the roof to the post.
Then we cut out small squares measuring 2.5*1.5 cm for the window. And for the door we cut out a square 7*2.5 cm.
Glue the square into a tube. We glue windows and doors.
Read this: Mother's Day Poster to Congratulate Loved Ones
A small pipe is glued in the center of the large pipe. A small piece of a square in the shape of paper is glued to the free edge.
We cut out a strip measuring three by seven cm. Use scissors to twist the edges of the strips so that we get a figure eight.
We make circles for the wheels.
We cut off the excess edges of the square, then glue the wheels and figure eight, as shown in the photo.
Then we make the car using this method.
Glue the car to the figure eight.
This is the train we have ready.
The last step in our article is to look at photos that show diagrams and templates for making a train.
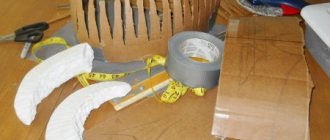
Passenger car made of cardboard - TT scale (1:120)
“Dedicated to the crazy people”
If your desires to build a model railroad exceed the capabilities of mass production, it’s time to think about making your own models. There are different materials and technologies - here we consider manufacturing from cardboard.
First of all, you should stock up on everything you need.
First you need good white cardboard (preferably 0.35 - 0.5 mm - determined by eye using a ruler).
You also need the right tools:
- mechanical pencil with a 0.5 mm lead,
- PVA glue,
- ruler 30 cm,
- corner,
- eraser,
- threads (preferably not very fleecy),
- transparent plastic, double-sided tape,
- two types of emery (coarse and fine),
- paper knife, regular scissors,
- manicure scissors,
- clothespins (preferably plastic with flat surfaces),
- and also some other little things, which will be discussed below.
And most importantly, you need a sincere desire to make a layout!
Here we will consider the production of a model on a ready-made chassis. As a donor, you can use cars from the TT-model or VTTV.
When producing any model, reference materials are required in the form of drawings and illustrations of the modeling object. To save time, I also used the DMV from the TT model.
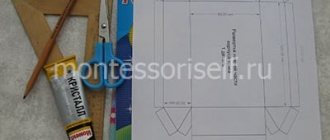
So, let's begin. If a drawing is used, then all dimensions must be recalculated to the appropriate scale, in my case - 1:120. Next, on a sheet of cardboard, you should draw a basic layout of the car WITHOUT a roof (the result should be an elongated parallelepiped without a floor) ( Fig. 1 ).
On it we draw everything that should be on the walls of the car, i.e. windows, doors, lines where there should be stiffeners, etc. After everything is drawn, we cut through all the windows with a knife.
Now it is necessary to increase the rigidity of the future body - on the back side you need to glue a second layer of cardboard with already cut windows onto the walls so that the windows coincide with each other ( Fig. 2 ).
Since cardboard has a bad tendency to swell when wet, you don’t need to spread a lot of glue, but quickly and thinly spread one side and immediately press it firmly and put it under a press.
Now let's deal with the stiffeners. They are made from threads that are glued along the drawn lines: first, an adhesive strip is applied, onto which the thread is then applied and pressed with a finger. The idea is to saturate the thread with glue and remove excess glue from the surface. Once all the ribs are glued on, it's time to outline the doors. To do this, cut a thin groove along the contour of the door with a knife. After this, we coat the cut out contours of the doors and the already glued threads. When everything has dried, you need to carefully walk over the surface of the threads with fine sandpaper and coat it with glue again. During all coatings, we try to leave as little glue as possible so that unnecessary irregularities do not come out later. Handrails are made from thin strips of cardboard.
Now it's time to start assembling. We press down the folds on the reverse side with scissors. Then we cut it out, carefully bend it and glue it together ( Fig. 3 ).
Carefully sand the rough protruding cardboard in the gluing areas.
Roof. To get the roof of the desired shape, you first need to create a parallelepiped from layered cardboard, the height of which is equal to the height of the roof itself (usually painted gray). The width and length should be 1 and 2 mm greater than the width and length of the car blank, respectively (these are approximate figures). This is necessary so that after gluing the roof (by the way, it is also advisable to glue it using a press), it can be sanded on the sides and thereby adjusted to the size of the car. Next, the roof needs to be given a convex shape - to do this, draw the roof profile from the ends and cut off the excess longitudinally. After this, we sand first with coarse sandpaper, and then with fine sandpaper. After this, coat the roof with glue and wait until it dries. We process with fine sandpaper and repeat the operation. Now you can glue the roof. If you can find something to hold it down with while it dries, that will be good. If the original has stiffening ribs on the roof, they are made in a similar way using threads. We coat the junction of the roof with the body with glue. After this, air intakes can be attached to the roof. We glue cardboard at the ends of the car to hide the joint, although, depending on the situation, you can do without it. Using toothpicks, transitional soufflés are made ( Fig. 4 ).
Let's talk a little about the insides. First you need to make a floor from 2-3 layers of cardboard. Next, we mark on it a diagram of the partitions, which, after cutting, we “put” on glue. The total height of the interior with the floor should be selected taking into account the height of the chassis. We glue the upper shelves to the walls, but the lower ones will most likely have to be glued to the floor. After this, a strip of cardboard 1 cm wide and 2 cm long less than the length of the car is glued on top of the partitions.
Now you can paint. It is advisable to use water-indelible paints. You can use aerosol, regular oil or special model paints. Next we use tape and brushes of different sizes to obtain the desired color.
When everything is dry, we glue strips of transparent plastic on the inside of the walls of the car using double-sided tape. From the inside, we stick double-sided tape onto the roof, and then press the insides of the car to it. We again glue double-sided tape to the floor of the car from below and press the chassis to it ( Fig. 5 ).
The car is ready!
Watch also the video on how to make a freight car out of cardboard:
- paper model
- carriage model
- coach
- TT scale
- 1:120
- with your own hands
- for beginners
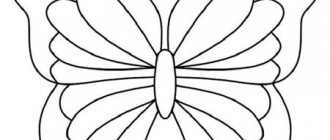
Simple origami diagram for children
You can quickly make such a locomotive even while you are in line or on public transport with your child. It is enough to have a square piece of paper with you. At home, you can take one-sided colored paper in blue or light blue to simulate a modern high-speed train.
- Fold the square in half from top to bottom.
- Fold the bottom edges about 1-1.5 cm.
- Fold the top left corner inward. So, the simplest model is ready.
- To make it more recognizable, it is worth drawing windows.
How to make a train from plastic cups for kindergarten: step-by-step instructions
Maybe it’s worth refreshing your memory and listing famous cartoon characters? Who knows Tishka, Chukh-Chukh and other engines?
Children will have fun working on creating an express train out of plastic cups. Please note that there are no longer any vacancies. This means that the route is popular.
So, to make crafts you will need:
- - plastic yoghurt cups;
- - PVA glue and superglue;
- - caps from plastic bottles;
- - colored paper;
- - cardboard;
- - scissors;
- - toy eyes;
- - Kinder Surprise egg container.
The first step in decorating the craft is desirable, but not required. In general, it would be a good idea to hide advertising labels for cottage cheese desserts and yoghurts. To do this, you need to cut strips of colored paper with a width equal to the height of the cups and cover the labels with them.
The carriages will look more attractive in a toy passenger express train.
At the next stage, you need to make wheels for the locomotive. Using PVA, we glue two caps unscrewed from plastic bottles to a cardboard strip measuring 1cm x 5cm. The number of parts is calculated independently. It all depends on the number of cars that are planned to be connected to the main booth with the driver.
All that remains is to attach the wheels to the cars and wait a few minutes until the glue dries completely.
To create a booth with a driver, you will need three cups. In two of them, you will have to cover the labels with red paper as standard and cut off the protruding edges. Glue toy eyes to the white cup.
It's time to connect the finished parts of the locomotive.
Something is missing from the picture. Probably a chimney.
To create the desired part, a plastic container from a Kinder Surprise and a lid are well suited. It is better to glue plastic with superglue. Here you will have to call your parents for help.
Let's add an element to the base of the craft. By the way, don’t forget about the wheels for the booth. They are made in advance. The process is no different from the described sequence of creating wheels for trailers.
How to make a train out of cardboard with your own hands
A real freight train made from cardboard rolls and corks! No child can remain indifferent to playing with trains: the process of linking different parts together and forming a single whole from them attracts both the little representatives of the stronger sex and future beauties.
Traditionally, trains are built from cubes or special blocks. But you can make them from the means that are currently at hand. And since a child of any age can easily make a train out of waste material, you can involve very young children and preschoolers in this activity.
For example, an unusual train is made from cardboard rolls of paper towels or toilet paper.
How to make a train out of cardboard with your own hands
To create it, prepare in advance:
- several cardboard rolls (the more, the longer the train will be);
- manual hole punch in the form of pliers (on a narrow handle);
- chenille (fluffy) multi-colored wire (or regular wire);
- scissors;
- decorative paper tape;
- tin bottle caps;
- polymer glue.
Materials for crafts
If you don’t have ready-made rolls, you can glue them together from cardboard or thick paper.
So, how to make a paper train with your own hands, a photo of which is given below.
We make two types of wagons from rolls – freight cars with an open platform and closed ones. In the first case, we cut the roll lengthwise into two halves; in the second, we leave it whole. If we make a train from straight paper sheets, then for open cars we simply cut out narrow rectangles, and for closed ones we glue them together in the form of a cylinder.
We cut some of the cylinders into two parts
We decorate each trailer with decorative tape, gluing it in different directions, forming unusual patterns.
We wrap each trailer with colored paper and adhesive tape.
How to make a train out of cardboard with your own hands photo
Then we proceed to coupling our train: in each trailer we make a hole at the edges on both sides, thread a piece of chenille wire into it and form a hook from it. We fasten two adjacent cars to each other using wire hooks.
Making holes
We fasten the cars with fluffy wire 1
We fasten the cars with fluffy wire 2
All that remains is to put our train on wheels. To do this, we glue caps to the sides of each trailer - like wheels. The train is ready!
Train wheels made from traffic jams 1
Wheels for a train made from traffic jams 2 The train with your own hands is ready!
How to make a train out of cardboard
With such trains you can play a lot of educational games for kids. For example, number the trailers and ask them to arrange them in a certain sequence. Or assign a letter to each carriage, and then build the train in the form of a word or alphabet. Each material can be used usefully, the main thing is to tune in to the right wave!
Modular version of origami
Way
Such a design will only be possible for those experienced in modular origami or several people; it will take a lot of time, but the result is grandiose. In addition to paper, you will need a small piece of wire, glue, wooden axles for the wheels and the same base. Detailed assembly diagrams are shown in the photo below. First you need to prepare the required number of modules of different sizes.
Step-by-step instruction:
- For pipes you will need red modules of two sizes - 1/64 and 1/128 A4 sheet. The two shortest pipes of the eight rows are made up of 254 pieces of the first type. The longest of the 21 rows consists of 252 small modules and its fastening of 8 large ones.
- The spotlight consists of 96 large modules - 66 red and 30 yellow.
- For the boiler you need 756 blue parts of size 1/16A4, 175 of the same white and 20 pieces of 1/32 blue for fastening.
- The star on the boiler requires 50 red 1/64A4 parts, 5 of which are useful for connecting to the boiler.
- For large wheels you need 30 pieces of white 1/16A4, 70 of the same red, 40 white 1/64A4 and 20 red of the same size.
- Small wheel – 30 white 1/64A4, 50 red same and 40 white 1/128.
- Base – 776 blue 1/64A.
- Cabin - 231 blue 1/16A, 14 1/32 of the same color and 16 1/64A4.
- Cabin wing - 385 red 1/16A4, 104 1/16A4 of the same color, 50 blue 1/16A4 and 50 1/32A4.
- Drive – 75 red 1/64A4.
- Buffer – 13 red 1/4A4, 4 white 1/4A4, 1/8A4: 12 white and 15 red, 1/16A4: 20 white and 25 red, 1/32A4: 12 white and 41 red.
Way
The video below shows a version of a less detailed modular locomotive, consisting of convenient large parts.
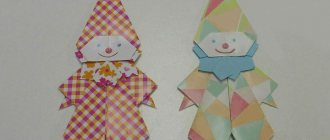
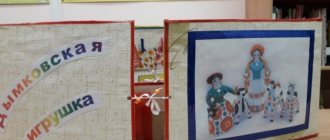
Master class on making the “Jolly Train”
Anastasia Krasnoperova
Master class on making the “Jolly Train”
Master class “On making “ Jolly Little Engine ” with photographs of students.
: Anastasia Viktorovna Krasnoperova, teacher at MBDOU “Kindergarten”
Purpose: " The Jolly Little Engine "
, can be used by preschool teachers to form a group, as well as in direct educational activities.
Goal: making your own “ Merry little train ”
with photographs of kindergarten students.
3D model of a steam locomotive
Way
This train looks most impressive when combined with carriages and a decorated background. The advantages of the options, on the one hand, are in the simplicity of the design, on the other hand, in the ability to change the background “landscape” to illustrate the journey. To make it you will need:
- A4 colored paper. Depending on the size of the figure, take a whole sheet for the base or cut it to length. As a rule, the longer the train, the smaller its parts. You also need paper for window decoration;
- scissors, ruler, glue;
- colored cardboard, watercolors, felt-tip pens for creating a landscape.
- Fold a rectangular sheet of paper in half lengthwise and unfold it.
- Fold the right and left edges to the middle.
- Straighten the structure and glue the workpiece.
- Cut out rectangular or square windows from paper of a different color and glue them to the carriage. You can glue figures of people and animals into the windows.
- To decorate the cabin of a steam locomotive, take a small rectangle, fold it in the same way and glue it on top.
- A paper tube is also added.
- The wheels are cut out of black and white paper, or preferably cardboard, and glued at the same level at the bottom of the cars.
- In this case, a sheet of Whatman paper was used for the landscape; cardboard would also work. For decoration, just cut out more small circles from double-sided colored paper, folding the sheet several times. They are folded in half and the desired shapes are created.
Way
This option couldn’t be simpler, and it’s also collapsible. All you need is a paper towel or toilet paper roll, cardboard, scissors, pencils or markers.
- Draw a steam locomotive on cardboard or thick paper, color and cut out.
- Cut 2 cylinders 3 cm wide from the sleeve.
- Make a half-thick slot in the middle and insert a cardboard locomotive into it.
Using the same technology it is possible to equip it with carriages.
Way
Such a simple model will require skill and accurate measurements. The base of the locomotive is still the same bushing, only this time it’s intact. In addition to it, you need paper, pencils or markers, scissors and glue.
- Place the cylinder on its side and measure the distance from the floor on one side to the floor on the other using a flexible measuring tape or using a thread and ruler.
- Also measure the approximate height of the cabin and pipe.
- Using these data, draw the parts of the locomotive, leaving a small margin for gluing, cut and assemble.
Maglev
China and Japan boast flying trains that compete with airplanes. The innovative transport, called “maglev”, does not have wings, but it has magnetic cushions for levitation above the rails. The lack of friction allows it to accelerate to 600 km/h in some areas - this is the speed of an average passenger airliner.
So far, maglevs are being tested at short distances to determine the optimal performance of the electromagnetic field. After all, the trains are heavy and require high power to levitate them. However, in a few years, superhigh-speed highways will appear in Japan that will connect the country's capital with the largest cities - Osaka and Nagoya.
The magnetic levitation train is easy to fold using the origami technique. To do this, you will need a square of paper with one white side and a marker.
Step-by-step instruction:
- Mark the middle of the square.
- Fold the bottom and top edges ¼.
- Fold the workpiece in half into a “mountain”.
- We bring the upper left corner inside the figure.
- We bend the lower points.
We draw the windows and cabin of the train.
Option from diapers
Young mothers will definitely appreciate such a gift, because diapers are always useful when there is a one-year-old child in the house.
- diapers (20 pcs.);
- elastic cord;
- rubber bands for money (22 pcs.);
- corrugated paper;
- skewer;
- satin ribbons;
- stapler;
- glue;
- pins.
To begin, roll the diapers into a tube.
To prevent them from unwinding, secure them in the middle with an elastic band for money.
Make sixteen tubes.
Tie two tubes together, then attach the next ones to them, wrap each one in a circle.
On a note! If you just tie them with an elastic band, they will curl up and will not lie flat and neat.
Then press the cardboard on top of the diapers so that the outermost diaper does not lift up.
We tie it with a ribbon. You can use any tape as it will not be visible.
Let's move on to the frame of the locomotive. Tie two pairs of tubes together with rubber bands and place them on crepe paper.
Pack the diapers in paper and glue or staple the seams. Then cut the cardboard so that it does not stick out from under the frame. Secure it with ribbons, first trying it on the wheels.
Make a pipe for our locomotive. Wrap one diaper in crepe paper and glue it on top and at the seams. Insert a tube from a sheet of office paper inside the diaper. It can be replaced with a skewer.
Using a narrow knife, make a hole in the paper between the two diapers and insert the tube.
To make a train cabin, fold four diapers in half and stack them on top of each other.
Wrap in paper.
Place the cabin on the locomotive and secure with pins or glue.
For the carriage, make two pairs of knitted diapers. If desired, you can make trailers from cardboard.
Make another trailer, but smaller. Secure all parts with satin ribbon. The diaper train is ready!
Cardboard cars
“Dedicated to the crazy people”
If your desires to build a model railroad exceed the capabilities of mass production, it’s time to think about making your own models. There are different materials and technologies - here we consider manufacturing from cardboard.
First of all, you should stock up on everything you need.
First you need good white cardboard (preferably 0.35 - 0.5 mm - determined by eye using a ruler).
You also need the right tools:
- mechanical pencil with a 0.5 mm lead,
- PVA glue,
- ruler 30 cm,
- corner,
- eraser,
- threads (preferably not very fleecy),
- transparent plastic, double-sided tape,
- two types of emery (coarse and fine),
- paper knife, regular scissors,
- manicure scissors,
- clothespins (preferably plastic with flat surfaces),
- and also some other little things, which will be discussed below.
And most importantly, you need a sincere desire to make a layout!
Here we will consider the production of a model on a ready-made chassis. As a donor, you can use cars from the TT-model or VTTV.
When producing any model, reference materials are required in the form of drawings and illustrations of the modeling object. To save time, I also used the DMV from the TT model.
So, let's begin. If a drawing is used, then all dimensions must be recalculated to the appropriate scale, in my case - 1:120. Next, on a sheet of cardboard, you should draw a basic layout of the car WITHOUT a roof (the result should be an elongated parallelepiped without a floor) ( Fig. 1 ).
On it we draw everything that should be on the walls of the car, i.e. windows, doors, lines where there should be stiffeners, etc. After everything is drawn, we cut through all the windows with a knife.
Now it is necessary to increase the rigidity of the future body - on the back side you need to glue a second layer of cardboard with already cut windows onto the walls so that the windows coincide with each other ( Fig. 2 ).
Since cardboard has a bad tendency to swell when wet, you don’t need to spread a lot of glue, but quickly and thinly spread one side and immediately press it firmly and put it under a press.
Now let's deal with the stiffeners. They are made from threads that are glued along the drawn lines: first, an adhesive strip is applied, onto which the thread is then applied and pressed with a finger. The idea is to saturate the thread with glue and remove excess glue from the surface. Once all the ribs are glued on, it's time to outline the doors. To do this, cut a thin groove along the contour of the door with a knife. After this, we coat the cut out contours of the doors and the already glued threads. When everything has dried, you need to carefully walk over the surface of the threads with fine sandpaper and coat it with glue again. During all coatings, we try to leave as little glue as possible so that unnecessary irregularities do not come out later. Handrails are made from thin strips of cardboard.
Now it's time to start assembling.
We press down the folds on the reverse side with scissors.
Then we cut it out, carefully bend it and glue it together ( Fig. 3 ).
Carefully sand the rough protruding cardboard in the gluing areas.
Roof. To get the roof of the desired shape, you first need to create a parallelepiped from layered cardboard, the height of which is equal to the height of the roof itself (usually painted gray).
The width and length should be 1 and 2 mm greater than the width and length of the car blank, respectively (these are approximate figures). This is necessary so that after gluing the roof (by the way, it is also advisable to glue it using a press), it can be sanded on the sides and thereby adjusted to the size of the car. Next, the roof needs to be given a convex shape - to do this, draw the roof profile from the ends and cut off the excess longitudinally. After this, we sand first with coarse sandpaper, and then with fine sandpaper. After this, coat the roof with glue and wait until it dries. We process with fine sandpaper and repeat the operation. Now you can glue the roof. If you can find something to hold it down with while it dries, that will be good. If the original has stiffening ribs on the roof, they are made in a similar way using threads. We coat the junction of the roof with the body with glue. After this, air intakes can be attached to the roof. We glue cardboard at the ends of the car to hide the joint, although, depending on the situation, you can do without it. Using toothpicks, transitional soufflés are made ( Fig. 4 ).
Let's talk a little about the insides. First you need to make a floor from 2-3 layers of cardboard. Next, we mark on it a diagram of the partitions, which, after cutting, we “put” on glue. The total height of the interior with the floor should be selected taking into account the height of the chassis. We glue the upper shelves to the walls, but the lower ones will most likely have to be glued to the floor. After this, a strip of cardboard 1 cm wide and 2 cm long less than the length of the car is glued on top of the partitions.
Now you can paint. It is advisable to use water-indelible paints. You can use aerosol, regular oil or special model paints. Next we use tape and brushes of different sizes to obtain the desired color.
When everything is dry, we glue strips of transparent plastic on the inside of the walls of the car using double-sided tape. From the inside, we stick double-sided tape onto the roof, and then press the insides of the car to it. We again glue double-sided tape to the floor of the car from below and press the chassis to it ( Fig. 5 ).
The car is ready!
Watch also the video on how to make a freight car out of cardboard: