What does the Dove of Peace symbolize?
Since ancient times, the dove has been considered a symbol of truce, and even earlier it was called a symbol of fertility.
In the countries of the East, gulki were sacred birds, because they are messengers of God. This concept of this bird was also traced in Christianity. In later times, doves became carrier pigeons; their arrival meant that some event had happened.
A handmade product in the shape of a bird will decorate any occasion: birthday, wedding or party, and will also be a special detail in your interior. You can place the figurine on a window, fireplace or attach it to the wall.
Paper dove of peace
Traditionally, the bird is made from white paper. However, there are no clear rules on this matter. A dove of peace made from origami paper is a simple craft if you follow the step-by-step instructions:
- Take a square piece of paper and fold it in half diagonally.
- Fold the triangle in half again and unfold to mark a line.
- Fold the bottom corners up toward the center line.
- Fold the loose ends down in the middle and straighten them to mark the lines.
- Fold the side corners towards the middle.
- Unfold them and fold them inside the workpiece.
- Fold the workpiece in half into a mountain. Place the long side to the left.
- Bend the top part diagonally to the left.
- Repeat on the other side.
- Fold the wing diagonally.
- Repeat on the other side.
- Fold diagonally again.
- Fold the tail along the resulting lines.
- Unfold it and fold it inside the workpiece.
- Form a beak.
- The dove is ready.
Paper birds are often used in room decoration. To create them, involve children to help, because origami develops motor skills, spatial thinking, and discipline.
Video tutorial:
What kind of paper is needed
Paper is the main material when making figurines. The result will depend on her choice. The simplest and most reliable option is regular office paper. If you want to diversify the appearance, you can use colored double-sided cardboard or cardboard.
If the craft is formed using several techniques, it may come in handy as additional corrugated paper napkins or even toilet paper. This type of cellulose raw material is softer and lighter.
Drawing of a dove with an olive branch
Draw or print a classic image of a dove with an olive branch. The drawing can be framed or attached with magnets to the refrigerator.
How to make a white paper dove more interesting? There are several options: you can decorate it with sparkles or glue rhinestones. This way it will not lose its classic look. What if the child still wants to color it? You can make one main dove of peace, and color the others as you wish or let the children color them. Or you can imagine that multi-colored pigeons are assistants to the main white dove. This way you will continue the creative process and complement it with a gaming beginning. If you want the process to be educational, tell about the pigeon yourself, read in a book or watch a video about these birds. You will not only make your child’s leisure time interesting, but you will also learn something new. For example, pigeons are among the ten most intelligent creatures of all animals and birds on the planet! This fact will not leave anyone indifferent!
Sheet and its folding
The meaning of folding is to mark a line or fold. To mark a line means to bring the edges of the sheet to the folding line and fold again. When folding, a sense of symmetry, patience and accuracy are important.
Normal folding involves creating another shape, but sometimes this shape has to be turned inside out. The closer you get to the end, the more difficult it is to make origami from paper. The pigeon according to the scheme for beginners requires no less “respect” than according to the video for masters.
A large amount of folding means a more labor-intensive process. This point should be kept in mind when getting acquainted with any option for making origami doves.
Simple and beautiful dove
How to fold an origami dove out of paper is shown step by step in the figure below. The numbers indicate the sequence of steps. The arrows show the directions of bends. The dotted lines highlight the bend lines.
This is the simplest origami dove. He has no legs, but he has wings. It can be placed or hung on a thread, and it will “fly” above the table, near a window or in another place as a simple but effective addition to the interior.
Preparing a Sheet of Paper
Any size square sheet can easily be turned into a dove, but a larger square is easier to fold. The thickness of the paper matters: the higher the density, the more difficult it will be to work. It is best to start with a standard sheet of A4 size and a density of 80 g/m3. It's a comfortable size and good density.
By applying the larger side to the smaller one, we get a triangle. Having cut off the excess with scissors, we get a square on which a line is already marked for starting work.
The easiest option
This dove of peace, made using the origami technique, is intended for children of preschool and primary school age. It folds up in just nine steps. To prevent inexperienced origamists from getting confused, it is recommended to use paper with sides of different colors.
Step-by-step instruction:
- Let's start from the inside out. Fold the square sheet diagonally from top to bottom.
- Then we open it and repeat the same action, but now from left to right.
- We bend the resulting triangle into a “valley” along the dotted line.
- Open the layer closest to us to the left, shifting it by about 1 cm.
- Fold the figure in half.
- Bend the lower part along the dotted line. Rotate the product 90° clockwise.
- We bend the corner on the left, first forward and then back.
- Then we make a reverse fold, indicating the beak.
Two origami birds can be combined, for example, into an elegant Asian-style pendant. In the east - in India and China, doves symbolize a happy married life, so a pair composition would be very appropriate for congratulating a wedding or family anniversary. Especially if one figure is folded from gold paper and the other from silver, in accordance with the principles of Yin and Yang:
Conventions on origami diagrams
- Valley - fold towards itself, a line inside a sheet of paper.
- Mountain - fold away from you, line outside the sheet of paper.
- Inflection line - does not reach the edge of the contour, inflection in any direction.
- The cut line is a thicker line from the beginning to the end of the contour.
- The invisible line is a line that you should focus on and imagine mentally.
Conventions and origami techniques
Even if we are making such a simple figure as an origami dove, we need to know the basic symbols and techniques of this technique. This will make it easier to understand a drawing like a diagram. It should be added that in such a simple origami as ours, simple patterns are used, the number of folds is small, it is permissible not to strictly observe symmetry and it is not necessary to have too smooth edges. But if there is more than one paper dove, your origami figures will all be different, unlike one another. So, here are the basic notations and techniques of origami technique:
More origami techniques: this will help you understand how origami folds and opens:
Flying bird
This origami dove is also suitable for beginners. If there is no task to fold the bird of the world, it is recommended to use paper with an oriental or floral print for the craft. Music sheets or Kraft newspaper “newspaper” would also be suitable. The dove looks great in installations and is suitable for interior decor. It is no less good as origami jewelry.
Origami dove diagram:
Step-by-step instruction:
- Fold the original square diagonally. We bend the resulting triangle in half and open it.
- Raise the right and left corners to the top. We bend only the top layer flaps in half. And open the intended folds.
- We bend the side corners towards the center. We return to the original position.
- Using reverse folds, we bring these corners inward.
- Bend the figure in half like a “mountain”. Rotate 90° clockwise.
- Open the right side up.
- Fold along the dotted line.
- We lower the “wing”, making a fold along the marked line. Repeat steps 6-8 on the back. Using a reverse fold, we form the pigeon's tail.
- We raise the wings up.
- We make another reverse fold to highlight the bird's beak.
An origami dove made from paper using this pattern can be used to decorate a postcard. An alternative to an olive branch is an origami heart, which looks touching and original. It is unlikely that the addressee will remain indifferent to such a confession-message:
The same emotions can be easily expressed with the help of a garland:
The decorative possibilities of a seemingly simple model are incredible. A panel of flying origami doves can decorate both home and public interiors:
This is exactly the model that the Belgian artist Charles Caysin used for his resonant art campaign. He appealed to the public to fold a lot of origami doves, and send the proceeds from the installation to the Erasmus Hospital fund in Brussels. For the Belgian, pigeons became an analogue of traditional Japanese cranes, a symbol of winged hope. The arch made of dozens of birds, located in the Kanal-Centre Pompidou Center for Contemporary Art, makes an unforgettable impression:
Origami dove
To make this cute dove, use thick paper. Cut out a square from this paper.
As you work, be guided by the diagram for making a dove.
- Fold the square diagonally on both sides.
- Turn the finished triangle over so that the vertex points to the left.
- Bend the top of the triangle to the right side. The fold must be at least 2 cm from the base.
- We repeat exactly the same actions in the other direction.
- We lift the protruding part up and grab the body of the pigeon.
- At the end of the work, all that remains is to make our bird’s beak. To create it, simply carefully bend the paper to the left.
The bird is ready! You can use a variety of paper colors, not just white. The material should be neither thin nor thick.
Use a cardboard base if you want to make a dove with embellishments such as markers, rhinestones or beads.
The simplest version of a pigeon, literally from scrap materials
To make it, we will need a quarter of an A4 sheet, one napkin, a pencil, scissors and a stationery knife. On a piece of paper you need to draw the outlines of the future dove. It’s best not to go into details and draw in a minimalist style. After this, the drawn figure must be cut out of paper. Then, on the figure itself, determine the approximate location of the dove’s wings, make a short horizontal line on one side with a pencil.
Then, using a utility knife, make a cut exactly along this line. Next, you need to take an ordinary napkin, fold it so that its length is about 13-14 centimeters, and form an “accordion” out of it. Having folded the napkin, you need to insert it into the hole that was previously made with a stationery knife. If it is not wide enough, it can be expanded using the same knife.
Once the napkin is in place, the accordion needs to be evenly straightened on both sides. You can also make a small hole next to the “wings” for thread so that you can hang the dove.
Dove made of cardboard and colored paper
Let's make this pigeon step by step:
1. On a sheet of thick paper, draw with a simple pencil the outline of a bird without wings of the desired size.
2. Cut out the dove along the contour with scissors. If desired, draw eyes and beak with colored pencils.
3. Take a sheet of thin colored paper and cut out a strip equal to the length of the two wings. The width of the strip depends on how many folds you want to make on the wings. The more folds, the more magnificent and beautiful they will look.
4. Using a ruler and pencil, draw lines on the cut-out strip along the entire length of the future wings in increments of 1.5-2 cm. Fold the paper into an accordion.
5. Cut a hole in the middle of the cut out outline of the dove and insert the wings there.
Make several of these doves with wings of different colors.
Volumetric figure
Children of the younger group of kindergarten can make such a craft. To make this you will need white paper, scissors, paper napkins or tissue paper, cardboard and a pencil. Creating a three-dimensional dove in stages:
- First you need to draw a dove template approximately 20 cm in size on cardboard, and then cut out the blank.
- Place the piece on the cardboard and trace it. Make as many blanks as will fit on the sheet. You should try to leave as little free space as possible. Then cut out the shapes. Fold the tissue paper into an accordion shape; the length of the piece should be no more than 12 cm.
- Using a utility knife or scissors, make a cut on the body of the bird that will be equal to the width of the accordion. Perform such manipulations in each workpiece. The wings will be inserted into these slots.
- Then you need to thread a napkin into the resulting cut. Pull the ends to straighten the wings.
With such crafts you can decorate the interior of a child’s room, a New Year tree, etc. In order for the figure to be hung, you need to make a hole through which to thread the thread. If you wish, you can decorate the bird by drawing its beak and eyes. Such a pigeon will not be able to fly; it is often used as decoration.
Bird based on a printed template
You can make your own dove stencils from paper or print cutting templates from the Internet. The latter option will require durable paper that can be used for printing, a printer, PVA glue, and scissors.
Print out the templates on two sheets of paper. On one there will be a body and a tail, on the second - wings.
Using scissors, carefully cut out the shapes along the contour. Make cuts along the solid lines on the tail, bend the body along the dotted lines. Bend the tail along the dotted lines and roll it along the lines. Bend it upward and fasten it with glue in special places. Then glue the two parts together.
Make cuts on the wings, like on the tail, along solid lines. Fold them along the dotted line so that there is a small triangle in the middle, apply PVA glue to the last one, and then insert it into the back of the bird and fasten it. A simple and original craft is ready.
Making a paper dove is not as difficult as it seems at first glance. Even a child can cope with this task. For beginners, there are many detailed master classes on the Internet with which you can create real masterpieces from paper with your own hands.
Christmas dove in 5 minutes
We will need:
- Paper.
- Scissors or a sharp utility knife.
- Napkins or tissue paper.
- Cardboard.
- Pencil.
Procedure:
- Draw a dove with a pencil on cardboard. I got a bird about 20 cm in size. Cut out the picture - it will become a template.
- Attach the template to the cardboard and draw as many birds on it as will fit on the sheet. Try to leave less free space. Cut out the shapes.
- Fold napkins or paper into an accordion shape, approximately 12 cm long.
- Using scissors or a knife, make a cut the width of the accordion in each piece. The wings will be inserted into these cuts.
- Insert the accordion into the cut.
- Pull the ends of the napkin so that the “wings” straighten. All is ready. All that remains is to make a small hole and thread a thread through it so that you can hang the decoration on the Christmas tree.
Making small voluminous pigeons
In order to get small voluminous birds, let's look at how to make paper doves using these templates.
To do this, we cut out doves from templates. Then we glue identical parts of the pigeons along the breast and head. And the tail and wings need to be fluffed. Next, you can draw the birds’ eyes, beak and outline the lines of the feathers.
Next, we offer options on how to make a paper dove with your own hands for May 9, Russia Day and other All-Russian holidays. We will paint one dove in the colors of the St. George's ribbon. And we will paint the other one in the colors of the Russian flag.
Make more of these pigeons and hang them on a string with clothespins. It will turn out to be a very beautiful and festive craft! In addition to the garland, you can make these doves on sticks. To do this, you need to take popsicle sticks or simply cut a wide strip of thick cardboard. Glue the pigeons to them with glue. With these sticks you can decorate a bouquet of flowers, a window, or just play.
How the dove became a symbol of peace
The dove has become a universally recognized symbol of peace. In order to become familiar with its amazing historical significance, let's look at different examples of how to make doves out of paper. But first, let's look deeper into the story itself.
The symbol of peace in Ancient Rome was a dove, or, more precisely, a dove that carries an olive branch in its beak. Also in other countries, this bird gradually became a symbol of kindness, love, purity and fidelity.
Pigeons can return home from almost anywhere on earth. The Egyptians were the first to breed them to send messages to each other.
In 1949, the famous Spanish artist Pablo Picasso painted a white dove with an olive branch in its beak. This image became famous throughout the world and was called the “dove of peace.” The first World International Peace Congress in Paris and Prague was held under this beautiful emblem of the reconciling bird.
The dove with an olive branch has become widespread in all areas of art. To this day, his image is part of peacekeeping holidays and movements. Pigeon monuments have been erected in 33 cities. In particular, in Russia they try to make a dove of peace on May 9, Great Victory Day, June 22 and other holidays.
Making a large voluminous dove from two parts
The second version of a large voluminous pigeon is more complex. The wings in this version are glued separately.
Step-by-step steps with photographs of how to make a three-dimensional dove from two parts are presented below:
1. Carefully cut out the template. Cut the feathers on the tail and chest and curl them up a little.
2. We bend the dotted lines on the pigeon’s chest.
3. Glue the body of the pigeon onto the back dotted triangle on the tail.
4. Glue the breast and head of the pigeon together as shown in the photo.
5. Fold the wings in half and iron the middle line.
6. Apply glue to the dotted triangle on the wings.
7. Apply the line of the middle of the wings to the back of the pigeon and glue it.
9. Let's paint the dove or decorate its wings and tail with sparkles.
The dove is ready! You can decorate window handles or a chandelier with it.
To hang a dove on a rope, make a larger cut in the wings in the middle, thread the rope there and tie it in one knot.
Pigeon airplane
Children will especially enjoy making this dove. Follow the step-by-step manufacturing scheme:
1. Fold a sheet of white paper in half horizontally. Draw a side view of the dove with its wing raised in the air. Make sure that the dove is drawn exactly in the center of the body.
2. Cut off the excess paper around the outline of the dove and its wing.
3. Fold each wing to make an airplane shape.
sitting pigeon
It happens that for decoration you need a model that does not require additional support or fastening. In this case, you should pay attention to the sitting dove, which is simple to perform and very impressive. It is based on the basic “Catamaran” shape.
Step-by-step instruction:
- We take a square sheet measuring 15x15 cm. We outline two diagonals, bending the workpiece into a “mountain”. Then turn the sheet over and fold it in half.
- We bend the right half to the diagonal line. In this case, the central triangular part rises upward. We do the same with the left half. This fold is called "Bunny Ears".
- Press the triangles and smooth them out. Turn the workpiece over.
- We make “mountain and valley” folds, as in the basic “Water Bomb” shape.
- Bend the workpiece along the dotted line.
- We assemble the figure according to the arrows. We raise our wings.
- We turn out the right and left corners using the outer reverse fold.
- Fold the left side along the dotted line. Make another outer fold.
- We bend the sharp end in a zigzag manner to highlight the beak.
The video tutorial will explain even more clearly how to make an origami dove step by step:
Children's mobile with birds
We will need:
- Branches.
- Cardboard or thick white paper.
- Artificial flowers.
- Glue.
- Cord or strong thread.
- Thin thread.
Procedure:
- First, go outside and collect beautiful twigs. The size of the branches can be any - from small for a children's room to large for an office.
- Tie or glue the sticks together to create a “snowflake”.
- Use hot glue to attach artificial flowers to the branches. You can make them yourself or buy ready-made ones.
- Cut out the doves according to the template (the first is the body with a head and tail, the second is the wings). Make a small hole on the back for the thread. Fasten the body and wings. You can use other templates from the master classes given here.
- Thread a thread through the paper and tie the birds to the branches.
Progress
Roll into a ball. It will serve as the basis for the body of the dove.
For the neck and head, prepare two sausages in two different shades to show off the beautiful plumage of the bird.
Twist the sausages together, stretching them a little. Fasten the resulting structure to the body. Blind the eyes and beak, and then attach them to the head.
Using a plasticine knife with a pointed end, make longitudinal stripes around the entire circumference of the neck.
Next we will need blanks for sculpting the tail and wings. You can also twist two sausages of different shades to create an unusual color.
The wings and tail should be flat. Give the blanks a characteristic shape, then use a plasticine knife to make many longitudinal stripes to show off each feather.
We will also prepare two small balls in advance, which will serve as the basis for the paws.
It's time to put everything together. Behind the tail. The wings should be attached symmetrically over the back for a distinctive shape.
Having turned the craft over, we attach our base for the legs: insert half a match into each ball, and then sculpt red legs onto the free ends of the matches. It is important to make good stable legs, otherwise the body will outweigh and the craft will not be able to stand on the table;
Turn the bird over with its paws down. Our wonderful plasticine dove is ready!
A plasticine dove will serve as an inexpensive, but very good and pleasant gift, symbolizing peace and goodness. You can also have a fun game with such a bird and make her a house and friends.
other methods
Method No. 1
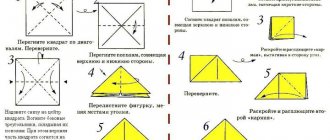
For work, prepare a paper square, approximately 20x20 cm. This is a paper dove, which is folded according to the classic method.
Follow the step-by-step instructions:
- Fold the square in half diagonally to form a triangle.
- Fold the triangle in half too, and then return it to its previous state. This is necessary to mark its center.
- Wrap the ends of the triangle inward, towards the center line. It should look like a rhombus.
- Fold the top and bottom of the diamond together to form a triangle. Make a bend and return the figure to its original position.
- On both sides of the diamond (right and left sides), fold the corners in half inward toward the center. Return to original position.
- The end of the triangle, from the corner of the diamond to the inflection line, needs to be folded inward. Do this on both sides of the figure.
- Fold the resulting figure in half, away from you, so that it looks like a boat.
- Form the wings by turning the ends of the boat up - on one side and the other.
- Make the pigeon's tail by bending the back of the figure inward.
- Make the bird's head in a similar way, bending the small tip of the front part inward.
- The last step is to make the bird’s wings more voluminous. To do this, you need to make a small bend near the very base of the wings.
Method number 2
This is a very easy way to make a paper dove. Ideal for activities with young children or beginners learning origami. You need a square with sides measuring from 10 to 20 cm. The smaller the sheet of paper, the more miniature the figure will be.
Step-by-step instructions are attached:
- Take a square and fold it in half diagonally. Make a fold line, then return the paper to its original position.
- Place the paper in front of you so that it looks like a diamond. Fold the top right and left sides inward so that the edges are even on the center fold line.
- Similarly, bend the bottom half of the diamond towards the center.
- Turn the workpiece over to the other side so that you have a solid part of the figure in front of you.
- Fold in half, tucking the bottom half of the shape up.
- To make the breast and neck, fold most of it up, making an inward fold. At the tip, make another bend inward to create a head for the bird.
- Spread your wings.
Method number 3. Modular pigeon
If you have enough time and patience, you can also assemble a dove using the 3D origami technique. The result should be an original 3D craft. Modular origami differs from classical origami in that many small pieces are first made, and only then are they fastened together. No glue is used.
First, learn how exactly small modules are made:
- Take thick A4 paper and mark rectangles of the same size on it with a pencil. This is easier to do if you first divide the sheet into 4 equal parts, and then divide each of them again into 4 parts. Cut the sheet along the lines, you should have 16 rectangles.
- Fold one rectangle in half so that the fold line runs parallel to its length.
- Connect both ends of the shape to create a bend in its center. Return everything to its original position. Turn the paper over so that the center fold line is at the top.
- Press the top edges to the center fold line. Turn it upside down again.
- Fold the edges that go beyond the limits upward, and then fold the small triangles along the edges again. The figure should be in the form of a triangle, so that nothing sticks out at the edges.
- Bend everything back, and then first fold the small triangles up, and then the bottom part.
- Fold the triangle in half. The model is ready.
Several hundred such modules need to be made, depending on the size of the figure. To fasten the parts together, the edges of one module are inserted into the pockets of another - and then in a circle. In the first three rows, 10 modules are fastened together with sharp edges facing outward, and then, by adding elements, the body and wings of the bird are formed.
The first time in the fourth row at an equal distance, 5 more elements are added to the 10. The next two rows do not change the number of modules, but you need to slightly compress the figure so that it looks a little flattened. The seventh row should already have 22 modules and then three rows continue to work according to the same pattern.
The eleventh and twelfth rows need to be made of 20 modules, and they need to be fastened not along the entire circumference, but only where the breast should be. The next row is 13 pieces, and then one more piece should be reduced. The pigeon’s neck is formed from 7 triangles, they are attached with the shorter side outward.
Then continue according to the scheme:
- 2nd row – 6 pcs.;
- 3rd – 5 pcs.;
- 4th – 4 pcs.;
- 5th – 5 pcs.;
- 6th – 4 pcs.;
- 7th – 5 pcs.;
- 8th – 4 pcs.;
- 9th – 3 pcs.;
- 10th – 4 pcs.;
- 11th – 3 pcs.;
- 12th – 4 pcs.;
- 13th – 3 pcs.
For the pigeon's head you need to take 3 modules first, then 4 pieces. In the next row, increase by one more, and then fasten two rows of 4 pieces each. The tail is made like this: first, 7 triangles are fastened, then increased first to 8, then to 9 pieces. The next three rows take 1 piece more, and then 1 piece less. The wings are made according to the scheme:
- 1-9 rows – 8 pcs.;
- 10th – 7 pcs.;
- 11th, 12th – 6 pcs.;
- 13th – 5 pcs.;
- 14th, 15th, 16th – 4 pcs.;
- 17th, 18th – 3 pcs.;
- 19th, 20th – 2 pcs.;
- 21st, 22nd – 1 pc.
The beak is made from one module and glued together with the wings to the body of the bird. The legs are made from 5 modules, inserting them into each other. The dove is ready, all that remains is to glue on its eyes, cutting them out of black cardboard.
Try making some paper doves right now! They can become an unusual part of your interior that attracts attention.
ideas and methods for making crafts
Content
The dove is a beautiful bird that has reflected the symbolism of many religions and cultures since ancient times. Doves are considered symbols of peace, purity, innocence and love, which is why a wedding couple is often depicted as a snow-white dove and dove, also if you remember, in biblical tales it was the dove that brought an olive branch to Noah on the ark, testifying to the end of the flood, so since then This image of a dove symbolizes good news.
The image of this bird is associated only with goodness and peace, so crafts in the shape of a dove can decorate any holiday.
It will be especially good to make these crafts with your own hands together with children, for example, in honor of the celebration of Victory Day on May 9, for friends for a wedding or in honor of the birth of a child, for Mother’s Day or Valentine’s Day, etc.
There is a huge range of options for choosing the idea and technology of paper crafts, depending on the purpose of the paper doves.
The content of the article
On holidays May 9 or May 1
Even kids can make a beautiful paper dove of peace for Victory Day. Help them make a simple applique or a thematic collage. To do this, you just need to find a beautiful template or stencil of a bird, cut it out and paste it onto a prepared base, for example, a blue sky with clouds or any other background.
Additionally, you can decorate the applique with a St. George ribbon, also cut out of paper. Then the children will be able to give handmade crafts to dear veterans.
It’s very easy to cut out doves using a stencil (you can do it right away from colored paper, but it’s better if the child then paints and decorates the craft himself), strengthen them by gluing them on cardboard or thick paper, and attach them to a stick. You can then tie a St. George’s ribbon on it, or you can also make it out of paper and glue it to the dove.
If you need a craft for the holiday of May 1, then the dove can hold a beautiful green twig or flower in its beak.
Pigeons using quilling technique
The application can be not only flat, but also voluminous. Of course, making one will be a little more difficult, however, you can quickly learn this by following the tips of the master classes step by step. Try making a quilling craft by rolling up a lot of paper dove shapes, or make a 3D bird applique from napkins, or use corrugated/decorative paper, etc.
This way you will get wonderful postcards with various images of doves, and even entire scrapbooks that can be presented to near and dear people in honor of any holiday.
To create a beautiful three-dimensional applique with elements of the quilling technique, use a cardboard blank in the form of a postcard on which you place cut out silhouettes of doves.
Then you will need to additionally make various individual parts that will give relief and volume to your birds, like feathers for wings, feathers for tails, etc. You can glue the elements with double-sided tape. Decorate the composition with quilling flowers and clouds.
Doves for a wedding
Using printed templates and 3D modeling, you can make many three-dimensional figures with your own hands, which you can then use as pendants or connect into long garlands. Stencils made using the openwork cutting method look especially beautiful on such garlands. This type of decoration is perfect for decorating a wedding hall.
A pair of doves can be used to create a beautiful greeting card or scrapbook for Valentine's Day or as a wedding/anniversary gift. Then it is better to stick the doves on a large red heart, which should be decorated with leaves and flowers (the same roses can be made from corrugated paper or use the quilling technique).
Volumetric pigeons for graduation
Paper silhouettes of birds are suitable for all kinds of designs, for example, the body of a dove can be flat, and the tail and wings can be made embossed or voluminous, using the same napkins or any other material. As a result, you will get a very original craft.
Volumetric dove using a template
- Take the proposed template, print it on thick paper or cardboard and cut out all the details - wings, body with head and tail, and crest of the bird.
- Carefully cut along the dotted lines the parts of the tail and wings.
- Then use scissors to make feathers for the pigeon from both edges.
- Bend the main element - the body of the bird along the dotted line, then take glue to glue its head, glue the wings and crest, and then beautifully straighten the figure.
- To hang a dove, you will need to stretch a thread or thin rope between the wings. Make a lot of these doves and you will have a real themed composition.
Crafts for pigeons made from napkins
To make a paper dove with your own hands using napkins, you can either attach the napkins using a stapler to a cardboard silhouette (then it is better to take openwork napkins), or design the craft in the form of an applique.
Master Class
- You will need to draw the outline of a dove on a piece of cardboard and prepare a lot of napkins, cutting them into small squares (two or three centimeters on a side) and rolling these squares into balls.
- Then you need to apply glue to the drawn dove and gradually cover the entire outline with paper balls from napkins.
- When the craft is dry, paint the background of the applique and decorate your bird.
Mixed media design
Use a combination of different techniques and materials, for example, a paper silhouette of a dove with a voluminous and fluffy pompom made of woolen threads - the result will be a very interesting craft.
Master Class
- Using the template, cut out all the necessary parts of the bird. Glue the head.
- Then cut out a blank from cardboard to create thread pompoms - these should be two circles (diameter ten centimeters). Make small holes inside them so that it is convenient for you to wind the thread. Insert the thread between these parts and wind until you get a workpiece of the size you need. Then cut the threads from the outer edge, and tie the thread that was inside the circles well. Now the pompom is ready.
- If you do not cut the ends of the threads, but tie large knots on them, then you will get paws.
- The resulting pompom will need to be glued into the paper blank made earlier.
Let creating such crafts bring you joy and pleasure!
Pigeon patterns and stencils
Simple Dove Patterns
Click on the picture to enlarge it. Then download it to your computer and print it.
More complex pigeon stencils
Stencils of volumetric doves made of paper
See similar master classes: How to make a 3D paper snowflake.
Save to yourself
www.toysew.ru
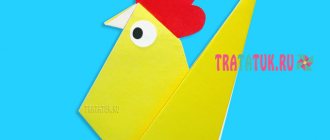
How to make an origami dove
Origami is a fairly popular technique for working with paper. Using it you can make almost any animal or bird. The simplest example of making a bird of the world can be seen from the presented assembly diagram:
Developmental schemes for children
Origami paper dove for children does not have to be complicated. Additionally, other techniques can be used within the same product. In any case, such an activity will develop the baby’s fine motor skills, thinking, imagination, and creative skills. In the end, it will just take a crumb.
Children's model of a pigeon
The most common type of assembly involves a combination of appliqué and origami techniques. Even a 3-year-old child can make a craft. What should be done:
- Prepare a flat bird profile template from cardboard.
- Cut out the blank, decorate the beak and draw an eye.
- In the template, namely the place where the wings should be located, make a longitudinal cut 1.5-2 cm long.
- Cut a sheet of paper crosswise and fold it like an accordion.
- Pull the accordion through the hole in the template.
- Spread your wings in a finished craft.
The children's version of the dove will look decent as part of any craft or holiday.
Step-by-step assembly of this model requires adult assistance only at stages that involve working with scissors.
Sources
- https://svoimirukami.guru/golub-mira/
- https://miazar.ru/origami/kak-sdelat-golubya-iz-bumagi-origami/
- https://e-ipar.ru/podelki/podelki-iz-bumagi/origami-golub
- https://handskill.ru/479376a-golubi-origami-iz-bumagi-svoimi-rukami-ot-prostogo-k-slojnomu
- https://all-origami.ru/origami-golub-mira-5-poetapnyx-sxem-dlya-detej/
- https://gidrukodeliya.ru/podelka-golub
- https://www.promyhouse.ru/rukodelie/izdeliya-iz-bumagi/golub-iz-bumagi.html
- https://natrukodel.ru/origami/golub-iz-bumagi-2
- https://handskill.ru/480250a-kak-sdelat-golubey-iz-bumagi-shablonyi-poshagovaya-instruktsiya
- https://svoimirukamy.com/golub-mira.html
- https://shkolarukodelia.ru/golub-svoimi-rukami/
- https://dnevnikmastera.ru/origami-golub
[collapse]
options and ideas for where to use crafts, do-it-yourself paper dove template
Are you trying to find new ideas for interesting things to do with your child? Paper crafts can be done together with your child if you choose an easy method of work. Make unusual jewelry. Teach your kids a new skill. This is a necessary, wonderful and exciting chance to spend time. So, how to make a dove out of paper?
Main types of application “Dove”
This paper craft can be made in different ways: from a pasted flat design. With large parts created by folding and gluing auxiliary elements (tail, wings). Made from a material with a textured surface made from napkins. From details in quilling technology. As you have already noticed, there is far more than one method for creating a product. Even small children can handle the first one if you give them a cut out template. The last method is suitable for an older child or for working together with parents.
Using paper birds
If you approach your work with joy and a good mood, you will get a rather interesting “Dove” paper applique. You can make a postcard yourself, a beautiful panel to decorate your apartment, or decorate a simple box using this idea. What holidays should you make this beautiful bird for:
- The theme may be suitable both for decorating congratulations for Defender of the Fatherland Day and, for example, for Mother’s Day.
- The bird, as an addition to a bouquet of roses, may also appear on a postcard for the lovely holiday of the Eighth of March.
- At home, you can give your child this type of work to create a present for someone in the family or for your friends for a wedding.
These paper birds symbolize peace, goodness and love - they can decorate any celebration.
Materials and accessories
Before work, you should always be well prepared. To create a beautiful bird, you need to take the following:
- White paper.
- Napkins.
- Pencil and eraser.
- Sharp scissors.
- Glue gun.
- Sample.
To work in quilling technology, you will need to take strips about five mm wide, as well as a device for twisting them. For this task, you can take a knitting needle, a toothpick or something similar. It turns out that there is nothing difficult, so you can safely entrust the work to your child. All you need to do is find templates - make an outline or print a picture.
We also recommend reading:
Simple option
Now it will be disassembled, a master class on creating a simple dove. The easiest way to create a bird can be created in the following way : Take a piece of white or multi-colored cardboard or paper as a base (background).
Leave it flat or try folding it into a fold-out card. Prepare bird templates made from white cardboard using any method. Glue the birds onto the base.
Draw or glue beautiful eyes and beak, you can also glue part of the wings or tail on top. It is good to decorate such a craft with ordinary flowers, an image of the earth, children's palms or people holding hands.
For an older child, you can make the work more difficult: Take napkins and tear them into small pieces. The smaller the pieces, the more interesting the applique will be. Place all the material in a plate or other similar container and pour in some water. When the napkins are wet, wring out the unnecessary material and add simple glue to the material. Glue the paper products onto the dove template you cut out earlier.
After drying, the surface of the product will become textured and slightly voluminous. Thus, you can even create something similar to a relief, demonstrating the shape of the wings. Using this principle, it’s easy to work with crumpled material.
Volumetric pigeon
To make such a bird, use one of the methods shown below.
Method #1 starts with the following steps: Take a dove template. Make different squares from white napkins (choose the size yourself so that they fit the size of the dove). Twist the made parts into cone-shaped bags. To do this, you can use a simple pencil. Dip the thin parts of the product in glue so that the napkin does not get wet, and glue it to the surface of the product. After completing all the steps, you will have a bird with very cute openwork plumage.
Method No. 2 is to prepare or make with your own hands the desired bird template, from which you can make the entire shape, and then, using the folds of the elements, make a three-dimensional bird.
The surface of such a craft can easily be decorated using any of the methods discussed above. To make a more lively craft, make individual feather elements in the form of scales from paper. Stick them all over the product. The elements may be larger on the wing, but smaller on the sternum and body. This option, of course, is quite difficult, but older children can cope with it.
Cardboard bird applique is made in various ways. Choose the right method based on the age of the children and their ability to work with crafts. Do different jobs with the guys and teach them something new.
Templates for work
To quickly make a dove out of paper, cutting templates will be very useful. The first image below shows the easiest version of the bird design. This craft is perfect for children's entertainment with the smallest kids. The shape here is light, and it will not be difficult to fill it with a mass of material.
The second picture shows a paper dove, a three-dimensional template. You can work with the second template both to create children's leisure activities and to decorate a wedding celebration. Children can cut out auxiliary parts that will repeat the shape of the wing and tail. The parts glued with an auxiliary layer will give the effect of relief to the craft. Many people wonder how to properly make a paper dove with their own hands. Patterns and the silhouette of a bird help in creating any craft and simplify the work.
handmeid.guru