Surely the following 8 DIY paint recipes will be appreciated by both children and parents!
Natural “watercolor” paints for children of all ages!
You have the opportunity to prepare paints with your child from natural ingredients that are not only harmless, but also to some extent useful if the child eats them!
What you will need:
- Yellow paint – turmeric, saffron.
- Orange – carrot juice.
- Red, pink, raspberry - beet juice, tomato juice, berry juice (viburnum, raspberry, strawberry, cranberry).
- Green – juice of spinach, parsley, dill, celery greens.
- Blue, purple, lilac - juice of red cabbage, currants, blueberries, blackberries, mulberries.
- Brown - coffee, tea, cinnamon, cocoa, chicory, decoction of onion peel or pomegranate peel.
How to cook:
- Wash the berries or vegetables and squeeze out the juice.
- If you are preparing paints from dry spices, coffee or chicory, dilute a tablespoon of powder with a small amount of water.
- The easiest way to make green dye is from pre-chopped and then frozen greens. Remove the bag or container of puree from the freezer, defrost it without opening it, and squeeze it through a cloth or sieve.
Tips for use:
- Natural dyes can be used as natural dyes in our other recipes.
- Keep in mind that natural paints cannot be stored for more than two hours at room temperature or more than a day in the refrigerator. But they can be successfully frozen in airtight containers. If you have prepared a large portion of paints, do so.
- If you want to keep your child busy with drawing right now, and you don’t have time to squeeze juice out of vegetables and berries, do it differently. Cut the washed vegetables and greens into small pieces (of course, everything should be very fresh and juicy), put the berries in separate sockets, and then offer the child a sheet of white paper and ask them to depict something using pieces and whole berries. We are sure that the child will simply be delighted!
- If you want to make unusual paints for your child, namely ice ones, then after class pour the remaining ice molds into the cells (it’s better to take ones with square or rectangular cells), insert an ice cream stick or a cotton swab into each, and send form in the freezer. Once frozen, you'll have a great ice cube painting set, just take the mold out of the freezer, wait a couple of minutes, and you're ready to paint!
How to wash Holi
In most cases, dye is washed off from any clothing very quickly and easily.
Moreover, in ordinary water, without the use of additional means.
But this only applies to natural ingredients. If synthetic components are added to the mixture, this complicates the task.
Another disadvantage is that for the holiday they wear mostly white clothes made of linen or cotton. In addition, other dirt and dust cannot get in, which will be quite difficult to wash off.
In connection with such difficulties, it is recommended to do it easier, wear clothes that you don’t mind getting dirty and throwing away if something happens.
Then you will be able to fully enjoy the festival without being distracted by unnecessary thoughts.
In addition to protective equipment, you also need to have a set of wet wipes with you, which, if necessary, can be used to wipe off HOLI from your ears, nose or other areas of the skin without wasting time.
The dye is washed off from the hair using regular shampoo.
It is recommended to cover exposed skin with sunscreen (this will prevent the formation of spots). But it is still better to use long-sleeved sweaters and trousers.
Bathroom paints
Is your child reluctant to go swimming? Then you just need to get him interested in some great creativity - painting on the bathtub and tiles!
Don't worry, no traces of creativity will remain in the bathroom - these paints are easily washed off surfaces. And the child himself will not receive colored “tattoos” on his skin after bathing.
The child's age is 2-5 years.
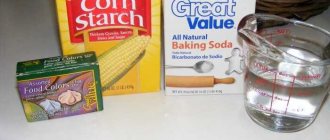
What you will need:
- 2 parts* baby clear shampoo.
- 1 part cornstarch.
- 1 part water.
- Food colorings.
*That is, if you measure in a glass, then take 2 glasses of shampoo + 1 glass of starch + 1 glass of water.
How to cook:
- In a metal or enamel bowl, mix water with starch (it is advisable to use warm water), then add shampoo and mix well, but do not beat! There should be no foam.
- Place the pan over moderate heat and cook until boiling, stirring constantly.
- Once boiling, remove from heat. The mixture should look like thick jelly. Let cool until warm.
- Divide the mixture into bowls or jars - their number will be equal to the number of your “paints”. For small children, I recommend making only 3-4 basic colors; for older children, you can play with mixing colors and shades.
- Add 1-2 drops of different food colors to each portion of the base, no more. I don’t recommend making a very rich color, because it will be more difficult to wash off the child’s skin. Stir each portion well (use different spoons or wooden spatulas - for example, ice cream legs).
- Transfer the resulting paints into pre-prepared jars with well-closing lids (not glass, because you will use the paints in the bath!). Jars of old finger paints, creams, small food containers, etc. will do.
That's it, the colors are ready - it's time to swim!
Tips for use:
- Never leave your child alone in the bath - this is an important safety issue!
- If the child is small, make sure that he does not eat your paints.
- It is advisable to have an oblong tray under the paints so that the paints do not fall into the water. You can use bathtub holders for soap and washcloths.
- The child can draw with his fingers or a piece of sponge.
- First, show your child how to use paints and what can be painted on the bathtub, tiles, or even on his tummy.
- At the end of the water procedure, these drawings will need to be washed off from the surfaces. To keep your child from getting upset, buy him a water pistol - and he will happily say goodbye to his art on his own. Don't forget to praise him for his accuracy!
A few words about the use of paints
Holi colors differ from other similar substances in their plant origin, and therefore they are considered completely harmless to the health of participants in the festive event. To make paints, they use starch and corn flour, to which food coloring is added. The most popular ingredients are the following:
- phalaenopsis;
- turmeric;
- sandalwood.
The extract or food additive when making your own Holi dye produces a wide variety of colors. But such coloring substances are used not only at festivals; they can also be used in other areas:
- make a bright, unforgettable photo session;
- used in body painting;
- at festive events for children and adults;
- at theatrical performances.
DIY stained glass paints
These paints can be used to paint on thick cardboard, glass, wooden surfaces, mirrors, tiles, and porcelain plates.
The designs are durable in damp environments.
Children's age is 5-8 years.
What you will need:
- PVA glue.
- Dyes.
How to cook:
- Pour 2-3 tablespoons of glue into small jars with tight-fitting lids and a wide neck.
- Add coloring to each portion. Stir until the color is uniform with wooden sticks. The paints are ready.
Tips for use:
- These paints can be used to paint directly on the selected surface.
- Or you can apply the drawing to an office file or glass (necessarily in a frame and under adult supervision!) - and let it dry for several hours. Then carefully remove the drawing from the base and glue it to any smooth surface - a corner of a mirror or window, tile, plate, etc. These drawings do not have to be large.
Legends of Holi
March 2–3 is one of the brightest, most colorful Hindu holidays, which symbolizes the onset of spring, the beginning of the year according to the Indian calendar. The second name is the Festival of Colors, because special coloring agents are widely used there. Every resident of India knows what date the Holi festival takes place.
It is named after the burning of the demoness Holika, the sister of the demon king Hiranyakasipu, who wanted complete submission only to himself. But Prahlad’s nephew resisted and began to worship the god Vishnu. Then Holika wanted to burn the boy in the fire, covering herself with a reliable cloak. At the last moment, he flew off, protecting Prahlada, and the demoness died.
At first, at the symbolic festival, the body was anointed with the ashes remaining after the burning of the effigy of Holika. Over time, gray ash was replaced with coloring powder of different colors, and this is still done today.
Volumetric salt paints for painting
These paints allow you to create voluminous, “plump” paintings; children really like them.
The child's age is 2-7 years.
What you will need:
- 1 part flour.
- 1 part salt.
- Required amount of water for kneading.
- Food colorings.
How to cook:
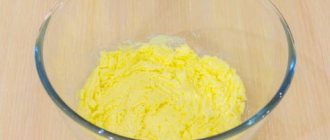
- Mix flour with salt.
- Add water in small portions and stir until smooth.
- As a result, the mass should resemble pancake batter - flow from the spoon in large drops.
- Divide the mass into different containers, add dyes to each part.
Are Holi colors dangerous?
If the paints are based on ingredients of natural origin, then there can be no question of harm. However, it is important to know that sandalwood, which is often present in this product, is contraindicated for women who are expecting the birth of a baby. If paint gets on mucous membranes, dermatologists recommend rinsing them thoroughly with water. To avoid worrying about the safety of paints, you can take precautions.
Before coming to the festival, you need to apply oil with protective properties to your skin. For the event itself, you can wear glasses and a headscarf.
How to Paint Furniture with Chalk Paint
Manufacturers often boast on cans of ready-made paint that no surface preparation needs to be done before painting. This is not entirely true; there are still minimum requirements. And even more so, you will have to work hard to make old lacquered furniture suitable for painting with chalk paint.
To make updating old furniture more convenient, you can disassemble it into individual elements (well, at a minimum, remove the doors, take out the drawers), remove the handles and hinges.
If there is a layer of varnish on the furniture or other element to be painted, it will have to be removed. You can use sandpaper for this or (if processing is not done at home) a grinding machine. Of course, you can use other means, for example, chemicals, but for this you will have to purchase the appropriate equipment and personal protective equipment. After removing the varnish, you can proceed to the next steps. By the way, you will also have to remove a thick layer of old paint.
The surface is treated with a soap solution to remove dust and dirt. Then you should go through sandpaper (150, 200 and finally 230) to give it a little roughness. The resulting dust is also removed. If necessary, the base can also be degreased.
Well, as soon as the prepared base has dried, you can paint. Apply the first layer with a brush in long strokes and leave to dry for about an hour.
The second layer can be applied either with a short-haired roller or with a brush - choose the option that suits you personally. Leave again for an hour to dry. If necessary, apply a third layer.
After all the parts have dried, you can begin applying wax. To do this, you will need a sponge or brush with very soft bristles (the choice of tool depends specifically on the type of wax you choose). After 15-20 minutes, rub the applied wax with a clean cotton cloth using light circular movements.
So, you can update old furniture, doors, or other interior decor items with homemade chalk paint.
Examples of using chalk paint can be seen here:
Source
How to make chalk paint on acrylic yourself
There are many options for chalk paint.
I don’t pretend to be a guru, I’ll just tell you how I make this magical paint of excellent quality and at minimal cost. I pour acrylic paint into a glass jar (I have building enamel acrylic universal white Tex), add art acrylic paint (I have Decola green, light turquoise and a drop of black) and add enough to get the desired color (I need mint color). I mix everything thoroughly until smooth. Artistic acrylic mixes beautifully with construction paint.
I add sifted 1/3 of the chalk to the mixed paint and stir well without lumps. It is necessary to sift the chalk, if this is not done, grains will remain on the painted surface after drying.
Gradually add 1/3 of water to the resulting mixture. I stir everything very well. The mixture should resemble liquid sour cream.
The paint is ready, you can paint it right away if you really can’t wait. It is better to close the jar with a lid and let it stand for about 6-8 hours so that the components marry.
After the paint has dried on the product, lightly sand it with fine sandpaper, without fanaticism.
The finishing coat for chalk paint is wax or polish.
Source