Blowtorches are a tool that is used along with soldering irons and soldering irons in construction and repair. Such a tool is often required on the farm due to its versatility.
Nothing prevents such a lamp from being used to warm up the car crankcase, which contains oil. It can also be used to remove paint and rusty threads, soldering and heat shrinking. Even for roofing, you can use a blowtorch.
Let's look at the fifteen best models of blowtorches that are worth the attention of a potential buyer.
What breakdowns and malfunctions are most likely?
Let’s take the “bull by the horns” and immediately name the most likely reasons for the inappropriate behavior of the blowtorch:
- it is not possible to create and maintain sufficient air pressure in the fuel container to spray fuel;
- fuel leaks anywhere, but not through the nozzle;
- the fuel from the nozzle is not sprayed, but flows out in a stream, and not evenly, like that of a well-known animal.
Most often, the listed “adventures” can be resolved with the help of basic cleaning of “sore” areas. To do this you need to have a certain set of tools.
It also happens that it is not possible to revive the instrument without replacing parts. In such a situation, most problems can be eliminated with the help of a special repair kit, which is better to purchase in advance.
Repair kit for blowtorch
Most likely, the pressure problem is caused by a faulty pump. If there is a spare one, it is simply replaced. Otherwise, you will have to work hard to repair it yourself.
If you have to constantly pump air, it means it comes out through a safety or service valve or threaded connections. It helps to clean the surfaces of these components and replace the gaskets.
If the fuel from the nozzle is not sprayed, but comes out in some other form, a normal flame will not work. The most likely cause is dirty fuel. You will have to drain the gasoline and fill it with clean gasoline, after rinsing the container. Of course, the nozzle and all fuel supply channels should be cleaned, rinsed and purged before refilling the lamp.
It happens that cleaning does not help and fuel continues to flow out in a stream. This will happen if the tool is not warmed up sufficiently. If warming up does not help, you will have to change the burner nozzle.
Sometimes gasoline flows down the flame adjustment valve rod. So the fire is not far away! We stop work, disassemble the control valve and change its seal, which is the stuffing box.
How to choose a blowtorch
If you need a blowtorch, you should pay attention to the following parameters when choosing:
| Criterion | Description |
| Criterion | Description |
| Torch temperature | The temperature of the flame emerging from a blowtorch can reach 2000 degrees. For this reason, the temperature will make it clear what material can be heated, melted, or anything else. |
| Ignition type | There are two types - manual and semi-automatic. The first method involves using a match or lighter. The second involved the use of technology with piezo ignition, which is really more convenient and safer, since you need to press one button to start the fire. |
| Weight and dimensions | Dimensions and weight must be taken into account when working in a limited space, so that there is where to place it and how exactly. |
| Burning time | A fully charged lamp can burn from twenty minutes to three hours. Naturally, the higher the indicator, the better. |
| What is included | Blowtorches can be seen in different configurations. For example, having a case will solve the issue of transportation and storage. Many different attachments will simplify the soldering process. |
Gasoline and kerosene
A blowtorch running on kerosene, like a gasoline one, consists of a tank in which the fuel is compressed to several atmospheres, and a burner. During compression, the fuel is partially mixed with air.
Reservoir and pump
The reservoir has a volume of 1-2 liters. Its body has a built-in filler plug, a pump to create pressure and a tube that connects the body to the burner, providing fuel to the latter.
To use the maximum amount of fuel from the tank and reduce the number of refills, the free “receiving” end of the tube is located almost at the bottom. All parts are built into the tank in such a way as to ensure tightness.
The simplest pump design is a cylinder with a piston. At the lower end of the cylinder there is a simple check valve that prevents air from escaping from the reservoir.
The piston is a cup-shaped cuff that compresses air when moving towards the cylinder valve, and when moving in the opposite direction, it allows air to flow, filling the cylinder.
Burner device
The burner consists of a nozzle, a control valve, an ejector tube and an ignition cup. From the injector, fuel is injected under pressure into a tube in which it is mixed with air captured from its rear hole.
To ensure complete combustion of the fuel, it must first be heated. This is ensured thanks to the design of the ejector tube. Fuel under pressure, before reaching the injector nozzle, is heated in the “jacket” of the tube, inside which a flame burns.
The initial heating of the tube is carried out when preparing the lamp for operation by igniting the fuel in the bowl. The adjusting screw ensures the required flame temperature by limiting the amount of injected fuel.
Fuel requirements
Fuel for use in a blowtorch must be clean, otherwise mechanical impurities may cause clogging of the nozzle. For the same reason, it is recommended to use gasoline with a low octane number, as it contains fewer additives.
If the hole is clogged, it can be cleaned with a soft wire of suitable diameter. Steel wire should not be used so as not to damage the nozzle by changing its geometry. Very often, gasoline and kerosene blowtorches come with a special wire cleaner.
https://youtube.com/watch?v=gbZ-HmK5O9g
The difference between and on kerosene is the diameter of the nozzle hole. In addition, in older designs of kerosene blowtorches, a small coil was located inside the ejector, which allowed the fuel to be heated more intensively. This design was a consequence of the fact that the combustion temperature of kerosene is slightly lower than that of gasoline.
Start and end of work
To start working, the device must be filled with fuel in an amount of no more than 2/3 of the volume of the fuel tank, and pressure must be created using a pump.
Then you should fill the burner bowl with fuel and carefully set it on fire. As the burner warms up, slowly open the control valve and increase the pressure in the tank.
When the fuel stream ignites, the nozzle nozzle must be directed into a fireproof, refractory surface, such as a brick wall or a sheet of asbestos. This will speed up the heating of the burner.
After completing the work, the flame is extinguished by stopping the fuel supply to the nozzle. Only after the lamp has cooled can the fuel tank be opened. It is allowed to refill the lamp if its temperature does not exceed 50 ℃.
Rating of the best blowtorches
| Photo | Name | Rating | Price | |||
| The best gas blowtorches | ||||||
| #1 | DREMEL VERSAFLAME 2200-4 | ⭐ 4.95 / 5 | Find out the price | |||
| #2 | KEMPER 1060 pz | ⭐ 4.85 / 5 1 - voice | Find out the price | |||
| #3 | EXPRESS 8700 | ⭐ 4.75 / 5 | Find out the price | |||
| #4 | WESTER GG02 | ⭐ 4.75 / 5 | Find out the price | |||
| #5 | STAYER MASTER 55590 | ⭐ 4.7 / 5 3 - votes | Find out the price | |||
| The best gasoline and kerosene blowtorches | ||||||
| #1 | Sibrteh 2.0 L 91444 | ⭐ 4.95 / 5 2 - votes | Find out the price | |||
| #2 | SIBRTECH 91442 | ⭐ 4.85 / 5 1 - voice | Find out the price | |||
| #3 | BARS 91452 | ⭐ 4.85 / 5 2 - votes | Find out the price | |||
| #4 | Leopard MIR-91451 | ⭐ 4.8 / 5 1 - voice | Find out the price | |||
| #5 | SPARTA 91443 | ⭐ 4.75 / 5 1 - voice | Find out the price | |||
| #6 | BISON "PROFESSIONAL" | ⭐ 4.75 / 5 4 - votes | Find out the price | |||
| #7 | BISON 40652-2.0_z02 | ⭐ 4.7 / 5 | Find out the price | |||
| #8 | Bison Samotlor SM-15 | ⭐ 4.6 / 5 2 - votes | Find out the price | |||
| #9 | STURM 5015-01-15 | ⭐ 4.6 / 5 | Find out the price | |||
| #10 | Caliber LP-1.0 | ⭐ 4.55 / 5 | Find out the price | |||
Which blowtorch would you choose or would you recommend?
Take the survey
The principle of operation of a blowtorch
The blowtorch can run on kerosene and gasoline.
After refueling the device, air is pumped into the tank using a pump, which creates increased pressure inside the fuel cylinder. Excessive air pressure forces fuel into the burner, where it burns and forms a flame. To ignite the burner and ensure stable operation, it must be preheated to a certain level. To carry out heating, a fuel cup is used, which is mounted under the burner. The capacity of one cup is usually enough to heat the burner to the desired temperature.
When a certain burner heating temperature is reached, the fuel supplied from the reservoir to the burner evaporates in the evaporator. Gaseous fuel enters the combustion area and forms a flame through a special nozzle. During the combustion of evaporated fuel, oxygen is sucked into the combustion area and the process is maintained.
During the process of heating the burner, air is not pumped into the tank for safety reasons, and the shut-off valve must be closed at this moment. The shut-off valve opens only after the burner and evaporator have warmed up. After opening the shut-off valve, the flame strength is adjusted. After finishing work with the device, turn it off by screwing in the shut-off valve.
The best gas blowtorches
5STAYER MASTER 55590
This gas blowtorch is inexpensive. She has good efficiency indicators. The gas consumption of this model is quite low, so the lamp can be used for a long time. At the same time, more energy is released than that of gasoline lamps.
This model also has high safety indicators. The durable housing helps prevent ignition and even explosion, which occur for two reasons - safety violations on the part of the user and careless handling of the lamp.
This lamp is a good choice for the novice builder and repairman. The only drawback of this model is that it will be difficult to find suitable fuel.
pros
- minimum fuel consumption;
- flame strength can be adjusted;
- durable body;
- good security.
Minuses
- It's hard to find quality fuel.
STAYER MASTER 55590
4WESTER GG02
This blowtorch runs on a mixture of propane and butane. The gas is ignited by a piezoelectric element, which is activated by pressing the front button. The torch formed after igniting the gas from the tank can be adjusted - to do this, you need to turn the wheel located at the end of the device.
The lamp is compact in size, as it easily fits in the hand. The rectangular base performs two functions - a stand (it becomes more convenient to work with two hands) and a limiter (the blowtorch does not fall out of your hands).
Important! The tank volume is 17 grams, and it can be refilled.
The presence of a fuse will prevent a flame from igniting if the button is accidentally pressed, which makes using the device much safer.
An electrician can easily use such a burner to heat the thermal insulation of wires.
pros
- the flame is easily ignited;
- wide availability;
- stable and durable base;
- You can adjust not only the length of the torch, but also the temperature of the fire.
Minuses
- upon purchase, the lamp is provided unfilled;
- works for 10-15 minutes.
WESTER GG02
3EXPRESS 8700
If you need a powerful heating source, then this model is what you need. It runs on liquefied gas fuel in the form of propane-butane. The consumption of this model is 110 grams per hour. The maximum temperature of the flame formed after ignition of the gas is 2010º C.
This lamp stands out in several ways. For example, it has a fairly comfortable handle that you can hold the tool for a long time without getting tired. In addition, this model has good protection for the fuel container. It is implemented in the form of a double shell made of steel.
The 190 gram cartridge is housed inside a metal casing to prevent exposure to sun and heat. The torch itself can burn for about an hour and a half without interruption. The upper part has space for installing a torch power regulator.
One of the obvious advantages is the high quality metal nozzle. It will obviously last more than one year.
pros
- easy-to-use regulator;
- durable and durable nozzle;
- high structural strength.
Minuses
- fuel lasts for an hour and a half;
- The dimensions of the device are quite large.
EXPRESS 8700
You may be wondering which water heater is best to buy.
2KEMPER 1060 pz
This soldering device received “silver” from the Italians for a reason. The model turned out to be very convenient to use. The lamp does not weigh too much, and the design is quite simple. The handle of this model is quite comfortable to grip.
There is no need to refill the lamp - you can simply remove the empty one and install a new full cylinder. Its volume is 400 grams. This burner is also economical - up to 110 grams of gas is consumed per hour, that is, the entire cylinder is enough for four hours.
The cylinder has a valve, the adjustment of which increases the level of safety of use. The piezoelectric element makes it easier to ignite the gas, and the wheel on the handle makes it easy to adjust the flame.
Important! The burner and cartridge can be separated for storage.
This model is considered one of the best gas models in such criteria as heating temperature. For this model it reaches 1900º C - this indicator is enough for melting copper, brass and steel.
In addition, this lamp is one of those rare ones that can work in cold weather. Withstands up to -17 degrees.
pros
- easy to light a flame;
- you can adjust the length of the torch;
- it is possible to disassemble into parts and store them separately;
- there is no need to refill the cylinder.
Minuses
- case not included;
- high price.
KEMPER 1060 pz
1DREMEL VERSAFLAME 2200-4
This gas lamp from Dremel received "first place" among all five models. It has a non-removable cylinder, and you can fill it through the fitting at the bottom. It runs on butane, the temperature of the torch leaving the device is 1200 degrees. It has a curved nozzle, which will provide a non-standard direction of the torch.
Important! The length of the torch can be adjusted with a wheel located on the side.
The fire is ignited by piezo ignition with a single press of the button. This model does not weigh too much, which allows you to hold the device with your hand for a long time without fatigue. There is a plastic stand that makes it convenient to place the device on the table.
In terms of configuration, this model is considered the best. She really looks richer compared to others. It contains a regular nozzle and a blue tip, a nozzle for extending the flame, a carrying case, and a box in which you can store small parts. Separately, you can highlight the insert with the catalyst. It improves fuel combustion, which ultimately produces a better quality fire.
pros
- A single press is enough to start a fire;
- fire is easy to ignite;
- stable plastic base;
- presence of a catalyst.
Minuses
- after sale it is given unfilled;
- does not work in cold weather;
- does not turn on immediately.
DREMEL VERSAFLAME 2200-4
Handling old lamps
Old blowtorches that have not been used for a long time should first be inspected from the outside. During inspection, you need to check how easily all the valves and the tank lid open. The adjustment valve should turn easily. After this, you need to check the housing for leaks. To do this, use a pump to pump air into a lamp that is not filled with fuel. Then, using a brush, apply a thick soap solution to all threaded connections and the faucet. You need to check it closed and open.
If all connections are tight and the pump is properly creating pressure in the housing, the tap performs its functions by opening and closing the burner, the lamp can be refilled and started.
Burner using a blowtorch: video instructions for making it yourself
Furnaces and boilers running on waste oil have long taken their rightful place among heating appliances. Exhaust is a cheap and sometimes free type of fuel; it is often used for this purpose in car repair shops and garages. Many craftsmen, when choosing a design, ask the question: is it possible to convert a gasoline blowtorch into a burner for mining?
Is it possible to make a blowtorch work during mining?
The principle of operation of a conventional blowtorch is to ignite gasoline vapors, which are pushed out under the action of compressed air. This effect is achieved by forcing air into the burner fuel tank.
What happens if you pour used oil into a blowtorch?
Oil itself, even under pressure, does not evaporate well - it needs to be heated. Due to poor atomization, the flame will be uneven and it will be difficult to ignite the burner.
The oil burns with the formation of a large amount of soot and soot, so the jet will quickly coke, its cross-section will decrease, and the lamp will fail.
Increasing the cross-section of the nozzle will also not give the expected effect - the oil will be sprayed in large drops, which will not allow obtaining a uniform flame of the torch.
In addition, used oil often contains impurities: diesel fuel, gasoline, antifreeze and even water, which can lead to flashes inside the lamp. To use waste as fuel for a blowtorch, you will have to install a filtration system, which will further complicate the task.
Considering all the difficulties, using a gasoline blowtorch as a burner during mining is difficult and unsafe. Therefore, it is necessary to modify or completely change its design.
How to make a burner for mining yourself
For successful combustion of oil, you must either preheat it to the evaporation temperature - approximately 300 degrees Celsius, or finely spray and enrich the oil vapors with air.
You can heat the oil to such temperatures using powerful heating elements, but this will increase energy costs. An oil aerosol can be created by applying a stream of compressed air through a layer of oil.
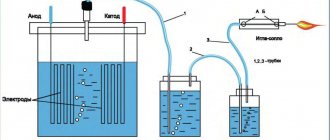
This effect is realized in the Babington burner - a device, an analogue of which you can assemble with your own hands from available components.
Babington burner - an alternative to a blowtorch
The Babington burner was originally patented to run on diesel fuel.
Later, having made minor changes to the design, the craftsmen changed the design with their own hands and adapted the burner for burning waste machine and food oils.
The degree of oil contamination does not matter much, since the fuel channels of the unit are free of bottlenecks prone to blockages.
Unlike a blowtorch, where the fuel-air mixture is sprayed under pressure through nozzles, in a Babington burner oil is pumped from a reservoir using a low-power pump and flows in a thin film along an inclined or spherical surface, and the oil-air mixture is formed by blowing a thin jet of compressed air air through this film.
The spraying effect is clearly presented in the video:
- The Babington burner consists of several functional blocks:
- Fuel - reservoir, pump and pipes for supplying fuel.
- Air, it consists of a compressor and an air tube.
- A hemisphere with a small diameter hole where the air stream mixes with oil.
- A nozzle that directs the flame in the desired direction.
The standard design can be modified with your own hands, increasing its efficiency. To do this, the fuel tank is equipped with a heater that heats the oil before the burner starts operating, which makes it possible to increase its fluidity. In addition, a fuel channel made of a metal tube can be wrapped around the nozzle - this way the oil will heat up while the burner is operating.
The burner nozzle is directed into the boiler, where the fuel chamber and water jacket are heated. You can also use the device to melt and heat metals.
Advantages of a DIY Babington burner:
- wide choice of fuel - used machine oils, lubricants of any viscosity, diesel fuel, fuel oil, any vegetable oils, including food waste;
- the presence of impurities in the fuel;
- simplicity of design - you can do it yourself.
Flaws:
- difficulty setting up the burner, especially often when changing the type of fuel;
- smell and dirt - the burner cannot be installed in residential premises, a boiler room is required;
- The use of the burner involves an open flame, so fire safety precautions must be observed.
There must be a powder or salt chemical fire extinguisher in the boiler room!
DIY Babington burner
You can assemble the burner yourself from simple components; for this you will need:
- A hollow ball or hemisphere with such a wall thickness that you can drill a hole with a diameter of no more than 0.3 mm. You can use any metal objects of a similar configuration, for example, a spherical brass door handle, nuts with plugs. The main condition is the possibility of reliable fastening of the air duct.
- Metal tube for supplying compressed air from a compressor, diameter - 10-15 mm.
- A compressor, for example, from a refrigerator, with an operating pressure of 2 atm, a maximum pressure of 4 atm.
- Fuel tank with a built-in heating element of 0.5-1 kW made of non-corrosion metal.
- Fuel sump and pipe to drain excess oil back into the tank.
- Copper tube, diameter - 10 mm, wall thickness - 1-1.5 mm for the fuel channel.
- Oil pump from a car or motorcycle with an electric motor to drive the pump. It is advisable to equip the pump with a filter with a large mesh at the inlet.
- The nozzle is a 200-400 mm long nozzle with an external thread of 2 inches.
- Crosspiece for two-inch metal pipe with internal threads.
- A 1" threaded drain and a 2/1" adapter to drain excess fuel into the sump.
- Adapters and fittings for connecting the fuel line, air duct and nozzle.
Preparing burner components for assembly
- The main and most important task is to make a hole of a given diameter in the spherical nozzle.
The power of the burner depends on its size. For example, a boiler with a thermal power of 10-15 kW requires a burning torch obtained by operating a burner with one hole with a diameter of 0.2-0.25 mm. To obtain more power, you do not need to widen the hole - this will result in larger droplets. It is better to make 2-4 holes with a diameter of 0.1-0.3 mm with a distance between them of 8-10 mm, otherwise the torches will be mutually extinguished. Fuel consumption can be calculated as follows: through one hole of 0.25 mm, 2 liters of waste are sprayed per hour.
on how to make small diameter holes in a metal hemisphere:
- The tank is made of corrosion-resistant metal. A heating element is built into it with a thermostat set to turn off the heating element at a temperature of 70 degrees Celsius.
- It is necessary to make a fuel sump from the same material, equipped with a pipe with an overflow. Through this pipe, oil from the sump will flow back into the tank. To drain dirt from the sump, you can provide a plug in its bottom.
- Assemble the burner body: connect the nozzle from the squeegee to the 2-inch cross in the front part, then adapters: from the top for oil supply, from the back side for air. From below, a 2/1-inch adapter and a squeegee are connected to the crosspiece, through which excess oil will drain into the sump. The adapters are made of plugs with drilled holes into which the fuel and air channel tubes are inserted.
The housing can also be made from a tee, in which the air duct is inserted into the upper part, having previously drilled a hole of the required diameter.
- The fuel path is made of a copper tube, one end of which is wound around the nozzle three times, and then led through a plug adapter into the housing at the top. The fuel pipe is connected to the pump, a coarse strainer is installed and the other end of the pipe is inserted into the tank. The fuel path can be equipped with a valve. The pump is connected to an electric motor operating from a 220 V network.
- An air duct made of a metal tube is attached at one end to a hemisphere with a hole, having previously installed a plug adapter at the required distance. The hemisphere should be positioned so that the oil from the fuel tube evenly flows onto the rounded part of the nozzle, and then into the lower part of the housing and into the sump. The other part of the air duct is connected to a compressor, which is also connected to a 220 V network.
- Since the installation will have as many as three consumers of electricity, which are not turned on simultaneously, it is advisable to equip the burner with a control panel: install a separate toggle switch or button to turn on the heating element and a separate toggle switch to turn on the compressor and pump. If desired, you can equip the remote control with a light signaling system made of diode lamps.
- You can equip the burner with a controller that automatically turns on the units in accordance with the selected mode. Electric ignition is realized using spark plugs, and to extinguish the burner it is enough to turn off the oil supply.
— burner assembly diagram:
Preparing fuel for the burner
Almost any waste oil can be used in a Babington burner. Automotive waste with a large number of foreign inclusions is filtered before being poured into the tank through a mesh and mixed with cleaner oil. Oils with a small amount of impurities can be poured without preparation.
When using edible vegetable oils, such as deep frying, it is recommended to let it sit for several hours and carefully drain off the residue.
These oils are sufficiently fluid at normal temperatures, so they can be heated in the tank only when the burner is started.
When using fuel oil and other thick materials, they must be heated to a temperature of 70 to 90 degrees, otherwise the pump will work with overload.
Security measures
- A burner using oils and other GSPs can be dangerous if installed and operated incorrectly. To avoid a fire, a number of measures must be observed:
- floors and walls made of flammable materials are sheathed with metal or asbestos sheets;
- fuel reserves are stored at a safe distance;
- oil leaks must be removed in a timely manner;
- electrical elements of the installation must be carefully insulated to avoid sparking in the oil spray area;
- The burner must be placed out of reach of air currents and drafts.
A burner with an open nozzle must not be left running unattended!
The Babington burner, unlike a blowtorch converted for working in mining, is a reliable and durable unit that does not require complex maintenance. It is enough to periodically clean the fuel system, tank and sump, blow out the air duct in idle mode, and also monitor the serviceability of the compressor and oil pump. A working burner is a reliable and economical unit with a long service life.
Design of a gasoline blowtorch
In the design of a gasoline blowtorch, there are two main structural parts - a tank for storing fuel reserves and a burner.
An ejector is a device in which kinetic energy is transferred from one medium moving at a higher speed to another.
The burner is called an ejector. The ejector has a design that promotes the flow of air and decaying combustion products during the combustion process. The operating principle of this device is based on creating thrust due to fuel combustion.
A supply of fuel is poured into the tank, after which it is closed with a tight lid with a seal. The lid with a seal prevents fuel leakage during storage of the device, as well as during its operation. The tank for storing a supply of gasoline is equipped with a pumping device that allows air to be pumped into the tank to create excess pressure in it. Excess pressure contributes to the transportation of gasoline from the tank to the burner during operation of the device.
A typical device contains the following structural elements:
- fuel tank;
- handle for holding the device during operation;
- hermetically sealed fuel filler neck;
- pump with valve - to create excess pressure in the tank;
- siphon tube providing fuel supply to the evaporator;
- a needle valve used to regulate the fuel supply;
- evaporator;
- nozzle;
- ejector;
- nozzle cleaning device.
The fuel filled into the device tank is a consumable item. The smokiness of the flame and the clogging of the nozzle depend on the quality of the fuel used; in addition, the degree of explosion hazard that occurs during the use of the device depends on the quality of the fuel. For normal operation of gasoline devices, it is necessary to use special gasoline or gasoline with an octane rating of at least 80. If low-quality fuel is used, the device may require repairs.
How to use a blowtorch
Using a blowtorch requires taking into account many nuances of the work. You need to fill the following immediately: you need to fill the tank about ¾ of the total volume of the tank. Example: the tank volume is 1.5 liters, then you need to fill it to about 1.1 liters. This is done to avoid accidents related to tool tanks.
Before starting the device, you need to check everything. For example, the adjusting screw must be checked - it must be tightly closed. Then you need to check what kind of fuel was filled - according to the instructions or not. Afterwards, make sure that there is increased pressure inside the accessory, because the more air is pumped, the more difficult it will be for the pump rod to move.
With a half-filled 1 liter tank, you need to pump the pump about 60 times. It happens that it is more or less - the features of the soldering device play a role here. The main thing is that if the rod moves hard, but after removing the hand it moves on its own, then there is no need to pump it up - you can start working.
Important! If the pump is slow to move, it is removed and the cuff is lubricated with grease.
You must act as carefully as possible if you do not want to get burned. When about 75% of the fuel has burned out, the propeller opens slightly. It is better to start using it in a minute or two.
Interesting! A blowtorch can be used in a field kitchen if you have a tripod.
Let's consider the basic safety rules when working with such a tool:
- do not open the lamp during operation;
- Do not pour fuel into a heated tank - you need to wait until the tank cools down;
- try not to use a blowtorch in a closed room - only if there is no other way, and you should work for a short time, after which you ventilate the room;
- constantly monitor the condition of the torch and its direction so as not to touch flammable objects;
- when the lamp cools down, bleed off all the air;
- clean the lamp everywhere.
Important! Do not operate a lamp that shows signs of fuel leakage.
To ensure a longer service life of the blowtorch, the user should reduce the amount of time he or she operates the torch. Monitoring the temperature of the cylinder will also be useful, since when the cylinder reaches a temperature of 50 degrees or higher, it will need to be cooled quickly.
Important! Under no circumstances should you smoke near the lamp. If she is ready to work, even more so.
Do not inflate the fuel tank with air beyond normal limits - this is very dangerous for human life. If flammable materials within a five-meter radius are not removed, they can either be covered with steel screens or water can be spilled. A fire extinguisher or a box of sand for extinguishing is placed near the grill.
Important! It is better to work inside a well after checking for the presence of explosive gases in the layers of the earth.
There are also these rules:
- The filler plug must be screwed in until it stops;
- disassemble the lamp only when it is empty and cooled down;
- leaking fuel is a reason to stop all work;
- It would be better not to place the device in a place where there is strong heating.
Making a gasoline burner with your own hands
Not everyone can purchase a new burner that runs on gas or a fuel-air mixture, which is due to the relative high cost of the device . And the purchased model does not always cope with the assigned tasks, especially if it has already been used. This may be due to the presence of hidden defects or breakdowns.
To avoid becoming a victim of such an unwise purchase, many men prefer homemade solutions, which are particularly affordable and easy to assemble. As mentioned earlier, even the most inexperienced welder can easily install such a device using improvised means, saving himself from high costs.
If a homemade gasoline burner is made taking into account the basic rules and recommendations, it should produce fire immediately after a lit match is brought to it. In this case, stable and steady combustion of the fuel-air mixture will be noticeable for another 3-7 minutes. During the combustion process, it is possible to reach temperatures up to 1000 degrees Celsius. Using such a device, you can successfully melt all kinds of solder, including hard solder, as well as metals and glass. In addition, the burner easily solves the problem of heat treatment of small-sized products.
To make a device with your own hands, it is enough to use a number of materials. Among them:
- Frame.
- Pen.
- Sleeve.
- Hook.
- Emphasis.
- A tube.
- Balloon.
- Ring.
- Rubber bulb.
- Filler.
By the way, it is not necessary to create such elements with your own hands - they are present in many other tools that are available in the home workshop. For example: instead of a rubber bulb, you can use a spray bottle .
Step-by-step instruction
A lathe is used to turn the body of the future device. Products from different manufacturers are used as steel. In this case, the body of such an important part is made composite so that one end remains open and the other is closed with a plug.
The latter case involves making a hole 0.1 millimeters larger than the outer diameter. This nuance will allow the body to move tightly within the tube, maintaining the necessary tightness.
- A ring is fixed in the inner part of the body, which is made of slag wool or durable metal mesh.
- At the next stage, the stop and bushing with a hook are manufactured, which involves the use of a durable steel sheet. Then a handle for a gasoline burner is cut out of oak or beech.
- Then all that remains is to prepare the tube by very carefully drilling two holes so that they are parallel to each other. The finished product is processed using special sandpaper, covered with colorless varnish in three to four layers.
- The last manufacturing step is to prepare the tube. The end of the element is passed through the middle of the body, which allows the formation of a nozzle. Using hard solder PMC-54, the end of the tube is soldered, and then a hole with a diameter of 0.2 millimeters is made along its axis.
Solder is optionally made from copper or zinc . In the first case, copper wire is used, which is fired and cut into several pieces using scissors. When choosing the second option, use a glass from a regular electric battery, which is first cleared of its contents and hardened by fire. After this, the glass is placed in a container with cold water and a weak solution of hydrochloric acid, cut into small pieces after such treatment.
Next, you need to combine pieces of zinc and copper in equal proportions, placing them in a crucible and sprinkling with borax. The fusion of metals is carried out on a burner. As a result, the block is cooled, secured in a vice and leveled using a file. The collected sawdust is collected and mixed with borax.
Other features and creation methods
It is not always possible to buy a ready-made burner that runs on a fuel-air mixture or gas, which is due to many reasons. Sometimes this is explained by the too high cost of the equipment, and sometimes by a simple lack of time to visit the store. Therefore, more and more people are becoming interested in making a burner with their own hands. By the way, homemade solutions look no worse than purchased ones. Their productivity is quite high, and there are practically no .
As mentioned above, if you bring a lighter or a lit match to a homemade burner, a fire will immediately break out from the corresponding window, which will burn for about 5-7 minutes, reaching a temperature of over 1000 degrees Celsius.
Due to these features, the device can be used for productive melting of hard solders, heat treatment of small tools, melting of all kinds of metals, solders, and sometimes even glass.
Most of the parts of a homemade burner are created using improvised materials, since they can be borrowed from other unnecessary things.
The burner device itself includes:
- Frame.
- Sleeve with hook.
- Emphasis.
- Handle.
- Rubber ring.
- Balloon.
- Pear (can be taken from a spray bottle).
- Filler.
№
If we talk about this method of making a gasoline burner, then it may be familiar even to those people who have never before asked the question of creating such a device . When completing this task, you need to take two aluminum cans, which must be empty. Cans of beer, condensed milk, Coca-Cola and other products are suitable.
- After thoroughly washing and drying the container, you can begin work. Four punctures are made in the central part of the bottom of the first jar. You can use a nail for this. Similar holes are made around the perimeter of the rim of the can. As a result, it is possible to produce a base part that will supply the flames.
- After this, you need to cut off the part that was made earlier from the rest of the container. The length of the side is three to four centimeters. If you cannot cut the product using ordinary scissors, you will have to use any other sharp object.
- The next step is to prepare a second jar, the bottom of which is simply cut off. Try to perform this step with extreme caution to prevent nicks from occurring. If there are nicks, it is enough to sand them off with sandpaper.
- In the end, all that remains is to connect the two resulting parts. By the way, at this stage, novice welders often have difficulties, because the cans have the same diameter and this significantly complicates the work. To solve the problem, it is enough to make a small cut in the side of one of the cans, wrapping the entire structure with aluminum tape to increase the tightness.
In order for the gasoline burner to be ready for use, all that remains is to fill it with gasoline and then heat the area with a lighter. It is better to thoroughly warm up the burner for 5-10 seconds, after which it will be able to maintain the optimal level without your help.
Now you see that creating such an indispensable device with your own hands is very simple.
№
Another method is used to make burners. It is significantly more complex than the previous one, but allows you to achieve higher reliability, strength and operational durability. Therefore, if you place emphasis on such features, then it is better to make the burner using the second method. True, this will require a lot of effort, patience and time.
So, to successfully manufacture the structure you should take:
- Compressor. You can use an old car inner tube that is constantly inflated, or a basic compressor from an unused refrigerator (if you have one).
- Receiver. Here you can use a regular plastic canister with a volume of up to 10 liters. You also need to find a dense translucent cork.
- Fuel tank. It uses a two-liter metal barrel that will store the fuel mixture.
- Burner. This element is created with your own hands or purchased at the appropriate store.
If all the necessary parts have been collected, all that remains is to follow the instructions and assemble the future device. If you strictly follow the basic rules and follow the step-by-step guide, the end result will exceed all your expectations and you will be pleasantly surprised by the quality of the homemade burner. The main thing is to be ready to devote several hours of time and patience to the upcoming event.
Design features and characteristics
A blowtorch is a necessary thing in the household, especially if the family lives in a private household or owns a car. There are a great variety of popular models, and they all differ in technical qualities and functionality, as well as fuel consumption. Everyone’s selection criteria are different: some pay attention to budget options, others give preference to products from the best manufacturers, others study the ratings of quality products, and still others are interested in maintainability. But there are certain parameters that should not be overlooked:
- Availability of capacity in the fuel tank.
- Fuel consumption indicator.
- How much can you fill the fuel tank?
- Maximum permissible pressure during operation.
- Availability of a warranty from the manufacturer.
- Weight of the device including fuel.
- Overall diameter of the fixture.
- Operational period.
The better the technical characteristics of a product, the more popular it is among professionals. The best designs are those that the manufacturer has equipped with a two-liter fuel tank. The maximum filling capacity is 1.5 - 1.8 liters. The pressure of such a unit is 0.3 MPa. Fuel consumption is 1.2. Weight excluding fuel reaches 2 kg. Most manufacturers provide a 1-year warranty on their products. If used correctly, the product is guaranteed to last about 5 years.
The structural elements of the standard model are:
| Name | Description |
| Fuel tank | The main component of the device. The largest detail in size. Sealed. Equipped with a closing type neck designed for refueling. |
| Hand pump equipped with valve | Necessary to create pressure in the fuel tank. Can be combined with the filling hole. To equip the mounting hole with fuel, the pump must be unscrewed from the housing. |
| Pen | Located on the side of the tank. Used to hold the device and move it from place to place. Guarantees ease of use. |
| Needle tap | Thanks to this device, you can change the rate of fuel supply to the evaporator and adjust the flame. Location: outside the siphon tube. The regulator faces the handle. |
| Siphon tube | The main task of the element is to supply fuel to the evaporator from the tank and connect these two elements into a single whole. |
| Evaporator | A container visually resembling a ring, inside which the fuel turns into a gaseous state and evaporates. |
| Nozzle | Thanks to it, the fuel is atomized and enters the ejector through the evaporator located at the end of the U-shaped tube. Evaporator component. |
| Ejector | This is where the fuel heats up. A flame appears at the outlet and the device is ready for use. It can be called a continuation of the evaporator. |
Popular models are available that are equipped with a small bath located under the evaporator. You can put some fuel in it and set it on fire. This can be considered the first stage of warming up the evaporator. The set contains a cleaning rod, which helps clean the nozzle from dirt and clogging.
How to build a relationship with an old lamp
If you get your hands on a rare old instrument, you should not rush to put it into operation. The same should apply to a tool that has simply not been used for a long time. It is useful to start by cleaning the outside of the lamp and inspecting it carefully. You should make sure that the control valve rotates without problems, the container lid opens and seals securely.
Before using the pump, it is useful to disassemble it and lubricate the cuff with lithol. Now we assemble the pump and check its operation, as well as the tightness of the tank. We pump air into the container without fuel. We apply a solution of water and soap with a brush to all connections and seals: air should not pass anywhere.
Before refilling an old lamp, it is useful to rinse the inside of the tank with gasoline, thus removing possible rust products. If all the pressure is maintained and the tap is working, fill the tool and get to work. Good luck to everyone and may the following video serve as a clear illustration of the above.
How to use
Before we talk about how to use it, we need to remember where a blowtorch is generally used. Among the areas of application are the following:
- soldering metal parts using molten solder;
- heating the elements to be joined by welding;
- heating pipes with frozen liquid in the event of malfunctions and accidents on pipelines;
- removal of old paint and varnish coatings from metal and sometimes wooden structures;
- heating rusted joints to facilitate their disassembly;
- heating and cooking food on the go;
- Use a blowtorch with extreme caution to warm up internal combustion engines before starting them in very cold weather.
In almost all cases, the lamp must be used the same way. It is filled with flammable liquid and ignited. The differences relate to the amount of time the flame is exposed to, the adjustment of its intensity and how to properly direct it.
Tags
make a blowtorch blowtorch blowtorch pump blowtorch pump the whole blowtorch. used blowtorches operation of a blowtorch use a blowtorch. with a blowtorch the blowtorch its own blowtorch appear in the lamp can in the lamp rinse the lamp clean the blowtorch consists of the blowtorch will use the lamp very blowtorch. old lamps screwdriver you will need it If you need to use it needs to be washed and inspected need to check this needs to be checked Need to be checked in
gasesgastimepipeoilhealing or valvemiglooworkingbabingtonforge