Features of wood lathes
In a number of cases, a hardworking owner has a desire to make furnishings and utensils that have a circular cross-section throughout their entire length.
Most often these things are:
- Holders for hammers and files;
- Stair posts, flowerpots, handles for railings;
- Rolling pins, potato presses, grape crushers;
- Vertical pencil cases;
- Cups, mugs, saucers, plates, trays, stoppers.
It will be impossible to cut such things with planes and saws. In this case, you will need at least the most primitive machine.
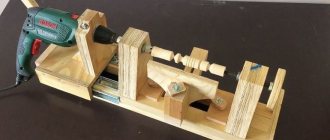
Tabletop drilling machine made from drill
The most common design can be considered a machine made from a hand or electric drill, which can be made removable, so that it can be used outside the machine, or stationary. In the latter case, the switching device can be moved to the frame for greater convenience.
The main elements of the machine are:
- drill;
- base;
- rack;
- drill mount;
- feed mechanism.
The base or frame can be made from a solid cut of hard wood, furniture board or chipboard. Some people prefer a metal plate, channel or tee as a base. The bed must be massive to ensure structural stability and compensate for vibrations during drilling to produce neat and accurate holes. The size of the frame made of wood is at least 600x600x30 mm, of sheet steel - 500x500x15 mm. For greater stability, the base can be made with eyes or holes for bolts and attached to the workbench.
The stand can be made of timber, round or square steel pipe. Some craftsmen use the frame of an old photographic enlarger, a substandard school microscope, and other parts that have a suitable configuration, strength and weight as a base and stand.
The drill is secured using clamps or brackets with a hole in the center. The bracket is more reliable and provides greater accuracy when drilling.
Buying a lathe
Today you can purchase such a device with a click of the mouse by going to a specialized online store. True, such a purchase will hurt your pocket, especially if you choose a high-quality model and not a cheap Chinese craft.
However, this does not mean that the idea of founding a miniature workshop will have to be given up. The problem of high cost can be solved by taking a different route. A simple and durable electrical unit must be made by hand.
Turning round architectural decorations
Such a mechanism will be an excellent help if you need to make inexpensive repairs to a cottage equipped with
- Flights of stairs with wooden balustrades;
- Decorative trims;
- Carved shutters;
- Window earrings.
Drilling machine from a conventional drill
To make a small but functional drilling machine for your home workshop, you do not need to purchase special materials and components. The design of such a convenient and useful desktop device contains the following components:
- The base, which is also called the bed;
- a mechanism that ensures rotation of the working tool (a conventional drill can be used as such a mechanism);
- device for providing supply;
- a vertical stand on which the rotation mechanism is fixed.
Diagram of a homemade machine from a drill
The stand on which the drill will be mounted can be made from a sheet of chipboard. This material is quite capable of supporting the weight of such a device. The bed of such a mini-machine should be more massive, since it protects the entire structure from vibrations, which can negatively affect both the quality and accuracy of the resulting hole, and the comfort of work.
As the material for the frame of such a drilling and adding machine, you can use a regular furniture board, the thickness of which is more than 2 cm. It is most convenient to use the base of an old photographic enlarger for this, slightly modifying its design. Sometimes an old microscope is used, but this is a rather rare option, since such a unit will not be large enough and its use will be limited.
The quality and accuracy that a homemade drilling machine will provide depends primarily on how correctly and reliably the connection of its base and vertical stand is made. The important elements of such a micro machine are two guides along which the block with the drill attached to it will move. Such guides are best made from two strips of steel, which must be securely screwed to the rack using screws.
When making the block, it is advisable to use steel clamps that will securely fix the drill on it. In addition, in order to avoid unwanted vibration processes when drilling, a thick rubber gasket must be installed at the junction of the block and the drill.
After this, you need to make a feed mechanism for such a mini machine, which should ensure the movement of the electric drill in the vertical direction. The manufacturing schemes for such a mechanism can be different, but it traditionally contains in its design a lever and a spring, which is attached at one end to the stand, and at the other to the block with the drill. This spring gives the feed mechanism greater rigidity.
A drilling machine made from a drill, which is not planned to be removed from it, can be made more convenient to use if you disassemble the original switch of the drill and mount a separate button on the frame of the mini equipment. This button will always be at your fingertips and will allow you to quickly turn the device on and off. As you can see, it’s not at all difficult to make a drilling machine from a drill; all you need to do is read these instructions carefully or watch the training videos in this article.
Profitable and promising business
Having gained some experience in the production of decor, it will be possible to move from banal savings to a profitable business. This could be the production and sale of chess pieces. If you sell them through online auctions or retail chains, then an additional source of income will appear in the family budget.
Handmade items quickly find demand, especially if they are offered for sale at a reasonable price.
In the future, this hobby will develop into full-time commercial employment, giving you a chance to acquire professional tools and start earning very good money.
How to make your own PCB drilling machine
A printed circuit board is a plate made of dielectric material, on the surface of which is applied a layer of metal that conducts electric current. The thickness of such products is 1.5–4.5 mm.
In this regard, a drilling machine designed for drilling printed circuit boards is a mini-machine, so when manufacturing it, the following features must be taken into account:
- such a machine does not need large electrical power;
- there is no need for a significant stroke of the machine head with a drill installed in it;
- the machine must be small in size, allowing it to be used on the desktop of a radio amateur or a person engaged in the manufacture of electronic systems;
- the absence of the need for significant power makes it possible to perform a similar installation at a lower voltage class and without the use of bulky chucks designed for installing large-diameter drills;
- On machines for this purpose, special adapters and collets are used to install drills, due to their small diameters.
Working with printed circuit boards is a “delicate” and scrupulous task that requires careful work and precision of the holes made.
You can make a homemade drilling machine for printed circuit boards using the technology considered in the case of using an electric drill or screwdriver, with the only difference being that electric motors of lower voltage and size can be used as a drive.
Main components
The most important components of such a device include
- Bed;
- Electric drive;
- Front and back headstock;
- Stand for accessories.
Rating of budget models
List of inexpensive jigsaw machines for household use with a limited set of functions.
BISON ZSL-90
Machine for longitudinal, oblique, inclined, combined, figured cutting. The device is equipped with an electromagnetic switch that blocks accidental start-up, a transparent protective casing, and a blower pipe for better visibility during operation.
Characteristics:
- used power – 90 W;
- purpose – plastic, wood;
- size (LxWxH) – 590x280x335 mm;
- saw speed – 1450 strokes/min;
- working surface dimensions (LxW) – 375x250 mm;
- table tilt angle - 45°;
- the gap between the body and the canvas is 410 mm;
- weight – 12 kg;
- supply voltage – 220 V;
- number of speeds – 1;
- workpiece thickness – 50 mm;
- price – 7370 rub.
Pros:
- price;
- build quality;
- size;
- Ease of use;
- quiet work.
Minuses:
- poor protection;
- There are no clamps for pinless files.
Dremel Moto-Saw (MS20-1/5)
A jigsaw for forming shaped elements from plastic, metal and wooden blanks. Effectively cuts sheets up to 18 mm thick. The device operates in stationary and manual modes. There is a graduated scale on the sole, which increases the accuracy of the tasks performed.
Characteristics:
- used power – 70 W;
- purpose – plastic, wood, metal;
- size (LxW) – 330x315 mm;
- saw speed – 2250 strokes/min;
- weight – 1.2 kg;
- the gap between the body and the canvas is 250 mm;
- supply voltage – 220 V;
- saw stroke distance – 8 mm;
- number of speeds – 1;
- workpiece thickness – 18 mm;
- price – 7999 rub.
Pros:
- quality of work;
- use in stationary and mobile form;
- low noise level;
- good fixation of saws;
- ease of use.
Minuses:
- noticeable vibration;
- compatible only with branded files;
- Inconvenient attachment to the table.
Support frame base
The bed is a frame that allows you to connect all the parts into a harmonious mechanism. The strength and reliability of such a support directly determines the stability and durability of the entire device. It is better and easier to use a steel angle to make the frame; another suitable material is a rectangular profile.
First of all, it is necessary to mark the dimensions of the assembled automatic sharpening machine. These parameters are determined by what exactly this machine will be used for. As a rule, a stand for an apartment or garage modification does not exceed eighty centimeters in length.
Steering rack drilling machine
You can make a homemade drilling machine from a drill and a steering rack
Necessary materials:
- sheet metal;
- round pipe (steel);
- car steering rack;
- steel round timber;
- metal strip;
- electric drill.
We start by making the base. From sheet metal 2-3 mm thick, cut a rectangular blank of the required size. We round off sharp corners using an angle grinder.
Next, cut a piece of metal strip 30-40 mm wide.
We weld it to the bottom of the base, and immediately bend it along the contour of the workpiece. The bend area must first be heated with a gas burner, or you can first bend the strip to size on a bending machine.
Using a grinder with a petal wheel, we process the outer part of the base so that the edges are flush with the welded strip of metal.
After this we need a steel disk. We attach it to the base and fix it with welding. Then the author drills three holes to install the bolts - tighten them with nuts.
Now we need to make a vertical stand. A round pipe is used as the starting material. Use a grinder to cut the workpiece to the appropriate length. Using welding, we attach it to a metal disk.
Additionally, you need to strengthen the rack in the lower part with the help of three or four jibs cut from thick sheet metal.
Next, from a pipe and a pair of steel plates, you need to make a tightening clamp that fits onto the rack. It is needed to rigidly secure the working support table.
Two metal plates with holes are welded to the top of the rack, which are needed to secure the steering rack of the car.
A section of professional pipe is welded to the end of the rail, to which the master welds a homemade metal clamp, with which the electric drill will be rigidly fixed.
Now we need to make a support work table (we cut it out of a sheet of metal) and a flywheel to lower and raise the drill.
We clean the weld seams with a grinder with a flap wheel, after which the surface of the metal must be painted - it will last longer and be more beautiful.
The design turned out to be quite inexpensive and easy to use. It is very convenient that a drill is used as a drive - if necessary, it can be removed and used for other purposes.
Frame manufacturing process
The slats selected for assembling the frame must be laid so that their upper edges are strictly in the same plane. The parallelism of these guides is checked by measuring the distances between their ends on each side.
- Longitudinal fragments are secured with clamps. The transverse parts are made from the same profile.
- There will be three crossbars in total. Two of them are fixed at the edges of the device, and the third is placed a couple of tens of centimeters from the left end.
At the next stage, all components are joined by welding into a solid composition. It is important that the resulting connecting joint is strong and smooth.
Materials and tools for making the machine
Before starting work, you need to think through the sequence of all technological operations in the manufacture of a homemade machine, plan the manufacturing technology, decide on future materials and tools that will be needed during the work process.
To make a machine with your own hands, you will need the following materials and components:
- Plywood 15 mm.
- Pine board, solid;
- Furniture drawer guides;
- Sleeve;
- Furniture footwear;
- Wing nut;
- Fastening: M6 bolt, self-tapping screws of various lengths.
To make a machine from a drill or screwdriver, you will need the following tool:
- Circular saw or sawing machine.
- Jigsaw.
- Angle grinder (angle grinder or simply “grinder”).
- Drill or screwdriver.
- Grinding machine.
- Various hand tools: hammer, screwdriver, clamps, wood core drill (or simply “crown”), square, marking pencil, etc.
Selecting an Electric Powertrain
When choosing a motor to power the turning system, it is necessary to clarify how powerful it is. For the construction of a homemade self-heating unit, an indicator in the range of 1.2 - 2 kW is quite sufficient. In this case, you should find out exactly what scheme the connection is made according to.
For desktop woodworking, a motor from a household centrifuge is sufficient. Although he is not able to provide turning of a massive workpiece, he will definitely master the processing
- Miniature souvenirs;
- Kitchenware;
- Various types of furniture accessories.
How to make a compact multifunctional machine
Good day to all brain crafters For those of you who do not have large workshops or small racks for tools, homemade product in this article will be useful, which compactly fits all the useful tools and can be easily moved to other work sites.
When creating this brain craft , I tried to make it as compact as possible so that it could be conveniently used even in a small space, and moved even if you don’t have a car. For this, it has transport wheels, and you can move the craft alone, and if you still use a car for this, you will only need a little help when loading.
This compact homemade includes: a circular table, a milling table and a jigsaw. It also has a large cabinet in which you can store your other tools.
Useful link
To show the craft in action I will make a couple of boxes from cheap pine boards. The video shows how I cut boards for drawers on a circular table using a sled; to obtain the required dimensions, I use an additional strip with a clamp.
Then I make a groove for the base. The desired angle can be obtained using a miter gauge with a guide. By removing the cover, you can set the angle of inclination of the disk, in this case 45 degrees.
The jigsaw guide is adjustable in three axes, so you can use blades of different sizes - from 100 to 180mm, thereby obtaining a maximum cutting height of 70mm.
Next, I make a handle for the drawer, and for this I use a router, which I use to create a rounded chamfer. There is also a guide for the miter gauge, and a remote bearing will also be useful for milling curved lines. The router itself can be tilted at an angle of 45°. The box is ready and it is in its designated place.
The tongue-and-groove connection can be made on this brain table in two ways. First, using a jigsaw, an additional strip and a miter gauge. And secondly, on a circular table, using a special conductor.
With the largest size disc that can be installed on a homemade machine (235mm), you can get a maximum cut of 70mm. There are small adjustment bolts on the guide to reduce the tilt and, if necessary, even to lock it.
To connect the parts, I chose the second method; for this, some parts should be placed on one side of the jig, and others on the other.
And this is what happened, we move on to the router, this time we use a clamping device to make a groove in the base. To do this, you need to raise the circular saw and set the router at an angle of 45°.
Step 1: Cutting the parts
homemade multifunctional table begins with cutting all the parts and numbering them. Next, to obtain a handle slot, 4 corner holes are drilled and “finished” with a jigsaw. Then holes are drilled the same size as the diameter and thickness of the opening system washer. The holes are countersunk.
After this, a place is prepared for installing power and emergency shutdown buttons. Then, using dowels and 50mm self-tapping screws, the body of the brain table . If desired, the body parts are varnished, so the craft will look better and last longer.
Having prepared the body, the 3 upper parts are assembled. To do this, parts of the folding frames are cut and the necessary holes are drilled in them. The hole for the tube is drilled of such a diameter that the tube can rotate freely in it, since it is the axis of rotation of the hinged lids.
Then a cavity is selected for the circular saw. I did this using my 3D router; in the absence of something similar, this can be done with a regular router using the appropriate jigs and guides.
On the front side of the circular table cover, a cavity is selected for a quick-release panel, by removing which you can change the angle of inclination of the disk. The panel itself can be used to adjust the milling depth of the cavity.
Having installed the circular saw in the intended cavity, holes for its fastening are marked. A 3D milling machine is well suited for this, because these holes cannot be drilled on a drilling machine due to its limited working surface.
Step 2: Start Build
homemade workshop begins .
The groove for the guide is marked and selected using a circular table. Two additional pieces of plywood will provide the necessary depth to securely attach the guide strip. Next, a strip with a self-adhesive tape measure applied to it is attached to the lid.
After this, a hole for the router is drilled. Then the tubes for the rotation axes are cut off and the frames of the hinged covers are mounted on the body. In accordance with the drawings, fixing supports are manufactured and installed.
The router cover is applied to the frame, aligned and secured with self-tapping screws through holes in the guide channel.
Then the jigsaw cover is prepared, a groove for this same jigsaw is selected in it. If a material with a non-sliding surface, such as melamine, is used for the cover, then the surface of this cover should be varnished, alternating with sanding.
Having done this, the parts of the vertical lift mechanism of the router are cut out and assembled, with the help of which the milling depth will be adjusted.
Next, two pieces of plywood are glued together to make a holder for the router itself. A hole of the same diameter, or a suitable one, is drilled into them as when creating the router cover. This brain router can be made on a CNC machine or even ordered online.
The finished router holder is attached to a vertical lift, and now you can try it in action.
To mark the radius of the tilt grooves, ordinary hinges are temporarily attached to the vertical lift, and scraps of plywood are used to make revolving handles.
Step 3: Completing the Assembly
this stage of assembling the homemade product with those parts that I forgot about earlier. They will give stability to the lifting system.
First, the base parts are cut, I did this on my circular table, then they are assembled into a frame, which is attached to the bottom of the body of the multifunctional brain table . The height of this frame should be the same as the height of the existing wheels.
A latch is attached to the flaps of one of the hinged lids, and a lock is attached to the flaps of the other. This can be useful when transporting your craft and act as a preventive measure against theft of your tool.
Next, a 4-slot electrical extension cord is prepared, two connectors of which will include a jigsaw and a router, and the remaining two connectors will connect an additional power tool. The socket for the circular saw is connected through the power button and the emergency shutdown button. The extension cord is wound around special handles made for this purpose.
The quick release panels are made from opal methacrylate. They are placed in place, and the slot in the circular saw panel is carefully made by the saw itself. I used an accessory from an old router kit as a guide bearing. This attachment will be useful when routing curved lines.
After this, the plane of the entire upper part of the craft ; if the hinged lids do not lie in the plane of the central part, this can be easily corrected by adjusting the tilt of the fixing supports.
Next, the perpendicularity of the working parts of the tools and the plane of the table is checked. To check the router, a tube is fixed in it, along which the perpendicularity of the router axis and the table plane is checked, and the parallelism of the guide channel and the circular disk is checked. And finally, the perpendicularity of the jigsaw blade is checked.
After this, the table covers are folded to check whether the brain instruments with each other.
Step 4: Useful Tools
This step talks about making some useful accessories for a homemade .
First of all, the parts of the slide are cut, then a groove is selected for the guide slider.
After this, the two plywood parts are fastened together with screws, and the positions of the screws should be chosen so that they do not interfere with the subsequent modification of this part.
Then a measuring tape is glued onto it in a specially prepared groove, and this accessory for the brain table is varnished, alternating with sanding, thereby creating the necessary smooth surface on this device.
The sleds are assembled, placed on a multifunctional homemade product , the excess is cut off and a middle cut is cut, and then a measuring tape is glued on.
The guide slider is unscrewed from the sled and a groove is made for the tongue and groove conductor. Same as my other circular table.
The channel slider is adjusted so that the roll between the bolts disappears. The slider itself can be stopped if necessary by simply twisting the bot to the maximum.
Next, the parts for the stand are cut, it is assembled, and varnished and sanded. After assembling the rack, a fixing system for it is made. Dowels glued into this fixing system are used as axle guides. At the end of the rack assembly, the locking system handle is made, and then the entire rack is tested in action.
Additionally, a dust collector for the router is installed on the stand, and threaded bushings for the pressure panel are screwed the brain stand
Having done this, the parallelism of the stand and the circular disk is checked, then a measuring tape is glued into the groove of the side wall.
Having finished this, the parts of the tongue and groove jig are cut, which are then glued and cleaned.
Step 5: A few more useful gadgets
This is the last video of this tutorial , and its first part shows how to make a corner stop (to create it, you can paste a printed template or use a ruler). The stop blank can already be cut on the most multifunctional machine.
The thread in the guide slider is inch, but if you need a metric one, you will have to use a tap.
It is definitely worth temporarily screwing the stop blank to the guide to make sure that the turning radius is correct.
Then the parts of the tenon conductor are cut, and in order to reduce friction it is necessary to slightly increase the thickness of the conductor fastening.
To make a pressure panel, a template is glued onto a plywood blank, and the adjustment grooves for this panel are selected using a milling machine . Threaded bushings are mounted in the required places on the cover with the router.
Next, the jigsaw blade guide is made, the fixing system of this guide is the same as that of the stand.
First, a bearing adjustment system is assembled to avoid wear of the plywood using a metal plate. One of the holes is made large in order to adjust the bearings.
The same thing is done with plywood.
After this, the height adjustment system is mechanized, and now the structure can move in three axes, thereby obtaining the required position.
Finally, the finished saw guide can be tested in action, and it is important to hold the board being sawed with both hands so that it fits firmly enough to the plane of the table.
about the compact multifunctional homemade product , good luck in your creativity!
(Specially for MozgoChins #Portable-Workshop
Functional front lock
For figured turning, the workpiece is fixed between two clamps, which are usually called headstocks. At the same time, torque from the electric motor is transmitted to the front, and therefore it will be somewhat more difficult to assemble it.
The front clamp of a home lathe is an iron U-shaped structure, between the sides of which a shaft and a pulley system are mounted on bearings. The body is assembled from thick rolled steel segments.
DIY drilling machine based on an electric drill
To make such a device you will need:
- a pair of used car shock absorbers;
- electric drill with power handle;
- two housing bearings;
- chain and sprocket;
- profile rectangular pipe;
- spindle feed handle;
- steel sheet, plates and angle;
- stud, bolts, washers and nuts;
- spring.
Let's make a vertical stand. According to the markings, we weld a piece of chain to the wide side of the profile pipe.
Let's make a mobile carriage. Using bearing housings, we mark and drill holes in the steel plate for fastening them with hardware.
We screw a nut onto the stud inserted through the bearing, put on the sprocket and secure it with a second nut.
We mark another plate for installation and welding in the center of the profile pipe.
We clean the old shock absorbers, and after drilling the bottoms, drain the oil and knock off the covers. After wrapping the mirrors of the rods and threads with aluminum foil, we place them in the shot blasting chamber for complete cleaning. Finally, remove the levers.
We place the shock absorbers with their upper parts in the corners at the level of the sloping shelves and weld them.
We fix the shock absorbers parallel to the steel plate at the corners using welding.
We apply a piece of profile pipe to the ends of the painted rods and drill two holes along the marks.
We lay it flat and place a U-shaped bracket in the center with its legs facing outwards and weld it.
For a piece of profile pipe with a length equal to the width of the larger side, remove the opposite edge. Drill a hole in the center of the square base.
We cut a piece of round pipe along the generatrix and weld ears with two holes along the edges of the cut. It turned out to be a kind of clamp.
Insert a bolt into a part made from a profile pipe from the inside and weld it behind the head. We fix the hardware in a vice, place the clamp along the legs with the ears up and connect them by welding.
We place the U-shaped bracket on the profile pipe between the shock absorbers, then the rods will fit into its holes. Screw the nuts onto the threads of the rods and tighten them.
In the photo: clamp for attaching a drill
We turn the shock absorbers over and place an assembly of bearing housings, pins and sprockets on the bracket leg. We weld the assembly plate to the bracket.
We place it on the assembly, then the sprocket will engage with the chain, and weld the shock absorbers to the plates.
Let's make a base for the machine.
We attach a vertical stand to the base of the machine with bolts.
We put the spindle feed handle on the pin and secure it with a nut. For convenience, we screw plastic balls onto the handles.
We secure the drill with a clamp.
The drilling machine is ready for use, so that it is convenient to use workpieces when drilling, we will install a vice on the base of the machine.
Installation of the second clamp
The purpose of the rear analogue is to support the conditional cylinder to be sharpened and provide it with freedom for rapid rotation. The more firmly the tailstock holds the workpiece, the better the final result will be.
- An indispensable condition for proper installation of the second clamp is maintaining alignment with the first.
- Faced with great difficulties at this stage, it makes sense to significantly simplify the task by purchasing a completely finished unit.
The use of an electric drill chuck will allow you to significantly modify the engineering solution. A shaft is clamped in it, the end of which must be pointed.
Operating principle and main components of the drilling machine
A drilling machine is a well-structured product.
Firstly, the bed. As a rule, this is a steel plate (but for small devices it can be made of light alloy) on which the entire product is mounted. A stand is installed vertically on the edge of the bed farthest from the master. The working part, consisting of a motor, a working head with a cartridge and, if there is one, a transmission, moves up and down along it and turns left and right. The head on the stand is fixed in the required position by a locking mechanism.
And precise positioning of the height of the spindle with the chuck and drill is performed with a special handle.
Professional drilling machine
The motor and work spindle can be located on both sides of the stand. In this case, a belt drive is organized on several pairs of pulleys between the motor shaft and the working spindle. By throwing the belt from one pair to another, they set different speeds of rotation of the working body - the drill.
Drilling machine with pulleys and belt drive
Another option is to mount the cartridge on the motor shaft. The design is simpler, but the speed of rotation of the drill must be adjusted by changing the speed of rotation of the motor, and this requires an electrical or electronic circuit.
Drilling machine with chuck on motor shaft
The working tool is a drill. Drills are classified by size and purpose. In the practice of home-made workers, diameters from 0.5 mm to 12 - 18 mm are used. Drills are selected for work on wood, plastic, hard and soft metal, and concrete. They will differ in the sharpening geometry of the working end and the presence or absence of hard surfacing at the end.
Drill
The machine works this way. The motor turns the working spindle, at the lower end of which the chuck sits. There is a drill clamped in it. With rapid rotation and pressure on the surface from top to bottom, the drill cuts into the material with its cutting edges.
Convenient turntable
All that remains is to make a tool rest, where needle files, jigsaws, sandpaper, planes and hacksaws will be laid out during work. Its outlines are not regulated in any way, but it must be completely comfortable.
It is better to design such a table with the participation of the master who will become the main user of the automatic sharpener.
The best option is a swivel stand in the shape of a trapezoid. It is cut out of a thick iron sheet, after which it is mounted on a rotary hinge with a large two-way angle. It will be easy to move such a table in order to bring files closer to you or move them away for a while.
Types of do-it-yourself drilling machines
There are different types of drill presses made at home. They differ in: material of manufacture, structure, size.
And home craftsmen never stop coming up with new designs and selecting sizes for drilling machines. After all, not everyone makes machines according to ready-made drawings.
Here are some of the most popular drill press designs:
Wireless machine made of wood. This design is well suited for portable drilling of large items. Since the operation of the drill in such a machine is provided by the battery, it is necessary to make a special wooden box. The machine drawing is adjusted independently to the dimensions of the built-in drill.
Mini drilling machine. Making such a tool will not take much effort and time. This design is considered the most economical and does not require a large amount of materials. The model is designed depending on the size and shape of the drill; the drill itself can be secured with ordinary rubber bands or cable ties.
Machine made of plastic pipes. This option is good for those who have pipe scraps left after plumbing repairs. In another case, this option is very economical, since PVC pipes are cheaper than metal or wood. It’s not that difficult to make, the main thing is to maintain the proportions and dimensions.
These machines are easy to assemble, inexpensive and very convenient. But still, most often craftsmen prefer a more classic version.
Cutters of different calibers
Cutting attachments are sold in every major hardware supermarket. At the same time, it is possible to buy both single cutting parts and sets.
With a wide selection of cutters available, the turner will create any complex and intricate configurations, including
- Grooves;
- Chamfers;
- Cones;
- Dashed lines;
- Edging;
- Wavy lines.
Classification of tools
There are several variants of jigsaws that have design features and differ in their scope of application:
- Manual - looks like a U-shaped frame with a file attached to it. This option is used for household needs, cutting tasks of plastic panels and plywood. The tool is low cost and easy to use.
- Electric household - distinguished by its high speed of operations, optimally suited for home construction and repair work. Such units have low power, which reduces the scope of their use. Electrical devices process sheet products of small thickness.
- Cordless professional - this type of jigsaw is suitable for quickly completing tasks that require high quality finishing. When manufacturing tools, much attention is paid to build quality and ease of use.
What jigsaw machine do you use?
ManualDesktop
- Tabletop - fixed on a workbench attached to the tabletop. This arrangement ensures safe and efficient operation with increased cutting accuracy. The devices are equipped with powerful motors that allow sawing through thick products.
- Industrial – serial machines for production purposes. Power devices are connected to a 220/380 W power source and can perform long cycles of operations without interruption. Powerful equipment copes with the thickest parts and shows high productivity. Such machines are supplied with a control unit for monitoring and adjusting the units.
Expert opinion
Kokovin Dmitry Vasilievich
Furniture restorer
Jigsaws can work for up to 20 minutes, after which they need time to cool down for 40 minutes; professional battery models can work up to 8-10 hours with short breaks.
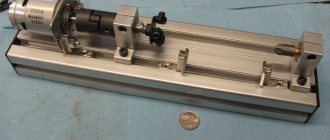
Photo of a homemade lathe
The best devices at an average price
Jigsaws, optimally balanced in the ratio of quality and price. Multifunctional models of high quality.
JET JSS-16A
A convenient tool for household use, allowing you to work with products made of wood, plywood, chipboard, fiberboard, and plastic. The saw strokes are adjustable from 550 to 1600. It is connected with a 35 mm pipe to the dust removal system. Thanks to its small size, the machine does not take up much space in the workshop.
Characteristics:
- used power – 90 W;
- the gap between the body and the canvas is 406 mm;
- size (LxWxH) – 620x340x330 mm;
- saw speed – 1600 strokes/min;
- working surface dimensions (LxW) – 415x254 mm;
- table tilt angle - 45°;
- weight – 11.5 kg;
- saw stroke length – 15 mm;
- power supply – 230 V;
- number of speeds – 1;
- purpose – plastic, wood;
- workpiece thickness – 50 mm;
- price – 12,000 rub.
Pros:
- stable work;
- price;
- reliability;
- quiet.
Minuses:
- slow execution of operations;
- noticeable vibrations;
- poor-quality fastening of saws.
Proxxon DS 230/E
A universal device with a low-noise, high-quality motor and electronic speed control. Equipped with a limit bar, a square with a scale, and a set of 5 files with different tooth pitches. The model has three levels of height adjustment, a cast aluminum frame with stiffening ribs.
Characteristics:
- used power – 85 W;
- purpose – plastic, wood, metal;
- number of speeds – 1;
- working surface dimensions (LxW) – 160x160 mm;
- workpiece thickness – 40 mm;
- the gap between the body and the canvas is 300 mm;
- power supply – 220 V;
- price – 17209 rub.
Advantages:
- low noise;
- light weight;
- smooth speed adjustment.
Flaws:
- low power.
Materials
No less important than the drawings and mechanisms is the material from which the lifting table parts are made. Its strength and reliability, resistance to damage and climatic influences, weight and dimensions of the structure depend on this. So, the most popular types of materials in manufacturing are:
- Chipboard. Combines low price, functionality and pleasant appearance. The material is easy to process, the lightest working surface for a circular saw.
- Fiberboard. Choose slabs with at least a middle plane! Then the material will be as easy to process as chipboard, which will make it possible to produce parts of any shape and size. Environmentally friendly.
- Natural wood. Significantly more durable, although expensive, material. Suitable only for the appropriate interior.
- Glass. It looks original and stylish, takes up little space, and has ample opportunities for decoration. However, it is very important to choose durable glass, otherwise the final structure will be too fragile; Tempered glass is not inferior in strength to hard wood.
- Metal. The most durable and heaviest material, harder than others to process. Not recommended for home installation; although some small models are relevant for such modern stylistic trends as loft and high-tech.
Popular professional machines
Professional expensive equipment models for performing a wide range of operations with high accuracy.
Proxxon DS 460
The device cuts non-ferrous metals with a thickness of 10-15 mm and wood - up to 60 mm, fiberglass, rubber, plexiglass, cork and leather products. It is characterized by low noise. The body is made of cast iron. The device is intended for finishing sawing without further finishing.
Characteristics:
- used power – 205 W;
- purpose – plastic, wood, metal;
- saw stroke – 1400 strokes/min;
- working surface inclination angle - 50°;
- size (LxWxH) – 580x320x300 mm;
- power supply – 220 V;
- weight – 20 kg;
- number of speeds – 2;
- table dimensions (LxW) – 400x250 mm;
- workpiece thickness – 65 mm;
- the gap between the body and the canvas is 460 mm;
- saw stroke length – 18 mm;
- price – 30511 rub.
Advantages:
- good assembly;
- low noise;
- two-speed motor.
Flaws:
- strong vibration on substrates with low hardness;
- ineffective sawdust blowing.
BISON ZSL-250
A device for processing plastic and wooden products. Additionally, it can perform grinding, drilling and polishing. The cooling system avoids excessive heating of the saw. The blade tilt function makes it possible to make cuts at an angle.
Characteristics:
- used power – 250 W;
- purpose – plastic, wood;
- the gap between the body and the canvas is 457 mm;
- power supply – 220 V;
- weight – 22 kg;
- workpiece thickness – 51 mm;
- saw stroke – 1600 strokes/min;
- number of speeds – 1;
- table dimensions (LxW) – 625x330 mm;
- working blade inclination angle - 45°;
- price – 22250 rub.
Advantages:
- stable;
- rubber feet;
- large work surface;
- possibility of simple modification of saw fasteners.
Flaws:
- price.
Purpose and types
Making homemade machines with your own hands is a completely feasible task. They are indispensable in the home workshop and help solve many problems, such as:
- processing of metal blanks, since in everyday life you often have to sharpen or drill something;
- working with wood.
The price of professional tools is high, so homemade machines and other devices made independently are in great demand.
The standard set in the workshop includes:
- carpentry workbench;
- device for sharpening cutting objects;
- device for sharpening drills;
- drilling machines;
- pressing mechanism;
- cutting machine using discs.
How to choose a router for installation in a table?
When purchasing a router that can be installed in a table, consider the following selection options:
- Purpose of the device. Look at what type of model it is and make sure that it is capable of performing the functions you specifically need. We will indicate the main types of table routers below.
- Power. The speed of work and the volume of processed workpieces depend on this indicator. Household appliances start from 0.5 kW, semi-professional from 0.75 to 1.5 kW, and professional from 1.5 to 2.5 kW.
- Milling depth. The distance the cutter can plunge into the part. Here, start from the thickness of your materials.
- Speed adjustment. Allows you to increase the number of revolutions depending on the load on the cutter.
- Additional features. Responsible for comfort of use. This includes lighting, protective visors, and the ability to connect a vacuum cleaner.
Saw frame design
Miter box for a circular saw.
Before considering the design of the future machine, it is necessary to calculate the load that will fall on it. Because the main thing in such a frame is stability and reliability. For powerful industrial saws, the base is a reinforced welded steel structure. But such a unit is not needed for a home workshop. If you are just planning to assemble your own woodworking machine, then you should take into account the basic parameters of the tool itself. After all, saws are different, and, accordingly, the design of the table should be different.
First of all, you need to consider the power of the tool. Typically, for a home workshop, a unit is chosen whose parameters do not exceed 800 W. But, for example, when building a house or cottage, a fairly large volume of wood has to be cut. At the same time, the power of the circular saw should be greater. But experts do not recommend purchasing saws whose characteristics are higher than 1200 W. There is no justification for installing such a tool in a private workshop. And working on it will only increase energy costs.
Remember: the higher the productivity of your machine, the more stable the base for it should be. For professional circular saws, a base assembled from a metal profile is usually installed. Sometimes such frames are even built into the floor. Because vibration of the machine can lead to situations dangerous to life and health.
Nuances to consider
Circular saw design.
The second parameter for choosing a saw is the depth of the intended cut. The thickness of the lumber processed on your machine depends on it. This parameter of professional and semi-professional models ranges from 4 to 7 cm. This is enough for sawing boards and even fairly thick plywood. But it will be inconvenient to process logs on such a machine. In addition, it is worth considering that this characteristic of a saw built into the frame with your own hands is reduced. The depth of the cut becomes smaller by about 1 cm. But this can be changed if the design of the table includes the ability to raise or lower the disk.
When choosing a tool, it is necessary to take into account its rotation frequency. If you need a circular saw to prepare building material, then this parameter may be lower. When an even and clean cut is needed, the rotation speed must be quite high. This is necessary, for example, for making furniture. But even this situation has its own nuances. This saw is not suitable for processing plastic materials. Due to too high tool speeds, the disc heats up and the plastic melts. Therefore, it is worth choosing a unit whose rotation speed does not exceed 4000 rpm; in this case, the table for a circular saw can be assembled from wood. The vibration of such a machine is insignificant and additional reinforcement of the frame is not required.
The last thing you need to consider when making your own woodworking machine is the location of the buttons and other controls. When assembling a circular saw with your own hands, remember that access to the controls must be safe. This rule is especially relevant if the tool is installed at the bottom of the tabletop. In this case, it makes more sense to install the panel with switches on the outside of the machine. Or provide a rising tabletop. This design will also help in servicing the unit. After you have taken into account all the little details and nuances, you can proceed directly to making the table.
Homemade woodworking machine. Adjustment and table lifting mechanism
Show Control Panel
- Homemade woodworking machine. Adjustment and table lifting mechanism. Some tips from my own experience when installing a table lifting device for a jointer. Review of a homemade woodworking machine: clip-share.net/video/5mRI0n5tek8/video.html Carpenter's ax made from royal rails. Sheath for an ax: clip-share.net/video/EDEDkZighUw/video.html Wood ball on a milling machine: clip-share.net/video/lHmH-fclNZI/video.html My channel: clip-share.net/channel/ UCpt4EHBhBdVVWNrmfLK_gJAvideos support the project: www.donationalerts.ru/r/chernak #woodworking #machine #jointer #circular #adjustment #table #mechanism #lifting #chernak