A pre-heater is a device to simplify starting and extend the life of the engine. In addition to these basic functions, installing a heater provides:
- saving fuel in winter. Since in the cold, the engine consumes more
- the interior is heated at the time of landing, which is especially important with leather seats
Heater: brew yourself
When choosing a preheater, you need to take into account the design of the engine, how often you operate it in cold weather and, of course, the cost. The price of a normal pre-heater is about 8,000 rubles, and the weight is about 8 kg, but you can make an engine pre-heater yourself.
In order for the engine to start without problems, it is necessary to heat the oil in the crater. It’s dangerous to do this with open fire, but here’s what you can come up with:
- Take a pipe bent in two places and in different planes (or weld it yourself)
- Weld 3 legs to it for stability and place a nozzle under it
- Since there is no longer an open fire due to the bend, and heating is on, you can place the structure under the crankcase and after 20 minutes, you can drive even in severe frost
It’s a good idea to carry such a device with you at all times, especially for those who like winter fishing and hunting. Nowadays there is a large selection of modern devices of similar action on sale.
Checking the heater operation
Here again, everything depends on the type of heater installed. This information must be indicated in the instructions. However, it often happens that the instructions are written in a foreign language or are not there at all.
In this case, you can be guided by the general rules. After completing the installation and filling in new antifreeze, you need to start the engine and run it for about 5-10 minutes with the device turned off at idle. This is done to remove air from the cooling system. After this time, the engine can be turned off.
When using an electrical type device, to check it you must first turn it on and touch the housing. If it's warm, then everything is fine.
Gasoline heaters should produce a characteristic noise during operation. In addition, you need to constantly monitor the coolant temperature on the dashboard.
Severs-M installation
One of the most popular of them is Severs-M. To install on a car you will need:
- Rubber hose, diameter 16 mm
- Two tees: the first is 32*16, and the second is smaller - 16*16
- Two clamps 30*40 and six clamps 12*20
- Sealant and 5 liters of antifreeze
Since this device is an electrical type, it is necessary to determine in advance the length of the cable and where the 220V outlet is located. It is better to install it under the air filter, and heat it through the stove. The antifreeze intake is from the pipe between the radiator and the stove.
- To get started, you need to drain the coolant and cut the hoses and pipes
- Then install the tees, lubricating them with sealant in advance
- We attach hoses to the tees and tighten everything with clamps
- After this, you need to pour liquid into the cooling system, wait a little until the air comes out, start the car and add liquid
- If after a visual inspection there are no drips at the joints, it means that the installation was successful and heating will be
- The power cord must be secured to the body so that it does not come into contact with heating or moving parts of the machine.
Advantages
These devices have gained such popularity due to their remarkable qualities:
- they are easy to use and perfectly heat antifreeze even in severe frost;
- they heat up the coolant long before the first start of the car engine;
- uniform heat exchange occurs between the engine elements and the antifreeze, due to which the parts included in the cylinder-piston group do not wear out during the process of starting the engine, even at very low temperatures;
- antifreeze heater ensures 100% engine starting even in severe frost;
- the load on other units, including the starter, is significantly reduced during the process of warming up and then starting the engine;
- fuel consumption becomes significantly lower when starting a warm engine;
- The antifreeze heater also has additional capabilities that allow you to warm up even the interior of the car and quickly melt the ice on all its windows.
Autonomous heater option
Another, one of the most common types of this equipment is an autonomous pre-heater. It is capable of heating large volumes of air quickly, consumes little energy, and its operation is almost silent.
Installation can be carried out both in the power supply system and in the cooling system of a car with a gasoline or diesel engine. There will be heating in any case. The energy source in this case is the fuel tank.
This preheater consists of a small chamber with a fuel-air mixture and a special pin that ignites it. In the walls of the chamber there is a constantly circulating coolant, the pump is responsible for heating it. Further, it enters the small circuit of the cooling system, which provides heating.
The installation is quite simple: you need to connect the heat exchanger of the device to the small cooling system office, and the electrical component to the machine’s electrical network. For example, in a Mercedes car, glow plugs can be installed in the same row with the injectors in the cylinders, the wires of which can be connected to the relay.
Spare parts for transport - heater
Top ads View all
Webasto/Heater/Autonomous/Autonomous heater/Webasto/Heater
Auto parts and accessories » Auto parts
3,000 UAH.
Heating, engine heater Longfei LongFei 2kW, pre-start
Auto parts and accessories » Auto parts
999 UAH
Nizhnie Serogozy Yesterday 15:28
Preheater/Webasto/Antifreeze engine preheater
Auto parts and accessories » Auto parts
800 UAH
webasto eberspacher webasto avtonomka preheater wet
Auto parts and accessories » Auto parts
5,000 UAH.
Diesel autonomous engine and interior heater 12v 5kw webasto
Auto parts and accessories » Auto parts
12,000 UAH.
Regular ads
138 advertisements found
138 advertisements found
Want to sell faster? Find out how
Preheater MTZ.
Spare parts for transport » Spare parts for special/agricultural technology
500 UAH
Kharkov, Novobavarsky Today 07:34
Abgas preheater Webasto
Spare parts for transport » Other spare parts
50 UAH
Kharkov, Osnovyansky Yesterday 23:17
Engine pre-heater. Webasto wet
Auto parts and accessories » Auto accessories
1,000 UAH
VAZ engine preheater
Auto parts and accessories » Auto accessories
500 UAH
Electric Antifreeze Heater Heater BMW E46 Schrot
Auto parts and accessories » Auto parts
699 UAH
Heating, engine heater Longfei LongFei 2kW, pre-start
Auto parts and accessories » Auto parts
999 UAH
Nizhnie Serogozy Yesterday 15:28
Air heater SPUTNIK-2D | Heater Binar, 14TS
Auto parts and accessories » Auto parts
7,000 UAH.
Kharkov, Osnovyansky Yesterday 13:56
Diesel autonomous engine and interior heater 12v 5kw webasto
Auto parts and accessories » Auto parts
12,000 UAH.
Liquid pre-heater for engine 14TS - 10, autonomous
Auto parts and accessories » Auto parts
13,300 UAH.
Diesel engine heater
Spare parts for transport » Other spare parts
1,200 UAH.
Kyiv, Obolonsky Yesterday 12:15
CO2, carbon dioxide heater
Auto parts and accessories » Auto parts
500 UAH
Krivoy Rog, Dolgintsevsky 5 Sep.
Antifreeze heater
Auto parts and accessories » Auto parts
1,200 UAH.
Boiler pre-heater, stove
Auto parts and accessories » Auto parts
200 UAH
Kharkov, Osnovyansky 5 September.
Crankcase gas heater VW, Skoda
Auto parts and accessories » Auto parts
200 UAH
Diesel heaters: flow-through Nomakon PP-201 and tank nozzle NTP 101
Auto parts and accessories » Auto accessories
318 UAH
Preheater/Webasto/Antifreeze engine preheater
Auto parts and accessories » Auto parts
800 UAH
Webasto/Heater/Autonomous/Autonomous heater/Webasto/Heater
Auto parts and accessories » Auto parts
3,000 UAH.
AdBlue Rs heater (urea) restoration
Auto parts and accessories » Auto parts
1,700 UAH.
Zaporozhye, Aleksandrovsky 4 September.
Auto refrigerator-heater Oreon
Auto parts and accessories » Auto accessories
2,000 UAH.
Lugansk, Kamennobrodsky 4 September.
Selling Webasto heater
Auto parts and accessories » Auto parts
4,000 UAH.
Diesel preheater PZD -600, PZD -30.
Spare parts for transport » Spare parts for special/agricultural technology
6,400 UAH.
Flow-through diesel fuel heater Nomakom.
Spare parts for transport » Spare parts for special/agricultural technology
2 100 UAH.
Pre-heater Mercedes
Auto parts and accessories » Auto parts
800 UAH
Autonomous system, pre-heater, Webasta for VW T5 2.5 diesel
Auto parts and accessories » Auto accessories
2,800 UAH.
Pipes of the starting heater PZD-30 for the Ural 4320 vehicle
Auto parts and accessories » Auto accessories
250 UAH
Starting heater
Auto parts and accessories » Auto parts
600 UAH.
Electortorch heater EFP 8101500
Spare parts for transport » Spare parts for special/agricultural technology
500 UAH
Liquid pre-heater for engine 14TS-10
Spare parts for transport » Spare parts for special/agricultural technology
2,200 UAH.
Kropyvnytskyi, Podolsky 2 Sep.
Electric pump for pre-heater. Pump.
Auto parts and accessories » Auto parts
300 UAH
Lugansk, Artyomovsky 2 Sep.
Preheater PZD-8-12 V
Auto parts and accessories » Auto parts
5,000 UAH.
Selling engine pre-heater Atlant Plus 2 kW. with pump
Spare parts for transport » Spare parts for special/agricultural technology
1,500 UAH.
Liquid heater/coolant heater
Auto parts and accessories » Auto parts
450 UAH
Electric torch heater MTZ EFP-8101500 Glow plug
Spare parts for transport » Spare parts for special/agricultural technology
600 UAH.
Preheater pzhd-30 KamAZ, URAL kit
Auto parts and accessories » Auto parts
4,500 UAH.
Pre-heater, engine heating Longfei LongFei 1.5kw
Auto parts and accessories » Auto accessories
849 UAH
Engine preheater manufacturing and installation.
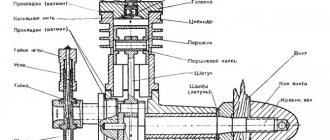
- One of the most important and labor-intensive processes is the manufacture of a heat exchanger; for this you need to make an expansion tank from a piece of pipe and plates using solder and a blowtorch. Make three holes on the top of the tank and solder nuts to them, and on the sides there are pipes, one at the top and the other at the bottom. Example in the photo.
- Install the spark plugs into the heat exchanger housing.
- Insulate the heat exchanger using splen or other insulation to avoid wasting energy and reduce the warm-up time of the liquid.
- The heater will be able to operate in three modes: at mild frosts of 0 - -5 degrees one candle will turn on, at -5 - -15 degrees two candles, severe frosts above -15 degrees three candles. To do this, connect two glow plugs with a jumper, and one should remain independent.
- Then you should connect the device to the car battery; the device must be connected with wires with a total cross-section of at least 5 squares. The wires are connected through breakers 16 and 32A, respectively; this must be done for safe operation of the device in different modes, with the expectation that one candle will consume 15A, and two 30A. Depending on the number of candles involved, power consumption can vary from 180 to 670 W.
- The engine pre-heater is installed in the lower radiator pipe on a small circle, and an electric pump for pumping coolant is also installed there.
You need to warm up the antifreeze in the morning for no longer than 10-15 minutes; this is enough for the liquid to warm up a little. After starting the engine, do not turn off the heating; it warms up the car much faster.
In winter, starting a frozen power plant causes many problems for car owners. Thickened oil, poor fuel volatility, and increased resistance in the battery make the power unit very reluctant to start. But there is a solution to this problem - install and use pre-heaters. These devices allow you to warm up engine fluids, providing relatively easy engine starting in severe frost.
The car accessories market offers a large number of such devices. But many car owners are in no hurry to spend money, preferring to make an engine heater with their own hands. And this is quite possible; in terms of performance indicators, homemade devices are not inferior to factory ones, and the financial costs will be significantly lower.
Fuel filter heater for diesel engine separator configuration
It is important to know
To manufacture a fuel filter heater for a separator configuration of a diesel engine, you will need a lathe.
Before installation, it should also be taken into account that the drain unit in diesel engines is used to remove liquid from the sump. Accordingly, if this device is to be removed, it is necessary to use only proven high-quality fuel.
What will you need?
Tools and materials required for installation:
- set of wrenches;
- a piece of metal pipe for making a bushing;
- wires for connection;
- a lathe that will be used to cut threads.
Algorithm of actions
You can install a diesel fuel filter heater of a separator configuration as follows:
- A metal sleeve of the required size is made. The outer circuit of the device must match the drain valve of the system.
- Using a drill, drill a central hole.
- Internal and external threads are cut. The outer pitch should correspond to the drain element, and the inner pitch should correspond to the thread for the glow plugs.
- The completed structure is assembled from candles. The resulting mechanism is screwed into the body of the separator device. The shape of the part itself needs to be corrected - a pin should be made on the hexagon. To do this, a screw or bolt is welded on the side.
- After installation, the wiring is laid. On the positive line you need to install a switch button and a four-pin relay. The entire electrical circuit must be protected by a safety device to prevent voltage surges and short circuits.
- After installation, it remains to connect two terminals. Grounding or “ground” goes to the bushing, and the positive contact must be connected to the glow plug. The installed device is being tested.
Video: features of the use of fuel heaters
Roman Romanov in his video spoke about the nuances of using heating devices for fuel filters of separator design.
Some nuances
A few details about the features of using both types of heaters. If you take a regular passenger car, the volume of lubricant and coolant is not much different (on average, 3.5 liters of oil are poured, and 4.5 liters of antifreeze). That is, theoretically, approximately the same energy will be required to heat both liquids. But there is one nuance - the oil is in one place - the pan, and the antifreeze is located throughout the system. Therefore, in the case of using a device for heating the coolant, circulation is required, but when heating the oil this is not necessary.
And one more thing - the antifreeze needs to be heated quite strongly (at least to 50-60 degrees), but the oil does not require this; you can only slightly increase its temperature to increase fluidity.
Due to these features, it is not advisable to use a 12-volt heater to heat antifreeze, since proper heating will require a lot of energy. Therefore, autonomous devices are mainly used to influence the lubricant, but those operating from a 220 V network are installed in the cooling system.
Next, we’ll look at how to make a pre-heater with your own hands for a VAZ or any other car. Note that there are a lot of variations of homemade devices, but we will describe only two devices that are relatively easy to manufacture.
Total
Homemade antifreeze heating for a diesel car aims to speed up the warming up of the engine and interior. The essence of its work is that glow plugs heat the coolant when the engine is turned on in a certain temperature range. The installation is easy to assemble yourself using components from VAG.
The heater fits into the inlet of the cabin radiator, the temperature sensor into the outlet of the heater. There are no special comments regarding the installation of performing equipment. Regarding the electrical wiring connection, the only warning is not to mix up the 30A and 70A relays.
The car antifreeze heater has been in use for quite a long time. This idea arose a long time ago and its main reason was the frequent problems with starting engines in winter, especially in regions that are located above the Arctic Circle. To make it easier to start the engine in winter, a variety of technical devices have begun to be used in cars. Among them, the antifreeze heater became the most popular. These devices have become widespread in the army. Almost all military vehicles were equipped with preheating boilers, which in their operating principle and purpose are very similar to antifreeze heaters.
Antifreeze heater 220 V
The first will be an antifreeze heater operating from a 220 V network. To manufacture it you will need:
- heating element;
- Pipe sections;
- Plumbing fittings, tees, adapters;
- Materials for sealing connections;
- Clamps;
- Cable with plug;
- Insulating materials;
Below are the plumbing items that will be required for assembly:
Regarding the heating element. It is best to purchase a heating element for a water heater (for example, “Ariston”), equipped with a thermostat. Installing it in a homemade device will not be difficult, and in addition it will be possible to adjust the heating range. As for power, a heating element of 1.2-1.5 kW is suitable for a passenger car.
The diameter of the pipe and its length should be selected based on the size of the heating element and its mounting thread. The pipe itself should be thick-walled.
To assemble the device you will not need many tools:
- Bench vice;
- Taps and dies for threading;
- A set of keys;
- Angle grinder with cutting wheel (“grinder”).
Having prepared everything, you can start working. Assembling the pre-heater is done as follows:
- We take the pipe and make the necessary measurements, taking into account the existing bends and tees;
- In plumbing tees, the threads are usually already made, so you can immediately screw the heating element into it using sealing materials;
- We cut threads on a piece of pipe (external on one side, internal on the other);
- Screw the prepared section into the tee;
- On the other side, screw the adapter into the pipe;
- We screw another adapter into the third terminal of the tee;
- We connect the cable to the heating element and isolate the connections;
After assembly you should get a device like this:
As you can see, assembling an antifreeze heater is very simple. It is only important that all connections are well processed in terms of sealing, since even the slightest leakage of antifreeze is not allowed. Therefore, after assembly, you should carefully check the device before installing it on the car.
Additionally, you can weld a mounting bracket to the pipe. Installing an engine heater yourself is also not difficult. It can be mounted using either a sequential circuit (embed the device into the antifreeze supply pipe into the interior heater) or parallel (organize the supply from the cylinder block, and the drain into the pipe leading from the main radiator).
Homemade heating of antifreeze in the cooling system with glow plugs: design basics
The main structural elements of the heater are the block and spark plugs. The electrical part consists of large cross-section wires, a thermal relay (thermal sensor), a fuse and an electric relay designed for high current. The main difficulties are associated with the manufacture of the housing to accommodate the heaters.
Components
When designing antifreeze heating for a diesel engine with your own hands, you should pay special attention to the number of spark plugs: two or three heaters are quite enough. An excessive increase in the number of heat-generating components is fraught - each candle has a power of about 200-250 W and consumes considerable current.
Branded heater housings are available both at disassembly sites and in retail sales. One of the options is VAG 028 121 145B for three spark plugs. Price – about 2,000 rubles. In addition to this product, it is recommended to purchase sealing rubber VAG 037 121 687. An alternative is to look at disassembly sites:
- JP GROUP 114505200.
- TRICLO 463201.
- Vaico V10-0962.
- MALO 116092.
- Renault 8200012119.
- Hyundai/Kia 97341-26100.
Fitting
The VAG block is focused on one-way communication. Installing a plastic counter flange will help correct this issue. Its catalog number is VAG 026 121 144E. The cost is about 500 rubles. Alternative parts:
- VIKA 14253 (metal – 250 rubles).
- DELLO 301210144026E (plastic – 50 rubles).
- VAICO V100270 (plastic – 80 rubles).
- JP GROUP 1114500600 (plastic - 50 rubles).
- VAG 0261211452 (metal - 750 rubles).
Functionality
Coolant heaters can be controlled over a long distance using GSM control. This is especially typical for devices that operate on a 12 (24) V power supply.
You can use smartphones, tablets and other similar devices for this. The duration of the heater operation can be adjusted by setting the necessary parameters to the mini-timer.
Manufacturers
Among them it is very difficult to single out anyone specifically. Nevertheless, according to observations, antifreeze heaters from the following manufacturers are installed on cars and trucks: Eberspache, Webasto and Hotstart, as well as the domestic manufacturer Alliance.
Antifreeze heaters are installed in the engine compartment. Most modern cars may have a special place already prepared for this. If the car is an old brand, then you will have to look for it. The heater is installed in two ways, depending on the car make and device model:
With this installation method, the device is placed in the cooling system at its lowest point. It is cut into the small circle ring on the hose anywhere. Heating of the antifreeze, as well as the engine along with it, begins precisely from the lowest point of the system.
As the name of the method implies, the heater is installed directly into the engine block.
The advantage of this method is that the device demonstrates much better efficiency compared to the previous one. But there is also a drawback, which is the rather high complexity of installation.
Emergency heating or how to heat the oil in the engine crankcase before starting in cold weather
Increased fuel consumption from frequent warm-ups is successfully forgotten when the mortal body is immersed in a warm cabin. Another concern is the unattended operation of the engine, you never know what can happen. And the neighbors on the first floor are not happy with the exhaust fumes, and conflict is not far away.
Old-fashioned methods
A proven way to heat up the oil is to heat the crankcase with an open fire. A blowtorch or a bunch of wood chips neatly stacked under the object to be heated will help you get a fire. Plus - there is no need to re-equip any machine system.
- Directing the same blowtorch to the required location is difficult, and sometimes even impossible, due to the small clearance or installed protection.
- Open flames pose a high risk of fire because they are concentrated near rubber and plastic parts.
Modern methods
Safe recipes for heating the oil in the crankcase before starting are based on obtaining heat from an electric current. Where to get it from depends on where the car is stored: in a street parking lot, autonomous power supply from the battery is preferable; in a garage, it can be powered from a household network.
The electric heater is different from that used in the antifreeze heating system from the muffler, but is similar to the glow plug, which is an integral part of the flow-through coolant heater. Generally speaking, there are several electrical oil heating schemes:
- External “heater”: a heating plate (220 V) is installed on the outside of the bottom engine cover.
- Electric dipstick: Through the hole for the oil dipstick, a flexible element is temporarily integrated into the crankcase, which heats up when electric current from a standard battery (12 V) is passed through it.
- Modified drain plug: instead of the standard plug, a part with a built-in heater (12 V) is mounted.
- Heating element: a tubular heating element (220V) is integrated inside the crankcase.
The heating rate and type of power supply are the main guidelines when choosing an idea. The best qualities among autonomous devices are shown by the electrical probe. A 220 V heating element heats the fastest, but its installation is fraught with difficulties.
The idea of heating antifreeze for a diesel car: basic provisions and nuances
The essence of the solution
Modern diesel engines are distinguished by the fact that they use heating of antifreeze with glow plugs in a certain temperature range. The main goal is to extend the life of the particulate filter. When cold, the fuel does not burn completely and soot is formed, which settles on the honeycomb of the filter element. As it warms up, its concentration in the exhaust gases decreases.
Structurally, the idea is presented in the form of a metal block into which special glow plugs are screwed. The housing is a component of the cooling system - a “coolant” circulates through its internal cavity. Most often, the assembly unit is integrated into the cylinder head.
The spark plugs are not always active: the ECU specifies a maximum coolant temperature below which the heater starts working. The system operates in fully automatic mode - when the upper thermal limit (60-75°C) is reached, the heater is deactivated.
Requirements
Let’s say right away that the installation should not be regarded as pre-heating of the coolant. This is not Webasto or Eberspächer! The device operates exclusively when the engine is running - the liquid must circulate through the internal channel.
Based on the operating features of the factory coolant heater, you can create a list of requirements that must be met when assembling and installing a home-made product:
- Switching on should occur after starting the engine.
- Automatic control is carried out by a temperature sensor, which opens the power circuit when it reaches 60-75°C and supplies current to the spark plugs at temperatures below 60-75°C.
- Duplicate manual channel for selecting the operating mode.
Connecting the heater, video
Different device models connect differently. However, they still have a lot in common in this regard. The complexity of the connection depends on the complexity of the heater design. There are quite a lot of peculiarities in the process of connecting units operating from an on-board electrical network of 12 (24) V.
The device must be connected in strict accordance with the instructions included with each heater. If you encounter difficulties with this procedure, then it is better to entrust it to a highly qualified specialist or purchase a device that operates on a 220 V network. Its connection is much simpler.
Installation recommendations
Before installing the heater, you must first completely drain the old antifreeze, rinse the cooling system thoroughly and prepare new fluid. You should try to install the unit in the cooling system for maximum efficiency at its lowest point.
During installation, do not bend the hoses and securely fasten them to the device. At the very end of the procedure, you need to check the heater for functionality directly in the garage.
Option number 2: homemade thermal film
Nichrome makes good thermoelements, but what to do if you don’t have this material at hand?
It turns out that ordinary soot can replace it. It is also a high-resistance conductor, but it has an important feature: a significant part of the thermal energy is released by the heated material in the form of infrared radiation.
This means that heaters with a carbon element heat not only the air, but also the user directly who is in the area of infrared radiation. This property made it possible to create thin film heaters based on carbon emitters.
The device will consist of the following components:
- two rectangular pieces of glass measuring approximately 30x70 mm;
- aluminium foil;
- 2-wire wire with plug.
You will also need some tools, materials and products:
- soldering iron;
- multimeter;
- candle;
- sealant or glue;
- cotton swab.
The heater is manufactured in several stages:
- The glass must be washed, treated with a degreaser and dried.
- We light a candle and begin to move one of the glass rectangles over it, as a result of which it will become covered with soot. The more soot there is, the lower its electrical resistance will be.
The operation must be interrupted periodically to allow the glass to cool.
Now you need to cut out two parts from aluminum foil in the shape of oblong rectangles, the length of which will correspond to the width of the soot strip.
They will serve as terminals for connecting wires.
At this stage, you need to measure the resistance of the carbon coating. We place aluminum contacts on both sides and press them with the second glass.
Now you can use a multimeter by placing its probes on the protruding pieces of aluminum foil. We are satisfied with a resistance of 120 Ohms, then the power of the device will be 1.2 W. If the device shows a different value, you need to remove (to increase resistance) or add (to decrease) a little soot.
- As soon as the desired resistance is achieved, using a cotton swab we clean the edges of the glass from soot to a width of about 5 mm.
- Lubricate the cleaned edges of the smoked glass with glue, then again lay out the foil contacts (they now need to be shortened by 10 mm) and glue the second glass blank on top. The job is done, now the heater can be connected to a 12-volt source.
Additional coolant heater 12 volts
Heated windshield: DIY heated windshield
Friends, I think this topic is interesting for many and the result of our joint constructive discussion will be useful.
INTRODUCTION:
There are coolant heaters, heating in which is carried out by special glow plugs (not to be confused with the usual ones for gasoline engines. Structurally, there are 2, 3 and 4 plugs. Each such spark plug carries a current of 10 to 15 Amps.
THIS IS NOT A PRE-HEATER. THIS IS A COOLANT HEATER, WHICH IS ALREADY TURNED ON WHEN THE ENGINE IS RUNNING.
Let's agree right away
1. Such products have long been standardly installed by automakers on many diesel and other car models. So let's skip the phrases “collective farm”, “how are you going to heat the antifreeze with candles” and the like.2. Comments on the case, constructive, with catalog numbers, with links to examples of installation in real cars, and I ask you - let's do without the empty phrases “wow, that’s not necessary”, “everything warms up quickly for me anyway”, “you’ll only need to change the battery once” per year" and the like. I am also surprised by my comrades who give advice to warm up the car faster by setting the thermostat to 92C. Gentlemen - the thermostat does not contribute to faster warming up of the engine and coolant, it only increases the threshold temperature for the transition from a small circle of operation of the cooling system to a large one through the main radiator.
So there you go! There is a task - to achieve faster heating of the coolant in the stove. Personally, my input data is
1.
I drive 40 km a day (so that the generator has time to charge the battery),
2.
no 220V heaters - this is inconvenient (depending on the outlet) and unsafe (questionable quality components of more dubious origin)
3.
I agree that it should not be a pre-heater, but a heater after the engine is started
4.
only factory products (heater body, flanges, gaskets, spark plugs)
5.
surely the introduction of such a unit will lead to faster aging of the coolant , but I’m ready to change the coolant not after 5 years/75tkm, but even twice as often.
6.
I think heaters with more than 2 candles will be redundant.
7.
Installation under the hood, not in the cabin
HEATER OPTIONS
this is what I found on Drive and more
To prevent the antifreeze in your car from freezing during the cold season, you can use preheating. A description of this device has already been posted earlier; it was made using homemade heating elements, the voltage is 12 Volts. However, it is possible to make a more powerful and faster device with your own hands that will heat the antifreeze and protect it from freezing.
In this case, instead of heating elements, glow plugs will be used, preferably from a foreign car, designed for a voltage of 11.5 Volts. Three spark plugs need to be installed in the heat exchanger, in its body. You can buy the simplest candles, for example: 2 pieces SWAG10919223 and 1 piece NipponDenso DG010.
You still need to buy nuts. The total cost will be relatively small. Nuts and candles will cost 1,300 rubles, solder - 600, and two machines - only 100.
Designs of flow heating of diesel fuel and their characteristics
An alternative to unit heating is flow-through heating of diesel fuel, the function of which, in contrast to a home-made cabin fan heater, is to increase the temperature of diesel fuel. Structurally, the idea is embodied in a small double-circuit block. The diesel fuel circulates along the internal circuit, the structure of the external circuit is determined by the type of coolant.
Liquid
Hot antifreeze is a natural source of heat. The easiest way to use this energy is to locally heat a small section of a pipeline with your own hands. The heater consists of two pipes of different diameters, one of which is located in the center of the other. The external circuit is an integral part of the cooling system; fuel passes through the internal circuit. The global implementation of such a system is hampered by a significant drawback - before starting the engine, the coolant is in a cold state. Essentially, the solution may be relevant in two cases:
- In harsh climatic conditions, as an alternative to tape heating of pipelines, so that diesel fuel does not lose fluidity during transportation.
- In midland regions, in the presence of pre-heating of the coolant.
Electrical
An electrical element with a high resistivity, through which a current of a certain strength is passed, is able to generate heat. This simple principle is taken as the basis for the manufacturing technology of electric heating. Progressive design:
- The direct function is executed immediately after the engine is started.
- There are prerequisites for automatic control of the operating temperature of diesel fuel.
Optimal layout
Flow heating of diesel fuel alone will not cope with dewaxing. Helpers needed. At the initial stage, a homemade fuel intake heater is sufficient. If you don’t want to make things yourself, ready-made factory products will help. Bandage heating of the filter is essentially unnecessary. According to the diesel fuel movement diagram, it is located behind the flow-through heater, therefore, warm diesel fuel splashes in the housing of the filter element and there is no need for an extraneous thermal field.
Artificial heating of the fuel line in the “intake-flow heater” section will not hurt. The line is long, and the local thermal field in the tank is not capable of significantly increasing the temperature of the fuel at the inlet to the fuel intake. Particular benefit from this accessory is felt in regions with harsh climatic conditions.