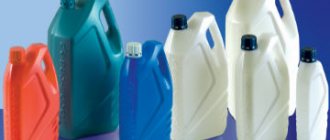
Application of PET tape from bottles
Let's show an interesting use of PET bottle tapes by making a tube.
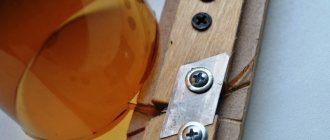
Heat with a construction hairdryer, passing through the narrowings under slight tension. If you use a hairdryer at full power, then in 10 hours of continuous operation, it will consume 60 rubles worth of electricity, if 3 rubles per kW. If you lightly hold the ends of the workpiece and heat it, it will curl. You will need to guide the tapering tape into a narrower passage so that the edges meet. All. Even if you pass the heated one through a hole in the board, you will get a tube. First I twisted a spring steel spiral for a diameter of 3 mm. There is nothing complicated about it, just the preparation. Attached to a hole in the board. For it, I cut the tape 12 mm wide, and there were a couple of holes in the board. I inserted a spiral into one, and screwed the neck of a bottle into the other for a skein to hold tension.
I threaded a ribbon through the neck and cut off the tip to fit into the spiral. Somehow I lost the spiral and made it out of aluminum. And it turned out to be a tube. Then, out of curiosity, he pulled the heated workpiece into the hole in the block.
The block is easy to get and prepare. It’s easy to burn a tube in a 1.5 mm coil, but you can’t burn it through a bar, since it doesn’t heat up behind it and cools quickly. If it's through it, it's harder to pull and you need to increase the tension.
We wrap a piece of fabric around the tape and insert it into the neck. We cut off the corner to fit into the hole of the block and create tubes. When you need to grab it with your hand, turn off the hair dryer and pull until it cools down.
First we will make it 2.5 mm in diameter from 9.5 mm tapes. Then by 2 mm from 7.5 mm. And by 1.5 mm out of 6 mm.
Portable device for turning plastic bottles into rope
Plastic PET bottles at the end of their shelf life usually have two options:
They are either thrown into landfills (which poses a threat to the environment) or they are recycled (a better option than landfill). But there is a third option (much better in my humble opinion). These containers can be reused in so many fun and creative ways, and I'm sure there are plenty of instructions for this already on www.instructables.com.
One thing you can make from a plastic bottle is rope. This type of rope is quite strong and has heat-shrink properties.
I have tried making some jigs in the past to cut pet bottles to make strings. The results were bad. Either the device was bulky, required a table or vice to hold it in place, or the cord got caught somewhere during cutting and broke.
After many prototypes, I have created a device that is simple, efficient and portable. You can take it with you in your backpack, in your car, or in your zombie apocalypse survival kit.
Step 1: Gather Some Materials
To do this you need:
rectangular piece of wood screwdriver metal tape (see above photo) paper blade 4 1.5cm long wooden screws resin paper hacksaw Choose a piece of wood that can easily fit in your hand. Shaft 4.5 x 4.5 x 17 cm.
Step 2: Assembly
You will need to make two slits as indicated in the photos above.
I used hacksaws for this because it has a thin blade. Continue installing the metal strapping strips and secure them to the wood with screws. Their purpose is to hold the blade in place.
Step 3: Let's make the ropes!
Make a cut at the bottom of the bottle and insert it into the device as shown in the picture.
Grab the protruding piece and pull it out with your hands or pliers. Continue pulling until the entire bottle is consumed.
The rope that comes out is 0.5 cm wide. If you want, you can make multiple cuts for different rope widths.
You can use your rope in the garden or anywhere else you need to tie things together. This material shrinks and hardens when heat is applied, so you can tighten things tighter.
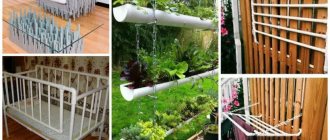
Plastic fence
The technology for making a fence with your own hands from plastic fabric is interesting. To obtain such a canvas, you will need large bottles (preferably two-liter). After removing the bottom and top, the rest of the bottle needs to be cut into two rectangles. The rectangles are connected to each other into a continuous sheet using a stapler. The resulting canvas is attached to posts installed along the perimeter of the fence.
Bottle cutting technology - plastic fence
Application of plastic bottle tape
It’s surprising that plastic bottles, which are thrown into general trash or simply left in nature: in forests, on lakes, in parks - and cause a lot of harm to the environment and the aesthetic appearance of recreational areas, can bring a lot of benefits. One of the applications, or rather the transformation of plastic bottles into useful material, is the creation of PET tape from them. It is this tape that we will now talk about.
To cut tape from plastic bottles you will need a simple device: a special machine. On the website Visiting Samodelkin, several options for such a machine are already presented, which are easy both to manufacture and to use. Option No. 1 Option No. 2 Option No. 3
PET tape is a very useful thing and is finding more and more new applications in the household. Wrapping the handles of hammers and axes with PET tape will protect them from chips and dents. Over the years, the protective handles on pliers, wire cutters, and other tools tend to fall apart. Wrapping such tools with PET tape will be more durable, as the material is more resistant to low temperatures and ultraviolet radiation.
The thinnest ribbon can be confused with fishing line; it can be successfully used on a donk. It was tested that fish up to 2 kg could not break such a fishing line.
You can make a broom from PET tape that can be used to clean concrete paths in your summer cottage or paths made of paving slabs. DIY MK Broom made from plastic bottles
Receive a selection of new homemade products by email. No spam, only useful ideas!
*By filling out the form you agree to the processing of personal data
Plastic bottles for watering the garden
The first thing you can use ready-made PET containers for is for watering. Irrigation of a plot is generally a pressing issue for most summer residents, especially for those who receive water on a schedule or visit a suburban area only on weekends. In such a situation, useless plastic bottles will help, which will help create an irrigation system for the entire site without any financial costs. Let's consider three easy-to-implement options for creating a drip irrigation system based on plastic bottles of various capacities.
Simple root irrigation system
In order to water plants in doses and automatically, you will need:
- PET containers with a volume of 2 liters at the rate of one bottle - one plant.
- foam rubber (any scraps).
Pour water into each container to 4/5 of its volume. Insert a piece of foam rubber into the neck instead of a cork. Place the bottle under the plant so that the neck is in close proximity to the plant's root. As you empty, simply add water to the container.
Drip irrigation
For this irrigation system, the size and shape of the containers does not matter. According to reviews from summer residents: the more, the better. Bottles need to have their bottoms cut off. Use a hot awl or thin drill to make 3-5 holes in the cork, 1-2 mm in diameter. Screw the stopper tightly onto the neck.
Dig such a container vertically (neck down) near each plant and fill it with water. Such a stationary root irrigation system requires only timely filling with water.
Hanging irrigation system
In this option, whole bottles with a capacity of 2 to 5 liters should be used. depending on the reliability of the fastening system. As when creating a drip system, make several holes in the plug with a diameter of 1 mm.
Now you need to build a support. Spears should be dug at different ends of the bed, with a jumper (slat, timber) placed on top of them. Hang the filled containers, neck down, from the top bar.
To prevent water from eroding the ground, the area where water drops fall should be mulched.
The advantages of a watering system made from plastic bottles are undeniable:
- the soil is moistened directly in the root zone of the plant;
- Irrigation is carried out with water heated by the sun;
- possibility of adding fertilizers directly to water;
- variability of application.
But the most important advantage of such watering is that it does not require human presence.
All the trash goes to work: 3 interesting ideas for using plastic bottles
Ideas for using plastic bottles
This time, the Homius editors received an interesting letter that they could not help but publish. The fact is that it is not like others coming under the “Stories” heading. Today’s article was sent to us by Vladimir Alekseev from the city of Klin, Moscow region. And he talked about how you can protect nature by recycling plastic bottles yourself, without throwing them in the trash.
Somehow I got excited about the idea of using plastic bottles for household purposes. Initially there were a lot of ideas, but the first of them were banal and uninteresting. Over time, my head began to work in a different direction. I wanted to do a similar review of some thoughts on this matter for a long time, but the problem was that the resources that were full of such content were not pleasing with the content of the material. All the articles on them were intended, as it seemed to me, for schoolchildren. And finally, this magazine caught my eye, so it is here that I will be pleased to present my review.
Plastic bottles are simply a storehouse of material for various needs.
Fence rack
To make such a fence, posts are placed along the perimeter of the fence, to which transverse slats and racks are attached and thickly lubricated with construction glue. Cleanly washed, dry, sand-filled bottles are placed on racks.
Alternatively, you can not glue the bottles to the racks, but screw caps from plastic bottles to the slats at the same distance. The bottles are screwed into the corks, and then their bottoms are fixed with nails to the top rail. In this case, the bottles are not filled with sand, or only half filled.
Sample fence made from bottles
Idea for a garden: plastic net for climbing plants
In order to weave a mesh from plastic bottles, you will need to cut them into a continuous strip. But performing this task with scissors is quite problematic. The costs of labor and time will clearly not be comparable to the final result. Therefore, I had to think about how to make it easier to cut plastic containers into narrow strips. The answer turned out to be simple.
Manufacturing of a tape cutting machine
To do this, you will need an aluminum corner, which is laid so that its edge is directed upward. Next, using a hacksaw for metal, cuts are made to different depths, but always through them (it is better to divide them into 2 groups, leaving space between them for a hairpin). I realized this after I made my machine. After this, all that remains is to drill a hole in the corner area in the gap left between the groups of cuts. A pin should be screwed into this hole and secured with nuts. In fact, at this point the manufacture of the machine can be considered complete.
Ready-made machine for cutting tape from a plastic bottle
How to use a plastic bottle cutting machine
The corner must be fixed in a vertical position, and a bottle with the neck cut off at the bottom from the machine must be placed on the pin. After this, we insert the edge into one of the slots and turn the container a little until a piece of strip appears from inside the corner, sufficient for it to be pulled. Now you can stretch out the strip. A plastic bottle placed on the machine's pin will rotate until it opens completely.
Be careful! It is better to perform all such work with gloves. The plastic strip has quite sharp edges. If your hand slips, you can seriously cut yourself.
You can pull out the strip until the plastic bottle runs out
It should be said why the cuts of different depths were made. The fact is that each of them corresponds to its own width of the resulting band. The deeper the cut, the wider the tape. As a result, you should get an even long strip from which you can weave a network. Although it can be used for other purposes.
For example, in cucumber beds you can do the following. Two reinforcement rods are driven in from the ends of the landing, between which steel wire is stretched. Wooden pegs are driven into the ground, and a plastic strip is stretched from them to the wire. As the cucumbers grow, they will wrap around the ribbon and then you will not have to pick the fruits from the ground.
This is the neat tape you should end up with:
Installing a net of plastic bottles at a summer cottage
Now I will not dwell on the technology of mesh weaving - there is quite a lot of similar information on the Internet. I will only say that the process is quite simple and even a child can cope with such work. As for installing the network, before placing it on the site, it makes sense to decide on the location. The fact is that if it is placed along the wall, you will need to make rings for fixation only along the upper and lower edges. In this case, climbing plants can help hide all the imperfections of the facade.
If you use it to create a hedge, then it is best not only to fix the network on the poles, but also to stretch the wire on top for fastening - this will be more reliable. But be prepared for the fact that every spring the network will have to be cleaned or completely replaced.
This mesh of cheerful colors can be obtained from ordinary plastic bottles intended for disposal
Making a multifunctional fishing line-rope from a PET bottle
What distinguishes a survivalist from an ordinary person is not camouflage, supplies and a stash of knives in his pockets. The differences are primarily at the level of thinking. An ordinary person looks at a thing and uses it according to generally accepted stereotypes. And the survivalist looks and thinks, “How can it be useful to me?” And this applies to everything - even ordinary plastic bottles.
The methods of their use are very diverse: water purification, building material, and much more.
But our comrade Fyodor Stepanov (he has already repeatedly shared with us his cunning know-how, for example, making a smokehouse for fish from an army cauldron) discovered another effective application - from PET bottles you can make a particularly strong fishing line-rope . Moreover, he not only figured out how, but also made a video about it. Below are the text and words of the author.
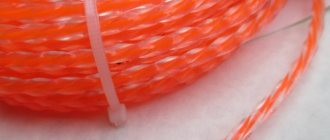
This video is about making a fishing line from a plastic bottle. Not tapes, but ropes. PET tape is good for everyone, but it has a number of restrictions on its use.
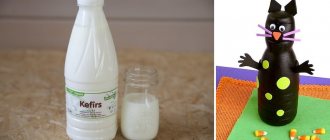
To make such a rope we will need a bottle cutter, a screwdriver and a hair dryer. The bottle cutter deserves special attention, thanks to its inventor, lawyer Egorov (this friend also made a kayak from construction film - we also have such an article. Editor's note), a link to a video on its manufacture is in the description.
First, we cut a ribbon from a regular plastic bottle. The thickness of the fishing line produced depends on the width of the tape being cut; the thicker the fishing line is, the wider the tape you use. Then one end of the cut tape must be fixed, for example, in a vice, and the other must be clamped in a screwdriver chuck.
We stretch the tape and begin to twist it into a rope. The tape must always be kept taut. If you let go, the ribbon will unravel. Now let's take a hair dryer and heat the tape along its entire length.
Due to the tension force, the heated section curls into a neat spiral, and when it cools back it will no longer unravel. One piece of advice - don't overheat. Polyethylene fluorophtholate easily vulcanizes and loses all its beneficial properties.
Please note: to ensure uniform weaving of the rope, the tape must be periodically twisted during the manufacturing process. That's it, the fishing line is ready.
If an urgent need arises, you can do without a hair dryer and a screwdriver. Using, for example, any stick as a crank, and a lighter or torch to heat the PET tape. But, it is better to use a more technologically advanced tool. Empirical observations have shown that a rope can be made from several layers of PET tape; such a rope is more elastic and stronger, but much thicker.
Now a few words about the use of such a fishing line-rope . As you guessed from the name, this line is perfect for trimmer lawn mowers and mulchers. The cost of industrial fishing lines is high, but here you get it almost free of charge and in unlimited quantities. In addition, the store may not have the type of size you need, but using my method you can make any size.
The fishing line is much stronger than PET tape of the same width and can withstand significantly more load. And thanks to the cylindrical geometry and rigidity, it easily fits into eyelets, grooves and sleeves. I'm sure there are a lot of uses for such a rope. From using it as linen to making bow strings and guitar strings from it.
Share your ideas on the use of fishing line-rope in x.
Author: Fedor Stepanov
Actually here it is. A completely ordinary plastic bottle turns into a multifunctional product that can seriously make life easier for our fellow survivor. So take this simple technology into your arsenal - you never know where you will need a strong rope.
Source: https://lastday.club/leska-veryovka-iz-pet-butylki/
Interesting product made from a plastic bottle: children are delighted
It is very interesting to watch the reaction of a child who sees the process of “birth” of a magnifying glass from an ordinary half-liter plastic bottle. Now I’ll tell you how it’s done.
First, you need a bottle with semicircular sides near the neck (this is important). We unscrew the lid from it and along it, like a stencil, we draw 2 circles along the bent sides. For clarity, I photographed this action.
Using a marker and a cap, marking the desired area is quite easy
This is the only step you can trust a small child to take on his own. Under no circumstances let him perform the remaining actions himself. This is fraught with injuries, cuts and burns.
Next, using a stationery knife, you need to carefully cut out the marked circles and attach them exactly one to the other so that the bulges are on both sides. Of course, in appearance it already looks like a magnifying glass, but such a product is unlikely to allow you to see small details, so it needs to be modified.
The two separate parts need to be connected. The most convenient options for performing this task would be hot melt glue or a regular soldering iron (the latter is preferable). Having folded the two halves, we carefully heat them with a soldering iron in a circle, the plastic melts and sticks together tightly. I was in a bit of a hurry, so the soldering flaws are visible in the photo. If you are not in a hurry, the lens will turn out very neat.
We heat the edges with a soldering iron, as a result of which the plastic melts and sticks together.
After the future magnifying glass has become sealed, we proceed to the third step, but we do not remove the soldering iron, we will still need it. Using a syringe with a needle, through a puncture in the seam, we fill the lens with plain water, preferably well-settled, so that bubbles do not appear there after a couple of hours. By the way, to do this, when soldering, you can leave a small area not glued. It is water that will give the lens the ability to magnify objects. After the “piece of glass” is filled, we solder the puncture with the same soldering iron.
Use a syringe to fill the lens with water.
Now you can give your child a magnifying glass made with his direct participation, which will contribute to even greater delight. Now it will be much more interesting for him to explore the world around him.
This is how a magnifying glass made from a plastic bottle works
Wire fence
When there is a need to enclose flowers in a flower bed with a higher structure, it makes sense to build a decorative fence from bottles strung on wire.
Step-by-step installation instructions
Work should begin with a preliminary calculation of consumables. It is extremely important to immediately determine the size of the fence, because you can build a fence of any height.
In order for the structure to have an aesthetic, neat appearance, it is made from identical spans with an equal number of fragments.
Advice. Do not make spans that are too large; the optimal size for each is 200 cm. With such dimensions, the wire will not sag in the sections made.
- To avoid distortions, use a ruler and marker to mark the areas of punctures for the wire on each fragment.
- Make holes in the bottles with hot wire or a soldering iron.
- Mark the area and install support posts.
- String the bottles onto the wire and connect them into sections.
- Secure the sections to support posts.
Advice. If you plan to install a fence of plastic bottles of considerable height, it makes sense to enclose each section in a wooden or metal frame. This will give the product strength and additional rigidity.
Useful lifehack for home use
Now it's time to move on to more useful things that can be useful to everyone. Surely everyone knows the problem of finding small objects on the carpet, especially if it has a large pile. And if scattered metal nuts and screws can be found with a magnet, then with plastic and rubber bands it is more difficult. Of course, you can sit for a long time collecting them manually, but it is better to do it differently by making a special attachment for the vacuum cleaner.
The plastic bottle is cut 5-7 cm from the neck - this will be the basis of our nozzle. You can put it aside for a while and work on the filter. We use part of a woman's stocking as it. And my advice to you is to ask your wife for permission to do this. I had the temerity to take this piece of women’s clothing on my own and use it for my own purposes. Believe me, this does not lead to anything good. To this day, my wife reminds me of what a bad person I am and how long she has been looking for exactly these tights.
Be careful, it’s better to ask than to ask for forgiveness after a long time
Let's start making a vacuum cleaner attachment
So, now all the elements are ready, all that remains is to pick up the tape and start making the nozzle. For this work, you can use any adhesive tape, but after several attempts, I came to the conclusion that paper masking tape or stretch (stretch) tape, which promotes greater tightness, is best suited for such purposes.
Part of the plastic bottle is ready, we cut the tights and proceed to the nozzle itself
Taking the cut-off part of a plastic bottle in your hands, we pull a stocking over it, which is fixed to the neck with adhesive tape. It should be wound until the nozzle fits tightly into the vacuum cleaner hose. Most often, this does not require a lot of tape - modern vacuum cleaners are equipped with hoses that are not as wide as their Soviet predecessors were equipped with.
We fix the stocking on the bell using adhesive tape
How it works: an example of using the nozzle
Now let's figure out when such an attachment can come in handy. A common example. In a plastic box from under the buttons, the owner contains small rubber gaskets (the kind used in vapes). There is a need to replace something that has become unusable. The owner opens the box. At this moment she slips out of her hands. As a result, all the pads scatter on the high-pile carpet. The gaskets were taken as an example. It can be anything, even beads for weaving bracelets and other small items for women.
The box slipped out, the gaskets fell apart, will have to be collected
There are no questions, you can sit down and assemble everything manually, but this will take time. In addition, such a number will not work with scattered beads. It is in this situation that a vacuum cleaner attachment made from a plastic bottle and stocking can help out. We stick it into the hose, turn on the home assistant and walk over the area of the carpet where the trouble occurred. If the owner is dissatisfied with the result, not everything has been collected, we simply repeat the action.
This is the result that can be achieved in 5 seconds where manually it would take at least 15 minutes
PET bottles for decorating a summer cottage
Due to their properties, plastic containers have long been successfully used by our summer residents to create garden decor. Next, let's look at several examples of the successful use of plastic bottles of various sizes in garden decoration.
Fencing beds and flower beds
The simplest design of a fence made from plastic containers is a palisade. In order to make a continuous fence of such a design, you will need a mass of bottles of the same volume and shape, filled with earth (sand, clay)
Now the small matter is small: we assemble the structure. We dig each container into the ground halfway, creating a “bottle picket fence.” After construction. You can leave it as is, or you can paint the resulting border in any color of the rainbow.
You can take a simpler route: do not dig in the elements of the palisade, but fasten them together with tape.
The structure is simply placed on the grass, outlining the boundaries of a flower bed or bed.
garden path
To create a garden path you will need bottoms from PET bottles with a capacity of 2 liters.
- the soil is leveled.
- covered with a layer of wet sand, layer thickness 70-100 mm.
The bottoms are laid out on the future path and carefully driven into the sand until completely filled. The joints between the bottoms are filled with dry sand, and for better fixation - with sand-cement mortar.
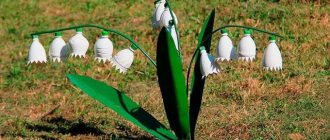
Flowers from PET bottles
You can simply decorate your summer cottage using “plantings” of plastic flowers.
Making such a composition is extremely simple: you just need to awaken your imagination, pick up a knife, several plastic bottles and a coil of thick wire.
From the tapering part of the bottle you can create beautiful flowers, which will be used to create bouquets and decorate crafts for the home and garden.
We cut the neck lengthwise, forming six petals. We round each one with scissors. We melt the edges of the petals over an open flame to give them volume. The inner part of the flower can be cut out of plastic of a different color. We glue (sew together) the structure using polymer glue or thin wire.
Animal figurines for garden decoration
The Internet is replete with photographs of funny animals made from plastic bottles. If you decide to decorate your garden with funny little animals from PET containers, then the easiest option is funny pigs and bunnies.
The bunny is made simply:
- in the tapering part two cuts are made for the “ears”;
- The ears themselves are cut from a plastic bottle.
The structure is assembled using glue.
Pigs are made similarly, but only horizontally. The main thing is to color your creation correctly and make it recognizable.
Let's sum it up
Of course, the 3 listed options for using plastic bottles in everyday life are just a drop in the ocean of ways to give a second life to such material. The format of the article does not allow us to cover everything that can be made from them. But it leaves room for flights of fancy. And if you think about it, anyone can come up with something new and interesting. The main thing is that if even one plastic bottle is used in a family, our nature will become cleaner. Remember that plastic does not decompose for decades, poisoning the soil in which it lies.
I hope you enjoyed reading my review. If something remains unclear, write about it in the comments below. I come here quite often, and therefore I will definitely explain everything. It is also very interesting to know your opinion about the article: whether you liked it, whether everything was explained clearly.
The Homius editors invite home craftsmen and craftsmen to become co-authors of the “Stories” section. Useful first-person stories will be published on the pages of our online magazine.
Mini-fence: visual zoning and decor
The simplest fencing option is a border or mini-fence made of bottles, half or more buried in the ground. As a rule, in this way the space on the site is zoned, flower beds or garden paths are fenced, and unusual flower beds are formed. Bottle borders can also serve a purely decorative function.
Finishing with plastic bottles
To make such a fence, it is enough to dig bottles, previously filled with sand or earth, around the perimeter of a flower bed or other area that you want to visually highlight. Such a seemingly simple, even primitive border can be made the highlight of the design of the site, if you take into account some nuances. So, you can “play” with the shape, size and color of the bottles, alternating them according to a pre-designed pattern. An interesting effect can be achieved if you use various bottle fillers. For example, fill some of them with light sand, and some with dark sand. You can use pebbles of different sizes and even broken glass as filler. Bottles that combine different types of fillers will look unexpected.
Application of plastic tape
Drinks and water in plastic bottles are a simple and inexpensive way to quench your thirst. Mountains of used containers fill highways and recreation areas, exacerbating the already unfavorable environmental situation. The production and use of plastic tape will not only allow you to enjoy clean water bodies and surrounding greenery, but also simplify the solution of everyday issues.
Fence made of lids
To make a fence, you can use not only entire bottles, but also only their caps. The main problem here is to collect the required amount of material. On average, it will take 10-15 thousand covers to make a fence around it. The work is painstaking - holes are drilled in the lids, then they are strung on wire. It is preferable to string the lids not randomly, but to think in advance which of them can be used to create a pattern - then your fence will look aesthetically pleasing.
Fence made of lids
Application of plastic tape
Extends the shelf life of tools and kitchen utensils. Plastic and wooden handles of knives, ladles, skimmers, pliers, screwdrivers, and axes wear out over time, break, and crack. With the help of affordable and inexpensive tape, kitchen utensils and construction tools can be used for several generations. Just wrap the handle tightly and heat it with a hairdryer; this connection is incredibly strong. After reconstruction, household items are not afraid of any mechanical damage, direct sunlight and low temperatures.
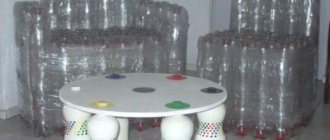
To create garden furniture with your own hands, it is not necessary to use expensive nails, screws, curtains and other fastening materials. It is easy to connect the elements of a swing, table, chairs, gazebo with plastic tape, even of small width. Such structures can withstand the weight of an adult; for a strong grip you will not need any tools other than your hands and a hair dryer. It is possible to give new life to old furniture - tables, chairs, sofa seats. The use of plastic tape in this case is similar to weaving furniture from grapevine. Only such material will not fade in the sun, will not deteriorate from rain, and will not be scratched by pets.- Plastic tape is also used in the world of fashionistas. Wicker bags and wallets are made from wider material. These are durable, transparent bags, trendy this season, or evening options - miniature, elegant clutches.
Variety of crafts
It is easy to make original necklaces, bracelets, hairbands and earrings from thin canvas. You can create entire compositions by giving the ribbon the shape of flowers. Acrylic paints apply evenly to the material, allowing you to give products a variety of color options.- A very thin tape 1 mm wide can replace fishing line when fishing. It will also be useful as a clothesline, or hanging a winter bird feeder, but it will last much longer.
- The use of plastic tape is indispensable in construction. Formwork for the foundation, installation of a fence will take less money using plastic fasteners. You can lift heavy loads to the desired height.
- When moving or transporting furniture and household appliances, homemade tape will protect all property from damage.
For a gift or designer box, material with a width of 5 to 10 mm is suitable. Using a few meters of inexpensive raw materials, it is possible to weave a laundry basket, for toys, or a whole set of boxes of different sizes, but in the same color scheme. In the same way, unique lamps are made, sconces and floor lamps are restored.
A hammock is one of the best ways to relax and unwind in your garden. To create it you will need a tape 10-12 mm wide, a piece of thick fabric and a furniture stapler. Having chosen the supports, tie 2 plastic pieces (without tension) around each, and heat the knots with a hairdryer for better fastening. Wrap the edges of the fabric around the tape and connect with a stapler. Do the same with the second ribbon and the other end of the fabric. Holes are made along the width of the canvas with scissors, narrower strips are made and attached to the bases (stands).
Sources:
https://izobreteniya.net/primenenie-pet-lentyi-iz-butyilok/ https://usamodelkina.ru/2542-primenenie-lenty-iz-plastikovyh-butylok.html https://homius.ru/idei-ispolzovaniya -plastikovyh-butylok.html https://7ya-i-ya.ru/kak-sdelat-samomu/8505.html
0 0 votes
Article rating
Fence as a decorative element on the site
Plastic bottles can be used to fence off beds from each other.
The easiest way to use plastic containers is to decorate flower beds. Some people use old tires for this, but bottles can be used as an alternative. Since such a fence serves only a decorative function, it should not be high. You can simply cut off the bottoms of the bottles and lay them around the perimeter of the flower garden. For beauty, they can be painted in the desired color, for example, so that they match the flowers in the flower bed. It is better to apply paint from the inside so that the color lasts longer. So the improvised border is ready!
If you need to divide the beds, separate the paths, or simply decorate the area, then the bottles should be dug into the ground about halfway. To make the fence stronger, sand or earth can be poured inside the containers. Some inventive people fill them with pebbles or colored glass. This makes it even more beautiful. You can alternate bottles of different heights and arrange them in zigzags. It all depends on your imagination.
If you need to make the fence higher, you can tie the bottles together in several rows. It is recommended to connect them using wire. After each bottle you string you will need to tie a knot. This will make the structure stronger and more durable.