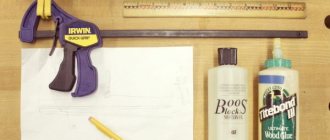
Stages of creating a spit at home
Many people are interested in how to make a spit with their own hands.
First you need to decide on the length of the skewer, as well as its diameter. An ordinary kebab requires a regular rod with a diameter of less than 1 cm, but to fry a pig you will already need a rod with a diameter of 1 to 1.6 cm. After welding the rods in a cross-shaped position, you need to create a handle, which can be made either stationary or stationary if desired. or removable. You can even take a regular door handle.
The rods can be round, square or flat - it all depends on the preferences of the master. The round view is not ideal, as there is a risk that the carcass will slide and turning it to the other side will become a difficult process, but from the physical side it is much easier.
Although the square shape of the spit guarantees uniform roasting of the meat, it is physically difficult to turn.
Each form has its own advantages and disadvantages, so everyone chooses what they can do.
The final stage is attaching the teeth to the spit with the blunt side or the handle side, which can also be removable. But this is not a required element.
After completing this stage, we can say that the spit is completely ready for use; all that remains is to purchase your favorite type of meat and cook it.
To create the perfect skewer for the grill, you need to adhere to the following some nuances:
- To place the supports evenly, they should be installed on a flat surface, as this helps to achieve a horizontal position of the spit while frying meat.
- It is better to make the skewer as short as possible to minimize additional effort during its movement, and the handle should, on the contrary, form a large lever. This way you can make turning the product as comfortable and easy as possible.
Interesting hiking ideas
During outdoor recreation, when it is not possible to use a metal rod, you can make a disposable spit using tree branches. Walnut, maple or alder branches are best. It is better not to use coniferous species. The branch must be chosen so that it does not bend under the weight of the meat. Before use, be sure to remove the bark from it, leaving a little at the end so that the cook’s hands do not slip during rotation. The tree can be given the desired shape using an ordinary ax.
In order to secure the carcass, it is better to choose a branch with branches that are located at a distance of about a third of the length from the “blunt” end. To make it easier to place meat on such an improvised skewer, one end should be sharpened.
Safety Tips
What kind of skewer do you use?
ManualElectro
The convenience of using an electric spit comes with certain risks that the cook should be aware of.
To avoid accidents, it is important to follow safety precautions, which include the following recommendations:
- Monitor the voltage in the electrical network (if it surges, you must immediately turn off the device).
- Electric spits can only be used if the winding is intact.
- Worn parts should be replaced promptly - using a faulty electrical appliance is life-threatening.
- Consider the storage rules that the manufacturer applies to their products. Different electric spits may have their own characteristics that need to be taken into account.
An electric barbecue spit is a useful device that can significantly simplify the cooking process. With proper setup and careful use of this mechanism, the cook will be able to prepare juicy and tasty meat that does not have overcooked or raw areas. If you follow safety precautions when using an electric spit, it will last for many years.
Making an Electrical Device
Creating an electric spit requires a little more effort and some knowledge. Creation stages:
- For the drive, 2 small pieces of plastic should be cut from a metal sheet.
- Then a hole should be cut on the resulting plates.
- For the gearbox, you need to attach the sprocket from the bicycle to the motor shaft, and then the gear. This structure should be secured to the plate and then mounted on the shaft.
- On the opposite edge, a second gear is installed through a bearing.
- After this, you need to attach the gears to the skewer a little further than the handle.
- Now you can install the motor on one of the legs of the grill and pull the chain to the body.
- The final step is to weld the support on the other side of the grill.
As you can see, creating a spit is a fairly simple process, the main thing is desire. If you follow all the steps, you can get a device that will become an indispensable assistant in creating barbecue. And the additional bonus in the form of money saved on the purchase will not leave anyone indifferent.
A reliable option that will serve for many years is a spit made of steel rods. Its production will require more effort, but will pay off with interest
It is important to choose the right metal - it should be high-density stainless steel. You should not use rods made of light alloy materials that contain lead, zinc, tin, or bismuth.
For greater strength, it is better to use not one, but several rods, welding or twisting them together. In this case, at least one of them must be long enough to lie on the racks of the fryer supports. The overall thickness of the metal may vary depending on the weight of the meat. For ordinary kebabs of 100-200 g, a skewer 0.7 cm thick is suitable, a rabbit or chicken carcass can withstand a rod 0.9-1.7 cm thick, cooking lamb or pig requires a more durable structure - at least 1.2-1.5 cm.
It is important to choose the right trochanter section. If it is round, frying boneless meat may be a problem, even with the extra teeth.
A flat skewer will most likely not be strong enough and will bend under the weight of the carcass. The ideal option is a triangular or square cross-section; the meat will not turn or slide off.
Be sure to weld onto the spit at least one pair of prongs to hold the meat and a long, curved handle to rotate it. It is convenient if any position of rotation on the fryer can be fixed.
Types of electric grills
Electric kebab makers are classified according to various parameters:
- by device type. They produce powerful horizontal models and compact analogues of vertical design;
- according to the body material. Stainless steel versions stand out for their size, strength and durability. Aluminum structures are lightweight and inexpensive;
- by type of heating element. Models with heating elements can serve reliably even with high intensity of use. The quartz tube heats up quickly, which makes the process of frying meat faster. The ceramic heating element allows you to minimize energy costs, but the model is slightly more expensive.
Horizontal electric barbecue
Also, electric barbecue makers for the home vary in performance. Powerful horizontal models of appliances starting from 2000 W have a set of skewers of up to 20 pieces, and allow you to prepare aromatic dishes for a large company of gourmets.
Horizontal loading
This category of equipment is equipped with an upper or lower heating element; there are also versions with a heating element on the rear wall.
Features of horizontal electric barbecues:
- a set of skewers from 2-4 to 10-20 pieces depending on the model;
- simultaneous loading of 2 to 8 kg of meat products;
- significant dimensions.
Horizontal options are generally more expensive than vertical ones, but mini versions are also produced in the affordable segment.
Top loading
Vertical electric barbecues for the home are distinguished by their ergonomic design and are designed for a small load of meat. Skewers are installed around the heating element in the center, complete with trays for collecting liquid. The inner surface of the metal casing has a heat-reflecting effect.
Features of vertical units:
- a set of skewers 5-10 pieces depending on the brand;
- The low power of the device determines the duration of the heat treatment process.
Electric barbecue with top loading
Top-loading versions take up minimal space and are designed for small families.
The process of making a barbecue spit with your own hands
So, first you need to determine the length of the skewer and its diameter. For a simple barbecue, a rod with a diameter of less than 1 cm is suitable, but if you plan to cook a small pig, you will have to take a thicker rod.
Its diameter, depending on its length, can vary from 1.2 cm to 1.6 cm.
If you plan to cook a very large animal, then you cannot do without complex mathematical calculations. The length of the spit is determined either by the dimensions of the grill, or by what will be used instead.
So, the rods are welded crosswise, and the rod is selected. What to do next?
The handle for the spit can be made from improvised means, for example, a piece of pipe.
It is necessary to build a handle. It can be either stationary or removable. It all depends on the desire of the master who builds the spit for the barbecue. It can be made from a simple door handle or a bicycle handle. You can also simply take a small piece of pipe and give it any shape convenient for further work.
You can take an even simpler route: do not make a handle, but leave about 1 m of rod protruding beyond the stops. This way you can also protect your hands from touching hot metal.
You can make a barbecue skewer in all possible shapes with your own hands.
You can use not only round rods, but also square or flat ones, but they must be thick enough to hold the carcass.
For the spit, you can use rods of various shapes: round, square and flat.
By the way, round rods are not very suitable for spits, since the carcass can slide on them and is difficult to turn from side to side. However, such a rod is easier to turn over.
If you make a spit with a square cross-section, then, on the contrary, it will be difficult to turn it over, but the meat will be fried evenly. In general, each option has its own pros and cons, and the choice depends on the specific desires and capabilities of the person.
There is very little left, and the spit for the barbecue will be completely ready. The final step is to attach the teeth to the spit either from the blunt end or from the handle side
It's not that important. By the way, they may not be removable.
After the last stage is completed, we can state the fact that the barbecue spit, created with your own hands, is absolutely ready for use. Now all that remains is to buy a young pig and try to roast it over the grill or fire.
Recently, people often spend time outdoors, taking a break from the bustle of big cities. In addition to admiring nature, every self-respecting person cannot do without kebabs on skewers, for the preparation of which it is recommended to use a grill with a spit for comfortable cooking and uniform heating of the meat.
There are many types of such devices on the market, among which the most popular is the electric spit, which allows you to rotate the skewers automatically. But the simplest option is to create a product with your own hands, which gives you confidence in the quality of the selected materials, and if you follow all the rules and recommendations, it will delight you with its functionality for several decades.
A mechanical barbecue spit requires the following materials:
- Metal rods;
- Actually a barbecue for carrying out basic measurements;
- Handle for rotating the spit;
- Metal bayonet;
- Welding machine;
- Pliers;
- Meter or tape measure;
- Bulgarian.
Making a spit with your own hands is quite simple and the process does not require special knowledge in this area.
The main condition when choosing a bayonet is to take into account the material from which it is made. It must be a difficult-to-melt product, since otherwise there is a risk that it will melt, thereby ruining the quality of the meat carcass
It is also important to choose stainless steel
To conveniently attach meat to a barbecue spit, you need 4 rods that are welded crosswise, and each of them must be the same size, otherwise it is impossible to achieve a uniform load.
What is a spit for?
A skewer is a long pin/rod that ends with a handle on one side and a sharp point on the other. Equipped with clamps to hold meat on it.
Initially used for cooking whole animal carcasses over fire: pig, lamb, bull or their large parts. But you can also see quails on a spit, legs and a row of bacon, strung one after another.
On a note! The thickness of the skewer is selected depending on the weight of the meat you will cook.
Experts advise choosing a skewer diameter of 10 mm for small pieces of meat. If you plan to regularly fry uncut carcasses, you should count on 12-16 mm of thickness.
Round or square in cross section?
- The meat can slide off the round axis of the spit, and there is a risk of undercooking. But it is easier to turn the spit and secure the meat product on it.
- Square rods will ensure that the carcass is firmly secured, but you will need to work hard to thread the piece onto the rod and rotate it during the cooking process.
- The flat shape of the base is good for medium and small pieces when the thickness of the skewer is no more than 10 mm. The meat is securely attached to such rods and does not fall down.
Start of creating a barbecue
To mount the electric skewers drive with your own hands, you need to prepare a drawing and the following types of tools:
- Bulgarian;
- electric drill.
The materials you will need are a set for rotating skewers, which includes:
- pulley;
- gears;
- belt;
- motor.
The belt can be easily replaced with the chain that was put on the bike. A car drive with a power of 12 V is installed as a motor on the grill with rotating skewers. You can use a motor from an existing toy. The standard number of gears is usually 8 pieces, which is determined by the number of skewers used.
You should make gears yourself using stainless steel. It is also used to make the parts that make up the engine of the device. To make an electric grill, you need to perform a number of basic steps:
- Clamp the plates in a vice.
- Use a grinder to drill several holes at the bottom of the wall to supply air flow.
- Make holes in the bottom of the body in the smallest increments.
- Weld the body of the structure from the plates.
- Strengthen the legs from the corner by welding.
Having equipped your country house with a barbecue, grill or barbecue, you can comfortably spend your leisure time on the site.
Tools
In this article we will talk about improving a regular barbecue. To do this yourself, you need the following tools:
- electric motor;
- electric drill;
- Bulgarian;
- drive pulley;
- drive belt, you can use a bicycle chain, but in this case there will be sprockets instead of pulleys;
- gears (their number is equal to the number of skewers).
For example, a motor from a windshield washer device in a car or a drive for rotating wipers is used as a motor.
In principle, any similar 12 V motor will do, no matter left or right rotation
If you use a 220 V motor, the electric grill will not be as mobile, and there will also be a risk of electric shock. The rotation speed will also be too high. The 12 V motor is powered even from a small motorcycle battery. Gears can be purchased at the store or cut out from stainless steel yourself.
Manufacturing process
The first thing you need to do is determine the length of the spit on the grill. If you only need to cook shish kebab, then take a rod of small diameter. But if you need a spit to cook, for example, a whole carcass, then it is better to choose a larger diameter.
In order to prevent the meat from falling off the rod, you need to take smaller rods, weld them crosswise and weld them to the future skewer. Next, let's start building the handle. It is best to use a wooden block because if you use metal the handle may get hot.
How to make an electric spit for a barbecue
In order to create an electric grill with your own hands, you will have to work hard. Additionally, this process will require you to have some knowledge and understanding of what needs to be done. We hope our article will help you. She will tell you how to make your own automatic drive for the grill, which will rotate the spit or skewers.
So, here is a rough work plan:
- To make the drive housing, you need to cut 2 small plates from a sheet of metal.
- If we are talking about an electric rotisserie, then I need to remove the plates and make a hole for it.
- To assemble the gearbox, attach a sprocket from a bicycle, for example, or a pulley with a small diameter, to the motor shaft. Afterwards, you need to weld the gear to the larger one. Attach the shaft with the bearing to the plate, after which you place the entire structure on the same shaft. From the axis to the bottom of the cut on the body there should be a distance equal to the diameter of the gear. But the size of a large “star”, as a rule, is chosen so that the spit can make approximately 1-2 revolutions around its axis in 60 seconds. It is this approach that will allow the meat to be thoroughly fried, but not burn.
- On the other edge of the housing on the shaft through the bearing, install the second gear.
- Now you need to secure the gears on the skewer near the handle. The diameter of this gear must match the gear that is welded to the sprocket.
- Now we install the engine somewhere on the scabbard of the grill. Pull a chain (a bicycle chain will do) from a small “sprocket” to a large one, which is located on the drive housing. And the second chain must be pulled horizontally between the large “sprocket” and the gears on the drive housing.
- The last step is to weld some kind of support for the spit on the opposite side of the grill.
Now your electric spit is ready! By analogy, you can also assemble an electric drive for skewers.
As you can see, there are a lot of interesting ideas for barbecue. And sometimes it’s not just about the marinade or the process of preparing barbecue, sometimes it’s about building a barbecue grill with your own hands, a spit, an electric drive and all that stuff. After all, it is precisely the fact that you had a hand in this that will give the divine taste to your dishes.
Electric spit
The main difference is in the electric drive with a gearbox. It is he who will rotate the spit for you. And so everything is the same. The motor must be powerful enough. If in the manual version it was sometimes possible to apply force and turn it, then the motor will simply stop due to loads for which it was not designed.
Where might these loads come from? A piece of meat is rarely symmetrical, especially for the whole carcass or its parts. Somewhere the piece is larger (and therefore the shoulder is larger), somewhere the skewer does not pass through the center of mass.
It is very important that the motor regulates the rotation speed. Typically the spit rotates 1-2 revolutions per minute. To facilitate rotation, the spit rests on stands through bearings. Although there are designs without them, the motor is more powerful.
Tips and tricks
When the grill is ready, you can start preparing the shish kebab.
In order for the device to serve for a long time and the cooked meat to be tasty, you should take into account safety rules, as well as some rules
- The device must be installed on a level place.
- Do not install the device too close to trees, bushes or buildings. Do not place flammable objects nearby.
- It is worth thoroughly cleaning the skewers and the grill itself after use, and promptly removing accumulated ash.
- It is necessary to lubricate metal structures with oil to avoid rust.
- Do not leave the operating device unattended.
- To avoid burns during cooking, it is correct to use oven mitts or special devices.
- To prepare high-quality barbecue, the coals must be properly prepared - they should be red and have a slight ash coating on them.
- The shish kebab will turn out more delicious if you use the coals of fruit trees. You can also use birch or oak options, but the coals of coniferous trees will be absolutely unsuitable - the aroma of the meat will be lost.
- If you have no experience in preparing coals, then you can simply buy them at the store.
- You need to prepare the “right” side dishes and drinks: vegetables, herbs, fresh bread, dry wine (beer and barbecue do not harmonize).
How to make a barbecue from metal with your own hands: dimensions, drawings, process features + photos and videos
Added by: Sergey Kolosov December 21
It's hard to find someone who doesn't like meat and vegetables cooked over charcoal. That is why the barbecue takes a leading position among other attributes necessary for outdoor recreation.
Modern devices have a varied design: they can be either portable metal or stationary made of brick or metal, with a canopy, a lid, etc. It all depends on the desire and imagination of the owner.
And you don’t have to buy a brazier at all, because you can make a metal brazier with your own hands.
Advantages of a metal grill
The simplest, but at the same time very practical barbecue model
The pros and cons of metal barbecues vary depending on which models to consider:
- thin-walled - they are mobile, compact and affordable. They are made by stamping parts from the thinnest sheets of metal, which has an advantageous effect on their weight. The most commonly produced are folding versions. However, they are often used not only as a container for coals from a separate fire, but also for ignition and kindling of the latter. Therefore, the service life of such a barbecue can be significantly reduced. The walls quickly burn out, become deformed and become unusable. In addition, they do not retain heat well, which leads to an unreasonably high consumption of coals;
- thick-walled - wear-resistant and spacious. Such barbecues can last for years. True, they are not so portable, since they are made of thick sheets of metal, and therefore have quite a lot of weight.
Before you start making a barbecue, you need to decide on its type.
Portable (folding/collapsible)
A compact, collapsible grill you can take with you even on a hiking trip.
Portable barbecues are easy to assemble and have a simple and compact design, designed for outdoor picnics. They come in two types: folding and collapsible.
- In a portable collapsible barbecue, the elements are connected during the assembly process using bolts, pins and other connecting elements. Such models are mobile and compact, but they have one drawback - poor reliability. Making such a grill with your own hands is quite difficult.
- In a portable folding barbecue, the elements are not completely separated, but moved or folded. The main disadvantage is the short service life. At best, they last for one or two seasons.
- Currently, a model such as a disposable grill, which is designed for one use, is very popular. Its undoubted advantage is its low price and light weight.
Stationary
A metal grill with a roof allows you to cook in almost any weather
The stationary grill has a large number of manufacturing options. Such models can be with or without a roof. The first ones are self-sufficient. The roof will protect not only the cook, but also the firebox itself from direct sunlight, snow or rain, which will extend its service life. The latter are usually installed where there is already a canopy.
With smokehouse
In such a grill you can not only fry, but also smoke meat or fish
A grill with a smokehouse can be used not only for frying meat or fish, but also for smoking them. To do this, it must be equipped with a dense metal lid, and shelves for installing a grill should be provided on the sides on the inside.
The principle of smoking in such a barbecue is as follows: thin branches of fruit trees (apple, cherry or plum) are placed on the bottom, and prepared pieces of meat or fish are placed on the installed grate.
Cover the grill with a lid and light a fire under it. The branches inside begin to smolder due to high temperatures, but due to lack of oxygen they do not ignite.
Thus, meat or fish is simultaneously baked at high temperatures and smoked in the smoke from smoldering fruit branches.
Unlike the rectangular barbecues we are used to, American barbecues are often round
The main difference between a barbecue and a grill is that the meat is fried not on skewers, but on a grill. In this case, not only coals, but also open fire can be used. Thus, the sides must be higher than those of the barbecue, and they require fastenings for the grill.
Selecting a location
When choosing a location, you need to consider some important points:
- The grill should not be placed under trees or near bushes, as high temperatures can scorch the branches;
- Do not place the device under film or fabric canopies, which may catch fire due to heat;
- it is advisable to take into account the wind rose so that smoke does not get into the windows of your house or neighbors;
- The best option would be a separate area equipped for a barbecue, located near the main recreation area.
If the barbecue is on the ground, it is advisable to pave the area under it with fire-resistant material (stones or paving slabs). During the rainy season, this will allow you to approach the barbecue without interference, and the structure itself will not sink into the ground over time.
So, we smoothly approached the main issue of our conversation. How to make a grill with your own hands?
Tools and materials
To make a metal barbecue with your own hands, you will need the following tools and materials:
- sheet metal (iron or steel);
- bolts and other fastening materials;
- welding machine;
When making a metal barbecue, you can’t do without a welding machine.
- hand drill or electric drill;
- grinder with cutting discs for metal;
- angle grinder;
- hammer or small sledgehammer;
- pipe or corner (for legs);
- tape measure and square for marking;
To 'pattern' the metal parts of the grill you will need a grinder
- angle grinder;
- hammer or small sledgehammer;
- pipe or corner (for legs);
- tape measure and square for marking.
DIY manufacturing technology
The grill, which we will make ourselves from metal, will be as simple as possible. For a small company, 8–10 skewers with meat are enough, and if the need arises, you can prepare another portion.
Skewers should not interfere with each other, but large gaps between them should be avoided so as not to waste heat.
Following these arguments, we calculate the length of the structure. A classic skewer holds 5-7 pieces of meat. The depth of the grill is determined by practical methods. The meat should not be far from the coals, but you should not place it too close, otherwise it will burn. The distance from the top edge of the structure to the ground depends on the height of the cook. Most often it is 75–125 cm.
Drawing
Let's make a drawing of our barbecue. The diagram may look something like the following figure.
The grill is not a space rocket, so the drawing may be the most primitive
We will use sheet metal 2–3 mm thick as the material.
So, we mark the sheet using a square to avoid distortions:
- 70x20 cm – 2 pcs. (back and front walls);
- 70x28 cm – 1 pc. (bottom);
- 28x20 cm - 2 pcs. (side walls).
We cut the elements with a grinder.
Small slits will help fix the skewer in the desired position
You can make small cuts along the upper long side of the sides to more securely fix the skewer in the chosen position.
To ensure the flow of oxygen, a number of holes are made along the sides of the grill
To ensure air flow inside the base of the drawer, several holes with a diameter of 10 mm should be drilled on the front and back panels in increments of 10–15 cm from each other. Measure 2 cm from the bottom edge of the structure and draw a straight line, marking the places for cutting.
Welding work
For the legs, you can use a 20x20 cm corner or metal pipes with a diameter of at least 20 mm and a length of 60–100 cm (depending on the height of the cook).
If you use tubes, you can make the structure collapsible. To do this, you will additionally need 4 bolts with nuts. Bolts are welded to each tube. In all four corners of the bottom of the box, you need to drill a hole with a diameter slightly larger than the bolts welded to the support legs. If corners are used, they can simply be welded to the base.
If you want to add a smoking function to your barbecue, then it will be enough to weld two corners to the inside of its long sides at a height of approximately 7-10 centimeters from the bottom.
You should also make a metal lid by welding small sides to a metal base slightly larger than the size of the grill.
For convenience, it is recommended to weld a bracket on top of the lid, which will be used as a handle.
If desired, you can make a canopy or shelf for firewood or coals, weld handles to the side walls, add a hook for a spatula or poker.
The grill can be not just an 'iron box', but a real multifunctional kitchen
How to care for your grill
Yes, the barbecue needs care. Which one?
- You can’t fill a hot barbecue with water yet (temperature changes can cause the metal to become deformed).
- Trapped grease, soot or soot can be easily removed with a rag and sand.
- From time to time, lubricate the grill with vegetable oil applied to a clean rag - this will add shine and at the same time protect the structure from adverse weather conditions.
Unusual grill design (video)
In conclusion, we present to your attention a short video that shows how to make a metal grill using the base from an old Singer sewing machine.
For many of us, kebab is the most delicious and desirable food. Cherry wood, properly marinated meat, a barbecue made by yourself - a gourmet’s dream. Having a minimum set of skills, you can easily build a barbecue yourself. All we can do is wish you successful work and bon appetit!
- Sergey Kolosov
Source: https://prorab.guru/zagorodniy-dom/ogon-metall-i-myaso-delaem-mangal-svoimi-rukami.html
Dispute about section
Choosing the cross-section of the rod for the spit is the first thing that comes to mind. There is no universal solution and much depends on the type of spit.
What are they:
- Trident skewer.
- Rotisserie with forks or clamps. Suitable for roasting carcasses.
- Rotate the rod. For the lightest and least crumbly pieces. Good in hiking conditions.
We discard the flat section immediately: when rotating, the piece of meat will periodically sag significantly. This is inconvenient for a manual spit and an extra load on the mechanism for an electric one. The idea that on a square rod, compared to a round one, the meat does not turn, discard forever. It turns and even starts to wobble.
For a simple rod skewer, both round and square rods will work.
For the trident skewer, this issue is also not fundamental.
In the version with clamps or forks, it is better to choose a square section of the rod. This makes it easier to secure the clamps against rotation and will allow you to confidently rotate large asymmetrical pieces.
1 - fork; 2 - handle; 3 — handle fastening; 4 — disk for fixing the trochanter; 5 - skewer spindle.
Hand spit design
The device is extremely simple: two stands, a spit rod and a handle. This is the minimum set. Add fork clamps to keep the meat from turning and you will get an ascetic, but very workable design.
You can also equip the spit on the handle side with a disk with holes. With its help, you can fix the meat with a certain side over the fire.
The stands could also be improved. If a ring-hole is sufficient on the side of the tip of the skewer, then on the side of the handle it is better to make an inclined groove. This will allow you to put the spit on the fire without disconnecting the handle.
Types of electric drives
Another way to distinguish electric spits is the use of different drives.
Based on this feature, four categories can be distinguished:
- Unregulated – allows you to start and stop rotation. In this case, the cook does not have the opportunity to influence the rotation frequency.
- Adjustable – this option is built into professional equipment. It allows you to regulate not only the rotation speed, but also the distance to the heat. It is not used in everyday life due to the high cost of parts.
- Non-automated - does not allow the cook to set time limits during which the meat will be turned.
- Automated - using the autonomous mode, the cook determines in advance the intervals of operation and stop of the device, setting time limits.
Types of skewers
A spit is a rod designed for evenly frying meat on a grill. Previously it was used to cook whole carcasses, but now pieces of meat are strung on it for convenience.
Today, two types of skewers are used:
- Manual is the simplest option, which requires constant monitoring by a person whose task is to turn the meat.
- Equipped with an electric drive – it works independently and promotes moderate frying of meat parts.
Each of these options has its own pros and cons.
The advantages of a hand spit include:
- Ease of use.
- Possibility of self-production.
- Individual approach (the cook himself determines how long the meat should be turned on one side or another).
- Inexpensive price and availability (when purchased in a store).
downside to this culinary accessory - you cannot leave the grill while frying meat. Any distraction can cost the cook a delicious piece of food that turns into charcoal.
The reasons why chefs prefer electric spits include the following:
- Facilitating the cooking process.
- Evenly cooked meat that retains its juiciness.
- Versatility (if there is a special handle, the electric spit can also be used as a manual one - if there are no energy sources nearby).
- Preventing the accumulation of carcinogens (due to the fact that fat does not have time to get onto the coals).
Among the difficulties that users of electric spits may encounter, the most common are:
- Difficult to purchase or make with your own hands.
- Difficulty of access and high cost of some parts.
- Fragility - the device requires skillful handling and does not tolerate carelessness.
- The need for an energy source (as a battery, batteries or a carrying device for connection to an outlet).
Expert opinion
Levin Dmitry Konstantinovich
The last drawback can be overcome by purchasing a model that runs on batteries.
Purchased electric drive
For those who are not comfortable with technology, it will be easier to purchase a ready-made drive in a store. This approach eliminates difficulties; moreover, a purchased electric drive is often equipped with a proprietary battery.
Structurally, the magazine drive is an ordinary attachment that can be easily attached to any flat surface. The drive can be powered by batteries, however, the rotation speed will be minimal. Devices are available equipped with a speed controller.
There are ready-made grills with electric drive available for sale. The meat is fried from a filament on vertically positioned skewers, the juice and fat flow into the provided recesses. The taste of shish kebab fried from a heating element is really different from meat cooked over a fire, but you can use such a device even in a city apartment.
How to assemble it yourself?
Considering that making an automatic barbecue to order is not the cheapest pleasure, a person who understands technology and has basic skills in working with metals will be able to make a device with an electric drive with his own hands. Schemes and drawings are publicly available on the Internet and specialized literature.
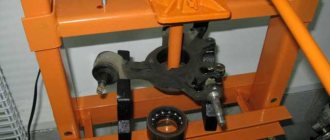
The drive device for skewers consists of two main elements: a rotation mechanism and a motor.
The engine can be used from old devices with low power. Any household appliance will do: microwave, stove, electric kebab maker. To equip the motor, it is good to use a gearbox - with its help it will be possible to adjust the rotation speed of the skewers in the kebab maker.
The entire system with the motor, gearbox and gears should be installed on a metal plate with a shaft and bearings - it is secured to the outside of the fryer using bolts. The motor, having started working, will set the first gear in motion, which will transmit the movement to the next part - and so on along the chain. Skewers inserted into the corresponding holes will rotate in the same mode (photo 1).
Manufacturing of gear system
The assembly sequence is as follows:
- Initially, install the first gear.
- The second is installed on the body and connected to the motor with a chain.
- Next, attach the third (also on the wall of the grill).
- The fourth and subsequent gears are attached in the same way.
A professional product made by an experienced craftsman
The engine, starting to work, rotates the first gear mounted on the shaft, which, in turn, through a chain, belt or teeth (depending on the design) transmits rotation to the second gear, which to the third, and so on. Thus, the skewers with meat turn at the same speed.
How to do it yourself
If you need a stationary grill, it’s easier to make it yourself. In this case, the device can turn out to be massive. A solid foundation is provided for it.
The simplest device should include two main elements:
- Engine. Can be removed from any unnecessary electrical appliance, a microwave or an electric toy will do. It would be good if the engine is equipped with a gearbox that allows you to regulate the speed of rotation of the skewers.
- Rotation mechanism. A good solution would be to use an ordinary bicycle chain and several sprocket wheels. The gears can be turned, but it’s easier to buy them, preferably with a coating that prevents rust.
The prepared materials will need to be secured on a metal plate equipped with a shaft with bearings. The plate will be mounted outside the fryer; for this purpose, bolts are provided in it.
The principle of operation of a homemade device: the switched on motor will begin to rotate the gears, which will gradually transmit torque to all parts one by one, causing the skewers fixed in the holes to rotate.
To create such a device you will need a drill and a grinder.
Don't forget about 2 main elements
Making a box
Those who do not have a barbecue itself will have to make a brazier as well. For installation you need metal sheets approximately 3 mm thick. They are cut, then cut with a grinder to create the bottom of the roasting pan and four sides in the form of a rectangle.
Manufacturing proceeds as follows:
- Each plate is fixed in turn in a vice, then holes with a diameter of 1 cm begin to be drilled.
- In the walls they are placed at the bottom in increments of 3 cm. The heat from the coals will be drawn through them.
- Holes in the bottom are made with a smaller distance. They are needed for ash disposal.
- All parts are welded into a box - the body of the future barbecue.
- In the upper part of the long sides, recesses are drilled into which the skewers will be inserted. The distance between the notches is equal to the width of the gear with a minimum tolerance of 0.5 cm.
Now all that remains is to “plant” the roasting pan on its legs.
Engine selection
It is advisable to select a 12 W motor. You can borrow it from:
- window regulator;
- car wiper;
- microwaves;
- battery-powered screwdriver;
- replaceable timing phase;
- outdated electric stove with grill function.
Even at the initial stage, it is worth deciding whether your motor will be powered from the mains, batteries or an accumulator. However, one does not interfere with the other. By making the power supply universal, you can be powered from an outlet while staying with your family at the dacha, or from a battery when the whole group is going on a picnic.
Assembling skewers
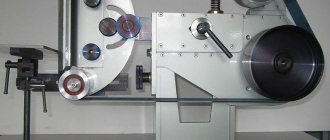
To rotate, the ends of the skewers are inserted into the middle of rotational gears, connected together into a common system. Two types of torque transmission from electric motor shafts to gears are used:
- Serrated. The mechanism is compact. Forms an overly hard transmission and makes a lot of noise. The transmission constantly has to be lubricated during operation.
- Using flexible elements. A bicycle chain, belt, thick tape or cord are suitable for this purpose. Unfortunately, soft parts (belt, tape) can slip from time to time, and such a mechanism cannot be called durable. The device will be larger, and you will have to take into account the increased load on the shafts and supports.
You can start rotating from the central gear, which will begin to move its neighbors on both sides. Another option is to turn one of the outermost ones, which transmits the moment to the one adjacent to it, etc. This mechanism forces the skewers to rotate in one direction, so that the skewered meat will not cling. The juice is also distributed more evenly, falling on neighboring pieces, making their surface more juicy.
Experienced cooks have noticed that the meat should receive the main portion of heat in the initial 2-3 minutes of cooking. To achieve this, it is advisable to heat it manually - first on one side, then on the other. As a result, a crust is formed that will not allow the juice to flow out. Only after this the skewers are connected to the rotating mechanism of the electric grill and automatic uniform frying begins.
Making a brazier
For those who do not have a barbecue to remodel, we will briefly describe how to make one with your own hands. To assemble an electric fryer, you will need metal sheets - component parts about 3 mm thick, which are marked and cut out with a grinder.
Scheme for making a barbecue
- All plates are clamped in a vice in turn.
- At the very bottom of the wall, holes with a diameter of 10 mm are drilled at a distance of 3 cm from each other. They are needed for traction, thanks to which the coals will produce heat.
- Holes are also drilled in the bottom, but with a smaller interval. Their function is to get rid of excess ash.
- The barbecue body is welded from the resulting blanks.
- Finally, the legs are welded.
In the upper part of the electric fryer, grooves are cut to rotate the skewers, the distance between which is equal to the width of the gear with a tolerance of 0.5 cm.
Features: pros and cons
Cooking meat on the grill requires constant attention and the presence of a person nearby who would turn the skewers in time. The most advanced type is automatic - it will rotate the skewers itself and maintain a constant temperature that can be adjusted.
The advantages are obvious.
- This function of the device not only frees up time and eliminates the need to monitor the process, but also promotes uniform frying, without charring. The owner just has to remove the skewers with meat in due time.
- Using this device, you can cook several different dishes at once, if you use not only skewers, but also a wire rack with a spit. Products cooked on an automatic grill are always juicy, since the juice or sauce simply does not have time to drain from the products.
- It does not take much time and effort to assemble or disassemble the device. In addition, when disassembled it does not take up much space - its compactness makes it convenient for storage and transportation.
- The device is easy to clean.
However, for its operation it will require a power source - this means that it will not be possible to use it, for example, on the river bank, if there is no special battery. In addition, the cost of automatic barbecues is several times higher than conventional ones. Additionally, you need to add the cost of electricity during operation.
Electric spit for barbecue: features and review of models
Most summer residents are accustomed to traditional barbecues, which require constant monitoring of the degree of meat readiness. Once you are distracted for a while, one side of the juicy piece becomes black and unsuitable for eating. In order to avoid this problem, several years ago an electric grill was invented, the spits of which rotate automatically.
The electric spit for the barbecue deserves special attention - it allows you not only to start the cooking process, but also to control the speed of rotation of the meat. You can purchase such a mechanism ready-made or try to make it yourself using available tools.
Choosing the right rod is half the success
Mostly flat, square and round shapes are used. It all depends on what products we are building the grill for. Boneless meat or minced meat will be difficult to roast on a round spit because it will slip off. It is more convenient to fry shish kebab and small pieces on a flat rod. In order to cook a whole carcass without any problems, it is best to take a square shape. The meat will not slide off such a spit and will be able to cook evenly on all sides.
Scheme of a simple metal grill.
The basis of the skewer is a metal bayonet, and the correct choice of material for it is a guarantee of successful use. For a bayonet, you should not choose low-melting alloys or use an old rod from scrap metal. The best solution is stainless steel. In addition, to create a spit you will need:
- Handle for spit.
- Roulette.
- Bulgarian.
- Metal rods.
- Pliers.
- Welding machine.
Rod selection question
Before independently creating a skewer and all the devices for it, it is necessary to prepare the working material and resolve the issue of its length and shape.
As a rule, flat designs are used, as well as versions in the shape of a circle or square. An important aspect here is what kind of dishes the grill is created for. It is extremely difficult to fry boneless meat or minced products on a round structure: it will constantly fall out of there.
For frying shish kebab and small pieces, it is better to use the flat version.
For convenient cooking of the carcass, a square design is used. The meat does not fall off and is fried efficiently and evenly.
The basis of the skewer is the bayonet. It is created from metal. It is very important not to make a mistake with the material for it.
For example, light alloys or scrap metal elements are completely unsuitable for this purpose. The best option is stainless steel.
Another do-it-yourself spit will require the following arsenal:
- Pen.
- Roulette.
- Bulgarian.
- Pliers.
- Welding equipment.
Travel version of the skewer
When you go out into nature and you have no way to use the necessary rod, you can create a disposable spit. Tree branches are suitable for this task. Just do not use branches from spruce and other coniferous trees. They are quite flexible.
The rod substitute should not bend under the weight of meat. Suitable trees in this regard: alder, walnut and maple
Before use, the bark is removed from almost the entire branch, leaving only its ends. This way the cook’s hands will not slip during rotation. The required shape of the product can be given using a regular ax.
A branch with large knots is used to secure the carcass. They are approximately one third away from the end of the branch. It will be more convenient to place the meat on such a “natural” skewer if you sharpen one end of it well.
This version of the spit was used in ancient times. Having created it, you will plunge a little into those distant eras.
Materials and tools
Before you start making the spit, you need to prepare everything in advance.
What you can't do without:
- Brazier. We will focus on it.
- Steel rod, maybe a pipe (if you fry large pieces and the whole carcass).
- Welding machine.
- Grinder with a set of wheels.
- Some iron (rods, pipes).
Of course, you should be able to cook at least at the basic level and be familiar with plumbing. The best material for a spit is stainless steel. Regular steel gives a metallic taste. Light alloys are a completely unsuitable material for a spit.
Do it yourself
You can purchase a ready-made automatic grill, but they, as a rule, are either stationary and powered by a 220 V network, or have too few skewers. In order to obtain a design that meets the user’s needs, you need to make an electric grill with your own hands. The easiest way is to modify an existing grill by installing an electric motor with a drive for skewers.
You need to get the necessary materials and tools and get to work.
Required Tools
To create a barbecue with automatically rotating skewers you will need:
- Electric motor.
- Grinder with cutting and grinding wheels.
- Electric drill.
- Pulleys, sprockets or gears in the required quantity (according to the number of skewers and gears of the gearbox, if any).
- Drive belt, bicycle chain (depending on the selected drive system).
Selection of electric motor
The best option is a 12 V electric motor, which has enough power to rotate the skewers, but does not require an excessively capacious power source. It can be connected to the car’s on-board power supply, use batteries, etc. You can use a motor from various devices, such as:
- Electric grill.
- Electric spit.
- Car window regulators or wipers.
- Microwaves.
- Cordless screwdrivers, etc.
The use of motors with a 220 V power supply deprives the grill of autonomy and precludes its use when traveling outdoors, so we will not consider this option.
Drive assembly
Skewers are inserted into special slots. On one side, they are sockets into which skewers are inserted from above; on the opposite side, they are grips for skewer rings installed on the axis of gears or drive pulleys. There are many drive design options:
- A bicycle chain with a drive sprocket on the motor axle and a row of driven sprockets on the skewers axles.
- A drive belt passed in a zigzag pattern through a series of drive pulleys and a drive pulley on the motor axle.
- The drive gear transmits rotation to the chain of gears along the axes of the skewers.
The latter option is more reliable - it does not create excessive load on the pulleys, so it is used most often.
Do you need an electric drive for skewers?
There are mechanical barbecues in which the rotation of all spits at once is carried out from one axis. A handle is installed on it, with the help of which the working rods are set in motion. The design is convenient due to its independence from power supply, but it requires constant human presence. An electric drive for a barbecue frees up a person, giving him the opportunity to do other things or just relax with friends.
Electric drive installation
includes several actions
- Installing the electric motor on the product frame.
- Creation of a chain of gears (pulleys, sprockets) transmitting rotational motion to each other.
- Installing the drive belt or chain.
The use of different types of transmission somewhat changes the specifics of the actions performed, but the general order of work is not disrupted.
Instructions for making a chain of gears
The first gear is the drive gear, it is installed on the motor shaft. It connects to the 2nd gear, to which all the others are connected in series. It is not recommended to disturb the installation order and place the gears out of order; this can interfere with the ease of movement and create unnecessary load. Unlike a pulley system or sprocket from a bicycle chain, the gears are all meshed, so they require the same sequential installation.
Successful examples and options
Usually there are no special requirements for the appearance of barbecues. However, there are often people who are no less demanding when it comes to device design. An important question for them is how to make a barbecue that fully matches the design of their summer cottage or has a specific shape. The network has a large number of examples and options for the appearance of barbecues, made in different styles and forms.
You need to choose the most suitable option for yourself before you start making an electric grill, so as not to redo the finished product due to some inconsistencies.
Instructions for making a chain of gears
After attaching the 1st six, the rest are mounted:
- The 2nd gear is attached to the drive housing on the motor shaft through a bearing.
- A 3rd gear of larger diameter is attached to the grill itself.
- The 4th is soldered to the 3rd.
- The 5th is attached to the 4th, etc. The number of gears depends on the number of skewers.
Gears are attached to a metal plate, one next to the other. The first gear drives the second, the second drives the third, etc.
Due to the fact that a gear works on each skewer, rotation is ensured. One gear transmits movement to another. Due to this, the skewers rotate at the same speed.
When all the gears are installed, the chains are tensioned:
- Between the pulley with the 1st gear installed and the 2nd gear on the drive.
- Horizontally through the gears, on the drive housing and the 3rd gear.
After installing the gears, you need to hide them with a metal strip. This will ensure safe operation of the device.
Preparing the grill
If there is no ready-made barbecue, then you can make it yourself:
- Each plate is clamped in a vice in turn. Small holes (about 10 mm) are drilled with a grinder. They should be at the bottom of the wall. The step is made at least 3 cm. This will ensure the supply of air to the fire. Holes in the bottom are made in smaller increments.
- A structure is welded from prepared plates with holes.
- A corner is welded along the perimeter (at the seams).
- A corner is used as legs. It is welded to the bottom of the structure.
Diagram of a stainless steel barbecue. If you have minimal skills in working with metal, making such a grill yourself will not be difficult.
Manual and electric drive
Let's look at the differences, pros and cons.
- Easy to use, difficult to break anything;
- Easy to do.
- Requires constant attention from the cook and skills in working with a spit are required;
- Physically expensive (after all, frying time is several hours).
Electrically driven.
- Removes the need for the cook to be at the spit and there is no fatigue from its rotation;
- The rotation is uniform and the meat cooks better;
- You can select the desired rotation speed and easily maintain it.
- This is a complex mechanism and not everyone can make it on their own;
- Drive elements are expensive;
- The design is more “gentle” than a manual drive;
- Requires a source of energy.
Manufacturing of a mechanical version
Before you build a spit, you first need to think about its length and diameter, and also prepare all the necessary materials. If the spit will be used for frying small pieces of shish kebab, then you should use a rod up to several millimeters thick. To make a carcass of a small animal, you need to select a skewer from a rod 10–12 mm thick. If you want to make large pieces of meat (for example, from lamb), then it is better to use a rod with a width of 13 to 17 mm. The length of the spit depends on the dimensions of the grill.
If suddenly there is no barbecue nearby, then you need to make a place that will hold the meat above the flame. A spit with the product is placed on top of it. The steel rods must be of the same type, due to this the load will be uniform. Several pairs of rods should be folded in twos. Thanks to the presence of gaps, the spit will stay well and securely near the fire.
The skewer differs from an ordinary swivel in the presence of a handle. With its help, you can securely hold the carcass for even frying, periodically changing its position. A barbecue fire is a real enemy that can ruin a long-awaited and delicious dinner. You can make a pen from absolutely any product you come across. A bicycle handle or a piece of pipe can be used.
The handle must be attached to the main structure. For reliability, it is better to weld it to the product. If you can’t find anything, then some kind of curved end of a rod, even the most ordinary one, will do. The main thing here is to get leverage. After this, you can make a rod of any convenient shape. This will ensure convenient cooking of meat. Hands should be far from the scorching fire, so the metal that extends beyond the limiters must be made at least one meter.
Date: March 17, 2013
Question about the pen
Its presence is a distinguishing feature of a spit from a standard skewer. It is used to turn the meat over to ensure even cooking. To create a handle, you can use various materials available nearby. Often a regular bicycle or door handle is used. Some craftsmen use a piece of pipe. It sets a form that is comfortable for use.
The handle is attached (by welding) to the base. If you have not found suitable materials for the handle, then you can make it like this: bend the end of the rod. There should be a lever. This will allow the cook to freely rotate the rod of various shapes. The speed of cooking action will increase. And you won't need to put in extra effort.
Question about the size of the working rod. The cook's hands should be kept at a safe distance from the fire. For this reason, the section of the rod that ends up behind the limiters must be at least 1 m in length.
The final stage of work is the operation of adding teeth to the skewer. Their main task is to reliably hold meat. On spits created using industrial methods, such teeth are equipped with a clamp. They are also removable. It is very easy to string a carcass on them.
For a homemade version, you need to create a couple of teeth - metal rods are used. The teeth are bent in an arc and welded to the base structure. They must be securely fixed on the side of the blunt end at a distance of one third of the length.
After these operations, the homemade spit is considered ready. And from now on, your site will boast a barbecue of your own production, and there will also be useful devices for it.