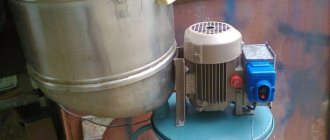
The Sergey BUKata channel continues to produce bedside tables. Next up are the drawer fronts. We prepare alder planks from which frames will be made. In the author's video, Sergei Bukata talked about the filler machine, which he made with his own hands.
Products for inventors Link to the store.
I processed the blanks in a surface planer and started burring. I sawed off one side at random, and the other according to the established size. When it came time to assemble these frames, the master’s patience ran out! For many years he has been using the Hoffman Swallow fastening system, and each time he builds some kind of device for this purpose. Then they get lost somewhere, and every time the rigmarole is repeated.
This time I decided not to make temporary devices, but to build a special additive machine. I took the machine as a basis. Buying such a machine is quite expensive, but making it yourself is quite possible. To begin with, I went with an audit of my bottom ends to select, more or less, natural details. In the end, something worked out. Various machines are sold in this Chinese store.
We invite you to see how it was! There is a small warehouse where various components and parts have accumulated over many years, both from machine tools and from other mechanisms. If desired, it is quite possible to select the necessary components there to make a primitive machine. In a short time we managed to select some details. Once upon a time there was a Soviet chain chiseling machine that was used to make sockets for a tenon. Then it burned out, meaning the electric motor, and after that it was no longer restored. But the racks and the platform along which its mechanism moved remained, and I decided to use them to make the machine.
I decided to use a Fiolent router to rotate the cutter. To fix the workpieces, we managed to select a pneumatic cylinder from an edge banding machine. In order to fix the router and the clamp, it was necessary to make two movable platforms, which is what I did. Having selected a pipe of the required diameter, I trimmed it and drilled holes according to the diameter of the “stolnik”. Then I cut the pipe into pieces of the required length. Take a closer look at the grip of the grinder - as it turns out, I have been using this tool incorrectly all my life! From the point of view of many masters, it should be held in reverse. And it’s not even clear whether to relearn it or continue to use it the way I’ve been doing it all my life! I cut out a plate of the required size from three-millimeter metal and welded this plate to the tubes. It turned out to be a moving platform!
DIY electronics in a Chinese store.
I made markings to drill the hole. I clamped the part in a vice and drilled a hole with a drill with a diameter of 24 mm. Then I marked and made holes for attaching the cutter. Thanks to this method of fastening, I was able to adjust the cutter left and right. This will be needed when setting up the machine. Watch from 5 min. video about a do-it-yourself additive machine, which is successfully used by the author of the idea for making furniture.
Together with the Sergey BUKata channel, we continue to manufacture a machine for conveniently adding keys. To attach the stops, an aluminum C-shaped profile was needed. There was an old Soviet curtain rod in stock. It made two great profiles. I decided to make a table for fixing workpieces from a kitchen countertop, so that the geometry of the mating planes was absolute, and asked to process this slab on a machining center. Considering that future mating parts are processed in mirror images, accuracy is important.
This Chinese store is a haven for woodworkers.
CNC machines are useful not for creating some decorations, but for producing precise parts. Whether there is soul in such details or there is none, it is absolutely the same for the designer. To manufacture the stops, 10 mm thick structural plastic was used. It is good because it has sufficient hardness and inertness to the effects of temperature and humidity. Using a finger cutter with a bearing, I separated the parts from each other. I bought 2 metal meter rulers and cut off sections from 70 to 100mm. I received the two required lengths to install the stop. At the same time, the rulers remained suitable in sizes from 1 to 70 mm.
I applied contact glue to the pre-milled grooves and fixed the ruler pieces on the table. The graduation in millimeters starts from the center of the table. The central stop is seated under two pins that will move in the groove. The task is to make them. Using screws, we attach the pins to the stop and check their functionality. We fix the screw in the center of the groove so that the stop can be fixed.
Next we screw the stops onto the end of the plate. There will be a small space between them for the cutter to pass through. This is how the setup will take place. Using T-bolts, I attached the corner stops to the profile. They are quite easy to fix to a given size. I selected a suitable table to install a machine on it that will eliminate the routine work of adding keys. I screwed 20 mm plywood onto this frame and selected the height for the platform through testing. Then I made compensators of the required thickness. I fixed this entire structure on the platform of the additive machine.
On one of the stands there is a clamp with which the overhang of the cutter is adjusted. We lower the platform with the pneumatic clamp to the required height to ensure sufficient fixation of the workpiece. To prevent the clamp from deforming the workpieces, I screwed a rubber sole underneath. Continuation from 5 minutes in the video about a homemade high-quality machine for practical dowel addition.
Device
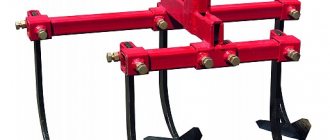
A potato planter for a walk-behind tractor can be easily made at home, using fairly traditional tools, as well as those components that almost every rural resident has on their farm (read about spare parts and parts for KSM 4 here).
The operating principle and purpose of a homemade potato planter for a walk-behind tractor is identical to factory analogues, such as a potato planter for a mini tractor, for a tractor, bomet, l 207, for MTZ.
Homemade potato planter
In general, this device has the following structural elements, which we will need to manufacture:
- frame structure on which the remaining elements of the unit will be located;
- container in which the planting potatoes will be located;
- a mechanism that will operate the system for planting tubers in holes;
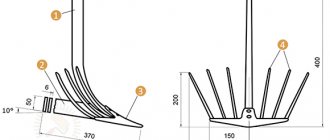
- rippers that dig holes;
- wheelbase;
- elements that bury holes after planting potato tubers in them.
In principle, this is the minimum that we need to make a fairly simple design of a potato planter at home.
The process of assembling such a device itself involves quite a lot of scope for action, because you can add an additional tank to the design, which will contain fertilizer, and also make not one, but two elements for planting tubers.
Of course, this will lead to the weight of the entire structure, slightly reducing its maneuverability and performance. Therefore, you need to think several times before adding additional elements to the potato planter.
For more information about a homemade potato planter for a walk-behind tractor, watch the video:
How to make a compact multifunctional machine
Translated by SaorY for mozgochiny.ru
Good day to all brain crafters For those of you who do not have large workshops or small racks for tools, homemade product in this article will be useful, which compactly fits all the useful tools and can be easily moved to other work sites.
When creating this brain craft , I tried to make it as compact as possible so that it could be conveniently used even in a small space, and moved even if you don’t have a car. For this, it has transport wheels, and you can move the craft alone, and if you still use a car for this, you will only need a little help when loading.
This compact homemade includes: a circular table, a milling table and a jigsaw. It also has a large cabinet in which you can store your other tools.
Useful link
To show the craft in action I will make a couple of boxes from cheap pine boards. The video shows how I cut boards for drawers on a circular table using a sled; to obtain the required dimensions, I use an additional strip with a clamp.
Then I make a groove for the base. The desired angle can be obtained using a miter gauge with a guide. By removing the cover, you can set the angle of inclination of the disk, in this case 45 degrees.
The jigsaw guide is adjustable in three axes, so you can use blades of different sizes - from 100 to 180mm, thereby obtaining a maximum cutting height of 70mm.
Next, I make a handle for the drawer, and for this I use a router, which I use to create a rounded chamfer. There is also a guide for the miter gauge, and a remote bearing will also be useful for milling curved lines. The router itself can be tilted at an angle of 45°. The box is ready and it is in its designated place.
The tongue-and-groove connection can be made on this brain table in two ways. First, using a jigsaw, an additional strip and a miter gauge. And secondly, on a circular table, using a special conductor.
With the largest size disc that can be installed on a homemade machine (235mm), you can get a maximum cut of 70mm. There are small adjustment bolts on the guide to reduce the tilt and, if necessary, even to lock it.
To connect the parts, I chose the second method; for this, some parts should be placed on one side of the jig, and others on the other.
And this is what happened, we move on to the router, this time we use a clamping device to make a groove in the base. To do this, you need to raise the circular saw and set the router at an angle of 45°.
Step 1: Cutting the parts
homemade multifunctional table begins with cutting all the parts and numbering them. Next, to obtain a handle slot, 4 corner holes are drilled and “finished” with a jigsaw. Then holes are drilled the same size as the diameter and thickness of the opening system washer. The holes are countersunk.
After this, a place is prepared for installing power and emergency shutdown buttons. Then, using dowels and 50mm self-tapping screws, the body of the brain table . If desired, the body parts are varnished, so the craft will look better and last longer.
Having prepared the body, the 3 upper parts are assembled. To do this, parts of the folding frames are cut and the necessary holes are drilled in them. The hole for the tube is drilled of such a diameter that the tube can rotate freely in it, since it is the axis of rotation of the hinged lids.
Then a cavity is selected for the circular saw. I did this using my 3D router; in the absence of something similar, this can be done with a regular router using the appropriate jigs and guides.
On the front side of the circular table cover, a cavity is selected for a quick-release panel, by removing which you can change the angle of inclination of the disk. The panel itself can be used to adjust the milling depth of the cavity.
Having installed the circular saw in the intended cavity, holes for its fastening are marked. A 3D milling machine is well suited for this, because these holes cannot be drilled on a drilling machine due to its limited working surface.
Step 2: Start Build
homemade workshop begins .
The groove for the guide is marked and selected using a circular table. Two additional pieces of plywood will provide the necessary depth to securely attach the guide strip. Next, a strip with a self-adhesive tape measure applied to it is attached to the lid.
After this, a hole for the router is drilled. Then the tubes for the rotation axes are cut off and the frames of the hinged covers are mounted on the body. In accordance with the drawings, fixing supports are manufactured and installed.
The router cover is applied to the frame, aligned and secured with self-tapping screws through holes in the guide channel.
Then the jigsaw cover is prepared, a groove for this same jigsaw is selected in it. If a material with a non-sliding surface, such as melamine, is used for the cover, then the surface of this cover should be varnished, alternating with sanding.
Having done this, the parts of the vertical lift mechanism of the router are cut out and assembled, with the help of which the milling depth will be adjusted.
Next, two pieces of plywood are glued together to make a holder for the router itself. A hole of the same diameter, or a suitable one, is drilled into them as when creating the router cover. This brain router can be made on a CNC machine or even ordered online.
The finished router holder is attached to a vertical lift, and now you can try it in action.
To mark the radius of the tilt grooves, ordinary hinges are temporarily attached to the vertical lift, and scraps of plywood are used to make revolving handles.
Step 3: Completing the Assembly
this stage of assembling the homemade product with those parts that I forgot about earlier. They will give stability to the lifting system.
First, the base parts are cut, I did this on my circular table, then they are assembled into a frame, which is attached to the bottom of the body of the multifunctional brain table . The height of this frame should be the same as the height of the existing wheels.
A latch is attached to the flaps of one of the hinged lids, and a lock is attached to the flaps of the other. This can be useful when transporting your craft and act as a preventive measure against theft of your tool.
Next, a 4-slot electrical extension cord is prepared, two connectors of which will include a jigsaw and a router, and the remaining two connectors will connect an additional power tool. The socket for the circular saw is connected through the power button and the emergency shutdown button. The extension cord is wound around special handles made for this purpose.
The quick release panels are made from opal methacrylate. They are placed in place, and the slot in the circular saw panel is carefully made by the saw itself. I used an accessory from an old router kit as a guide bearing. This attachment will be useful when routing curved lines.
After this, the plane of the entire upper part of the craft ; if the hinged lids do not lie in the plane of the central part, this can be easily corrected by adjusting the tilt of the fixing supports.
Next, the perpendicularity of the working parts of the tools and the plane of the table is checked. To check the router, a tube is fixed in it, along which the perpendicularity of the router axis and the table plane is checked, and the parallelism of the guide channel and the circular disk is checked. And finally, the perpendicularity of the jigsaw blade is checked.
After this, the table covers are folded to check whether the brain instruments with each other.
Step 4: Useful Tools
This step talks about making some useful accessories for a homemade .
First of all, the parts of the slide are cut, then a groove is selected for the guide slider.
After this, the two plywood parts are fastened together with screws, and the positions of the screws should be chosen so that they do not interfere with the subsequent modification of this part.
Then a measuring tape is glued onto it in a specially prepared groove, and this accessory for
the brain table is varnished, alternating with sanding, thereby creating the necessary smooth surface on this device.
The sleds are assembled, placed on a multifunctional homemade product , the excess is cut off and a middle cut is cut, and then a measuring tape is glued on.
The guide slider is unscrewed from the sled and a groove is made for the tongue and groove conductor. Same as my other circular table.
The channel slider is adjusted so that the roll between the bolts disappears. The slider itself can be stopped if necessary by simply twisting the bot to the maximum.
Next, the parts for the stand are cut, it is assembled, and varnished and sanded. After assembling the rack, a fixing system for it is made. Dowels glued into this fixing system are used as axle guides. At the end of the rack assembly, the locking system handle is made, and then the entire rack is tested in action.
Additionally, a dust collector for the router is installed on the stand, and threaded bushings for the pressure panel are screwed the brain stand
Having done this, the parallelism of the stand and the circular disk is checked, then a measuring tape is glued into the groove of the side wall.
Having finished this, the parts of the tongue and groove jig are cut, which are then glued and cleaned.
Step 5: A few more useful gadgets
This is the last video of this tutorial , and its first part shows how to make a corner stop (to create it, you can paste a printed template or use a ruler). The stop blank can already be cut on the most multifunctional machine.
The thread in the guide slider is inch, but if you need a metric one, you will have to use a tap.
It is definitely worth temporarily screwing the stop blank to the guide to make sure that the turning radius is correct.
Then the parts of the tenon conductor are cut, and in order to reduce friction it is necessary to slightly increase the thickness of the conductor fastening.
To make a pressure panel, a template is glued onto a plywood blank, and the adjustment grooves for this panel are selected using a milling machine . Threaded bushings are mounted in the required places on the cover with the router.
Next, the jigsaw blade guide is made, the fixing system of this guide is the same as that of the stand.
First, a bearing adjustment system is assembled to avoid wear of the plywood using a metal plate. One of the holes is made large in order to adjust the bearings.
The same thing is done with plywood.
After this, the height adjustment system is mechanized, and now the structure can move in three axes, thereby obtaining the required position.
Finally, the finished saw guide can be tested in action, and it is important to hold the board being sawed with both hands so that it fits firmly enough to the plane of the table.
about the compact multifunctional homemade product , good luck in your creativity!
Necessary materials
In principle, to make a homemade potato planter, the materials that many summer residents have on their farms are sufficient. At worst, we can go to the nearest landfill, where we can find a lot of parts and related materials that may be useful to us during assembly.
Required material
Here is an approximate list of what we may need:
- sheet metal of various widths;
- bolts and nuts;
- welding machine;
- Bulgarian;
- wheels;
- channels, etc.
As we can see, we will need quite a lot of metal, which in itself implies the use of a welding machine. Therefore, if you do not have the skill to work with it, then assembling a homemade potato planter will not be available to you.
The list of required materials does not include various components that will be discussed in detail in the process of describing the technology for constructing this device.
A few words about the material and tools
We will not deceive you, making such structures with your own hands is only possible for a person who is well acquainted with the basics of carpentry and confidently owns all household power tools.
Tabletop version of the machine.
What kind of plywood is needed
Although laminated wood sheet is deservedly considered a fairly durable material, not every profile is suitable for the manufacture of such structures.
- Let us immediately note that sheets with a thickness of less than 6 mm cannot be used for the manufacture of supporting and load-bearing structures. In this case, we can only talk about the design of casings or lightweight protective panels;
- As for sheets with a thickness of 10 - 12 mm, expert opinions differ. Some believe that this thickness is not enough for reliable operation of the units. The latter, on the contrary, argue that everything depends on the purpose of the machine; a ten-millimeter sheet, for example, is quite suitable for a cutting table in CNC machines made of plywood;
Characteristics of the material.
- Some claim that medium-thick sheets are well suited for gluing three-dimensional parts that are subject to periodic vibration; supposedly, the multilayer structure of the monolith dampens vibrations better. And in principle we agree with them;
- Sheets with a thickness of 19 mm and above are the strongest. They are most often used to make dimensional load-bearing and supporting structures. And although the price of this material is far from affordable, this is the profile that most craftsmen prefer to use.
Assortment of sheets.
But besides thickness, there are a number of important characteristics of a laminated wooden sheet, and since all such structures experience significant mechanical loads, it is undesirable to neglect these recommendations.
- Basically, all plywood is divided into coniferous and hardwood. Coniferous wood itself is lighter and softer, and accordingly the leaf inherited its qualities. Material glued together from hardwood veneer, although more expensive, is better suited in this case;
- Gradations in the chemical composition of the adhesive and the level of moisture resistance are not so important for such products. As a rule, machines are installed in a home workshop and are operated at room temperature and normal humidity. Therefore, you can safely take a thick sheet marked “FC”; in terms of cost, this is the best option;
Veneer grade.
- For such structures, the quality of the veneer matters. The more knots, the higher the likelihood of cracking and delamination of the sheet. There is no need to save money here; the sheet should be taken no lower than second grade;
- Sheets with unsanded jackets (NS), sanded only on the front side (Sh1), as well as completely sanded plywood sheets (Sh2) are produced. Theoretically, you can take unpolished material and polish it yourself, but in artisanal conditions this is difficult to do. Therefore, experts recommend using completely polished material. It is easier to process, and most importantly it adheres better.
Tool selection
The construction of such units requires a good power tool; a hand hacksaw or drill attachments will not work here. There is an opinion among professionals that sheets up to 10 mm thick can be cut with an electric jigsaw. Anything outside of these parameters requires the use of a circular hand saw or a stationary circular saw.
Standard jigsaw.
Important: modern high-frequency jigsaws from reputable and well-known manufacturers, as the attached instructions say, can easily cope with furniture boards up to 20 mm thick. And we have no reason not to believe in this.
To select various types of grooves and holes of non-standard configuration, you will definitely need a hand cutter. It is better to have this tool for personal use, since you can make a plywood bed for it and then you will have a personal milling machine. It is these units that are common among home craftsmen.
Manual frezer.
Naturally, in any such work you cannot do without an electric drill and a set of high-quality carpentry tools. Various kinds of clamps, screwdrivers, hammers, files, sandpaper and other little things are a must have for any self-respecting craftsman by default.
Set of carpentry tools.
Design and principle of operation of potato planters for walk-behind tractors
Such devices consist of:
- frames;
- a bunker in which potatoes intended for planting are placed;
- wheel base;
- a mechanism that ensures loosening of the soil and planting tubers on the site.
Most models have a similar device
Attention! In addition to those listed, other elements may be present - for example, a container for fertilizer.
The operating principle of such a device is very simple. The sprocket mounted on a wheel base is part of a chain lift. When the wheels rotate, the tubers from the hopper rise through a vertical pipe and then are dropped down into the prepared furrow.
Planting process
Potato tubers are planted in a furrow made in advance using a walk-behind tractor. Thus, first you need to use it to plow the garden, then you need to attach a trailed potato planter to the back of the walk-behind tractor, place the tubers in its hopper and plant the potatoes.
It is impossible to simultaneously cut a furrow and plant tubers with a potato planter using a conventional household walk-behind tractor. Only a powerful diesel walk-behind tractor or mini-tractor can perform such operations.
The main types of potato planters for walk-behind tractors
Such devices can be single- or double-row. The first type is suitable for a small area. It has small dimensions and low productivity.
Two-row models are more productive
Some potato planters for walk-behind tractors allow you to plant sprouted potato tubers. Others focus exclusively on unsprouted ones. Also, a number of models allow connection to a certain line of walk-behind tractors. Others, if they have a universal hitch, can be aggregated with various units. The loading hopper can be rectangular or cone-shaped.
Depending on the type of tuber feeding, such attachments are usually divided into units with:
- flat belt system. Tubers are planted using horizontal belts;
- spoon system. To serve potatoes, a design consisting of spoons attached to a belt is used;
- shaped belts that have a special recess that resembles a spoon. An operator must be present when planting, but there is no fear of damaging the tubers;
- piercing mechanism. Such devices are relevant when planting cut potatoes;
- multi-belt design. Such attachments allow you to simultaneously plant two rows of potatoes.
Feeding mechanism may vary
What devices are needed?
To plant potato tubers, it is clear that one single walk-behind tractor will not be enough; additional devices will be required, in particular a potato planter. This equipment will allow you to carry out the procedure efficiently and quickly, without the use of heavy physical labor.
The effectiveness of this approach also lies in the fact that the potato planter may well be homemade. That is, anyone can make the device with their own hands: it is not necessary to buy a finished product. This allows you to optimally select the dimensions of the potato planter for the walk-behind tractor that will meet your needs.
Therefore, we present a diagram and drawing of such a device in order to understand what kind of unit you can get in the end if you make it yourself.
Features of manufacturing a frame facade
We do the nuances of making a high-quality furniture jig with our own hands.
To make a frame facade, a series of sequential actions are performed.
- Vertical and horizontal slats are sawed with some margin, so that later on an angle machine you can make cuts at an angle of 45°.
- When cutting out the final size, the exact size of the frame is maintained.
- Using a manual filler machine, holes are prepared for the final assembly of the facade.
- The chipboard core is cut out on a format-cutting machine (glass is cut to size on a glass cutting table and a reinforcing film is glued onto it).
- The work of assembling the facade is carried out on the table. To ensure that right angles are assembled, a jig is made. In it, the guides converge at an angle of 90°.
- Connect one pair of profiles, check the angle. It should be exactly 90°. Before assembly, the dowels are lubricated with polymer glue.
- Connect the second pair of profiles.
- Glue is applied to the edges of the filler, and then the filler is inserted into the first assembled corner.
- A second corner is mounted on the reverse side, and dowels coated with glue are first installed in it.
- With light blows of the mallet, the entire frame is finally assembled.
- The finished façade is put out to dry. Typically, polymer adhesives are completely polymerized within 24 hours.
The corner from the profile is assembled onto two dowels, as in the photo below. For them you need to drill two holes on the mating surfaces. For this you need an additive machine.
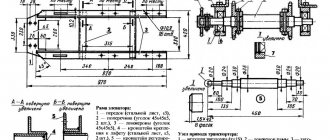
Drawings of a potato planter for a walk-behind tractor.
Calculation of gears of the chain rotation mechanism with potato planter bowls.
The frame of the potato planter is welded from a profile pipe; a tank from a Soviet Riga washing machine or a similar cone-shaped container can be used as a hopper.
Bearings with a lower axle and a drive sprocket for the chain and vertical posts for the upper axle with a sprocket are attached to the frame.
Bucket rings made of 6 mm wire are welded to the sides of the chain; the buckets must be welded in such a way as not to weld the connections between the chain links.
To prevent the tubers from falling out of the buckets prematurely, you need to install a guide pipe; alternatively, you can use a plastic drain pipe with a diameter of 100 mm.
To fill the furrow, two rotary disks with the ability to adjust the angles are installed.
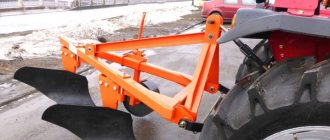
Installation diagram of the planter on a walk-behind tractor.
I recommend watching a video of making a homemade potato planter.
Video: homemade potato planter in action.
Homemade additive machine
Everything ingenious is simple! It would be even more ingenious to combine two drilling cycles into one pass, by slightly modifying the clamp-feeder of the vertical parts and using a single-pass drill for confirmations. Those. Place a vertical sheet, a horizontal one at the joint, and in one pass form a hole of two diameters and a countersink in a vertical sheet of chipboard + an end hole of the same diameter in its horizontal “colleague”!
DIY making
You can choose a potato planter and other necessary attachments in a specialized store, or you can make such a device at home. You just need to have some plumbing skills and purchase the necessary materials to make a mounting device for a walk-behind tractor.
Tools and materials
To make a potato planter with your own hands, you will need to purchase:
- Axles, bicycle chain (or chain from a car engine), bearings for wheel movement, making a chain elevator.
- Metal sheet for making a bunker.
- Square or round metal profile for mounting a frame holder and other purposes.
- Welding machine for firmly connecting potato planter elements to each other.
- Several electrodes for welding.
- Grinder and discs for cutting metal sheets into the required parts.
- An electric drill and drill bits for it for drilling work.
- Fastening elements to add strength to the device.
- Nuts and screws for mounting the structure.
- Wire (several meters) for fastening some elements of the device.
- Sandpaper or file for sanding and cleaning parts.
Before you start assembling the potato planter, you need to carefully study the drawing, think about the dimensions of the future device, its appearance, and the method of attachment to the walk-behind tractor. The dimensions of the planter should not be very large so that the design does not become too bulky.
The volume of the bunker for filling tubers is determined based on the calculation of the double length of the bed. The volume of the container should be enough for a walk-behind tractor with a bunker filled with potatoes to pass two furrows and return to the place of re-loading.
Options for choreographic machines: which is more convenient for home use?
They differ both in configuration and in the method of fastening. Let's start with the first one. First of all, the ballet barre can be single-row (with a single handrail) or double-row (one is located higher, the other is slightly lower). The second is suitable only for specialized gyms where groups of different ages practice. For home exercises, “single-story” is usually chosen. However, if you expect that ballet will captivate your child for more than a couple of months, keep in mind that your child is still growing. If you don’t want to install a new ballet barre every six months or a year, choose one with telescopic stands or several levels to which you can rearrange floor-parallel bars.
Specific points of using a potato planter for a walk-behind tractor
If you decide to use a potato planter for a walk-behind tractor, familiarize yourself with the features of its use in order to understand how to set up the device and the planting process itself.
The potato planter must be set up correctly
Setting up a walk-behind tractor and potato planter
Before planting, the soil is plowed, harrowed and moistened. The unit and device are configured to ensure the following points:
- forming a furrow of suitable depth;
- ensuring sufficient distance between furrows;
- stable operation of the planting material supply mechanism.
Recommendations for planting potatoes
To ensure that the walk-behind tractor does not change its position and is stable due to the large weight of the potato planter, you should immediately take care of the ballast, which is attached to the front of the unit. The speed of the unit should be about 1 km/h. Forming a furrow and covering the planted potatoes with soil is carried out using special sealing discs. Special cultivation paws should prevent the formation of marks after the walk-behind tractor passes.
If possible, planting potatoes should be uniform in size. It should be carefully prepared for the growing process.
How to attach?
The next important parameter: how to secure the ballet barre? The most reliable is considered to be fixation both in the floor and in the wall. If the walls are unreliable, the equipment is attached only to the floor, but over time, the racks can become loose, making it uncomfortable to practice. If the apartment has strong (brick or concrete) walls and, for example, expensive flooring (the same parquet made of natural wood), you can fix the ballet barre only on the walls. However, if there is heavy load on it, there is a possibility that over time the screws or dowels will become loose, which can also lead to injury.
If you regularly go somewhere for a long time (to the dacha for the summer), but do not want your child to stop classes, then in this case you will have to make sure that the ballet barre is mobile. This type is placed on stable “legs”, but it is advisable to additionally secure it horizontally in a new place.
Design and principle of operation
All such units have almost the same design. This is necessarily a strong frame onto which the remaining components are attached, consisting of an axle with lugs, two gears, a conveyor with cells for root crops and a supply pipe. A small plow is also attached to the frame to create a furrow into which the tubers are placed at the same distance. And behind the frame, a disk hiller is installed to fill the potatoes with soil. The entire landing process occurs automatically.
The principle of operation is simple and is as follows. When the walk-behind tractor moves, the planter's lugs, on the axis of which the sprocket is located, begin to rotate. It is connected to the top gear via a chain. It is precisely the conveyor for feeding tubers into the furrow. Cells welded to the chain capture the potatoes and feed them into the guide pipe. At the very bottom there is a small plow. He makes a furrow in which the potatoes fall. A hiller is installed behind the frame, which backfills root crops.
The distance between tubers in a row is from 35 to 40 cm. All adjustments are made during the manufacture of the unit. Then tests are carried out and deficiencies are eliminated.
Options for choreographic machines: which is more convenient for home use?
They differ both in configuration and in the method of fastening. Let's start with the first one. First of all, the ballet barre can be single-row (with a single handrail) or double-row (one is located higher, the other is slightly lower). The second is suitable only for specialized gyms where groups of different ages practice. For home exercises, “single-story” is usually chosen. However, if you expect that ballet will captivate your child for more than a couple of months, keep in mind that your child is still growing. If you don’t want to install a new ballet barre every six months or a year, choose one with telescopic stands or several levels to which you can rearrange floor-parallel bars.
Testing a planter in the garden
After production, the potato planter must be tested and adjusted for normal planting. The unit must meet the following parameters:
- the depth of the tuber is 12-15 cm. This is regulated by the height of the furrow plow;
- the distance between potatoes in a row is 30-40 cm. This depends on the diameter of the lugs and the number of conveyor cells. This calculation is made at the stage of manufacturing the unit;
- the distance between potato rows is 60-70 cm.
In addition, it is necessary to carefully select seed material. The tubers should be the same size, fit freely into the planter cell and not have long shoots.
These are optimal conditions for good germination and, therefore, a large harvest.
Easy to make additive
Discussion
- Can drills be replaced with edge routers? There will be revolutions like an additive machine +/-. The machine turned out to be interesting, well done!
- The device is very good, but I wanted to ask: are the drills clamped normally from the additive, since they have a beveled edge?
- Yes they clamp normally. The beveled part needs to get between the clamping jaws of the drill chuck. There are three legs in the chuck and the beveled part of the drill base must be placed between two adjacent legs. And in the same way, I take a couple of filler drills with me for installation and clamp them into a screwdriver if I need to move the fasteners on site.
- There is a drawing, but it is not detailed. There the emphasis was more on the amount of material and the approximate appearance. And there is no assembly drawing with markings of mounting holes, etc. This was done on the fly.
What is required for production
To make a walk-behind potato planter, you do not need any rare or expensive tool.
The simplest version of this device consists of six main elements:
- wheels;
- tuning mechanism;
- loosening mechanism;
- gear systems;
- bunkers for root crops;
- frames
The device can be improved by adding new parts to its design, for example, a container for fertilizers or a pair of landing modules. However, as the number of parts increases, the walk-behind tractor becomes heavier, and therefore becomes more difficult to control during operation.
To make your own potato planter for a walk-behind tractor, you usually use a tank from an old washing machine. It acts as a bunker for potatoes. Self-taught craftsmen also use a metal corner, steel wire, chain, gear, fittings, a pair of wheels from old vehicles, and a channel.
The tools you will need are the simplest:
- hammer;
- drill;
- spanners;
- welding machine;
- screwdriver;
- wire cutters;
- Bulgarian.
This is the required minimum for making a homemade unit. Essentially, a self-made potato planter is a cart attached to a walk-behind tractor.
But only at first glance the design seems simple: if you look closely, you can find many features in it.
Instructions
Do-it-yourself homemade potato planters for walk-behind tractors are a regular cart on wheels, which is attached to a walk-behind tractor. The apparent simplicity is a little deceptive, because the design of this unit has its own nuances and features that are worth paying attention to.
Frame design
You need to start assembly by making the frame structure. It will consist of channels welded together, as well as longitudinally located spars, which are connected by three transverse elements.
Thanks to a lawn mower, you can trim the grass and remove weeds - this is a suitable device for mowing unnecessary plants near the fence, at home, between the rows in the garden in a flower bed, and so on. Learn how to spool a line onto your lawnmower here.
The MAZ-500 can rightfully be considered one of the iconic cars of the Soviet period, which became the first cabover truck produced in the Soviet Union. MAZ-500 is a Minsk legend from the 60s.
Cultivation is on the list of priority tasks for any tiller, as it helps prevent the appearance of weeds, at least in large quantities, and helps saturate the soil with oxygen, thanks to loosening. Here's how to make a cultivator yourself.
There will be an arch and a fork in front, and on the sides of the structure there will be racks of elements for planting and digging holes. The wheels of the potato planter must be equipped with lugs. Between them there is a wooden disk 6 cm thick with four semicircular grooves located on it.
This disk will capture potato tubers, moving them into the dug holes.
Next you need to make a container for potatoes - a bunker. It can also be made from plywood, but for structural strength it is best to use sheet metal 3 mm thick.
The four sides of the hopper are measured and then cut out. They are connected by welding. The bottom can be covered with rubber so that the potato tubers are not damaged. It is necessary to strengthen the frame with steel strips, placing them from the middle transverse part to the arch in front.
There you need to weld linings and corners with a thickness of 4 mm. DIY drawings of a potato planter for a walk-behind tractor, which can be found on the Internet, describe this process in sufficient detail. Next, you need to attach a support and a footrest, consisting of a sheet of metal 5 mm thick, to the side members.
Making a seat
We make a seat. To do this, we need a metal corner with dimensions of 4.5 × 4.5 × 0.4 cm. To this support we need to attach boards covered with foam rubber for greater comfort. For the wheel axle, you can use a steel pipe that is sized to fit the frame.
At the ends there should be spikes secured with steel pins. As wheels, you can use any wheels from old equipment that has served its purpose. To hold the rippers, a metal rod measuring 5x5x0.5 cm is used.
On the sides of this rod there are elements holding the blade struts. They are made from metal plates 0.5 cm thick. As a seeder, you can use a regular 10 cm pipe, the wall thickness of which will be about 0.3 cm.
A furrow cutter will be located at the bottom of this structure. Digging elements, for which discs from a seeder can be used, must have two bearings. In principle, this description is quite schematic, with an approximate indication of dimensions and parameters.
On the Internet you can find quite a lot of detailed drawings, where other markings are indicated, so there are no strict recommendations in this process.
Main characteristics of the choreography machine
- Dimensions
The minimum length of the crossbar is 1 meter, the maximum is not limited. According to the generally accepted standard, the top bar is located at a height of 1.1 m. The distance from the wall is at least 20–30 cm. The radius of the crossbar is 2–2.5 cm. This provides good palm coverage while maintaining the proper strength of the material. - Stands
are made of metal, less often - of wood (this increases the cost of the choreographic machine). The optimal distance between the two nearest posts is no more than 2 meters. If intense loads on the barre are expected for choreography, it is best to secure the crossbar with an additional support stand. - Brackets for fixation (for stationary models)
Metal brackets are made based on the characteristics of the machine (two-level, single-level). For maximum safety and convenience, all welds are cleaned and thoroughly polished to avoid possible injury. The design of each bracket is designed to ensure that it does not have sharp or protruding corners. This also helps reduce injuries.
Types and descriptions of seeders for walk-behind tractors
Planting garlic and other crops with a walk-behind tractor can be done with different seeders. Below we will consider the design features of each type of seeders for walk-behind tractors in more detail.
Row seeders
Devices of this kind are used for row sowing and simultaneous placement of seeds into the soil. Depending on the purpose, on sale there is a row seeder for a walk-behind tractor for garlic, a corn seeder for a walk-behind tractor, and a universal row seeder, which is suitable for sowing seeds of any crops.
The main elements of row seeders on a walk-behind tractor are coulters and sowing devices. The coulters are equipped with special “legs” or chains, which are necessary for embedding seeds into the ground. For operation in areas with heavy soils, row seeders with disc coulters are used, and for use on loose soil, devices with anchor coulters are used. The main advantages of row seeders include the uniformity of sowing and the optimal depth of placement of planting material.
Nest seeders
Devices of this kind are optimally suited in cases where the farmer needs to sow crops precisely into holes or nests prepared in advance. Nest seeders for walk-behind tractors can be successfully used for sowing seeds of garlic, onions and other small planting material.
The advantages of nest seeders for walk-behind tractors include ease of use. Such equipment is characterized by small dimensions and weight. However, this type of seeders is very slow, which is why it takes a lot of time to work with them.
Square nest seeders
These grain seeders for walk-behind tractors make nests at pre-marked points in conventional squares or rectangles. Such structures consist of a frame, support wheels, a mechanism for unwinding measuring wire from a reel and sowing sections.
The advantages of these devices for a walk-behind tractor include the ability to cover a large area of territory when working. Among the disadvantages of such seeders is their large mass due to the presence of a large number of metal elements in their design. These seeders are not capable of developing high speed, which leads to loss of time when working with it.
Broadcast seeders
Devices of this type have a simple and reliable design, do not require special care and rarely require repairs. The principle of operation of broadcast seeders on a walk-behind tractor is very simple: during operation, seeds taken by a special disk are subject to pressure, as a result of which they are thrown out of the seeder onto the site.
The advantages of such devices include high productivity. Among the disadvantages, it is worth highlighting the difficulties when using seeders at the edge of the plot, in which most of the seeds are thrown outside the garden.
Dotted seeders
These devices are used for sowing seeds of garlic, onions, corn and legumes in pre-prepared nests, which are located at a certain distance from each other. Despite the complex design and large dimensions, dotted seeders for walk-behind tractors are quite easy to operate.
The advantages of such devices include high precision during sowing and good productivity. Among the disadvantages, we should highlight the inability to use such seeders in areas with heavy clay soil.
Selection options
Many parents, faced with the need to purchase appropriate equipment, make standard mistakes. This is natural, since choosing a ballet barre is quite difficult. A person who is not professionally involved in dancing simply does not know how to do it “correctly.” And wherever you get the ballet barre intended for your child - you made it yourself, ordered it from a special workshop, or bought a ready-made one - you need to take into account the following recommendations.
First of all, the height of the beam. In order not to correct defects in posture and memorized movements later, remember: it should be at the level of the dancer’s lowest rib. The next requirement: no cheap stuff! Neither in the selection of materials, nor in the choice of a ready-made choreographic machine. Chinese versions usually contain easily evaporating inclusions that will simply poison your child in a confined space and under severe stress. “Environmental cleanliness” is the motto of caring parents!
Equally important: the ballet barre must include only wooden handrails. And at the same time not covered with varnish. A sweaty hand will slip on metal or varnished ones, which very often leads to injury.