How to make tire rims with your own hands?
For any all-terrain vehicle, the decisive condition for excellent cross-country ability is the use of the right tires.
But the cost of a suitable kit is considerable, because it is often produced either in small quantities or by special order.
But it is quite possible to make low-pressure tires yourself . This work is labor-intensive and requires patience and attention. The finished product has a characteristic name - odorishi.
Why are they needed and where are they used?
The peculiarity of such tires is that they have a large contact area with the ground surface. This allows you to pass through the most difficult areas. The design allows you to adapt to specific shapes and unevenness of the obstacle, as if enveloping them.
Obodryshi can be considered indispensable in matters of off-road driving, when participating in relevant competitions, in solving agricultural issues, etc. At the same time, the machine will not compact the ground when moving even heavy equipment.
Hunting and fishing enthusiasts and military services usually refit their cars with such tires; this is an indispensable thing in matters of geological exploration.
Low-pressure tires are designed for vehicles that travel on rocky roads, through mud and swamps.
This is roughly how one can characterize the abilities of the rabble-rousers.
What are buds and what are they for?
Tires (also known as low-pressure tires) are huge tractor, truck or helicopter tires that have been stripped of excess rubber.
Thanks to the large area of such wheels and their low pressure on the surface, an ordinary passenger car equipped with them becomes a real SUV .
With encouragement, Niva and UAZ can overcome a wide variety of obstacles - fields, deserts, rocky and marshy soil.
It is difficult for hunters and simply those who like to ride in difficult terrain to do without wheels with low pressure.
Making such tires yourself is not a problem. For this, the most common tools like a knife or winch . It will still take a little skill.
Before you start creating low-pressure tires, you need to clearly understand what exactly they will be needed for , that is, in what conditions, where exactly they will be used.
- primarily for driving on dirty, bumpy roads and rural roads - then you need to use a self-cleaning tread;
- If we go through swamps on tires, we will need to lower the tread grooves a little so that the grip becomes as good as possible;
- In snow drifts and sand, it is better to drive on tires on which the tread pattern elements are as close to each other as possible.
You need to think about the above in advance.
Feasibility of installation
Let's look at the features that make low pressure tires so effective:
- light weight compared to conventional off-road tires of comparable dimensions. Thanks to this internal combustion engine, it is much easier to turn the wheels, which equates to an increase in torque without changes to the engine or transmission;
- increased contact area with the road surface. As you know from a physics course, the larger the area over which the mass is distributed, the less pressure on the surface at each point. This is what determines the use of low-pressure wheels on swamp and snowmobiles. A similar effect is used in agricultural machinery, where excessive load on the soil is harmful to crops. At a certain ratio of the mass of the vehicle, the displacing area and the amount of air placed in the tire, the car becomes buoyant.
You can regulate the specific pressure on the ground, and therefore the cross-country ability, by changing the internal pressure of the tire. The vehicle can actually be equipped with automatic tire inflation, after which the pressure can be changed from the passenger compartment.
The only noticeable drawback of low-pressure tires is their vulnerability to punctures by sharp objects. This disadvantage is due to the high elasticity of the rubber, which is an additional advantage when overcoming off-road conditions.
The process of creating low pressure tires
To make low-pressure tires for a UAZ, Karakat or Niva, you need to create the tire itself, as well as a strong metal base to attach it to.
To create your own wrappers you will need:
- The main material is old tires for trucks such as Gaza-66, Kraza 255 (VI-3 tires), ZIL 131. Tires from helicopters, tractors and small aircraft are also perfect. If the tires have a “chewed” inner part, they should not be used. A hole may form in such rubber after the top layer is removed. As a result, they will simply have to be thrown away.
- An awl, a knife (construction knife), a set of blades and a sharpener for straightening them. When in contact with durable truck tires, the blades quickly dull and become unusable, so you can’t do it alone.
- A special template made of a thin steel sheet or thicker cardboard, as well as chalk or a marker for outlining the template.
- Clamps (maximum strength). The best ones are those that straighteners use to clamp the bodies of crumpled vehicles when they try to straighten them. A standard clamp will also work for stripping tires , but you will need to be very careful. You can use the workflow with ordinary wire cutters.
- A winch (automatic or manual) and a cable to tension the part of the tread that we will cut off. It can also be tightened using a manual gearbox.
You may also need a hammer (for straightening).
To make the tires airy, large tires will need to be freed of excess rubber on the tread and sidewalls. It is also necessary to remove the seat cores and the base of the cord (the inner protective layer of the tire).
- thoroughly clean the tire from all dirt and then dry it;
- using a template, using a marker or chalk along the entire circumference of the wheel, we create a tread pattern (the way it will become after some of the unnecessary rubber is removed).
- We make a cut along the inner perimeter of the tire to get rid of the wire . It is better to make the cut with a construction knife. It is convenient because you can set the length of the blade on it.
- In the area of the cut, mark rectangles with a marker and begin cutting .
- Through the holes formed in the tire we will be able to see the wire, which we will get rid of.
- We fix the tire with an iron rod so that it does not move, and pry up the wire with a hook , and remove it from the tire with a winch. You can also remove it with a screwdriver, but this will require a lot of effort.
Now we start stripping the tire:
- We make cuts along the perimeter of the tread circle we drew , digging a little deeper into the rubberized base of the cord;
- using pliers we fix the resulting hole ;
- and peel off the rubber that has peeled off using a winch .
To make things go easier and faster, we cut it with a knife.
- gradually peel off unnecessary layers of rubber and cord from the tread surface and sides until only one frame remains;
- clean the surface using sandpaper (if necessary, straighten it with a hammer).
The camera for the future wheel is ready.
- We create a new tire frame . We weld the wheel rims with the plates. You can also create low-pressure rims yourself. For this, the most ordinary aluminum basin and fire hose (for fastening) will do.
- Grinding the frame.
- We put the support camera on the frame.
We pump the tire and can install it on our car.
Let's make some refreshments
To make your own low-pressure tires you will need:
To make rims, the first step is to pull out the side metal cord. To do this, make a cut, departing approximately 10 mm from the inside of the tire. Hook the cord with a screwdriver, and then, hooking it with a hook, pull out the metal rim using a winch.
Using a template, apply the future outline of the tread along the entire perimeter of the wheel. Some obradyshas can be seen with the protector left in the center. It is along the contour of the outline that it is necessary to make cuts in the rubber.
As soon as you cut through the rubber layer and reach the metal cord of the tire, the sound will acquire the appropriate color.
Cut the tire profile along the inner perimeter (where the metal wire ring used to be). It is the cut section that must be grasped with the clamp.
Use a winch to create tension, and then use a utility knife to gradually trim off the peeling piece. After stripping the entire tire, you will get strips.
Please note that when tension is created, the tire will tend to lean in, so it is necessary to implement a stop.
Particular attention should be paid to this point if you do the lifting using a winch installed on the car. It is not necessary to create a lot of force for peeling. For extra safety, place an old jacket on the cable, which will serve as a kind of damper if the clamp does break.
Advantages and disadvantages
Wheels have many advantages over purchased wheels:
- Price. All-terrain wheels are very expensive, which can’t be said about the wheels.
- Such wheels have excellent adhesion to almost any surface, which significantly reduces the risk of accidents.
- The husks weigh relatively little. An “unpumped” passenger car engine will be quite capable of cranking them.
- Low surface pressure due to the large tire area. With encouragement, muddy terrain, quicksand and deep snow become quite passable obstacles. The tire pressure on the surface can be adjusted. They just need to be pumped up or lowered a little.
- Tires with low pressure do not harm the surface soil layers in any way, so you can safely drive an all-terrain vehicle with tires across plowed fields or use it as a tractor in agriculture.
They are also not without some disadvantages :
- You should try to ride less on hard asphalt and concrete surfaces. Otherwise, they will have to be changed very soon .
- A car on such wheels is not very stable. It’s better not to make sharp turns on it, and you shouldn’t drive it fast at all.
- Wheels wear out much faster than normal ones.
- Encouragement is a considerable burden. Transmission and suspension parts with such wheels will have to be changed and repaired more often.
- Low pressure tires are very flexible. This increases their permeability. But due to their increased stretchability, tires get punctured more often than regular tires.
- The car will have to be re-registered - “upgraded” to the status of an all-terrain vehicle.
Advantages and disadvantages
When planning to make homemade low-pressure car wheels, you can save a lot and get a number of advantages. There are many factories that produce ready-made all-terrain tires, but their cost is very high.
The strengths of homemade rippers include:
- Low cost. The costs are minimal since you can use any old tires.
- Excellent grip. This is an indispensable thing for overcoming the most difficult areas.
- Relatively light weight. Even if you put the wheels on a regular car, the engine power will be enough to rotate these tires.
- Ability to overcome sand, soft soil, snow drifts.
- The ability to regulate pressure depending on the purpose and operating conditions.
- There is no harm to the soil, which makes it possible to use the peels even in conditions of plowed and sown soil.
But there are also disadvantages that are important to consider. The main disadvantages here are:
- these tires are not suitable for use on asphalt and concrete as they wear out quickly;
- passenger cars noticeably lose stability;
- driving at a speed of more than 60 km/h is prohibited and dangerous;
- You cannot make sharp turns and maneuvers;
- tires load the suspension and transmission parts, causing them to wear out faster;
- It is much easier to puncture such tires;
- The car needs to be re-registered because it is now an all-terrain vehicle.
How significant these shortcomings are, everyone decides for himself.
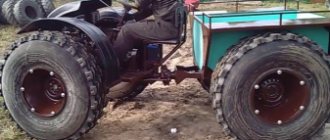
Making low-pressure wheels with your own hands
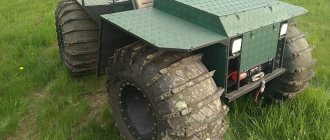
Among amateur designers of all-terrain vehicles, low-pressure wheels of their own production are very popular. The beginning of the history of the use of this type of propulsion by enthusiasts of homemade all-terrain vehicles can be considered the mid-sixties of the last century. It was then that the first timid attempts were made to master the production of wheeled vehicles capable of moving with equal success through wetlands and virgin snow. All these machines were equipped with low-pressure pneumatics, and became the ancestors of today's homemade products.
Table: characteristics of off-road tires
| Road conditions | Maximum tire load, kgf | Internal pressure in the tire corresponding to the maximum load, kgf/cm2 | Maximum speed, km/h | Mileage rate within the warranty period, no more, km |
| Paved roads | 600 500 | 0,6 0,5 | 70 | 800 |
| Dirt roads | 600 500 | 0,45 0,35 | 60 | 900 |
| Sand, plowing | 600 500 | 0,3 0,25 | 40 | 1500 |
| Virgin snow | 500 | 0,2 | 20 | 1300 |
Distinctive features of low pressure wheels
Why did the designers of caracats like this type of tires made by themselves? The pneumatic has low weight, very high elasticity and pressure on the ground within small limits. All these characteristics, coupled with a large rolling radius, give the all-terrain vehicle amazing maneuverability along with efficiency.
Factory LP wheels
A decent volume of chambers gives the design with such a propulsion sufficient buoyancy. This can be called an additional bonus to the vehicle's cross-country ability. In addition, by filling the inner space of the disk with foam, you can give the all-terrain vehicle additional stability on the water and at the same time reduce the sticking of snow or dirt on the inner surfaces of the wheel.
The simple design of these chassis elements and the absence of problems with finding materials for their manufacture allows you to make a pneumatic passage with your own hands without any special material and labor costs. This made machines built according to this principle very popular among home-made people.
Of course, such designs also have their drawbacks, in particular the short service life of the cameras, but they are overcome by introducing additional elements into the design.
How to make a pneumatic duct from a walk-behind tractor
In order to take on the creation of such an all-terrain vehicle, an amateur designer must solve the following problem: for what purpose is the future vehicle intended. Here you need to clarify the desired number of seats, the weight of the maximum luggage, the season of use and for what conditions the device is intended.
And now the idea is ready, the goal is visible, which means we can move on to the issue of selecting the elements of the all-terrain vehicle. Here you need to decide on the type and model of the engine, the composition of the transmission, the design and type of frame, the equipment of the cabin and other elements. One of the main characteristics that needs to be paid attention to when creating an all-terrain vehicle is the choice of the propulsion system formula.
After analyzing and comparing all desires and possibilities, you can make the final choice of the required all-terrain vehicle design. At this stage of activity, a project for a homemade all-terrain vehicle is a necessary condition for its completion.
Stripping tires for all-terrain vehicles
For such a difficult task you will need not only tires and a garage, but also many related tools. The most necessary ones include:
It’s better to prepare everything in advance so as not to slow down the whole process later. Stripping the wheels will take a long time, so you will need to be patient.
If all the components are available, then you can start. Applying chalk markings is necessary for future drawing of the tread. Moreover, this can be done as much as your imagination allows. But it’s better to draw the simplest one so that there’s less work.
The winch is prepared first; it should be securely attached to the wall or floor. Not far from the winch you will need to equip a tire fixation area. It must be installed and remain stationary while the electric winch is operating. You can make a hole in the concrete floor and insert a crowbar into it, and then put a tire on it. But if your imagination can come up with a more interesting mount, then you shouldn’t hold back. For a stationery knife, you will definitely need replacement blades, since they become dull very quickly during operation.
You may be interested in this About wheel sizes for Lada Granta
Materials for stripping tires
How to strip tires for an all-terrain vehicle| instructions
Dear visitors to the “Self-Made Friend” website, today we will walk you through step by step how to strip tires for an all-terrain vehicle. Guys mostly call them obodryshi, pneumatics, low-pressure tires..
Donors for the production of lightweight tires for homemade all-terrain vehicles are mainly used tires from domestic tractors and trucks; as practice has shown, the best ones from KRAZ and KAMAZ, tractor T-150.
The weight of such tires in normal condition is very large for a small all-terrain vehicle, but if you peel off the top layer of rubber to the braided cord, the weight of the tire is significantly reduced to about 30 kg.
Of course, the camera will add 4 kg, the disk 16 kg, in general, a fully equipped wheel will weigh no more than 50 kg, which is quite acceptable for a homemade all-terrain vehicle
Stripping tires is a rather serious and painstaking task; it must be treated with special responsibility and care, because one awkward movement with a knife or saw will send the workpiece to waste.
First you need to mark the wheel with white chalk, then use a utility knife to make cuts. Remove the metal part of the cord at the base using pliers and an electric winch, and then rip off the rubber itself, see how this is done below..
Tools
Step-by-step instructions for stripping tires for an all-terrain vehicle with your own hands.
We cut off the rubber and see this same wire. Next, you need to pry it off, take a screwdriver and start pulling it out little by little. We pass the baton to the assembly line and trim the rubber with a knife.
After a more or less acceptable loop has been pulled out, we hook the hook of the cable from the electric winch, and lock the wheel itself with a crowbar so that the tire is motionless. We tear out the wire using a winch, calmly and slowly, cutting the rubber as we go so that the wire comes out well . Then you should make an incision just above the seat.
The pliers are inserted into the incision site and clamped. And also, using a winch, we rip off the ring. Then again, using a stationery knife, we begin to cut the side of the tire along the pre-marked lines. We hook the pliers to the edge and begin to tear it off using an electric winch. We cut along the edges with a knife, but be careful not to touch the cord, work with the knife from the bottom up.
Next, we move on to the less labor-intensive work of cutting the tread; this is done mainly with the help of gas or electric saws. These are the kind of encouragements you should end up with. Thank you very much for your attention, we hope this material will help you. If you have experience in this matter, please share with us (comment form below)
We make a pneumatic walker with our own hands from a walk-behind tractor
Choosing a motor for a pneumatic duct
Very often, the lack of sufficient funding leads to restrictions when choosing an engine, therefore, you have to use what is available. These, as a rule, are two- or four-stroke motorcycle engines, and also use old automobile power plants, but much less frequently. If you still have extra money available and when choosing an engine you don’t have to think about its quantity, then you can use the following recommendations:
Four-stroke engines have a number of advantages over their two-stroke counterparts, which is why many designers use them. For example, you can take boxer engines from heavy motorcycles. In such devices, you can also use a motor from a car, which is most suitable for installing it on a homemade tracked all-terrain vehicle. Such an engine has sufficient torque, is also reliable in use, and it has (and importantly) a good price-to-required performance ratio. What type of engine to use - diesel or carburetor - will be your decision.
Both schemes have their advantages and disadvantages. For example, a diesel engine is more economical than a gasoline engine, although in severe frost conditions it can be difficult to start it stably and make it work stably without using additional equipment (preheater). (What can be said about gasoline engines, but to a much lesser extent).
Design of pneumatic wheels
Designers of all-terrain vehicles in many cases use homemade low-pressure wheels.
What is so unusual about pneumatic tires? They have relatively low weight, high elasticity and pressure on the ground within small limits. Such characteristics, along with a large rolling radius, provide the all-terrain vehicle with good maneuverability along with efficiency.
Factory LP wheels
The volume of the chambers determines good buoyancy for the structure, which is an additional advantage for cross-country ability. And if you use foam to fill the space inside the disk, the all-terrain vehicle will be more stable on the water and there will also be a noticeable reduction in the accumulation of snow or dirt.
The simple design of the chassis elements and the ease of finding materials for them makes it possible to manufacture an all-terrain vehicle without much difficulty. But, of course, this also has its drawbacks, for example, the low lifespan of cameras, but the introduction of additional elements allows this to be avoided. Tires for pneumatic all-terrain vehicles are made by craftsmen themselves, using four basic principles:
- The first - 2 sheet metal disks with jumpers between them are attached to a sleeve, after which you need to put on a camera, which is fixed with pieces of conveyor belt. Sometimes a camera can use a protector from another camera.
- The second is to fasten one disk to the bushing, and then attach jumpers to it, and weld or rivet the side rings to them.
- Third - the scheme is similar to the previous construction principle, only a spoke made of sheet metal or pipe is used for the central disk.
- According to the fourth principle, two discs are mounted on the hub, similar to the discs of a motor scooter wheel (split wheel).
DIY crafts from old car wheels with manufacturing instructions and photo examples
An original recreation area can be made with the participation of the male half of your family and several metal disks.
Crafts from wheels for the garden
The entire work process takes no more than 5-6 hours.
Difficulty may arise at the stage of searching for bricks for finishing.
This homemade fire pit can be used to cook your favorite dishes outdoors.
DIY crafts from CDs for the home
Now let’s look at the process of making a coffee table from a car wheel, which can decorate any modern living room.
| Illustration | Description of action |
| We cut the disks into two parts. For this we use a grinder. | |
| To make it, you will need to make a “rustle” in the garage: find a brake disc, hubs, pipe, washer and bolts. | |
| We connect the hub to the brake disc. | |
| We insert the metal pipe into the brake disc and secure it. Next, we turn the structure over. | |
| We attach the car disk to the hub. Next, we attach the glass to the holders. |
We talked about some options, a small part of all the ideas that can be realized with the help of seemingly junk things. To implement ideas for making an interesting and unique product, you don’t need much, just find the time and the material that is needed.
How to install Zhiguli wheels
If you have old spare parts for Lada cars, then there are two options for using them. The first is the creation of lug elements based on discs. This procedure requires the following steps:
- remove and clean the disks;
- weld the plates in a certain order, which will act as lugs;
- install lugs using weights and extensions on the base.
If you use pneumatic tires from Zhiguli, then it is advisable to install winter tires on the walk-behind tractor, which are more aggressive and have greater cross-country ability. If the walk-behind tractor is used for large-area work, then it is necessary to use a paired version or lengthen the axle when installing parts from Zhiguli.
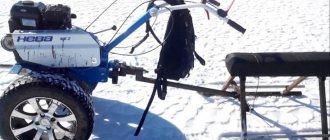
Homemade all-terrain vehicles on a pneumatic walk-behind tractor
Homemade pneumatic vehicles on low-pressure tires are popular due to their versatility and durability: both in summer (karakat on a pneumatic vehicle) and in winter (snowmobile made from a walk-behind tractor), such a unit will always be on the move.
The design of a home-made pneumatic runner is based on the main traction force - the walk-behind tractor. The walk-behind tractor is an engine with a rotating element that allows the use of attachments - a cultivator, a rotary mower, a plow and others. You can often find pneumatics with a trailer - the power of a middle-class unit is even enough to transport a haystack.
In any case, there is no point in buying an expensive mechanism, since the pneumatic duct will still be upgraded to meet specific needs.
Engine selection
The engine power of a homemade pneumatic walker determines the performance of the walk-behind tractor, and therefore, the higher the power, the more efficient the pneumatic walker will work. But there is also a downside: with high power, fuel consumption also increases, and this is not practical if you live far from a gas station. If you plan to use an all-terrain vehicle only in the summer, then it is better to choose a budget model that has a two-stroke engine. It starts quickly and has a simpler design.
For winter fishing or hunting, only a four-stroke is suitable.
Four-stroke walk-behind tractors, thanks to step-by-step stages of activation, warm up gradually, which significantly extends the service life of the pneumatic drive.
Required tools and materials
Since it is necessary to weld metal parts together, you definitely cannot do without a good welding machine!
The list contains the following tools:
- Hammer;
- Screwdriver;
- Metal cutters;
- Drill with drills for metal;
- Grinder with a circle for metal;
- Set of car keys size 10 or 12.
The next step is to purchase the missing materials for a homemade pneumatic runner:
- Walk-behind tractor: you can use the engine from hybrid agricultural equipment;
- Wheels from a car or motorcycle: they are iron, so buy anti-corrosion paint; or homemade/modified depending on needs;.
- Cameras GAZ or others (for example, aviation or from trailed agricultural machines);
- Pipes: any pipes and even their trimmings will do;
- Steering column: it is advisable to purchase a model as new as possible, since the quality of control of a pneumatic all-terrain vehicle depends on this, or use a car rack;
- Hubs: suspension elements must be selected with the least wear, automobile ones can be used;
- Metal corners;
- Fastening elements (bolts, screws);
- Rebar or wire.
Assembling a pneumatic duct on low-pressure tires
Approximate drawing of a pneumatic duct
Before you start assembling a pneumatic walker from a walk-behind tractor with your own hands, make sure that all electrical components are compatible with each other. Be sure to draw up a detailed plan for the implementation of the project, as well as describe the assembly process step by step.
Observe safety precautions when working with a welding machine. Always wear a mask to protect your eyes and cotton gloves.
The installation process can be divided into the following stages:
- Preparing and cleaning the workplace from excess debris and tools.
- After determining the dimensions of the supporting frame, cut pieces of pipes with a grinder and then weld them into a single structure.
- Next, put the cameras on the disks and secure them. Check the tightness of the joints by pumping them with air.
Pneumatic wheel with a rim from an Izh motorcycle and a disk from a Moskvich
- Pay special attention to the design of the pneumatic steering: it must be free of damage and obvious signs of wear. Install the steering and secure it to the frame using a galvanized bolt.
- It's time to connect the drive! Screw the wheels and attach the brake pads to the metal axle.
- Installation of electrical circuits.
- After all the manipulations have been completed, proceed to install the walk-behind tractor. For stationary use, securely fix it with bolts. Now you can understand how your invention will work.
For durability and an attractive appearance of the pneumatic walker made from a walk-behind tractor, the finished structure should be painted with a special protective paint for metal.
DIY pneumatic wheels
Wheels can be of the following types:
- Tire with treads. Tires from a tractor or truck will do. They have a deep pattern that increases the maneuverability of a homemade pneumatic all-terrain vehicle. Often, home-made tires are made lighter by increasing the tread pattern by cutting off excess rubber on the outer layer - such wheels are called “rip-off” or “scuff” wheels.
- A car tube filled with air - low pressure tires. To increase the grip of the pneumatic hose with sand, ice, mud and water, it is necessary to attach metal chains, rings or belts to the chambers - this will give the structure additional rigidity when moving, and also increase maneuverability when cornering.
- Combined, when tires are used together with low pressure chambers.
For wheels, choose galvanized metal cast wheels, despite their cost - they will last much longer than iron ones and will fully pay for themselves in a few years.
To distribute traction more smoothly and evenly while working on a pneumatic track, install a four-speed gearbox from Zhigulenka. This way you can regulate the speed and significantly save fuel consumption.
If you plan to use the pneumatic vehicle at night, be sure to install headlights in the front of the frame: build a box where the generator and battery will be installed.
Buying a pneumatic walker is an expensive pleasure that not everyone can afford, but almost everyone can assemble a homemade pneumatic walker from a walk-behind tractor and scrap materials, saving a lot of money!
DIY crafts from CDs and DVDs, for home, photo ideas
Almost every person has a couple of unnecessary CDs, DWDs, CDs that are simply scratched, stale and no longer needed. Don’t rush to throw them away because you can use them to make useful crafts for the home, such as: a napkin holder, a photo frame, a candlestick, a hot stand, a pincushion, and even children’s crafts like fish and smeshariki. In this article we will look at how to make crafts for the home from old CDs, DWDs, CDs with your own hands.
Napkin holder made from discs
You will need: three discs, a glue gun, scissors, decorative elements (beads, beads, ribbons) ...
Master Class
- Take two disks, cut off 25% of each disk in a straight line.
- Take a whole disk that will serve as the base of the napkin holder.
- Glue the cut disks on both sides to the base so that they act as holders.
- Wait until completely dry.
- Decorate to your taste.
I recommend watching the video master class!
Photo frame from disk
You will need:
Master Class
- Make a decoration from threads or ribbons, folding them several times.
- Glue the decoration to the disk.
- Cut the photo into a disk shape.
- Glue it to the disk.
- Decorate to your taste and hang it in the right place.
Let's consider another option for creating a photo frame from disks!
Photo frame made from disk fragments
You will need: 2 discs, glue, black stained glass paint with a fine tip, thick cardboard, scissors.
Master Class
- Cut out a cardboard frame of the desired size.
- Cut the disks into pieces.
- Glue the disc pieces to the frame, leaving small gaps.
- Color in the spaces.
I recommend watching the video master class!
Candlestick made of disk and shells
You will need: a disk, shells, pebbles, a glue gun or instant glue.
Master Class
- Take the disc.
- Glue shells and pebbles to the shiny side of the disk.
- Leave room for a candle in the center.
I recommend watching the video master class!
Disc hot tray
You will need: disk, padding polyester, fabric, scissors, double-sided tape.
Master Class
- Cut a circle of padding polyester in the shape of a disk.
- Cut a circle of fabric 1.5 times larger than the disk.
- Place a circle of padding polyester on the disk.
- Attach double-sided tape to the edges of the fabric circle.
- Wrap the disc with padding polyester in a circle of fabric, and secure the edges of the fabric on the reverse side.
I recommend watching the video master class!
Hot stand made from a disk using decoupage technique
Decoupage is a method of decorating objects.
You will need: a disk, a napkin with a pattern, scissors, PVA glue, varnish, a sheet of flexi (so that the stand does not slide on the table).
Master Class
- Peel off the top layer of the napkin.
- Apply PVA glue to the surface of the disc.
- Glue the napkin. (If wrinkles have formed, smooth them out with a cotton pad).
- Cut a disc-shaped circle from a sheet of flexi paper.
- Glue the circle of flexi on the other side of the disk.
- Apply varnish and wait until completely dry.
I recommend watching the video master class!
Disk pincushion
You will need: a disc, a glass of yoghurt-fermented baked milk-sour cream, thread with a needle, ribbon, fabric, padding polyester.
Master Class
- Cut a circle of fabric 1.5 times larger than the disk.
- Sew along the edge with a basting stitch.
- Fill the fabric with padding polyester.
- Insert the disc.
- Tighten lightly.
- Cut off the bottom of the glass.
- Cut a circle of fabric to completely cover the glass.
- Fill the glass with padding polyester.
- Sew the pieces together to create a hat shape.
- Decorate with ribbon to make a bow.
I recommend watching the video master class!
https://youtube.com/watch?v=Xxh_PZh2YCE
Disc fish
You will need: disk, colored cardboard, scissors, glue, markers, plasticine.
Master Class
- Draw a mouth, fins and tail of a fish on a piece of cardboard.
- Cut out the pieces.
- Glue the fish parts onto the disk.
- Cover the disk with plasticine using the pressing method.
- Draw the eye of the fish on white cardboard.
- Cut it out.
- Attach it to plasticine.
- Make eyelashes from plasticine.
Smeshariki from disks
You will need: disks, colored cardboard, PVA glue or double-sided tape, a simple pencil, scissors, felt-tip pens.
Master Class
- Draw ears, eyes, mouth, teeth, nose, legs and arms on colored cardboard.
- Trace the outlines of the parts with felt-tip pens.
- Cut out the pieces.
- Glue it onto the disc.
I recommend watching the video master class!
Crafts made from disks will not only become an original decoration for your home, but will also be practical to use!
Homemade wheels and tires
First of all, you need to select the source material on which such tires will be made. It is best if the design is based on aircraft tires - they are made of high-strength rubber and the best quality. Tires from agricultural machinery or industrial all-terrain vehicles are also suitable.
Each bus consists of several interconnected elements. To manufacture the SND, it is necessary to remove excess rubber from the tread and side surfaces, and remove the seat cores from the inner part. If necessary, you can even remove the rubberized part of the cord base, but this is quite difficult to do without affecting the nearby layer. So, the main task is to lighten the tires and make them such that they will allow the car to move over difficult terrain and weak-bearing soils.
What is a low pressure tire
Special-purpose tires are a way out of a situation when you need to quickly convert an SUV into a full-fledged all-terrain vehicle. The easiest way is to make low-pressure wheels with your own hands. There is nothing complicated in their manufacture, and the price of homemade tires is several times cheaper than factory ones. First, it’s worth understanding the features of such tires and seeing in what cases and on what vehicles their use is most rational.
Equipment on low-pressure wheels is not afraid of swampy terrain, sand, or rocky roads. The pressure in such wheels is about 2 kg/cm2, due to which any obstacle in the path of the tire is overcome thanks to the high elasticity of the rubber and the large volume of air. Branded low-pressure wheels can cost no less than half the entire car, which is why many people make them themselves. Such a tire works in the same way as the wheels on an ATV or a wheeled snowmobile - it distributes the load on the soil more evenly, and due to the large contact area of the tire with any surface, the all-terrain vehicle does not fall through and can move even on loose snow.
Ads for the request “discs for cheerleaders” in Russia
When the disk is completely ready, a thin strip of 2mm steel can be welded to the barrel for reinforcement. It will prevent beading due to the breaking of holes in the barrel through which the locking ring is screwed. If the ring itself is made of aluminum, then in these places it is worth switching to steel.
Since in our case we are interested in the process of making all-terrain tires with our own hands, we will not dwell on factory design options. After completing the job, it is extremely important to make sure that the base of the homemade low-pressure tire is not damaged anywhere.
The fact is that there is a video of Ildar and he made a 26 cm disc on the same tire. What size will be optimal?
To make the wire turn faster, you need to cut it on both sides with a knife. When you have managed to pull out a sufficient loop, you can move on to the stage of fixing the tire. The cable with the hook clings to the loop and the winch starts. The tire must be stationary, otherwise the wire will not be pulled out. There is no need to rush, as you will need to make cuts near the wire to ensure it comes out well.
They are equipped with an oval profile and are used under different operating pressures. They have a pressure 2 times lower than in standard models.
Vologda. The film shows the assembly of caracats. Find out. We need to prepare for the start of winter fishing. We decided to put fur coats on the karakat, just like changing fur coats.
Used when traveling off-road. Placed on the wheels of the vehicle's drivetrain. Here you should purchase high-profile rubber with a thickness of less than 700 mm. The final width of the structure will be 2-5 times larger than a standard tire. Because of this, the appearance of the product resembles a barrel.
Prepare the necessary tools in advance. Having started directly making low-pressure tires with your own hands, you need to perform certain actions in strict sequence.
In order for the tires to be not only effective, but also to look good, the tread must be cut as evenly and symmetrically as possible.
Varieties
There are several types of low pressure tires.
They are divided into the following categories:
Torroid products. They are divided into tube and tubeless. Mainly used on sports cars. Can be used for everyday use. They have an average profile width. They are more often than others in Russia made with their own hands.
It’s worth taking a closer look at tires when planning to buy them rather than making them yourself.
Design options
Since in our case we are interested in the process of making all-terrain tires with our own hands, we will not dwell on factory design options. Types of low-pressure tires that are available for self-production:
- a tube made from a tire of the required size is used as a base. In this case, you can completely make the disk yourself or retrofit the finished wheel with the necessary stops and fasteners. Since the chamber is very elastic, it needs additional support, which will prevent it from breaking under lateral loads. Along the perimeter of the contact patch, the camera is tied with pieces of dense material or chains, which is necessary not only for attaching the camera to the disk, but also to create the effect of lugs. The ability to cling is important not only on sand, loose soil or snow, but also on water;
- Low pressure hydrators. Truck tires are used as a base, from which part of the tread and profile layer is cut off. As a result, the tire becomes lighter and acquires additional elasticity. To reduce the risk of disassembling the wheels when driving at low pressure, as in the previous case, it is necessary to make an additional side stop. We'll look at how to make the pads, as well as the design of the disc, in the photos and videos below.
Chamber version
First of all, you need to select or grind your own discs that will fit the parameters of the hubs of your vehicle. What to do if you need to adjust the width of the disk to the camera:
- cut the disk, cutting out the inner part of the required size, then welding the disks again if it is necessary to reduce the seat size;
- if the width needs to be increased, then a part of another disk is welded between the two cut halves. These wheels can be made to order for you, since making welding joints is quite common class=”aligncenter” width=”600″ height=”390″[/img]
Features of the LP off-road tire
Briefly, here are the features of low-pressure wheels:
- The large contact area of the tire with the surface allows the tire efficiency to be increased by 20-25% compared to conventional rubber.
- Versatility. The tire requirements for military equipment and agricultural equipment can be completely different - for a tractor the main thing is the minimum load on the soil, for a military all-terrain vehicle the priority is cross-country ability, but all equipment on low-pressure wheels is capable of overcoming severe off-road conditions, moving through water and swampy areas.
- The peculiarities of driving on low-pressure tires are that driving on concrete and asphalt roads in many cases leads to accelerated tire wear. It is also worth considering that the center of gravity of the all-terrain vehicle can be raised, so there is a danger of tipping over at high speed.
Feasibility of installation
Let's look at the features that make low pressure tires so effective:
- light weight compared to conventional off-road tires of comparable dimensions. Thanks to this internal combustion engine, it is much easier to turn the wheels, which equates to an increase in torque without changes to the engine or transmission;
- increased contact area with the road surface. As you know from a physics course, the larger the area over which the mass is distributed, the less pressure on the surface at each point. This is what determines the use of low-pressure wheels on swamp and snowmobiles. A similar effect is used in agricultural machinery, where excessive load on the soil is harmful to crops. At a certain ratio of the mass of the vehicle, the displacing area and the amount of air placed in the tire, the car becomes buoyant.
You can regulate the specific pressure on the ground, and therefore the cross-country ability, by changing the internal pressure of the tire. The vehicle can actually be equipped with automatic tire inflation, after which the pressure can be changed from the passenger compartment.
The only noticeable drawback of low-pressure tires is their vulnerability to punctures by sharp objects. This disadvantage is due to the high elasticity of the rubber, which is an additional advantage when overcoming off-road conditions.