What drive does the VAZ Oka have?
The Lada 1111 Oka is equipped with the following types of drive: Front (FF). Let's figure out which type of drive is best for a car.
There are only three types of drive. Front-wheel drive (FF) - when torque from the engine is transmitted only to the front wheels. All-wheel drive (4WD) - when the torque is distributed to the wheels of both the front and rear axles. And also Rear-wheel drive (FR), in its case, all the engine power is completely given to the two rear wheels.
Front-wheel drive is “safer”, front-wheel drive cars are easier to control and more predictable in motion, even a beginner can handle them. Therefore, most modern cars are equipped with front-wheel drive. In addition, it is inexpensive and requires less attention to maintain.
All-wheel drive can be called an advantage of any car. 4WD increases the vehicle's cross-country ability and allows its owner to feel confident both in winter on snow and ice, and in summer on sand and mud. However, you will have to pay for the pleasure, both in increased fuel consumption and in the price of the car itself - cars with a 4WD drive type are more expensive than other options.
As for rear-wheel drive, in the modern automotive industry it is equipped with either sports cars or budget SUVs.
Parts selection
ATV frame
Depending on the “donor” and the design of the quad, you either have to make the frame yourself, or you can reconstruct a finished, used one.
The most important thing is that the engine is securely bolted to the bottom along the frame, which can be located either front or rear. The transmission and drive should also be firmly attached to the frame to avoid play.
Homemade frame
The material used is ordinary water and gas pipes with a wall thickness of no more than 3 mm:
- for spars - 25 mm;
- for crossbars and struts - 20 mm.
The pipes are connected using spot welding, followed by solid welding. Ears for attaching shock absorbers and levers are welded to the frame immediately. Brackets - during installation of units and components.
Reconstruction of an existing frame
To reconstruct a finished frame, you should remove everything, leaving the frame, dismantle the back part and build up the front. Then weld elements for fastening a complete set of components and assemblies of the ATV. When reconstructing a motorcycle frame, the seatposts should be moved back by 40 - 45 cm.
The front and rear luggage racks are cut out of a metal sheet and welded to the frame. Finally, the finished frame is painted; there is no need to varnish it.
Additionally, we recommend reading our expert’s article on how to choose a roof rack for your car.
We also recommend reading our specialist’s article, from which you will learn how to select and install a box on the roof of a car.
Engine
The engine is suitable for a car, motorcycle or scooter. Some “Lefties” even construct an ATV from a walk-behind tractor with their own hands, since newer models are equipped with four-stroke engines, the power of which in heavy devices reaches 15 “horses” - versus 11 hp. "Ant."
The engine of a scooter has the advantage of low fuel consumption; in addition, the scooter-based quad is the lightest, which makes it easy to pull it out when stuck in mud and sand. But a quad to transport cargo and/or drive off-road requires a more powerful engine.
The engine power of the Izh-1, Izh-2 and Izh Jupiter is 24 hp, the old Ural is 32 or 36 hp, the two-cylinder engine of the old Oka is 35 hp. , a three-cylinder car of a later release - 53.
Suspension
The suspension can be used both rear and front. The easiest way is to take the front one from a motorcycle.
2 rear suspension options:
- The rear axle of the car, shortened to fit the dimensions of a quad. The advantage is the presence of a differential. Disadvantage - the design will be heavier.
- Cardan-gear design - with a gearbox mounted on the rear axle.
Please note: the quad all-terrain vehicle requires an independent suspension with high ground clearance.
The suspension arms are bolted to the frame through rubber-metal hinges - silent blocks.
The shock absorbers are suitable from Izha, but if the budget allows you to purchase gas-oil shock absorbers with pumping, the driver will be able to adjust the suspension according to road conditions.
Steering and chassis
The steering system of an ATV can be based on a car - with a steering wheel, or with a motorcycle steering wheel. Some craftsmen combine both types: motorcycle handlebars, levers and shafts at the top, car tie rods at the bottom. It is advisable to take the fuel tank along with the motorcycle handlebars.
A homemade steering shaft is made from a 20 mm pipe with walls up to 3 mm. A travel limiter must be installed at the bottom.
We recommend a manual gearbox, since it improves maneuverability; moreover, when driving an ATV, you still have to shift the rear, low or high gear manually.
The wheels are most often taken from small-sized VAZs (“Oka” or “Niva”) and are shod with tires that correspond to the operating conditions (weather, terrain, etc.). The brake system is selected depending on the wheels. The steering knuckles are also from Niva or Oka.
Four-wheel drive
All-wheel drive ATVs are characterized by particularly good cross-country ability - of course, if they have a fairly reliable engine and studded tires (read about the law on winter tires).
If you choose a four-wheel drive vehicle, vehicle steering, differentials, and a manual transmission are required.
The suspensions, like the steering system, must be taken from the car. On the front it is necessary to provide space for installing the gearbox.
Installing an all-wheel drive model requires not only special skills of the craftsman, but also additional labor costs. The alternative is to buy a ready-made all-wheel drive unit - it costs money.
Frame
Making the body is far from the simplest stage of the story called “how to assemble an ATV with your own hands.” Suitable materials are fiberglass and fiberglass; it is easier to make a body kit from the second.
Lada Oka All-wheel drive Syncro › Logbook › all-wheel drive gearbox is ready
Let me remind you: the most important task was to make the same shank for transmitting torque to the bevel gear, this operation is not simple, and most importantly there were very serious concerns that this unit would not fall apart on the first exit, in the end the decision was made to implant gearbox VAZ differential housing from the Passat. they look almost alike
It would probably have been easier to just attach the entire VW box at once, but it is very heavy, and most importantly, I need a lowering pair because the car is built for driving on dirt roads, light off-road and for household needs (pulling a trailer) in fact, this is a “tuning main pair” with a ratio of 5.3 instead of the standard 4.1
The differential housing was modified many times on a lathe; in order to fit into the VAZ gearbox housing, both the housing itself and the bearing mounting locations had to be modified
The bearings themselves from the VW differential are installed through adapter rings
As I already said, the differential housing was machined several times in order to go as deep as possible to the bottom without touching the crankcase walls. The final operation was to measure the gap between the crankcases and groove the bearing so that no distance shims were required
I also had to modify the planetary gear because it should be attached to the VW differential housing on one side and on the VAZ on the other
I also had to prepare a diff housing for mounting on the other side for the planetary gear
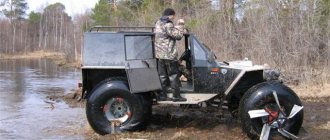
4x4 ATV based on OKI
An all-wheel drive ATV that is designed specifically for off-road driving. The design uses components and assemblies from a great variety of equipment - from OKI to Mitsubishi.
A little about the ATV itself:
width 1550 base 1600 handlebar height 1300, seat height 900 ground clearance 430 weight ~ 400 kg OKA engine gearboxes on axles - Mitsubishi RVR hubs and knuckles front and rear - Niva drive - Niva + 2108 suspension front and rear - on A-shaped double wishbones elastic elements in the front - torsion bars, in the rear - springs power steering - converted from Subaru, the axle differential is locked, the rear wheel differential is locked
It should be noted that the device is constantly being improved and modified.
05 Feb 2009
yes, things are going little by little... it’s a pity that all the construction takes place in the evenings after work and for 3-4 hours. I’m waiting for some turning orders, a lot of things are slowing down, I gave the order to a turner from my old place of work, and this is the other end of Moscow. I moved to a new place of work, now I’m looking for turners and other necessary people nearby.
Front view
07 Feb 2009
pipe Ф21х4. If you weld a lever with diagonal spacers-amplifiers, do you think it will be rather weak?
Yesterday I stopped by the MS store in Ochakovo, they measured (my aunt measured) the pipe for the silent blocks - says F32...bought...the car broke down a little, then I stood waiting for a person and then decided to measure it myself, fortunately I had a caliper. In general, it turned out to be an internal F35, where does it go for me? I brought it back to the store and gave it back. I don’t know how she measured it, or if she measured it with burrs...that’s how it burst. We'll have to go to the market. Buying on a metal base will take half a day...
08 Feb 2009
I went around a bunch of markets today looking for an internal F32 pipe. And everywhere it’s the same, only at 35…. Damn, because of a meter-long piece of pipe, I drag myself to the metal base and stand in queues....uuuuu
08 Feb 2009
2 per lever, 4 levers in the suspension... a total of 16 pieces. Tomorrow, if I can get away from work, I’ll try to drop by M.S. in Karacharovo, maybe there will be the necessary pipe (it seems to be in the catalogues). Another guy at the market said - go to the Gazprom metal base. There they sell pipes for gas, seamless and thick-walled... but where is this hard-to-finish base (he said that there are only two of them in Moscow, and where not...). Well, or I'll go to a turner.
About the turners, damn it... last Friday I gave away a drawing of the adapter okashrus-flange of the Mitsubishi RVR gearbox... this Friday I dropped by to find out how things were going... the guys say, bring the grenades, we’ll do everything and weld it, and center it, and balance it... damn it, the driveshafts. They say we won’t make a mistake...
15 Feb 2009
Under the right hand. The question is interesting, but the speeds are not that high, max 50km in 4th. Moreover, I will be able to get under way without any problems from the third one (two gearboxes - one in the gearbox, the second on the wheels). I think that special jerking of the gearshift knob is not required, but playing with the clutch... squeezed the clutch, stopped, turned off the speed... the first two will actually turn out to be like tractors...
Well, in general, this is still an open question and to be honest, I haven’t fully worked it out yet, when it comes to that... then I’ll split hairs...
On Friday evening I assembled the first suspension arm...
Tomorrow, if I don’t forget, I’ll take my camera to work...
27 Feb 2009
The system works like this: We have a standard steering wheel - gearbox, rods... steering shaft and steering wheel. We take the steering rack, I took it from Toyota for analysis. More precisely, not the rack, but the hydraulic distributor from it (the rack with the steering wheel), which can be removed as a collapsible rack), we grind the gear, which turns the rack itself... and puts a cardan or something else there, depending on who you like. We put this crap in the section of the steering shaft, I have it as a cardan for the gearbox. Moreover, the connection remains 100% rigid, just like the standard shaft. It’s already clear about the power steering pump... Next, we put on the steering rod or, as I did for myself, I welded another ear to the bipod...a hydraulic cylinder. One side to the frame, the other to the rod. I won’t write about the hassle of measuring working hours, it’s different for everyone...
in general, this scheme is often used on trucks, GAZ 66 for example. Even on the Volga 3110, the first Gurs did this. By the way, I installed the hydraulic cylinder from it, it costs 300 rubles.
This design is good because the money costs: 1500 rubles for a rack (you can also attach a Volgov distributor - it also costs 300 rubles, but you’ll have to look for it), 500 rubles for a pump, 300 rubles for a hydraulic cylinder, two hoses for 200 rubles each and + turning work - adapters for fittings 2-3 more 200 rubles. total about 3000 rubles. A standard UAZ costs from 12,000 rubles
Related article: Wood burning patterns for beginners: simple and beautiful sketches
At the same time, we have a hydraulic booster without changing the design of the standard system, an awesome steering damper (which is very important for off-road with large rollers), a fairly reliable unit, if it fails, for further movement it is enough to remove the belt from the pump (so as not to burn the pump), or drain the oil... .
There is a lot written about this gur on the UAZbook.
So you can implement such a scheme by shortening the cylinder to the required size, for compactness and so that the liquid has time to fill it when turning the steering wheel (the steering wheel will be of a motorcycle type)….
but before that it’s still…build and build….
This is what I have configured so far... I have completed the front suspension. All that remains is to attach the elastic elements such as the stand.... I rebuilt the frame a little...
maximum travel to the top... the total turned out to be 290mm, ground clearance at maximum to the bottom is 450mm - on standard UAZ wheels
April 13, 2009
I purchased Ural springs assembled with shock absorbers. I installed 1 piece per wheel on the front axle. As soon as I removed it from the trestles, the quad immediately fell to my “knees”, while the springs folded all the way. I put two on the wheel and they hold, but when I sit astride it and move my weight closer to the steering wheel, almost the same thing happens! What kind of crap is this? at the moment he cannot weigh more than 250 kg! Yes, the rear is still on the sawhorse, so maybe that’s why all the weight goes to the front. ….in the end I made a torsion bar front suspension. As torsion bars I used a stabilizer bar from the classics, altering it a little. One rod per wheel and arranged them lengthwise. I adjusted the suspension height and stiffness using a lever and a bolt (as on torsion bar suspensions) - it holds perfectly, the ride suits me too! I think the back can do the same. The question is, will they burst? the welding site is heated to red hot, i.e. welding has non-surface calcination…. tests will show. I'm waiting for the turner when the wheel drive shafts are ready.
May 29, 2009
The front and rear suspensions are exactly the same! Even in the rear suspension I used steering knuckles from the Niva. I took the Niva suspension drawings, analyzed them, calculated the length of the arms based on the drawing.....and built my own. parts of the front and rear suspensions are maximally unified and interchangeable. On the rear suspension, the toe-in is adjusted by the steering rod, it is attached to the frame. You can turn on the steering, it’s like a third lever... the camber - I adjusted it with my ears - using the silent block fasteners. The centers of the drive and silents are almost on the same straight line. The drive was measured locally. There are all sorts of joints and other things that can be done on the knee using welding and a grinder.
At the moment I have finished the transmission and finishing the outer frame.
I made a hydraulic clutch drive, instead of a cable like on an oka, it works perfectly and very smoothly. there is still a lot to do.
But it's already on wheels.
May 29, 2009
The front and rear suspensions are exactly the same! Even in the rear suspension I used steering knuckles from the Niva. I took the Niva suspension drawings, analyzed them, calculated the length of the arms based on the drawing.....and built my own. parts of the front and rear suspensions are maximally unified and interchangeable. On the rear suspension, the toe-in is adjusted by the steering rod, it is attached to the frame. You can turn on the steering, it’s like a third lever... the camber - I adjusted it with my ears - using the silent block fasteners. The centers of the drive and silents are almost on the same straight line. The drive was measured locally. There are all sorts of messes and other things that can be done on the knee using welding and a grinder.
At the moment I have finished the transmission and finishing the outer frame.
I made a hydraulic clutch drive, instead of a cable like on an oka, it works perfectly and very smoothly.
there is still a lot to do.
But it's already on wheels.
July 23, 2009
I tested my little animal today. rushing like a tank... I even managed to push it a little :-))) I need to figure out something with the brakes, the pedal is a little hard to press. But in general everything is normal. The suspension works and goes over bumps well. It takes a little getting used to the hydraulic fluid. I welded the box (differ) for nothing. The LSD in the bridge works like crap - I’ll put it forward, and the front one in the rear and turn on the navigation.
19 Aug 2009
The first trial start was back in early July. The motor works great. Back then, the differential was not blocked in the box, and when accelerating hard, the quadric jerked and squealed with UAZ tires... it was scary... Then they welded the differential, and the jerking stopped. I even managed to get him caught in a pile of stones and sand - I didn’t want to go forward anymore, only back. The rear locking was not enough...and the front one too...
Related article: Learning to crochet from scratch using patterns with videos and photos
Yesterday I swapped the gearbox - put it in front with LSD (since it is of little use), and in the rear with the front one (having first welded the differential). They are interchangeable (the same) for me.
In almost all dimensions it is similar to the Yamaha Reno, but I have less weight and larger wheels... and the ground clearance, respectively, at full stroke of the levers down (max stroke down) is 420mm.
The base is 1600, the width at the edges of the wheels is 1300, the height of the handlebar is 1300, the height of the saddle is 900. The total length of the body is 2200.
Quinoa, which without a block has a stated lifting capacity of 250 kg, although it is difficult, lifts it off the ground. The weight is somewhere around 350 kg. This is so offhand. The wheels are very heavy - 80-100 kg.
Here are some more photos from today...also from a cell phone. The camera is a long way off, and I always forget about it... So to speak, I’m mastering fiberglass...
There are literally 1-2 layers of glass fabric, so the cardboard frame-backing (back part) is visible through
20 Aug 2009
I think the maximum speed will be no more than 60... but I don’t really need that much. The gears are switched manually, everything works smoothly, I'll take a photo later. Gearboxes cost 3000 and 5000 with LSD - but it’s crap, it almost doesn’t work - only for snow... The assembled drives cost 1500+ NIV OUTSIDE GRENADES AND sticks + threading on the sticks and a sleeve-nut connector... in general, each drive cost about 2000 rubles. The most expensive spare parts are all the rest are small things. Gearbox from Mitsubishi RVR. A small axle shaft is inserted into the gearbox, and a drive is screwed to it with 3 bolts - it is very convenient to remove the drive!
Brake without vacuum. Made from a clutch master cylinder and two Niva calipers. On the calipers, I combined the cylinders under one hose (in the field they work separately) now on the Chevrolet. The brakes are currently only on the rear axle, but the front axle is also braked through the transmission.
The clutch is hydraulic and consists of a classic GCS and a RCS. It is activated by the pedal on the left (temporarily removed for fiddling with fiberglass, but there is a desire to make it on the steering wheel).
I haven't driven with a welded diff yet. But I rode a Merc Gelendvagen with 100% locks, rushing like a tank, but steering a little worse (it’s easier for the car to drive straight), but my front end is free. More precisely, it contains LSD, but it blocks it quite a bit. So everything should be fine!
With fiberglass, the worst thing is the air! you need good fiberglass. I’ve run out of it, it’s left removed from the pipes (not stale) - it’s soaked in something, and lays down very badly….
In general, something like this.....
11 Oct 2009 By weight, according to preliminary calculations, it turns out to be about 400 kg, and the heaviest thing is the wheels...
the base is 1600, at the edges it was 1300, but now I installed different tires and it turned out to be about 1400...
At first speed it climbs into the wall, although it’s a little hard... and at second you can get underway and drive quite briskly... well, I haven’t had to turn on third yet - there’s nowhere to accelerate like that...
I think maybe I can install a gearbox with larger numbers...
25 Oct 2009
I primed it... Small mistakes came out due to preparation... I'll touch it up and paint.... Trying on evil tires. I had to widen the rims to 8″, and even then they were a little small - the tires were bent...
09 Nov 2009
A test drive over the weekend showed that the vehicle has decent cross-country ability - it walks almost freely through the swamp, where the UAZ on 35″ wheels hangs on the bridges... But the first jamb came out - the weak point turned out to be the power steering cylinder from the Volga 3110, a rod with a diameter of 10 mm was bent and broken off ...it needs to be thicker... I had to get to the gazelle without a hydroch - it’s quite difficult on these wheels. But you can go. In third gear, 4th, it became scary to engage; according to GPS data, a speed of 35 km/h was reached - on a forest road with a small rut….more is possible…. It drags 2 adult men without any problems, as does one, the only thing is that the rear suspension breaks a little on large bumps. It will be necessary to select other springs and increase the suspension travel...
In general, the test drive was not particularly successful - because... the technique quickly failed and the remaining shortcomings were not identified....it's a pity. I couldn’t drive it any further because... I didn’t take my original alternator belt to turn off the hydraulic system (otherwise it would burn out), in general, because of this... that’s all..
14 Nov 2009
A power steering rack was taken. From the rack we take the distributor (spool assembly) and the hydraulic cylinder through passage. The cylinder is made impenetrable - it is welded on one side and the rod is cut accordingly...
Initially, I took a cylinder from a Volga 3129-3110 gyroscope with a separate circuit (i.e. with a power cylinder). But during testing the rod could bend and it broke (the diameter of the rod was about 7 mm), although the UAZ carries 36″ wheels. It was bent due to the hinge being made incorrectly. The result was an undesirable lever that was skewed, which is why it bent...
Related article: DIY shell painting: master class with photos
On Wednesday I bought the cheapest scrap rack from a right-hand drive Subaru and made a cylinder out of it. Rod diameter 21mm. I re-threaded the rod to M16x1 - for a classic steering end. I slightly modified the bipod, or rather the lever for attaching the cylinder to the bipod. I installed everything. Works great, no hint of bending...
This is the original idea with the ball - it didn’t work because... The ball has small travel angles...
I posted videos from the tests... a little bit true...
https://video.mail.ru/mail/ramm_stas/3/7.html https://video.mail.ru/mail/ramm_stas/3/6.html
23 Nov 2009
A short report from tests No. 2. The device drives decently, even very decently. It rushes through the swamp and clay like a tank. Among the breakdowns, this time the rear-wheel drive turned out to be the weak point. At the beginning of the ride, the nasty stick pierced and tore the boot of the outer CV joint. After some time, the separator shattered... There was only one drive rear wheel left. But even at the same time, the quad is like a tank. In fact, we drove for another 4 hours along the entire off-road competition route. Then, in a ford with a fairly difficult exit, the drive shaft broke. A scrap piece from a Niva was pulled together, but the Mitsubishi was intact. And the connection is also normal. It looks like the Niva pieces of iron cannot withstand the loads. But we drove along the highway together, which probably gave such a result. It rides on the front end, but is unsure and mostly skids.
This week I'll dismantle the suspension and replace the hardware with the same ones. I'll see if it's overload... Otherwise you may have to do it on cardans...
Some video
https://video.mail.ru/mail/ramm_stas/3/8.html
https://video.mail.ru/mail/ramm_stas/3/9.html
https://video.mail.ru/mail/ramm_stas/3/10.html
https://video.mail.ru/mail/ramm_stas/3/11.html
Yes, we need to make fender flares, otherwise there will be a mud shower... although chemical protection copes with this quite well :-))
09 Dec 2009
With a gear ratio of 27? Then it won’t work - the tires are very heavy - the assembled wheel weighs 40kg - HORROR!!!
Last week I sold these wheels, and today I finally picked up another 28x12xR14 tire from a quad - the weight is 3 times less, with a larger width and the same lugs and a total weight of 20 kg. Volgov 14″ wheels boiled down to 9″ wide….
I also dismantled the rear suspension - I’m making adjustable struts based on Okovsky springs and shock absorbers (they will be like replaceable cartridges in the struts), the Ural struts break through and are very rigid...
18 Dec 2009
I’ve slightly redesigned the rear suspension, or rather the elastic elements... now with adjustable stiffness and replaceable shock absorbers. Reduced the weight of the wheel by 2.5 times - by replacing the wheels..., tires from a quadric 28x12xR14 Volgov disk, welded to 9″. True, the width has changed to 1550mm, although it is more stable now.
I rebuilt the gas truck and replaced the motorcycle with a quad trigger. It is more effective and convenient in shitting - proven! The device has become noticeably faster and more powerful. The suspension travel and smooth operation have increased significantly.
All that remains is to carry out a “combat” sortie and test everything under harsh conditions... a few photos (from a mobile phone)
10 Jan 2010
I drove it almost all weekend. The flight is normal, it rushes confidently through 30 cm of snow. The rear spring burst (the front spring) - I replaced it with the front ones, but they turned out to be too soft. need to be tougher...
Here's a little video..
10 Jan 2010
gear 2 and a little in third.
I tried 4th on the asphalt - I easily caught up with the motorcycle (it was traveling 40 km, according to him) and overtook it - 60 I think it’s going. The asphalt is a little slippery because of the snow, it started to drive faster... And in the forest we received nagany from skiers. Druzhban on a motorcycle is mainly on the ski track in the left lane (on virgin soil it’s a little hard), and I’m close or in the cut... Our ski track is wider than theirs - so they were offended .
31 Jan 2010
minor improvements to the rear suspension...
Well, I finally waited for the tokor, who composted his brain for 3 weeks... people don’t want to work for money, but at the same time they complain that there is no money... Yesterday we made all the necessary hardware...
I took cups for the springs from the rear shock absorbers 2108 (I had to climb through piles of iron in scrap metal receptacles), in order to get the best fit for the spring, saving weight and money. I shortened and lengthened the supports accordingly, as recommended. Let's see how it works. VZL springs with variable pitch from 2108 - they are easy to cut, and the part of the spring with a frequent pitch is the softest and will fit perfectly into all structures. The weight of the finished structure was 5.5 kg.
This is what I did...
09 June 2010 Here are some new videos, although it was back in April, but they only just reached me...
Test drive in swamp shit.....
He broke through an ice floe and hung on it.....
Oka engine tuning
Duster all-wheel drive
The process of improving engine performance can be divided into 2 directions:
- A radical change in characteristics - a complete replacement of the motor
- Improving the standard power unit
In the first case, the ideal option would be a 1.3-liter injection engine from Rover Mini. The advantage of this type of tuning is a significant increase in technical indicators; the disadvantages are the high cost of implementation and the need to rework most of the car’s systems for a new engine. It's expensive and time consuming.
The second option - upgrading the standard power unit - is cheaper and simpler, but will not allow you to obtain such an increase in power as in the first case.
Do-it-yourself Oka engine tuning must begin with the carburetor. The first step is to increase the throttle body diameter to 52–54 mm. This will allow the engine to receive more air, which will make its operation easier, improve performance and increase engine life. You can immediately install a tuning modification of the carburetor.
Installing a new camshaft allows you to increase the speed to 7000 units. In this case, it is necessary to increase the engine power, which is done using the following operations:
- Replacing standard valves with lightweight ones
- Valve seat upgrades
- Modification of inlet and outlet valve channels
- Sealing valves
- Installation of bronze guides
- Changing the shape of combustion chambers
Additionally, it is necessary to replace the intake and exhaust manifolds with sports modifications, as well as the air filter with a K&N model with zero resistance. This set of measures will significantly improve the technical characteristics of the engine and optimize its operation, that is, the loss of power will be minimal.
The muffler attachment can be used to give the engine a sporty growl. Illuminated models will create the effect of a flame escaping from a jet nozzle.
"Lenekhod"
Just by the name of this transport, it becomes clear that its author and designer was a master named Leonid. Indeed, a resident of the city of Nyagan, who built such a miracle of technology, capable of accelerating up to 50 km/h and overcoming any water barriers, bears this very name.
If we talk about the technical characteristics of the snowmobile, then it was built on the body of the same Oka, placed on an all-welded profile frame, receiving a motor from a VAZ-1111 as a power plant.
The result is a real hodgepodge of meat, and even on studded SHAIN tires, but the car copes with its duties with a bang, helping the owner transport firewood and other cargo.
How to convert an eye into an all-terrain vehicle with your own hands
If you decide to independently improve your Oka car, then initially you need to prepare. For production you will need:
- Oka car;
- profile pipe for frame;
- chassis from Niva;
- VAZ-1111 engine;
- steering from "Nine";
- tires.
First you need to make a frame from a profile pipe. It is best to develop a detailed diagram and contact a professional welder to ensure reliable connections. After this, the transfer case is installed and connected to the vehicle’s mechanisms. As for the suspension, it is best to install springs here. There can also be springs, but then the frame design will become more complicated. And in general, springs will be better for off-road driving. To install the wheels, it was necessary to cut off the car's fenders. If this is not done, it will be impossible to install large diameter tires. The Niva chassis should provide ideal off-road performance. Once the basic assembly is completed, the vehicle needs to be inspected. It is best to carry out tests at once in several stages off-road.
SUV from Oka: what to watch out for
As practice shows, the all-terrain vehicle also has weaknesses and vulnerabilities.
Engine oil consumption increases, especially if you often overcome water obstacles. Some owners of such all-terrain vehicles note rapid wear of the rubber. There shouldn't be any problems with the frame, but it's best to play it safe and double-check the welds. It is best to cover all mechanisms and parts with protective material or paint to avoid corrosion. Due to sloppy connections, water can get inside the car, which will soon cause a problem. It is necessary to additionally install special protection on the engine sump. Some car enthusiasts specifically attach foam to increase the buoyancy of the vehicle. If the designer decided to leave springs instead of springs, then there is a high risk of their rapid wear. It causes roughness and discomfort for passengers while driving off-road.
Nuances of tuning "Oka"
The VAZ-1111 is considered one of the cheapest and most economical cars: fuel consumption per 100 kilometers is only 3-4 liters, affecting the dynamics.
In this regard, car owners resort to modernizing the technical part of the model, before which it is necessary to take into account several nuances:
- Modernization begins with the acquisition of the necessary materials.
- It is advisable to buy tools, equipment and devices from authorized dealers to avoid counterfeits.
- Metallic materials must be of high quality.
The range of materials and components for the Oka may vary depending on what specific type of tuning will be used and what the car owner plans to modify.
In rural areas, a common problem is the lack of roads. This problem is especially acute during winter, when even the usual crossings are covered with a layer of snow. To improve traffic even during such a period, you can make an all-terrain vehicle out of the Oka car on your own.
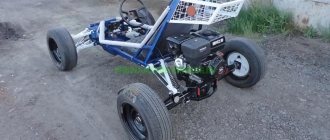
How to create a buggy with your own hands?
If you decide to make a buggy with your own hands, you should know that there are two types of drawings: sports (racing) and tourist. When assembling the structure, do not forget that certain proportions must be observed; the parts must correspond to each other in size, weight, load, etc. A machine assembled by yourself should be light (about 300 kg).
The racing model must have a reinforced pipe frame. A reliable frame is required to protect the driver in the event of a collision or rollover at difficult distances. Such a car is made single-seater. A tourist buggy “fits” into a body and has two seats.
What tool do we need?
Before you start assembling the buggy at home, you need to prepare everything you need. You will need a set of tools for your work:
• Welding (for initial setting of frame elements and final welding of pipes). Remember! When welding, metal tension occurs. Therefore, make sure that the frame does not move.
• Grinder (the pipes will need to be cut and the edges aligned for welding work).
• Pipe bender (they vary in price and in the amount of work they can perform: manual, manual hydraulic, electro-hydraulic, electric). The pipes will have to be bent in different places, according to the drawing.
Attention! When buying a pipe bender, ask what diameter and thickness of pipes it can work with, what the maximum bending angle is and the accuracy of the bending angle.
• Drill.
• Bars and trimmings of boards (for lifting or fixing various elements during construction).
• Milling machine.
• Metal crown.
Frame material:
• Pipes (approximately 50 m of pipe, diameter 40 mm, wall thickness 3 mm). Pipes can be suture or seamless.
What do we take as a basis?
You can assemble a buggy yourself, using the supporting frame of a motorcycle, Oka, Zaporozhets, Niva or VAZ as a basis. You need a body, frame, wheels, fuel tank, engine, brake system, shock absorber, exhaust pipe, air filter, steering wheel (can be taken from a racing kart), seat (preferably equipped with a headrest). This is not a complete list of everything you need.
A homemade buggy model will not have a hood, trunk, or doors. Your windshield will be replaced by a fine metal mesh.
Attention! The engine and fuel tank are separated from the driver's seat by a partition made of fire-resistant material. A fire extinguisher is attached to the right side of the driver (one pipe is directed towards the engine, the second towards the driver). Fire protection must be activated from both sides (from two levers).
Buggy from a motorcycle
If you take an old IZH or Ural motorcycle as a basis, then the result of assembly can be a compact buggy weighing 300 kg, which can travel off-road at a speed of 80 km/h. To assemble a buggy you will need a motorcycle engine (although this is a somewhat noisy option) and parts from small cars.
Oka is a good donor for a buggy
Oka is a very profitable donor for a buggy. The Oka engine is liquid cooled and therefore protected from overheating, the hubs are light in weight, and the steering rack has a sufficient margin of safety. The brake system and shock absorbers from Oka are suitable for your buggy.
Attention! When dismantling the car into parts for the buggy, do not forget to keep the certificate of deregistration.
The Oka seat is suitable only for extreme sports enthusiasts (it is too hard). It is best to look for a disassembled seat with good lateral support. At the same time, we must not forget about the headrest - this protects your cervical vertebrae during off-road driving. A buggy based on the Oka is characterized by high cross-country ability.
“Zaporozhets” for buggy, ready-made version
If we take the Zaporozhets as a basis, then this will be a ready-made rear-engine model. The engine needs to be mounted backwards (this will improve its cooling and evenly distribute the weight along the axles). The differential will have to be reversed (switching the right and left sides). Rework the gear shift drive (since the gearbox rod rotates towards the rear bumper from the driver - and this complicates the rocker system).
Make a buggy from a VAZ
If you are afraid of problems with electronics, then it is better to use a carburetor VAZ as a basis.
The engine, like all buggies, is mounted behind the driver. The rear wheels are driven by front axle shafts and VAZ hubs. The axle shafts are attached to a cut-off bridge from a VAZ 2106.
Tracked all-terrain vehicle from Oka: design features
Making an all-terrain vehicle based on tracks is a complex and expensive process. Of course, you can build them yourself, but it’s best not to overthink anything and buy ready-made ones. An excellent option would be tracks from Buran. They are much cheaper and have sufficient mass.
Drive shafts also need to be purchased from this model. The Oka variable gearbox with brake mechanism will be ideally combined with such tracks. The splined part of the drive shafts must be removed and mounted with the Oka. This is where the car's own CV joints come in handy. Brake discs are also convenient to attach and connect to mechanisms. The same work must be done on the front shafts. After this procedure, it is necessary to install the brake mechanisms. It is best to install the brakes at the front.
Next, you need to check the operation of all mechanisms and their fastenings. If everything works flawlessly, then we can safely start using such an all-terrain vehicle. You can also find models in which tracks are installed on each wheel. The only advantage of such a vehicle is considered to be less weight. However, traction will be better with solid tracks.
Stages of creation
Before we start assembling our buggy based on the Oka car, we need to make its drawings. Before this, we determine what type – sports or tourist – our design will be. An excellent version of a do-it-yourself sports buggy with a VAZ 11113 engine with a power of 33 horsepower. The parameters of your future SUV are as follows.
- The height of the machine is 1.43 m.
- Track: front - 1.5 m, wider rear - 1.7 m.
- Frame - 1.7 m.
- Ground clearance - 30 cm.
- Machine weight - 0.35 tons.
The drawings show the car from all sides, which convey in sufficient detail the entire appearance and relative ease of manufacture and assembly. The seat can be made from a sheet of metal, covered with foam rubber, or covered with artificial leather. Take responsibility for the components at the junction of the wheels, this affects the torque. The biggest responsibility when creating a buggy is the installation of the suspension; the safety of not only movement, but also the structure as a whole depends on it.
Carefully consider the location of the instrument panel, gearbox and other components necessary for driving.
After this, you can create a frame from metal pipes using a welding machine, pipe bender, grinder and other tools and materials. After the frame comes the engine installation. The best option is a buggy with a rear-mounted engine; accordingly, the drive is also rear-wheel drive. This solution makes it possible to do without connecting the rear axle to the front, and the steering column will not be located together with the vehicle’s traction unit. In addition, the rear-wheel drive model is more maneuverable and comfortable for extreme racing. The next steps will be: installation of suspensions, wheels, seats.
Examples of Oka SUV
Often users turn on their imagination, which amazes the imagination of professional automobile designers. Basically, the alterations differ in design, chassis elements and wheel sizes. Often, low-pressure tires are installed on a car, which improve the vehicle’s off-road capability.
The base of such cars, as a rule, consists of the chassis of other vehicles. To install wheels with a large radius, the wings are cut off; some Oka SUVs undergo body modifications. All manipulations are aimed at giving the car an original and presentable exterior. In addition, craftsmen beautifully straighten and paint the joints.
As an option, you can install protection for the bottom of the all-terrain vehicle. The low-power engine of the original is replaced with more powerful analogues. This is one of the most complex and time-consuming processes when improving a small car. In general, there are modifications that are not embarrassing to present at international exhibitions.
View gallery
Stages of creation
To acquire the design of an SUV, you will need to carry out the following manipulations:
- Finding the basis for the vehicle. Using a motorcycle frame is quite suitable for this. The brand doesn’t matter, it all depends on the financial choice, as well as off-road preferences. This indicator is most developed in IZH motor vehicles.
- Creation of the rear axle and suspension. To do this, you need to use a strut that connects the side members. All this is complemented by a strut and steering bushing, which as a whole form an independent rear suspension. It is recommended to use just such a suspension, because it will provide the product with the necessary maneuverability in difficult places.
- Installation of wheels. In practice, such an all-terrain vehicle based on the Oka is equipped not with the wheels themselves, but with their cameras. They are taken from trucks and attached to the suspension using a hub. Stability is complemented by special tapes that wrap around the wheel. As a rule, cameras from KAMAZ, Ural and cargo trailers are used. This solution increases the reliability of the trip.
- Providing torque and mounting the engine. Such procedures begin to be done after installing the frame and suspension. In addition to the motor, you will also need to install a brake, clutch and exhaust system.
When the entire list of work has been completed, it is necessary to test the device for functionality. If errors are identified, they must be corrected. As practice shows, an illiterately made all-terrain vehicle or swamp vehicle from the Oka can create a danger to others.
Possible nuances
Despite its advantages, this technique has its drawbacks. Frequent troubles are caused by the fragility of low-pressure chambers. Of course, due to the absence of a differential, the vehicle does not require frequent maintenance, but the presence of high pressure in the overall wheels reduces their maneuverability. Also, due to the size of the wheel system, there is a problem with flying dirt, because it is quite difficult to cover them with wings.
In conclusion
It is difficult to imagine that Oka can act as an all-terrain vehicle. Nevertheless, ingenuity and resourcefulness make it possible to create a real off-road conqueror out of this “baby”. Full-fledged Russian-made SUVs, not to mention foreign-made grandees, are very expensive. Converting a “compact car” into an all-terrain vehicle also requires considerable expenses. However, many consumers are confident that “the game is worth the candle.” First, the transformation can be carried out in stages. Secondly, you can easily find spare parts, as well as use improvised means and parts from non-working cars.
Among the most popular homemade versions of the all-terrain Oka, Fr. They are based on low-pressure pneumatic wheels. The originality of the tracked models is that they are perfect for snowy and sandy areas.
Thoughtful solution
Since in rural areas you often have to navigate difficult terrain, many people want to buy an SUV. Alas, such cars are quite expensive, so you need to know how to make an all-terrain vehicle from the Oka. To create it, they use improvised means, which include spare parts from broken cars and motorcycles.
Among the most popular options for “folk” crafts are “station wagons” based on low-pressure pneumatics or air-cushioned ones. The use of crawler tracks is also common, but they are more suitable for snowy areas. Creating an SUV based on the Oka is a cost-effective solution, since it does not require the purchase of expensive components.
All-terrain vehicle on low-pressure tires
This design is based on an invention that uses a body that is located on a breakable frame. This solution significantly strengthens the design of the product. All wheels are installed with your own hands as drive wheels, so they can even overcome swampy terrain.
Based on Oka engines, the production of so-called karakat engines is also very popular. They stand out for their increased cross-country ability thanks to wide-format tires. This complements the advantages of pneumatics, because it does not destroy the grass cover.
Using Tracks
These “station wagon” options are most popular among fishermen and hunters. Homemade tracked all-terrain vehicles from Oka have increased maneuverability in water bodies and wooded areas. Their body is usually made of a box structure, which reaches a length of 3 meters. It is light in weight, so in places where deep traces of a person remain, vehicles penetrate into the quagmire only 10 cm.
Let's start making a tractor
So, let's start by making the frame. To make a tractor with your own hands, you need two spars - left and right. You will also need two traverses (front and rear). For the manufacture of spars, you need to use channel No. 10. For traverses, channel No. 12, No. 16 is suitable. According to the diagram given in the article, you need to connect all the parts.
As for the engine, ideally, of course, choose a diesel one. Such engines have much higher torque than gasoline engines. If you plan to make a tractor with all-wheel drive, you will need to increase the gear ratio on the gearbox pairs. But if a diesel engine is not available, it is possible to install a unit from an Oka car.
The front axle from Oka is installed on the frame without changes and is secured to it at four points. In principle, you can install a driveshaft from any rear-wheel drive car, for example, a VAZ-2101.
Preliminary design stage
BMW xdrive all-wheel drive
The following parts are taken from the Oka car during design:
- Motor;
- Transmission;
- Wheel axles;
- Steering.
If necessary, elements can be replaced with compatible ones and some connections can be modified.
A mini tractor from an Oka walk-behind tractor is constructed on the basis of a channel No. 6-8 or a corner 4x4 centimeters. The amount of necessary materials is determined according to prepared drawings with the exact dimensions of the elements.
You need to acquire the following tools and materials:
- Bulgarian;
- Welding machine;
- Screwdrivers and keys;
- Sheet metal;
- Tires and wheels with a diameter of 13-24 inches;
- Operator's seat. You can use not only a car seat, but an office chair. It is fixed to the frame of the unit.
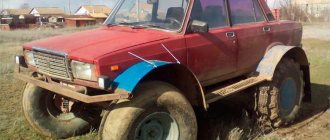
How to make an all-terrain vehicle from Oka with your own hands?
To make your own unique jeep you will need several basic elements:
- directly the Oka car under the SUV;
- profile pipe for making a frame;
- running gear from Niva;
- steering block, can be from VAZ-2109;
- special tires.
At the first stage, a frame is created from a profile pipe. To begin with, they develop a detailed diagram, after which they entrust the work to an experienced welder, who is guaranteed to ensure the quality of all connections. Next, the transfer case is mounted with its connection to the corresponding mechanisms of the machine.
It is recommended to use springs as a suspension. Springs are not excluded, but they will significantly complicate the frame structure. To mount larger wheels, the fenders are cut off, otherwise it will not be possible to install larger diameter tires. The Niva chassis will ensure ideal off-road performance of the vehicle. After the Oka SUV is ready, test and field tests are carried out in several stages, starting with light off-road and low speeds.
Frame assembly
To make an ATV from Oka, you must first make a base. You should work in a heated room with good ventilation or outdoors under a canopy. At the first stage, you need to assemble a frame, which is created by welding from the following parts:
- The lower and upper spars are made of two pipes with a round cross-section. The metal thickness should be 3 mm, and the cross-section diameter should be 25 mm.
- Auxiliary spars, which are used for struts.
- The spars are bent, which form the upper and lower planes.
- Clamps for shock absorbers and levers.
To install various components on the frame, you need to purchase the appropriate number of metal brackets and other small parts.
Suspension tuning
When converting an Oka into an SUV, improving driving characteristics is the car owner’s primary task, since the standard suspension leaves much to be desired. For this purpose, gas-oil shock absorbers are installed, increasing the vehicle's handling and stability.
It is not worth changing the standard springs, since improved modifications quickly fail. When converting an Oka, 13-wheelers are fitted with tires of the appropriate size.
To create an SUV, the suspension is lifted using a special set or installing spacers under the springs. As a result, the rear of the car rises, but the shock absorber mounts require modification.
Homemade. Part 2. Oka 4x4.
It seems that the last post was interesting, which means we can continue after 4 months... sorry.
I make all sorts of passable cars.
The next one was Oka 4x4 (all-wheel drive)
The original motor moved to the rear of the car, original gearbox, BMW 5ka gearbox, 2108 drive, air suspension all around.
It turned out to be a very warm and cozy companion for ATV riders..)
A few photos of the work in progress.
The car was sold in 2022.
Possible duplicates found
Automotive community
13.1K post 35.3K subscribers
Community Rules
We prohibit:
-Publication of videos on the subject of road accidents (exception: original content with description).
-Break the rules of the site.
-Create posts that do not correspond to the topic of the community.
-Advertise anything.
-Accordions are not advisable (ignoring the accordion meter is punishable by flugegeheimen).
-Brew chamomile tea in a giraffe costume.
We are allowed:
-Create interesting content.
-Participate in the life of the community.
-Suggest topics for posts.
-Call the administrator or community moderators if necessary.
-Express ideas to improve the Automotive Community.
-Image a horse when commenting.
The post itself is interesting, but the photo of the TS is something that was pressed to include more.
Eh, the back sofa was stolen. Where do we put three girls and that guy with a guitar now? 
For a double seat
whatever the Russians won’t come up with, as long as they don’t fix the roads ©
But this specimen is aesthetically pleasing in its own way. I would even say, in some ways, impeccable.
The classic conversion of an Oka into an all-terrain vehicle/pneumatic vehicle: the standard transverse engine is turned along the axis of the car, the diff box is blocked (welded), one drive is thrown onto the transfer case, and from the transfer case the torque is distributed to axles or gearboxes with drives.
Lowering the transfer case and GP axles reduces the speed, but increases the torque severalfold, thereby compensating for the lack of power of the original engine. Pihl is quite light, unpretentious, economical, simple and cheap to maintain.
An overly powerful engine will have more mass and will cause the car to slip, which can lead to “digging” in soft soils, and/or tearing the transmission. The wheels, as a rule, are larger than the standard size of the wheels of the cars from which the axles and transfer case were borrowed, and the tread is very aggressive. Therefore, the transmission has to overcome a much greater response that it was not designed for. Accordingly, you have to choose: install a powerful heavy engine in order to give gas and end up with torn axle shafts, diff, transfer case housing and twisted cardan; or install a light, low-power fart and, where it doesn’t pull, stick a lowering device/unwind the winch/look for a detour/go back, but in any case on your own.
Assembly steps
How to make tracks for all-terrain vehicles with your own hands: drawing, design and components
Making an all-terrain vehicle with your own hands begins with finding a suitable base. A common solution is to use motorcycle frames. The specific brand does not play a special role. It is much more important to take into account the financial side of the matter and the passability of the finished structure. If you need to conquer the most severe off-road conditions, the base frame is taken from Izh motorcycles, and the engine and control system are mostly left from the car.
At the next stage, you need to make a connection between the suspension and the rear axle. Most often it is formed from a strut that tightens the spar parts. By adding a strut and handlebar bushing, an independent type rear suspension will be formed.
Most often, all-terrain vehicles based on the Oka are equipped not with wheels in the full sense of the word, but with cameras from trucks. Hubs are used to secure the suspension. The stability of the structure is guaranteed by special tapes wound on the outside. Practice shows that such projects are quite reliable and successfully overcome various obstacles. The next step is fixing the engine and installing mechanisms that transmit torque.
We will also have to install brakes, a clutch and an exhaust system. When all the main work is completed, the all-terrain vehicle must be tested. Experts emphasize that errors in its manufacture often make the device dangerous for the riders themselves and other people. It is worth understanding that even the “simplest” transport cannot be done properly if the drawings are not prepared. The scheme of operation differs slightly depending on the execution of a particular sample.
Thus, making a vehicle on tracks with an Oka engine is possible only with careful consideration of the dimensions of all components. There are much fewer “degrees of freedom” here than when working with wheeled vehicles. The engine is removed along with the gearbox, because using dissimilar units is too problematic.
Recommendation: for models designed for off-road use, the “native” power plant is not powerful enough. We'll have to take more serious models from cars with more power. The caterpillar rollers and “stars” are installed independently. Sometimes only the body of the Oka is left. It and all the main components are installed on a self-made frame.
It is also useful to consider how a 4x4 with an Oka engine is made. The wipers, pedal assembly, brakes, calipers, exhaust pipes are also removed from it. The entire frame is made from scratch using a suitable tubular profile. The next step is the installation of bridges and main components. First of all, you need to place the steering column among them; after that, the “kung” is made and assembled, and the car is sheathed.
If the Lenekhod model is taken as a basis, then the transfer case needs to be fixed to the mounts from the Moskvich bridge, which usually hold the springs. These fasteners are measured and welded. On weak all-terrain vehicles you can make spring suspensions. However, springs are much more reliable and eliminate the need to modify the frame or add silent blocks.
How to make a homemade wheeled all-terrain vehicle
An example of a drawing of an all-terrain vehicle on low-pressure tires
It makes sense to equip the basic unit with a reduction gearbox. The reason is that gasoline and diesel engines have the best torque performance at a crankshaft speed of approximately 75-85% of the maximum.
All-terrain vehicle frame
An example of a frame-fracture drawing
A frame is created between the front and rear axles. It is better to use profile pipes of rectangular or square cross-section as the basis. They provide greater rigidity than rolled angles, channels and I-beams of the same mass.
The joining of the frame elements of a wheeled all-terrain vehicle can be rigid, then it will be formed in a single-volume format. When using heavy Neva or MTZ walk-behind tractors, this option will be preferable.
As an option, a breakable frame (fracture) is made; this option is used for areas with a complex profile. Here the articulation is performed through the kingpin. The front and rear axles have independent suspension from each other. Craftsmen create such all-terrain vehicles based on the Neva and Ugra walk-behind tractors.
Rear axle and suspension of a homemade all-terrain vehicle
To simplify the design, some DIYers use a ready-made rear axle from a passenger car. For example, from the Moskvich-412 car: its low weight allows installation on a light all-terrain vehicle. The suspension is performed on shock absorbers for a smooth ride and reduced vibration.
Other craftsmen make independent suspension on each rear wheel. This approach is implemented on the Ant scooter. When driving, a slight rocking is felt, at the same time the wheels experience less resistance on uneven surfaces, and fuel consumption is noticeably reduced.
The rear axle is connected to the frame with long, hardened bolts. For elastic joints, rubber inserts are used, for example, silent blocks. This improves the performance characteristics of an all-terrain vehicle based on a walk-behind tractor.
Wheels (low pressure chambers)
To move on wet and unstable ground, you can use lugs. They provide high grip. Large-diameter low-pressure chambers perform even better. Pneumatics have minimal ground pressure, and the presence of air contained in the all-terrain vehicle’s chambers will make it possible to create a floating all-terrain vehicle.
For installation on the rear axle, homemade or special wheels for all-terrain vehicles, swamp vehicles and snowmobiles are used. They can be purchased assembled or as separate elements: tire, tube, disc. The wheel is easy to assemble.
- Homemade discs for pneumatics are made by welding ordinary discs and mounting plates using metal tubes. This expansion is necessary in order to adjust the small diameter of the car rim to large cameras and better fix them.
- A large camera is placed on a specially expanded disk - either a proprietary one or from other units (GAZ 53, Ural, Kamaz or another truck, an aviation camera, etc.).
- An air valve is installed in the hole of the disk.
- The wheel is inflated with air.
- The resulting tires are installed on a homemade all-terrain vehicle.
You can increase the cross-country ability of regular wheels on low-pressure chambers by creating an additional tread. For example, additionally secure the cameras with chains, conveyor belts, homemade tracks or another method.
Another option is to cut a patch lug from the tire. The depth of the structure’s hook reaches more than 20-25 mm. Rolling resistance increases, while at the same time the slip coefficient decreases sharply.
Assembling a homemade all-terrain vehicle from a walk-behind tractor
When all the tools, spare parts and components are prepared, you can begin assembly. This is a rough plan for how to assemble a homemade all-terrain vehicle, it all depends on the chosen design.
- A walk-behind tractor is installed on a welded or finished frame.
- The rear axle and, if necessary, the front axle are mounted.
- The seat is placed on the frame.
- If provided in the drawing and diagram, the steering control is installed.
- The protection is attached to the frame; it is made of plastic or metal sheet.
- The future driver should try out the comfort of the seat; if necessary, provide auxiliary devices for adjusting the seat.
- The functionality of the brakes is checked.
- Electrical circuits and lighting fixtures are installed.
After completing the bench tests, they begin the field tests. You need to know how the car behaves in difficult conditions.
All-wheel drive Oka
To create this unique all-terrain vehicle, donors such as Oka, which habitually donated its body, UAZ, which donated strong axles to the SUV, and Niva with its durable transfer case, were used.
As for the features of the assembly, among them it is worth highlighting the wheels with tires from KrAZ, spaced from the body, mounted on discs with an offset, springs from the Volga cut into two leaves and its steering, which, although it did not give light turns, but cost zero, in contrast to the previously planned expensive hydraulic booster.
There were also weaknesses, which turned out to be CV joints that quickly fail, as a result of which the owner always has to carry a spare tire with him.
Snow and swamp-going vehicle on "batteries"
Recently, more and more self-taught craftsmen have been trying to use so-called rubber tires, which more than replace large-radius factory tires that cost a lot of money. As for their processing, this process is not complicated, implying the creation of a new tread on an old tire.
Practice shows that such wheels cope well with off-road conditions, and as an example we can cite the Oka installed on them with a frame and axles from a UAZ, a transfer case from a Niva and an original engine with a gearbox.
Homemade SUVs inspire other car enthusiasts to the most daring feats, especially since their assembly can be limited to old spare parts and cars that have fallen into disrepair. Perhaps that is why every year more and more examples of such works appear on the Internet, which really deserve special attention.
Discussed
- Alexander to What happened to the RAF plant, the most popular minibus of the USSR.
Small-scale production of buses operates on the territory of the RAF, for some reason only for the city of Jelgava. - Alexey to What happened to the RAF plant, the most popular minibus of the USSR,
here it is the most famous model - Nodar to The third pen in a canister: why is it secret and why is it needed at all?
And at the beginning of the 90s I invented an improved canister - the shape was designed in such a way that there was no need for a tube... - Leonid to Environmental regulations make replacing the Citroen C1 “virtually impossible”
wow! Interesting - alex k Rating of the most reliable cars with mileage from 5 to 10 years in Russia in 2022,
what are the harsh off-road conditions like for the Duster??? it just won’t get there, it’s a crossover.