Origami fox for children in three versions from simple to complex. Step-by-step instructions with visual photos.
Materials:
- Double-sided and single-sided colored paper (origami paper);
- Glue, markers, paper eyes, adhesive moving eyes to choose from.
How to make a bookmark fox
A step-by-step diagram for folding a fox bookmark looks like this:
- Fold a square sheet of single-sided orange colored paper diagonally.
- Place the resulting triangle with the fold down, and bend it in half again horizontally.
- The result was a strip of three triangles. The side triangles need to be folded up.
- Turn the fox over and draw its nose and eyes with a black felt-tip pen. The craft is ready.
Now you can use the fox trick to attract your child to read books that have a cute face in them.
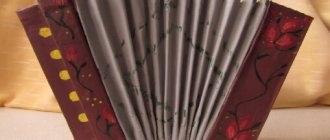
Cup of English tea
First graders can be offered a slightly more labor-intensive task. To work you will need white or gray cardboard, checkered or striped paper sheets, glue, scissors, thick cotton thread, felt-tip pens.
Procedure:
- Cut out the shape of a tea cup with a handle from cardboard.
- Make two exactly the same shapes from colored paper, only one of them has a handle turned in the other direction (mirror shape).
- Glue the thread to either side of the cardboard, as if you were putting a tea bag in a cup.
- Glue colored shapes on top of the cardboard base on both sides.
- Place the free end of the thread between two small squares of cardboard, glue everything together, and draw a flower on each square on both sides. This end will serve as the outer tab.
This craft is a nice gift and a stylish accessory for a book.
A simple scheme for making chanterelles
Another option is to make a fox face in a couple of minutes. Again you will need an orange square leaf.
You need to fold it diagonally, unfold it and fold it again along another diagonal. Bend both corners of the workpiece towards the middle, but leave a small distance between them. These will be fox ears.
Now all that remains is to turn the product over and paint the narrow fox face. You can draw slyly narrowed eyes, a nose, a mouth and even a short mustache.
Japanese version
Origami first appeared in Japan. Therefore, crafts made using classical techniques have a more correct appearance. Origami paper “fox” in the Japanese style is created no more difficult than the previous version.
A square is being prepared. It is bent diagonally to obtain a triangular-shaped model. Both lower corners are turned in the direction of the acute one. The resulting two folds should remain the same size.
Now, unlike the first option, it is not the free corners that are bent in their direction, but a rectangular strip on the opposite side of the workpiece. All that remains is to unfold the fox's face from the protruding free corner.
NOTE!
Origami airplane: master class on making beautiful models with your own hands (125 photos and videos)- Origami vase - manufacturing technique and step-by-step instructions for assembling a modular paper vase (100 photos)
Origami boat - types, manufacturing methods and features of use in decoration (110 photos)
Finished products can be additionally decorated with eyes, nose, mouth and even fur. The tip of the tail can be highlighted with white paint.
Origami diagram of a sitting fox
The authorship of this elegant figurine is attributed to the famous popularizer of origami Fumiaki Shingu.
A sitting fox is easy to make. And from several figures it is quite possible to form a club of red-haired sages.
Instructions on how to make an origami fox look like this:
- bend a square sheet of paper along one diagonal, straighten it and bend it along the second;
- the result was a triangular blank with a fold in the middle;
- fold the side corners to the fold line to form a rhombus;
- roll the diamond in the middle “hill”, that is, away from you;
- fold the side of the resulting triangle with a triple edge by one quarter, as shown in the photo;
- open the folded corners in the center; the middle corner will lower and turn into a muzzle, and the top two will become ears;
- bend the tail on the opposite side, giving stability to the entire structure;
- draw a fox's face.
Application
Even a child of primary school age can make a felt fox applique. This picture can be used to decorate the cover of a book, or you can put it in a frame and hang it on the wall.
A felt fox could be something like this, for example.
To create an application you need to prepare the following materials and tools:
- a sheet of blue or light green felt for the base;
- a sheet of orange felt (the size of the sheet depends on the expected size of the image);
- a small piece of white or beige felt (for the face, belly, etc.);
- a small piece of black felt (for feet, nose, eyes);
- scissors;
- needle;
- threads;
- sample;
- hot glue;
- soft simple pencil.
Master class on making a felt applique of a little fox:
- First you need to cut out (transfer images of parts onto felt using a pencil or marker and cut them out) the necessary parts. There should be 1 of them. except for paired ones (ears, paws, eyes), since the little fox will not be a separate figurine, but an applique sewn to the base. The following parts are required:
- head (orange color) – 1 pc.;
- face (white) – 1 pc.;
- center of the ear (white) – 2 pcs.;
- eye (black) – 2 pcs.;
- nose (black) – 1 pc.;
- body (orange) – 1 pc.;
- front paw (orange) – 1 pc.;
- foot (black) – 2 pcs.;
- belly (white) – 1 pc.;
- tail (orange) – 1 pc.;
- tail tip (white) – 1 pc.
- Then you need to outline the location of the applique parts on the base. To do this, you should lay out all the parts to create an image of a fox, and then fix them to the base using safety pins.
- Now you can start sewing the parts, making sure that they do not “move out” and fit snugly to each other. First, the torso is sewn on, since the head overlaps slightly in relation to the torso. The seam should be neat and decorative - “forward needle” or “back needle”. First you need to place the tail under the body, securing it with a seam.
- Next, you need to sew on the belly, followed by the front legs and feet, and then sew the rest of the tail to the base.
- Then the head and face are sewn on: both parts, overlapping each other, must be simultaneously stitched in the lower part (in the chin area) to the top of the body.
- Next, the seam is completed along the entire circumference of the head and the centers of the ears are sewn on.
- After this, the animal’s face is sewn on and shaped: the eyes and nose are glued into place.
Origami fox with bushy tail
A large fluffy tail is the calling card of a fox. Therefore, it plays an important role in the manufacturing scheme of the next model.
The instructions are:
- Fold a square sheet of orange paper in half and unfold it.
- Fold both halves of the workpiece to the fold in the middle.
- Fold the workpiece in half crosswise and unfold.
- Fold one side to the intended fold and bend it back.
- Convert the folded corners into triangles-pockets.
- Bend the workpiece lengthwise in the middle, with the “pockets” facing out.
- Bend over the triangles.
- Fold the triangular edge of the workpiece to the middle.
- Open the three-layer part of the workpiece in the center. This will make a muzzle and ears.
- Open the central triangle and press along the fold lines. The finished muzzle will be in the shape of a diamond.
- Make a tail on the other side of the craft. To do this, roll it twice. Once - diagonally to the upper corner, the second time - close to the fox's chest.
- Unfold both folds. Turn the middle folds in the opposite direction.
- Fold the bottom corners of the tail a few millimeters inward to give a natural shape and stability to the tail.
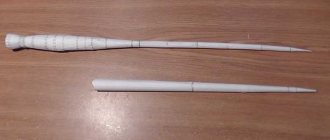
A beautiful and simple card for girls in 5 minutes
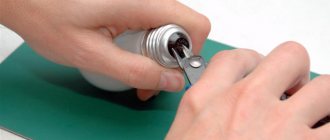
What girl doesn't love beautiful dresses? Let's take advantage of this and make a very cute bookmark in the form of this piece of clothing. And it will take us no more than 10 minutes. We will cut out a dress from fabric and felt according to the template. Let's put one part on top of another.
Glue them together and then sew them with a thick thread along the contour.
Glue an elastic band to the back of the dress. The bookmark is ready. Now you can put it on books!
Girls will also like these bookmarks with images of princesses that they can color on their own.
A child can also make these gentle bookmarks with the help of an adult.
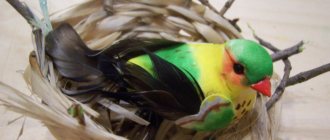
How do you like these knitted foxes? However, you will have to spend a little more than 10 minutes making them.
If you don’t want to sit for a long time at work, cut out cats from colored stickers. They will make absolutely everyone smile!
Or refer to this video:
Well, now you know how to easily and quickly make beautiful bookmarks for books for yourself and your children. I hope you liked my collection of ideas. Read for yourself and instill a love of reading in others! I wish everyone a good rest and creative success, and with that I say goodbye.
"Talking" fox head
The fox is a traditional fairy tale character. Since children really love home dramatizations of fairy tales, a fox head that you can put on your hand and “speak” with it will be a useful craft.
Below is a simple paper fox for beginning storytellers. You can create other “talking” characters to accompany her using the same model.
Scheme for creating a fox toy for your hand
You will need a square sheet of orange paper. The steps to create a fox are:
- fold the sheet in half;
- fold a double layer of paper crosswise so that the opposite edges meet in the middle;
- Open the side pockets so that triangles appear on top;
- turn the product over;
- bend the right and left edges of the workpiece towards the middle;
- fold the lower right corner diagonally towards the middle;
- form a fox ear; bend the top layer of the workpiece twice as shown in the photo of the origami fox;
- do the same with the second ear;
- carefully push the sides apart, adding volume to the middle part;
- press the product inside from the outside, forming the mouth of a fox;
- align all the folds and decorate the face with eyes.
Realistic fox using origami technique
Having passed the initial level of simple assemblies, you can proceed to labor-intensive schemes. If you are going to create a real masterpiece in the world of origami, you definitely need to take care of high-quality material.
Only good paper can withstand complex patterns with many kinks.
How to choose origami paper
The most common and affordable option is regular office paper for printers and copiers. It comes in white and colored. This paper withstands all manipulations well, does not tear and does not lose color when folded.
There is also special paper for origami. It is already sold in square sheets, because most blanks must have equal side lengths. It can be plain or with ornaments.
Step-by-step instructions for assembling a fox
- Work on the fox begins with assembling the “door” blank.
- Then, on one side of the workpiece, triangles are made from the corners, the future legs.
- A zigzag fold separates the area of the head and front paws.
- The muzzle and front paws are being formed.
You can clearly see all the stages of assembly in the diagram, there is a folding guide and in video format.
What additional things might be needed?
As with any work, origami creativity requires special endurance, patience and understanding of basic actions. To do this, we offer for your reference templates and standard practices for making paper chanterelles.
Please note that the step-by-step instructions for the origami fox are quite simple to make, since we offer the most optimal templates for creativity, but then you will also find original ideas on where and how you can apply the fake.
Materials:
- Colored paper.
- Scissors.
- Pencil.
- Felt pens or markers.
- Foil.
- Rhinestones.
- Pieces of cotton wool or fur.