Interest in handmade products is growing day by day. And it’s not just about savings: mass-produced products lack something ephemeral that gives things a special charm. Usually this elusive substance is called the Soul of the Master.
And even though the master is not yet very experienced, and his creations are far from perfect, they still have soul and individuality. Every time you open a jewelry box made by yourself, you will receive a charge of positive energy that will help you get through another difficult day and make the holiday even more joyful.
What can a box be made from?
A jewelry case can be made from anything, if only you have the desire and imagination. If this is not available, you can borrow ideas for storing jewelry on the Internet; fortunately, there are many master classes on the Internet, for every taste and level of skill.
The box can be made from:
- wood, plywood and even wooden spatulas;
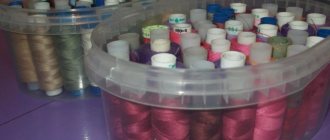
- cardboard and paper in all forms (sheets, ready-made boxes, reels);
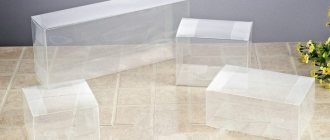
- plastic bottles of any size;
- bamboo sticks and napkins;
- egg containers and anything else you can find in the house.
And there are countless ideas for decoration: a jewelry box can be decorated using the decoupage technique, using rhinestones, ribbons, textiles, laces, beads and even eggshells and pasta! In this case, the only limiting factor can be a lack of time or imagination.
A box of any sweets is an almost ready-made jewelry box. It only needs to be slightly strengthened and decorated to your own taste. Even attaching the lid can be neglected if desired!
Purpose and Size of the Box
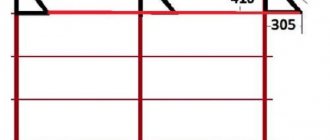
So let's get to work. First you need to decide for what purpose you will use the box. Its dimensions will depend on this. For example, for handicrafts you need a large box, which means it is better to use the entire bamboo napkin. For some small things you may need a miniature box. I decided to make a money box, so I measured the length according to the banknote.
If necessary, mark on the back of the bamboo napkin with a simple pencil and cut off the excess with scissors.
How to make a jewelry box with your own hands
Even a schoolchild can make a jewelry box with his own hands, and if he has a ready-made base, even without the help of his parents. A large jewelry box can be made from a shoe box: you just need to organize the cells and decorate the product. Making a small jewelry box with your own hands is even easier: you just need accuracy and patience.
How to make a wooden box with your own hands
Making a simple wooden jewelry box requires at least minimal tools (a jigsaw, a chisel, sandpaper) and the ability to handle them.
The easiest option for beginners is to work with multi-layer plywood. The main working tools in this case are a jigsaw, pencil, ruler, glue and clamp.
The main thing in this case is to construct the drawing correctly, taking into account that the bottom of the box should not be glued from below (this looks sloppy), but inserted between the walls.
It is important to try to cut the plywood without burrs or chips. To do this, you can use either a jigsaw or its traditional manual counterpart. The main thing is to choose a file with a minimum pitch and work as carefully as possible.
You don’t have to bother with all sorts of spikes and corners: the easiest way is to simply glue the walls end-to-end. You can use the cheapest glue, like PVA. Pay attention to the secure fixation of the elements.
Boxes made from baguette and plywood look interesting: they don’t even need to be particularly decorated – they’re ready-made Art Deco. And to simplify the task, you can ask a baguette workshop to cut the baguette at the desired angles.
Another cool idea for novice craftsmen is a box of wooden spatulas. Here you don’t even need to saw anything, and spatulas are sold in any large store and cost literally pennies.
Lay out the spatulas on a flat surface. We put crossbars on the sides and glue them with PVA.
We build an impromptu “hut” from spatulas, not forgetting to glue the intersections.
We glue the lid together in a similar way, secure it with ribbons, and then decorate our box to our own taste. You can decorate it using decoupage technique and varnish it.
Now let’s see how more confident craftsmen make wooden jewelry boxes with their own hands.
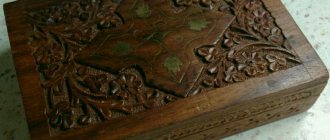
This is what the original cherry box looks like. The wooden rose looks like it’s alive, doesn’t it?
Oh, this carving!
Cardboard jewelry box
Of course, you can get creative and make your own jewelry box from sheets of cardboard and designer paper. But the easiest option is to improve and decorate the shoebox.
Strips of thick cardboard covered with paper can be used as dividers. It is best to give preference to embossed designer paper: it is very thick, durable and, of course, spectacular!
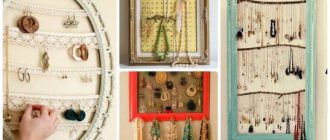
Let's see how experienced needlewomen decorate shoebox boxes.
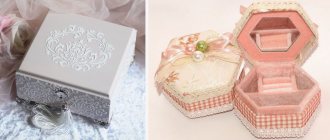
What do you think of this shabby chic suitcase? Or this elegant box decorated with textiles?
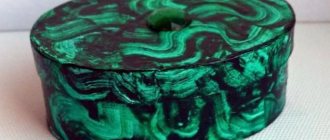
But this heavy-looking casket is simply magnificent!
How to make and decorate a book box with your own hands?
If you have an old thick book lying around, you can easily turn it into a designer box.
For this you will need:
- book,
- PVA glue,
- glue gun,
- tassel,
- golden paint,
- ruler,
- sharp stationery knife,
- simple pencil,
- scrap paper,
- four wooden balls for the legs.
Let's get to work. We open the book and coat the stack of pages on all sides. Don't forget to glue the pages to the bottom cover.
Then we take a ruler and a pencil, draw a rectangle in the center and carefully cut it out, leaving a few pages at the bottom. We glue the pages from the inside. After the glue has dried, cover the sections and ends of the book with gold paint.
Glue the legs and cover the entire book with gold paint. After it dries, we begin decorating with scrap paper and cuttings.
The finished composition can be coated with acrylic varnish and you will get this beauty:
However, there are simply countless ideas for decorating book boxes!
If you don't have enough time or money to visit craft stores, no problem. In any home there will probably be old newspapers, magazines, buttons, ribbons and other little things that can be given a second life, much more elegant than the first!
Making a box from a reel of tape
Even a young fashionista can handle making a miniature jewelry box. Such a box can become the first treasure storage for a little princess. It's especially great if she makes it herself. Mom is allowed to help a little!
So, we will need:
- tape reel;
- PVA glue;
- glue gun (if it is not available, “Moment” or its equivalent);
- brush;
- thick cardboard;
- scrap paper;
- a simple pencil;
- sharp scissors;
- ruler and tailor's centimeter;
- decorative elements.
Let's start creating! We take a reel of tape, place it on cardboard, trace it around the circumference with a simple pencil at least twice and cut it out. This will be the bottom and the lid.
If the cardboard is not very thick, multiply the number of circles. They will have to be glued together with PVA so that the lid and bottom are tight.
Glue the bottom. Next, we measure the circumference with a tailor's centimeter or use a ruler and a simple formula: the circumference is equal to the diameter multiplied by 3.14 (Pi). We cut out a ribbon of the appropriate length from cardboard and form the rim of the lid.
We turn to scrap paper and cut out parts of the appropriate size and configuration from it.
We carefully cover our masterpiece with paper and decorate it. We remember that the power of PVA is not enough to secure the decor: you will need stronger glue, such as “Moment”.
But all this beauty was once the basis for a roll of tape, which had every chance of going into the trash:
Original box made from an egg container
All kinds of little things, including jewelry, can be conveniently stored in an egg container. Needlewomen often use such containers for storing beads, beads, small accessories, and so on. Why not decorate the whole thing, especially since it’s not difficult?
To work you will need:
- spray bottle with acrylic paint of the desired color;
- roll of toilet paper;
- a bottle of PVA glue;
- curly pasta of various shapes;
- the actual egg container is made of porous polymer.
Pour PVA glue into a container and dilute it a little with water so that it is not too thick. Then we take some toilet paper, put it in glue, soak it well and put it on the egg tray. We repeat this manipulation until we cover the entire tray with glued paper.
The result should be something like this:
We don’t wait for the base to dry and decorate it with pasta according to our own taste. At the end of the work, wait for the composition to dry completely.
We take an aerosol can and cover the box with paint on all sides. Done – improvisation on a marine theme!
Instead of pasta, you can use other textured decor. For example, different-sized buttons, elements of the children's alphabet, shells, pebbles, and so on are ideal for this purpose!
Bamboo napkin box
A bamboo napkin is an ideal blank for a designer box. All you need is:
- Sew or glue the napkin onto a thick, beautiful fabric (this will be the “bowels” of the box).
- Cut out the sides from cardboard and carefully cover them with fabric.
- Put everything together, hang accessories if desired and decorate to your liking!
If you try hard enough, you will end up with this incredible beauty:
Fabric Trim on the Interior of the Box and Sides
The inside of the box will be lined with fabric. I took elastic fabric and cut it not to the size of the napkin, but about 1 cm smaller on each edge. Then I sewed it on the back side, stretching the fabric. This is necessary so that the fabric does not form wrinkles. If your fabric does not stretch, then it is better to cut it to the size of the napkin and glue it.
For the sides, I cut out pieces from fabric to the size of the cardboard, also four pieces.
After you have sewn the fabric to the wrong side of the bamboo napkin, proceed to cover all the parts of the cardboard sides with fabric (as shown in the photo below).
Design ideas
Do you think that pasta is the most original material for decorating boxes? Nothing happened! The most unexpected materials can be used as decor, if, of course, you know how to work with them!
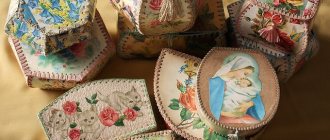
What do you think is there, under the decoupage napkin, that creates such an interesting texture a la crocodile skin? You won't believe it: a run-of-the-mill eggshell!
Are there any old newspapers left? And we’ll put them into action, for the benefit of hand-made:
And from glossy magazine pages you can make an interesting braid. An ordinary jute thread, but what a look! However, burlap is in no way inferior to it.
Yes, and different-sized buttons, clasps and other accessories from outdated clothing can be put to good use!
Shabby chic style box
This elegant small box is perfect for storing jewelry.
To create it you will need:
- box “Raffaello”;
- lace;
- beaded ribbon;
- textile;
- decorative elements;
- threads;
- glue;
- polystyrene foam or penoplex;
- paper;
- thick thread;
- sheet with a picture.
Cut a circle out of paper the size of the bottom of the box. We prepare a volumetric circle of the same size from polystyrene foam or penoplex. Glue a sheet of paper around the box with a design.
Cut out a circle of fabric slightly larger than the foam.
We place a circle of paper on top of the foam and cover it with fabric. This will be the lid of the box.
We connect the lid to the box.
We decorate the box with lace, beads, thick thread and other elements.
Relevance
A box is a unique item in the interior of each apartment. These beautiful boxes, designed to store jewelry and treasures, have been used by women and men for many centuries. And today they have not lost their relevance.
On the eve of the holidays, be it the eighth of March or a birthday, thoughts become confused, and nothing comes to mind except the usual perfumes, sweets and flowers. But you want the gift to be bright and memorable. It’s good when the gift is not only attractive, but also functional. A handmade box will be just such a significant gift. You can make any fantasy come true without spending a lot of money and effort. And the process of making the box itself will bring an amazing charge of positive energy.
Pot from a tin can
A tin can can be made of either aluminum or iron. Most often, canned food is placed in tin material; aluminum is rare; drinks are often poured into it.
However, both are good for making pots.
- Before starting, the jar must be degreased.
- This is done on the outer surface, the inner surface is simply washed to remove food residues and dried.
- If the container is not degreased, it will be more difficult to decorate.
Acrylic paints are perfect for decoration. They will lie flat on the surface. You can also use spray paint, but you need to spray it in an open and protected room so that there is no smell left and foreign objects are not painted.
There must be drainage at the bottom of the jar if you plan to plant a plant in the pot. This DIY craft made from tin cans can be decorated with anything.