A typical problem when working with a soldering iron is burning of the tip. This is due to its high heating. During operation, soldering operations require unequal power, so you have to use soldering irons with different power. To protect the device from overheating and the speed of power change, it is best to use a soldering iron with temperature control. This will allow you to change operating parameters in a matter of seconds and extend the life of the device.
Principle of operation
Parameters are adjusted using a special mechanism. A soldering iron with a thermostat consists of a tip, a housing, a board and a set of resistors in the structure. The design allows for heat adjustment when working with various parts. More expensive samples have variable voltage limits. At each setting, you need to select the appropriate tip to control the outlet temperature. It is important for a novice radio amateur to determine with what parameters a soldering iron is required. Professionals in their field choose reliable models with temperature control. The equipment has good soldering performance, the action is carried out by meeting the necessary criteria. A different load is applied to each product; thermal stabilization allows you to select the boundaries necessary for high-quality soldering of various products.
Network soldering iron with temperature control
The temperature is selected in accordance with the description of the material and method of operation of the equipment used.
Sometimes it's easier to make than to buy
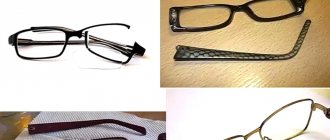
A good electronics engineer should have a wide variety of tools in his arsenal. This also applies to soldering irons. It is impossible to get by with one soldering iron for all cases. There are usually no problems with powerful soldering irons: there is enough of this stuff on sale for every taste. But with their “younger brothers” it’s more difficult. However, it is more correct to talk not about power (it should ideally be adjustable), but about the diameter of the tip and the distance from the tip of the tip to the handle. Power is often talked about as the main criterion, simply for the reason that soldering irons with a thick tip are designed to work with massive parts that have a large thermal capacity - to warm them up, the tool must develop quite a lot of power. And vice versa, for the smallest installation, soldering of SMD components
and microcircuits with small pin pitches require
a miniature soldering iron
with a very
thin tip
.
Such a soldering iron does not need much power, because the thermal capacity of the parts in this case is very small. Moreover, the shorter the distance from the tip of the tip to the handle, the more accurate the movements during soldering. This is especially noticeable under a microscope. But with a long soldering iron, the probability of making a mistake increases significantly, and, for example, “gluing” two closely spaced tracks or pins on a microcircuit, and then spending time eliminating such a defect. But in small installations
this can be very difficult.
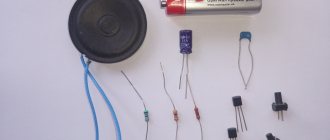
That's all you need to make a soldering iron!
1 - wooden block (material for making a handle); 2 — condensed milk can (mild steel for the body); 3 - silicate glue (liquid glass - a binding component for a heat-resistant composite); 4 - a coil of thin steel wire; 5 - mild steel about 0.5 mm, often called galvanized iron; 6 — wire tuning resistor (source of high-resistance wire for the heater); 7 - a piece of copper winding wire for making a tip; 8 - asbestos cord (fiber for heat-resistant composite). The only thing not shown in the photo is the electrical wire, a small piece of fiberglass, as well as 10 centimeters of any thread and a drop of BF glue. All other materials used are shown in the photo.
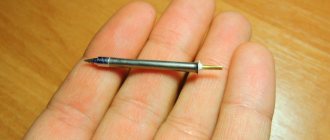
Electronics are getting smaller and smaller. Today, a tip with a diameter of even 1 mm seems thick in some cases. In household supply stores you rarely find soldering irons with a power of less than 25 W and a tip diameter of less than 4 - 5 millimeters. For such products, it is better to contact specialized stores. You can also search in online stores. In general, you can find interesting examples. But even with these samples, as a rule, something is wrong. Not a single “spoon of honey” is immune from the “barrel of ointment”. For example, I don’t understand the fashion for stings with a conical working end made of some difficult-to-maintain alloy. Such tips (unless sharpened, and it seems impossible to sharpen them) do not have a working edge and are poorly wetted by solder. But I would like, as the poet said: “And the fingers ask for the pen, the pen for the paper.” Only in our case, instead of a pen, a soldering iron, and instead of paper, you know what. Yes, a soldering iron by its very appearance should inspire inspiration. And what? Technical creativity also requires inspiration. This is also a kind of art.
In general, you can look for a ready-made soldering iron and adapt to its shortcomings, or you can make a soldering iron yourself
, adapting it to your preferences.
Design
When choosing a tool, it is important to select the required setting sizes. It is important to pay attention to the adjustment element; a high-quality soldering iron has a switch with indicated minimum and maximum temperatures. The toggle switch is responsible for switching the voltage; a simple design may not meet the requirements when soldering material. Thermal stabilization allows you to avoid overheating of the tip when the tool is idle for a long time. A soldering iron with temperature control allows you to set the amount of heat generated by the tip during small jobs. Operating modes:
- Operating capacity can vary from 60 to 140 W, the average output voltage is 80 W.
- Power comes from a 220 V power supply.
- The heat range starts from 185 °C, for low-melting solders and soft materials, and reaches 450 °C for more refractory products.
Soldering iron circuit with thermostat
The adjustment is made using a special toggle switch; the format setting error is 10 °C.
Completing the soldering iron assembly
Of course, before I attached the cord, I put a handle on it. Next, all that remained was to screw in the body of the soldering iron
into the handle using his improvised carving.
After connecting the handle to the body
the place where the cord exits the handle is additionally reinforced so that the cord does not dangle in the handle and extraneous forces are not transferred to the connections located inside.
Finally the sting is inserted
,
soldering iron has been tested
. Everything worked out as it should. A soldering iron that is properly assembled from suitable materials does not smoke or emit odors. A little later I varnished the handle.
If the tip enters the heater
too loose, you can wrap it with a strip of aluminum foil.
It is better not to use copper foil, so as not to get scale in its place over time, making it difficult to remove the worn tip. After testing, I shortened the tip a little, bringing its outer length to about ten diameters. Reducing the length of the tip expands the capabilities of the soldering iron and allows even a thin tip
to perform not the smallest work.
Equipment
The radio materials tool contains some accessories, the direction and characteristics of which may vary. It is necessary to familiarize yourself with the complete set in order to avoid downtime and poor-quality connections. The average soldering iron with a temperature controller has:
- A set of soldering tips usually consists of 5 items to perform various actions.
- Thermal sensor for own adjustment of the tool.
- Heating indicator, a regular LED that signals when the set temperature has been reached.
When purchasing, you should pay attention to the length of the wire; the length should be at least 1.5 meters; in this case, you probably do not need to use extension cords. The heating component can be of two types:
- ceramic;
- made of nichrome wire.
Temperature-controlled soldering iron included
The heating device must have a change of tips to perform different processes. Cheap products do not provide such a modification, so you need to choose a tip according to the type of action.
Materials for making a soldering iron
After first glance at the photo depicting the materials, it may seem that the contents of a trash can have been emptied and neatly laid out in front of the camera. Yes, the soldering iron described in this article is made from such “garbage”.
There was no need to think too hard about the choice of material for the handle. Soldering iron handle
made of wood. This is a readily available material, which is easy to process, quite durable, and has good thermal insulation properties.
Tin from a tin can is used to make a soldering iron body
.
This is a soft sheet of steel that is easy to cut and bend, and at the same time, rolled into a tube, it is strong enough for a miniature soldering iron
. I strongly recommend the condensed milk tin - it does not have polymer coatings, which is important for our case. Tin plate coated on the outside with varnish, like canned fish, or on the inside with something white, like various peas and corn, is not suitable because of this very coating. At high temperatures it will begin to release combustion products that we do not need. I especially want to emphasize that in the store you need to buy not “condensed milk”, but rather whole condensed milk with sugar. I will not describe the difference here - this is not related to the topic, but there is a difference between these products, and the quality of the tin can also be different.
Next on the list is silicate glue.
.
This is a very interesting substance. It does not contain organic matter, is not poisonous, and is not harmful to the skin - you can work without gloves. After drying, it turns into glass - a substance that can easily withstand high temperatures (more than enough for a soldering iron) and at the same time does not conduct electric current. When adding heat-resistant fiber, it forms a composite that also has high mechanical strength. This is what we need as insulation when making a heater
.
In Soviet times, silicate glue could be bought at any bookstore. It was the most popular adhesive for paper and cardboard. But, I must admit, it is not very good for paper. Apparently that’s why it’s not so easy to find it on sale now. Silicate glue has almost completely been replaced by more modern paper adhesives. It’s a pity, because it is indispensable when making a soldering iron
.
But it is still on sale today. The bottle of glue shown in the photo, among other materials, was purchased in 2016 for a symbolic price. Fifteen rubles. I admit, when I saw it at a newsstand located on the territory of a grocery store, I immediately thought about a new homemade soldering iron
, which would bring together all the accumulated best technological solutions.
The seller looked at me strangely, clearly not approving of my choice. I wanted to suggest a higher quality glue. But I assured her that silicate glue
is simply irreplaceable in some cases. She had nothing to object to such a powerful argument, and a profitable deal took place.
I will add that there is a lot of Chinese paper glue on sale now, and, it seems, also silicate. But I haven’t tried to use it, because I really doubt its composition. Most likely, it contains a large percentage of impurities that make the glue more suitable for paper, but absolutely unsuitable for the manufacture of high-temperature composites
.
When heated, these possible impurities can begin to chemically break down, releasing toxic substances. A significant reduction in the strength of the product is also possible. Therefore, when purchasing, it was important for me that this was a domestically produced glue, and very cheap, which means it was just liquid glass
without any additives.
Thin steel wire is used to tie the tin body, which allows you to secure the heater in it, as well as create a “thread” for the handle - a simple but very effective solution. In addition, two pieces of steel wire are required to make the heater leads.
You will need mild steel sheet about 0.5 mm thick. A small rectangle is rolled into a cylinder, which is then inserted into the body from the handle attachment side and provides the necessary strength in this place. Sheet galvanized iron is sold in building materials stores. It's mild steel, like the kind used in tin cans. It is also easy to cut and bend, but it is much thicker than canned material, and therefore parts made from it are stronger. There is no shortage, but stores only sell large sheets. One such sheet is enough for a thousand soldering irons. However, the material is good for many applications. In any case, you need to have it in the household.
For making a heater
a high resistivity alloy wire
will also be required .
You can obtain such wire in different ways. In the described case, the wire was taken from a wire-wound tuning resistor, which was once soldered from a domestically produced color TV. To level it, the wire can be pulled along the edge of the table. It is necessary to evaluate the thickness of the wire, its length and resistance. High accuracy is not required in this case. Just keep in mind that very thin wire reduces the reliability of the soldering iron due to the risk of burnout. Thick wire will be more difficult to wind, and the thickness of the product will be increased. with the wire resistance (and, consequently, with the supply voltage of the soldering iron
) - it is unknown how much of it will go to the heater. It’s easier to make an approximate version, and when the soldering iron is ready, select the voltage to achieve the required power. But too large errors with the heater resistance will lead to the fact that either a very large current will have to be supplied to the heater, which increases the requirements for wires and electrical connections, or to make a power source with a very “specific” voltage, for example, 50 volts. However, the power supply is from 50 When the resistance of the heater is too high, it is much better and more reliable than when the current is unreasonably high - when it is too low.
For making a sting
Thick winding wire with a diameter of 1 to 2 mm is ideal.
You can set aside a whole coil of such wire as a consumable, and in the future, as it wears out, make new tips. The design of the soldering iron
provides for the possibility
of replacing the tip
. It is inserted into the steel base of the heater and is held in place by friction. So you don’t have to worry about the tip burning out.
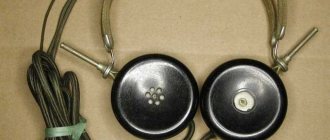
Asbestos is a naturally occurring fibrous mineral. Resistance to high temperatures is one of its most valuable qualities. In combination with silicate glue
makes it possible to obtain an excellent composite for
heater insulation
.
As you can see, the materials are mostly readily available. Difficulties may arise with the search for asbestos
. If you can’t find the cord, you can try crushing asbestos cardboard and mixing it with silicate glue to get a paste. It can be used to insulate the heater. But I haven't tried this method. I used a cord, separating more or less even sections from it and winding it around the insulated surface. Then it was impregnated with silicate glue. You could try using fiberglass. There is more about this at the end of the article. There was an idea about using gypsum or even clay, but I haven’t tried using these materials either, so I can’t guarantee anything. One way or another, you can find something suitable.
Types of regulators
Devices for connecting various types of radio components have several types of characteristics. Soldering stations with heat and load adjustments are produced by the manufacturer with different parameter settings. Main varieties:
- Changing the voltage and power of the node is possible using a triac. This modification is most common when using heating components in radio engineering.
- Thyristor type adjusting element.
- Modification to increase the performance of the device allows you to change the output force to the required values.
- The indication makes it possible to recognize in which mode the heating is being carried out.
- Low-voltage controllers are used in designs designed to operate with a voltage of no more than 36 Volts.
You can probably make components that have adjustable temperature volumes with your own hands. A simple structure without interference is used, which makes it possible to extend the service life of the heating element. The galvanic component is considered reliable; its versatility allows the design to be used with various modifications and models.
Low frequency devices
A design feature of the device is the repair of thin connections that can be burned through in the usual way. Stabilizers for 12 and 36 V are used, depending on the output power. There are options with a microcontroller, which is installed in products when operating with sensitive parts.
It is important to understand that the operation of such devices will be less productive.
The performance is not enough to quickly heat up the tip; the maximum degree of heating does not reach larger mechanisms.
terms of Use
Soldering iron repair is unlikely to be required if you follow the necessary operating rules:
- ensure safety precautions at the workplace in accordance with the product instructions;
- take into account the value of the mains voltage;
- in rooms with high humidity, use a 36 V device (no more), first grounding it;
- The heater and cord must be free from mechanical loads during operation;
- do not touch the cord with a hot tip;
- do not overheat the soldering iron coil;
- select the heating mode using the power regulator.
Important! Correct selection of power parameters does not guarantee the quality of soldering.
Copper fixtures
The structure is made of copper wire twisted in a spiral pattern. Copper is capable of carrying the low current produced by small transformers. The adjustable heating components are equipped with a temperature sensor, which is responsible for controlling the tip. The thermocouple is installed on the working tip, which allows you to adjust the temperature level to the required state. The copper spiral does not pass electric current through itself, the performance of the unit stops, or the load indicator changes. Types of copper heaters:
- with wire wound around the body, preventing voltage from reaching the tip;
- The insulated structure avoids heat loss when using the device.
Homemade thermostat
The quality of copper depends on performance; adding additives in order to save money by the manufacturer can significantly reduce the service life and damage the parts being repaired.
Making a pen
Soldering iron handle
planed with a knife from a wooden block without the use of machines. But first a hole was drilled in the block. If you first plan the cylinder and then drill a hole in it, then without using a machine it will be very difficult to get the hole exactly in the center. It is much easier to first drill and then smoothly plan the workpiece around the existing hole. The finished handle is sanded.
The diameter of the hole in the handle on the side connected to the body is slightly increased to a certain depth. This is done so that the actual contact between the metal body (carrying the unwanted heat flow from the heater) and the handle occurs a little deeper inside the handle. Thus, while maintaining a small distance from the tip to the handle
Handle heating
is reduced .
Ceramic heaters
Unlike products equipped with nichrome wire, the ceramic component can last longer than its competitor. The ceramic element allows operation at the maximum permissible thresholds, the resistance is minimal. Electrical voltage spreads along the tip, resulting in heating. Ceramic heaters require attention; under mechanical stress they are destroyed and become unusable.
Soldering iron with ceramic heater
The price of a soldering iron with a ceramic tip is higher, so it is important to choose high-quality material. Durable and reliable operation is achieved through careful use of the component.
Advantages and disadvantages
When choosing a device for soldering radio components, you should pay attention to the technical documentation. You should not ignore the advice of a professional, because... Years of experience can help beginners choose the right device. The choice between a ceramic and a conventional device can lead to a dead end; an inexperienced craftsman should familiarize himself with the negative and positive sides of each product. Advantages of copper tips used with soldering iron temperature control equipment:
- the affordable price makes it possible for a novice master to purchase it;
- resistance to mechanical stress allows you to avoid breakdowns of the mechanism when the process has not yet been fully mastered.
Negative sides:
- Copper wire is not known for its durability due to exposure to high heat levels over a long period of time. It is possible to avoid overheating by pausing during the process; the method under consideration keeps even cheap models intact.
- Slow heating of the electrical connection.
Ceramic soldering irons, including a thermostat, have the following advantages:
- the integral system makes it possible to avoid device failure;
- the configured temperature readings are available immediately after connecting to the network, some models heat up in less than a minute;
- reliable unit subject to operating rules.
When using any device you are faced with a number of negative aspects, ceramic products are no exception. A destroyed tip is replaced only with the original one, due to the design features of each model. If dropped, the heating component cracks and loses its working properties.
Why increase power?
It is not advisable to purchase several options for performing soldering work of various types. Increased intensity is used for short-term exposure to elements; fragile parts may not withstand high temperatures and become unusable. Burnt tracks located near the controllers can affect the operation of the part being repaired.
Soldering station with thermostat
Less power output contributes to slow heating and low temperatures. With the presented indicators, during the soldering process it is necessary to act on the material longer before melting begins. Long-term heating can also have a detrimental effect on the board. To avoid serious consequences, you should correctly select the level of return through regulation. For example, to adhere massive objects, it is necessary to increase the intensity until the time of exposure to the elements is less than the melting point and provided that the appropriate solder is used.
The bee doesn’t have a pity, or What a good sting should be
If theater begins with a hanger, then a soldering iron begins with a tip. Both ease of use and the result obtained largely depend on the quality of the tip. Making a soldering iron
It's also wise to start with choosing a tip.
But what kind of a good sting
?
Here I would like to recommend a short article about the basic secrets of good soldering. It talks about the physics of the process, how wetting, capillary effect and surface tension solve most of the problem for us. This information is very useful for beginners and will not hurt those who are continuing.
But, returning to the topic of a good sting, we will have to remember physics again. Now from the field of thermodynamics. Don't be alarmed - there will be no formulas. We are talking about what shape the working surface of the tip
.
We had to touch on this topic because manufacturers of soldering irons have a unique understanding of the optimal shape of the working surface and supply their products with tips sharpened to a cone. As a rule, imported soldering irons suffer from this. I can’t say the same about domestic ones yet. I think this is a marketing ploy among foreigners, aimed at the mass amateur, for whom the sharp end of a conical tip
is associated with high soldering precision.
But let's figure it out. A cone, in principle, can be beneficial and effective, but only from the point of view of heat transfer along the entire length of the tip - this is when the entire tip is conical
(at least its outer part).
At the same time, the cone-shaped working surface is extremely inconvenient and ineffective. That is, if you have a cylindrical tip
and a conical working end, this is bad and pointless. Why is this so, and what does physics and its thermodynamics have to do with it?
As is known, heat transfer proceeds faster, the larger the surface area of contact of interacting bodies. In our case, this is a tip and a part. This means that, ideally, the surfaces should either be both flat, or each convexity should have its own “convexity,” and vice versa. Conical working surface of the tip
thus optimized for soldering “pits” and various kinds of “holes”, which is not so in demand in practice.
But working with a plane, for example, tinning a contact pad
on a board, will be much more difficult with a cone than with a flat edge.
Practice shows that it is the flat edge that is the most universal working surface, which means that the tip can be sharpened as you like, but so that there is at least one flat edge. In this case, it is not at all necessary to turn the sting into a “shovel”. Even the smallest flat surface at the end of the tip provides a noticeable gain in ease of use of the tool. For thin tips
(1-2 mm), we can recommend two classic forms of sharpening: wedge-shaped - with two flat edges, and oblique cut - with one flat edge. Of course, any variations are possible (there are an indescribable number of them) for reasons of convenience for a particular case, but do not lose the working edge by getting carried away with sharpening.
We figured out the shape of the working surface. And now it may not even be clear why I am picking on manufacturers of soldering irons with conically sharpened tips, if the tip can be resharpened. Yes, the fact of the matter is that not every tip requires sharpening. The tips I criticized are often short in length and not made of copper. It seems like this is some supposedly wear-resistant non-burnable alloy. Maybe with some kind of coating. There is no point in sharpening also because this alloy is poorly wetted by solder. That is, tin
such a sting is very difficult even with the use of the best fluxes. And after prolonged effort, when everything seems to have worked out, the tip is tinned, soon the solder on the surface of the tip again becomes uneven and begins to gradually gather into droplets. Maybe that’s why the sting doesn’t burn because it can’t be used. It’s like that joke: to prevent toys from breaking, don’t give them to children. Why then use such metal for a sting, if even an ordinary iron nail is more suitable for this role? But maybe I just don’t understand something about the newfangled stings. I would be grateful if someone could tell me what I'm doing wrong, if so.
I can’t recommend anything better than ordinary copper for a sting. Some copper alloys are also good. I'm in my soldering iron
I used a piece of thick winding wire for the tip.
At first the tip
was made with some extra length, then I shortened it slightly. This is due to the fact that for a tip with a constant cross-sectional area (not a cone), there is a maximum permissible length for a given diameter. Approximately (I do not pretend to be mathematically accurate!) the length of the outer part of the cylindrical tip (from the tip to the edge of the heater) can reach ten diameters. Exceeding this limit reduces the heat transfer efficiency of the tip, resulting in the ability to solder only small parts even with a powerful heater.
And now, when there is complete clarity about what a good sting
, you can describe the process
of making a soldering iron
.
In my description I do not give exact dimensions, since this makes no sense. Exactly copying a product in compliance with all dimensions is an extremely labor-intensive task. The technology I propose is based on the fact that the dimensions of subsequent parts depend on the finished parts and are adjusted to the exact dimensions of the finished parts, where necessary. In cases where dimensions are not of fundamental importance, they are selected “by eye”. And the first dimensions that I had to decide on were the diameter and length of the part of the tip that goes into the heater
.
I prepared a piece of thick winding wire for the future tip, aligning one end of it. I have not removed the enamel coating yet, so that there is some margin in diameter. There were fears (possibly unfounded) that I would not be able to insert the tip
due to the “too precise” size match. Thus, the diameter of the enameled copper wire became the internal diameter of the base of the future heater. I chose the length of the heater intuitively.
Switches and Dimmers
A simple type switch allows you to select a position in two directions. The unit is operated at minimum and maximum output values, allowing only to save energy. At the minimum level, the tip is maintained by the required degree of heating on the stand; pressing the switch warms it up. With a product equipped with the specified type of switch, it is difficult to perform high-quality fusion of metals, because There is no full parameter setting. Dimmable varieties of adjustable devices allow you to select important parameters.
Homemade dimmer for soldering iron
The device includes a dimmer, which is present in the grid between the power cable and the heating element. The adjustment is made by monitoring the voltage; these mechanisms are popular among beginning radio amateurs due to their low price.
Control units
More advanced systems have a control unit consisting of a set of regulators and microcircuits. The compactness allows you to place the drawing in the handle of the soldering iron, which is very convenient in the process. The control sensor is located outside the housing, which makes it possible to select an indicator without interrupting the soldering process.
There are soldering irons that have an external power supply. This device makes it possible to work with a stable voltage on a rectified current.
The unit adjusts the parameters of the potential differences in the electrical network, regardless of the modes; with some actions this condition must be observed. The varieties of control units can be confusing; if mobility is important, it is better to pay attention to the internal arrangement. External blocks allow for better contact; a type of soldering station that includes a hair dryer is provided.
DIY temperature regulator
Making a soldering iron with do-it-yourself adjustment requires knowledge of electrical engineering. If you have experience, it is proposed to make the mechanism from a conventional heating element with a power of 60 watts. High-quality connections can only be made when using a heating value balancer. Assembly is carried out by implementing some modifications and involves the use of available materials. The simplest system includes:
- thyristor model KU101G;
- resistor SP – 1;
- diode operating at a current of at least 1A.
Thermostat circuit for a low-voltage soldering iron
Installation of the model is possible without the use of a board, in a power supply housing of any size. The connection is placed on the resistor body, to which the connector for adjusting the degree of heating is adjacent. The result is an adjustable device with an output power of up to 60 watts. Schematic drawings for more powerful devices include slightly different components. Assembly is carried out on a circuit board; variable resistor R2 is responsible for adjustment, which operates in the range from 50 to 100%. The maximum permissible load is 300 watts, sufficient for a household device. Circuit options depending on the power limiter The power of the device can be adjusted in several ways; the differences lie in the use of a semiconductor controller that performs the necessary tasks. Schemes can be built using several components, depending on the purpose:
- The thyristor works like an electronic switch; the current starts in one direction. The structure is made with three outputs, a cathode, an anode, and a control electrode. Applying a pulse to the electrode causes the thyristor to open; closing occurs after stopping the supply or changing the direction of the current.
- Semiconductors that conduct current in both directions are called triacs. The housing has a control gate and power electrodes; the operation is essentially similar to two connected thyristors.
- The design of control sensors uses parts known to radio amateurs, such as a resistor, diode, capacitor, and microcontroller.
In most cases, a thyristor or triac is used, the precise debugging is regulated using a microcontroller added to the circuit.
Step-by-step instructions on how to repair it yourself
Soldering iron repair begins with calculating the resistance of the heating element or winding. The voltage and resistance values of an electrical appliance allow you to calculate its power consumption. For example, the resistance in the winding of a soldering iron with a power of 60 W and powered from a 36 V network should be equal to or slightly more than 22 Ohms.
For repairs, you need to prepare the following tools:
- pliers;
- sharp knife;
- ceramic resistance “PEV-10”;
- asbestos thread.
A ceramic resistor is pre-prepared. The power wires must be close to its base to test the electronic power and heat dissipation.
You need to have nichrome wire on hand; its diameter must correspond to the parameters of the winding. The coils are laid closely. When heated, the surface of the nichrome wire will oxidize, creating an insulating layer. The wound layer, which according to the rules should not be placed in the first row, is covered with mica and placed in the second row.
Important
Before repairing a soldering iron, it is advisable to have its diagram at hand. You can draw it by reading the instructions or while disassembling the tool into its component parts.
Recommendations for testing and adjustment
When the adjustment knob is rotated, the voltage changes; the test is performed under load, i.e. with the soldering iron turned on. Accurate readings can be obtained using a multimeter. Also, the load level is determined by the connected incandescent light bulb; when the parameters are changed, the light intensity changes. A do-it-yourself voltage regulator helps with soldering work, regardless of the type of material. Varieties of circuits allow you to select exactly the modification that allows you to make a high-quality connection.