Register Login
Publication date: July 15, 2019
Scientists from the Russian Academy of Sciences conducted research during which they calculated that per sq.m. In the middle zone of our country, the sun “gives” about 100-250 W of energy. At noon on a cloudless day, this value can reach 1000 W. A logical consequence follows from this: a solar collector with an area of 2 sq.m. can heat 100 liters of water to 45...55 °C every day.
A solar oven is an environmentally friendly, easy-to-use, automated heating system, which is characterized by the absence of additional expenses: you do not need to buy firewood, coal, pay for electricity or gas. Like wind energy, solar energy is completely free and available to every resident of our country.
High demand for solar ovens has led to an expansion of supply: today a suitable model is easy to find and buy both in regular stores in the city and on the Internet. The advantages of ready-made designs include the presence of functional options that make working with the device easier. This is the optimal tool for hiking - most models can be folded into a bag or backpack, and, if necessary, quickly put into “combat readiness”. Among the most useful additional functions are a thermometer, a system for rotating mirror elements, a timer that folds the mirrors inside the convector at a certain time - when the dish is ready, the timer will notify you with a sound signal.
What kind of food can be cooked in solar convectors? There are no restrictions in this regard: heat water, cook stew, or even bake stuffed pies. At the same time, you will be able to save on electrical energy and be proud that your stove is absolutely environmentally friendly and does not negatively affect the environment.
If you are not ready to spend money on a ready-made solar convector, you can make a solar oven with your own hands.
Technical characteristics and features of solar ovens
Solar ovens have long been available in stores or online. They are equipped with many useful devices that make working with the equipment easier.
The solar oven is lightweight, it can be folded like a suitcase in a few minutes and just as quickly unfolded into its working position - it is an ideal tool for traveling.
The solar oven is lightweight and can be folded in a few minutes.
Furnaces manufactured on an industrial scale combine all the positive properties of solar parabolic cylindrical concentrators, as well as vacuum tubes. Thanks to this, the heating temperature reaches 300 degrees Celsius.
To control the temperature, a thermometer is also built into the equipment - this is an integral part of the control unit.
A thermostat with a specific operating temperature setting, as well as a mirror rotation system, is also installed in the oven.
A modern device is equipped with a timer, which, after a certain time, will begin to close the mirrors located inside the solar oven. When the set time arrives, the timer will also beep to indicate the food is ready.
The electronic part of the equipment is powered by solar energy through a battery installed in the housing.
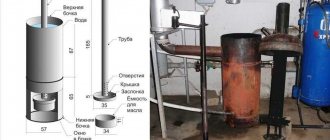
When assembled, the suitcase has the following dimensions:
- length 75 cm;
- height 40 cm;
- thickness – 11 cm.
The weight is quite light and comfortable for carrying over long distances - only 4 kg.
Using the oven you can cook vegetables, mushrooms, meat or even bake pies. The main advantage is environmental friendliness and energy savings. The equipment does not pollute the environment at all.
Types of solar ovens
Modern devices are available in three main varieties:
- Boxed.
- With mirror concentrator.
- Combined.
Box oven
The equipment is a heat-insulating box covered with mirror material or plastic. To increase heat collection, several mirrors are added inside to serve as reflectors.
Box solar oven
This type of equipment is used for slow cooking. Since the box can be of any size if you make it yourself, you can use it to prepare large volumes of food. Store samples are not large in size.
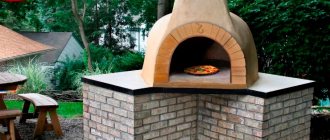
Furnace with concentrator
The device is a concave mirror that collects the sun's rays at its focus and redirects it to a point set by the user. When making it yourself, there is no need to maintain the perfect geometry of the mirror, since a large pan or other container with food will be in focus.
A special feature of the structure is the achievement of high heating temperatures. The equipment is convenient to use when you need to heat up a small amount of food.
But the stove also has a design drawback: it is necessary to constantly monitor the rays of the sun and from time to time turn the mirror to redirect the beam in the required direction. If you do not handle the stove skillfully, you can burn your hands and eyes. But by following safety precautions, this trouble can be avoided.
Combined
The combined type is a combination of the two previous options. A pan of food that needs to be heated is placed in a box, which is framed on one side by a concave plate with a mirror surface. The oven quickly folds and assembles into working position.
Steps
Lightweight solar oven
- Place the smaller box inside the larger box.
Fill the space between the boxes with torn newspapers. This is an insulating material.
Line the inside of the smaller box with black construction paper.
It will absorb heat. When you secure the construction paper to the walls of the box, make sure that the width of the tapered end of the square is the same as the width of the side on which you secure the square; the width of the flared end should be several centimeters larger than the width of the narrowed end.
Cover all areas of the cardboard with reflective foil-type material.
The reflective material should fit snugly, so smooth out all wrinkles and folds. Secure the material with rubber cement or tape to the side of each reflector.
Attach all the reflectors to the top of the box.
You can use glue, a stapler or thread and let the reflectors hang for now.
Prop each reflector at a 45 degree angle.
The easiest way to do this is to connect the reflectors at the flared top corners (eg by piercing adjacent corners and tying them with string, then untying them for disassembly). However, it is possible to insert rods into the ground below the reflectors or something else that can hold them in place. If it's windy outside, secure the poles tightly to prevent them from blowing away.
- If you take the rods, secure them with glue for greater reliability.
- Place the oven in the open sun and cook.
Place food in a small cooking box. Best cooked in jars or on a small, dark baking tray. Experiment with cooking times and where you place the box. You may have to change the position of the box several times during the cooking process to catch the sun's rays.
Powerful solar oven
- Use a power jigsaw to cut the metal can vertically.
- To cut a large rectangle, measure one side equal to the inside height of half the can and the other equal to the arced length of the side, which you can measure with a flexible tape measure (eg seamstress' tape).
A can for petroleum products will do. Take a metal cutting saw. When you are finished, half of the can should look like a cradle. For the stove you only need one half of the can.
Wash the inside of the can thoroughly with degreasing soap.
Use a scrub brush, paying attention to nooks and crannies.
Measure and cut pieces of sheet metal to cover the inside of the can.
You will need one large rectangle for the arced side and two half circles for the other sides.
To cut two semicircles, measure the radius (half the diameter) of the semicircular sides; Holding the end of the tape in the middle, draw a perfect circle on the sheet metal with a marker, cut it out and cut it in half.
To attach sheet metal pieces with blind rivets, drill holes through the sheet metal and can with a 3mm drill bit, then insert 3mm rivets. You can also drill holes and then attach the sheet metal to the can with screws to secure the sheet metal together. The screws will now be sticking out of the back of the oven, but later they will be covered with insulation.
Paint the inside of the can with reflective BBQ paint.
It will increase the temperature inside the oven.
Cover three of the four top edges of the oven with a continuous metal opening.
This will secure the glass top (which you will slide in and out through the fourth open side) in place. The easiest way to make it is from six pieces of a metal apron:
- Measure the short top edge of the stove and cut two lengths to that length. Then measure the long top edge of the stove, subtract the width of the apron from the resulting length, and cut the remaining four lengths; Attach the apron to the sides, making room for a piece at the end.
Place the apron piece on the last edge so that the curved metal “folds” of the vertical outside edge are over the horizontal top edge. Place the second piece of apron on top of the first so that the vertical sides are at the same level, but there is a wide enough hole left for the passage of the glass tabletop. Place a strip of material (eg thick cardboard) between two pieces of apron to leave an open gap, then drill through the double layer of apron and can and rivet them together. Pull out the cardboard and do the same with the remaining two edges. An apron “sandwich” (as opposed to a single-layer opening along the top) will protect the glass from staining on the uneven edges of the can that you cut by hand.
The layer should be thin because it will expand later. Look at the canister for further instructions.
Secure the bottom of the oven to the base.
Simply drill and secure the can onto a base that is most convenient for your location (eg wooden or rectangular aluminum frame on wheels, etc.), making sure the base is wide enough to prevent the can from tipping over. Depending on your location, you may need to tilt the stove slightly to get better sunlight (for example, in the northern hemisphere, the stove should be tilted towards the south, but at the equator, it should be pointed straight up).
Drill drainage holes in the bottom of the oven.
Simply drill small holes every few inches in a straight line through the bottom, drilling into the insulation. Thanks to these holes, accumulated and cooled steam will flow down from the oven.
Insert the appropriately sized tempered glass into the metal opening.
Tempered glass is not only stronger than regular glass, but it also comes with ground edges so you can use it right away. Since you will be moving the glass regularly, choose a thicker sheet (eg 5mm) for extra strength. Order one from a hardware store, specifying the size of your solar oven.
Install a magnetic thermometer.
For example, wood stove thermometers have a magnetic backing that allows the thermometer to withstand constant high temperatures.
Place a thin aluminum grill along the bottom (optional).
Just add one or two aluminum grills for convenient food placement.
Test the heat capacity of your stove on a hot sunny day.
It is reasonable to assume that the maximum temperature for a given oven is between 250 and 350 degrees Fahrenheit (90-175 degrees Celsius). The heat capacity of a particular oven model is determined by the size, materials from which it is made, and insulation. Use this temperature to stretch out the cooking of the meat over several hours, as if you were cooking it in a slow cooker. Cooking roast beef or chicken will take about 5 hours, and ribs will take only 3 (plus 5-10 minutes of roasting at the end). Check the internal temperature of your meat with a thermometer when you close the oven.
- Scrap material can be used to make a lightweight stove for a school project.
- You should use the oven in an area exposed to the sun. Thermal energy comes from the sun.
- To make a light oven more efficient and cook at a very high temperature, trap the sun's rays (without a cover, hot air will constantly rise and cool air will remain). Oven bags are cheap and easy to use. Just put the pan in which you cook something in such a bag. A glass panel, preferably double, is an alternative solution. The glass should be slightly larger than the smaller box, but not so much that it will not fit into the larger box.
- Positioning the rods that support the reflectors will be much easier if you have a partner to hold the reflectors at the correct angle while you install the rods and secure the result with glue.
- As a last resort, reheat pre-cooked foods like canned food by stashing them in two ovenproof bags: put the food in a small bag, and the larger bag, zip them up for a great heat trap. Place the food on a reflective surface, such as a bag of chips or a reflector on your car windshield.
Step-by-step instructions for making a solar oven with your own hands
Assembling a solar oven with your own hands is not difficult. You can use different methods based on the drawings, which are very simple and intuitive.
Users may have questions about oven sizes. It is advisable to rely on the following tips:
- If you need to make a stove for a summer house or a country house, then you need to think about a more solid and fixed structure.
- If the device is needed for hiking, then the design should be collapsible and as light as possible for ease of transportation.
- If the furnace is planned to be moved by car, then the design can be made more complex, but it must still be collapsible.
The simplest option for a solar oven is to use a regular umbrella. There is no need to use drawings for manufacturing, since the device is as simple and understandable as possible.
A mirror film or aluminum foil is glued to the open umbrella from the inside. The handle needs to be detached so that it does not interfere when placing the dish in the center for heating. This is all the necessary work. The oven is completely ready for use.
Now you need to stick a stand into the ground where the pot and kettle will be attached, and place an improvised mirror near the objects and focus the sun’s ray on the container with food.
Some craftsmen use a broken mirror and cover the inside of the umbrella with a kind of mosaic. But in this case the structure turns out to be heavy and not collapsible.
Boxed
When assembling a box structure, you need to consider several main factors:
- The walls located on the inside of the box are covered with foil and should have a very good reflection.
- The pan placed inside must absorb the sun's rays, and therefore it is advisable to paint it black or smoke it.
- Thermal insulation must be at a high level. The walls of the box should fit tightly to each other so that the heat does not escape outside. To provide high-quality thermal insulation, use ordinary cardboard or other natural materials that will not emit harmful substances when heated. After assembly, the temperature inside the oven can reach 170 degrees Celsius. But you shouldn’t be afraid of the box catching fire, since this temperature will not be enough.
If you approach the construction of the structure with all responsibility, the stove will last up to 10 years or longer.
DIY box solar oven
Non-dismountable unit:
- A reliable box is made from boards.
- Black paper (compacted) is placed inside over the entire area. This is necessary so that the solar energy is absorbed as much as possible by the device.
- Based on the dimensions of the resulting box, reflectors are cut out of tin. Before installation, the edges should be rounded and sanded to avoid cutting.
- Reflectors are fixed on top of the box. Ordinary hinges or screws are used - at the discretion of the master. Afterwards, the sheets are bent at the desired angle to accumulate the sun's rays on a specific object inside the unit.
- The lid must be made of glass. Thus, ultraviolet rays are converted into thermal energy necessary to heat food.
- It is advisable to build a small platform of bricks under the stove. They will accumulate the resulting heat.
- If you want to monitor the temperature, you should attach a thermometer to the box.
This type of solar oven is ideal for summer cottages. You won’t be able to take it with you on a trip due to its relatively large weight, dimensions and inseparability.
Mirror with reflector
To make a mirror stove with a reflector, you can use the option with an umbrella, which was presented above, or assemble the structure according to the drawing.
- You will need to cut out 12 cardboard petals.
- Afterwards, all the parts are connected along the long side.
- Next, the inner part of the resulting “plate” is fastened.
- All parts are tied together with wire or a good rope at the base.
- The plate is covered with foil, which reflects the sun's rays well.
Combination oven
The combined type is the easiest to manufacture and is a concentrator made from several flat mirrors. You will also need a pan with good thermal insulation.
To isolate the internal object, use ordinary plastic bags.
As a mirror, you can use thick cardboard to which aluminum foil is glued.
The design is notable for the fact that it can be folded and carried. Approximate dimensions are 33 by 33 cm. But larger sizes can be assembled if desired.
Build process:
- First you need to prepare the base for the body. It is advisable to use a sheet of plywood. An aluminum or steel rod is placed in the center and securely fastened. Length - half a meter. A thread is first made on the rod so that the stand can be placed on it later.
- Grooves are made into which plywood stiffeners are placed.
- The walls are assembled from the same plywood. You will need four rectangular sheets. On one side they should be cut with a curved arc, and grooves should be made with the arc for fastening to the ribs.
- The parts to be joined are covered with high-quality glue and connected. For additional fixation, it is advisable to use paper clips. After the box has dried, you should shake the workpieces and gently pull the walls to make sure they are secure. If the design has passed the tests, you can proceed to the next stage. But if some part is loose, it will need to be put in place and filled with glue again.
After creating the box, you can move on to the mirror.
- You need triangular thick cardboard with a smooth texture.
- All cardboard parts are overlapped and placed on the top of the attached ribs.
- After fixing, the cardboard is covered with a layer of glue. Afterwards aluminum foil is applied.
- A stand is placed on the rod at a point equal to half the radius of the mirror surface.
A DIY solar oven is ready for use. Instead of wood, aluminum is also used for the box. It conducts heat well and is not subject to corrosion.
The instructions will answer the question of how to make a solar oven at home.
Recommendation for choosing panels
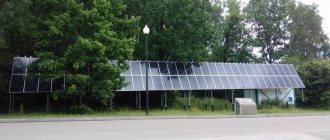
Not only Chinese, but all solar panels are divided into mono- (more expensive) and polycrystalline (amorphous). What is the difference? Without going into manufacturing technology, it is enough to point out that the former are characterized by a homogeneous structure. Therefore, their efficiency is higher than that of amorphous analogues (approximately 25% versus 18%) and they are more expensive.
Visually, they can be distinguished by their shape (shown in the figure) and shade of blue. Monocrystalline panels are slightly darker. Well, whether it makes sense to save on power, you will have to decide for yourself. In addition, it should be taken into account that the production of inexpensive polycrystalline panels in China is mainly carried out by small companies that save on literally everything, including raw materials. This directly affects not only the cost, but also the quality of the product.
All photocells are connected into a single energy chain by conductors. Depending on the type of panels, they may already be fixed in place or missing. This means you will have to solder them yourself. All crystalline samples are quite fragile and must be handled with extreme care.
If you do not have the proper skills to work with a soldering iron, then it is better to purchase class A panels (more expensive). When buying cheap analogues (B), it is advisable to take at least one in stock. The practice of assembling solar panels shows that damage cannot be avoided, so an extra panel will definitely be needed.
When determining the required number of photocells, you can rely on such data. 1 m² of panels provides approximately 0.12 kW/hour of electricity. Energy consumption statistics show that for a small family (4 people) about 280 - 320 kW per month is sufficient.
Solar panels are sold in two possible versions - with a wax coating (to protect against damage during transportation) and without it. If the panels have a protective layer, they will have to be prepared for assembly.
What needs to be done?
- Unpack the goods.
- Immerse the kit in hot water. Approximate temperature – 90±5 0С. The main thing is that it is not boiling water, otherwise the panels will be partially deformed.
- Separate samples. Signs that the wax has melted are visible visually.
- Process each panel. The technology is simple - alternately immerse them in hot soapy water, then clean. The “washing” procedure continues until there are no traces of wax left on the surface.
- Dry. The panels should be laid out on a soft cloth. For example, on a terry tablecloth.
Advantages and disadvantages
Self-assembled solar ovens vary in size, but are identical in structure, and therefore there are no difficulties with assembly. Ovens can easily store heat to heat food. The principle of operation is based on absorbing the energy of the sun's rays and redirecting them to the desired object.
Solar ovens have the following advantages:
- Cheapness. To operate, you do not need to buy fuel or use additional energy sources. To work, you only need sunlight.
- Food is prepared as safely as possible - there is no fear of fire, as when lighting a fire.
- The stove is easy to care for and simple to use - you just need to direct the sun's ray to the desired object through the mirror surface.
- Mobility. The stove is quickly assembled and disassembled. Therefore, there are no problems with transportation.
- Environmentally friendly.
- Food heats evenly and there is no risk of burning. There is no need to stir the food.
These qualities have made solar ovens very popular among travelers. The stove is easy to cook food on. To cook food, you just need to direct the sun's ray to the desired object.
Disposal of the system
Solar systems assembled in production are designed for a 45-year service life. Their components - the controller and the inverter - last about 20 years. The battery life is also very limited, but certainly does not exceed ten years.
Therefore, a logical question arises: what to do with the elements of the solar system that have exhausted their service life?
The answer is obvious - sell!
There is no doubt that in your city there will be a company ready to buy these components.
They are quite suitable for reuse to create similar systems. The price of natural silicon is very high, as is its processing. It is more profitable to buy back used elements, recycle them and put them into re-production of solar panels. This is much more profitable than buying raw materials or mining rare earth materials yourself.