Strawberry necklace made using the wet method
Felting wool is an ancient type of needlework, which today is again experiencing a real boom among craftswomen. Felting, felting or felting, has many different techniques, having mastered which you can create fashionable clothes, shoes, toys, even stylish interior items.
One of the modern trends in felting is the production of original jewelry. Wool can be used to make necklaces, brooches, beads and bracelets. We invite you to take a closer look at this unusual art and make beautiful beads from felt with your own hands.
Interesting ideas for felting wool beads
A special decoration for children can be made by a mother who has mastered the basics of wool felting.
These are the so-called mother beads (sling beads) - a woman’s jewelry that is also a toy for a child. The baby, being in his mother's arms or in a sling, occupies himself and does not fiddle with his mother. Mama beads act as a sedative. Make beads for your loved one. Initially, beads were a men's accessory. Our very distant great-grandfathers, successful hunters or tribal leaders, demonstrated their dominance with jewelry made from teeth or animal bones.
Today, men's beads are just a return to ancient traditions. They won the hearts of the stronger sex not only in a creative environment or on vacation, but also in everyday life. Ahead are young people, supporters of subcultures and stylish men.
The beads are felted in small sizes, round and in the shape of a cylinder. It is customary to decorate them with a small metal pendant with a masculine “character” in the form of a claw, a coin, and so on.
Felted beads are multifunctional - they will take on any meaning given by the owner. Their beauty lies in the fact that they will always remain a unique work of authorship. Millions of hairs will never intertwine in the same way. Wool fashion show...
The basics: what to equip yourself with for wet felting jewelry
The main material you will need is uncombed wool. You can use any material designed for felting.
The color and number of wool fibers depend on how the desired decoration appears: plain or colored, necked or hanging freely.
If the intended beads are short, you will need a special lock. It is purchased in a specialized store along with other accessories.
It is possible to alternate wool balls with beads made of wood, metal, plastic; decorating them with embroidery, beads or something else. Design solutions will be suggested by your imagination.
Tools and materials
Often in pictures of the process of felting wool products you can see unusual needles. This is the main tool when working with wool, especially in dry techniques. Unlike ordinary sewing needles, these needles have several notches closer to the ends.
Thanks to them, the wool fibers are pushed in and tangled, resulting in felting. It's always a good idea to have a few in stock, as they can break quite often.
- They differ in numbers (needle thickness) and cross-section. There are two separate types: reverse and crown. The latter is used mainly for attaching small parts.
- The choice of needle depends on the personal experience of the master, so you will have to work with different ones.
Substrate
It is far from the least important because it allows you to keep both your fingers and working needles safe. You can find these both in specialized departments and in craft stores.
Substrate options
A foam sponge is perhaps the most budget-friendly of the ideas presented. You can even find it in hardware stores. A noticeable drawback is that it quickly deteriorates and can remain on the product.
Special brush
Convenient and suitable even for small items. However, it fluffs up quite quickly and becomes unusable.
Hard felt
The material is dense and durable, comfortable to use. Minus - a small thickness will not always save you from damage.
Secondary tools should not be neglected. They will significantly simplify the process and make it more enjoyable, reducing the risk of failure.
Needle holders
They are put on needles and are usually designed for different numbers of them. Often used to create flat elements. Such a thing can be purchased in departments, or you can find suitable material for its creation. For example, an ordinary cork can play this role.
Felting machine
Simplifies the creation of reliefs on the surface of the work.
Carder
In simple terms – a tool for combing fluff. You can find it in a pet store, since animals are also combed with the same method.
Thimbles
Especially relevant for beginners, for more experienced ones - optional. Will help prevent and reduce the number of inevitable finger injuries from needle sticks.
Molds
Culinary, children's, ice. Any option will do. Useful for appliqués and creating elements with a clear, neat outline.
Felting wool beads
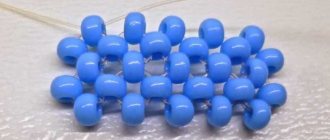
First of all, we make wool beads. Prepare a soap solution (liquid soap + water). Tear the wool into pieces.
I made nine beads. Therefore, you will need nine pieces of wool. Plan in advance what color the beads will be. Be sure to make several beads of mixed colors, they will decorate the accessory. In order to make such a three-color bead, take three pieces of different colored wool and form a lump from this mass, dip it in soapy water. Start rolling the ball between your palms. Do this very carefully at a slow pace.
After a series of several movements, the mass will begin to take the shape of a ball and gradually become denser. Achieve the desired density, volume and finish felting. The bead should be quite hard, preferably without defects or holes. If you are satisfied with everything, rinse the bead under cold water, wring it out and set it to dry. Make nine beads in a similar way and leave to dry on the radiator.
Master class on wet felting wool beads at home
The master class presents the making of “malachite” beads of the Mistress of the Copper Mountain.
Materials and tools
- Combed ribbon of noble green color.
- A little black tint - to create veins “on the stone”.
- Bubble film speeds up the matting process.
- Container with hot water.
- Liquid soap without cream additives.
- Towel.
- Gypsy needle.
- Thin knitting needle.
- A narrow satin ribbon, the color harmonizing with the intended decoration. Beads gather on it, which looks very beautiful. In this case, there is no need for a clasp - a beautiful bow will replace it.
- Glue "Moment Crystal" for processing the edge of the tape.
Sequencing
1. Blanks for beads. Tear thin long strands from the green combed ribbon, two for each bead. Don't forget that wool shrinks during felting - take extra. If you need beads of the same size, then the strands need to be prepared in advance, according to the desired number.
Taking the strand by the edge, roll it into a bun. Wind the second strand on top. You should get a tight ball. Prepare the material for all beads in the same way. Wind thin strands of black fiber onto each green piece, imitating the veins on the stone.
2. Wet felting. Immerse the ball in the soapy solution. Be sure to hold it with your fingers, thereby preventing the fibers from unwinding. The bead should be well saturated with water. After slightly squeezing the ball, begin to roll it between your palms. Movements should be very soft - without pressure.
Excess foam can be removed from the ball by dipping it into a container with soapy water. To speed up the process of falling the bead, start rolling it on bubble wrap. As the ball thickens, increase the pressure.
3. Wash and dry. Rinse the beads well in running warm water and then in cold water. Finally, roll each ball between your palms to even out the shape.
Make holes for the tape in advance, before drying. Once the beads are dry, it will be much more difficult to pierce them through. You can pierce the beads with a gypsy needle or a thin knitting needle. Make larger holes for the tape.
You can dry the balls on a knitting needle, or use toothpicks for this purpose. It will take overnight to dry. The next day, start assembling the beads into an original decoration.
4. Assembly. Place the dried beads on a cloth or towel. This is necessary so that they do not roll away anywhere. Cut the edge of the tape diagonally and treat it with Moment Crystal glue. Once the glue has dried, use a gypsy needle to string the beads onto the ribbon.
Dry method
Elements made using the felting technique can be used in a wide variety of ways, but most often wool balls are used to create felt jewelry. Even a novice needlewoman can handle creating beads using the felting method. A do-it-yourself bead felting master class will help make the needlework process easier and eliminate some errors.
To felt wool beads using the dry method, which is known in the professional language of needlewomen as “feeling,” you will need the following materials and tools:
- untwisted wool yarn;
- needles for felting - thin and thicker;
- foam sponge;
- bag for washing clothes;
- thick needles, knitting needle or pin for creating holes in finished beads.
Follow this sequence for a master class on felting wool beads with your own hands:
Choose the yarn of the color you need. Measure the same length of yarn to make beads of the same size. If you want the elements to be different, then the length of the threads should be different.
To determine the desired size of the decoration elements, it is advisable to felt one bead first.
Roll the cut piece of yarn into a small ball, finally wrapping it in soft, slightly fluffy wool.
Place the rolled small ball on a foam sponge, take a thick, coarse needle and begin to roll out elements for felt beads.
During the felting process, both hands should be used - one should hold the ball of wool, the other should work with the needle. To felt a bead with a needle, a sharp object should be held strictly vertically and in this position, often pierce the ball of wool with it.
The felting needle has special notches that tangle the yarn fibers together. You need to move the needle smoothly and not too quickly, so as not to injure yourself or break the instrument.
The future element of decoration should be well treated with a needle on all sides. To do this, you need to scroll it evenly on all sides, piercing it with a needle.
It is easy to determine the suitability of a wool bead for creating jewelry: it should be moderately springy and not too soft. When pressed with your finger, it should shrink, and after a couple of seconds straighten out and take its original shape.
Using a fine felting needle, sand the ball into a perfectly rounded shape.
The beads are ready by dry felting and can be strung on a thread.
However, you should know that dry felting beads do not turn out perfectly smooth and beautiful; noticeable nicks from the needle remain on the surface of each element.
To avoid them, experienced needlewomen recommend that when dry felting wool beads, complete the process using the wet method, treating them in a soap solution.
To do this, load the finished beads into a container or laundry bag and close it so that the elements of the future decoration do not spill out.
Place them in the drum of the washing machine and start it. You can load them with light-colored, non-fading laundry so that the washing machine does not waste time.
Select normal cycle at 60 degrees using all-purpose washing powder.
Remove the beads from the container or bag. Roll them in your hands to return them to their round shape.
In wet products, make holes strictly in the center by piercing them with a thick needle, knitting needle or pin.
It is much more difficult to make even holes in dry beads, so you should not wait until the jewelry items are completely dry.
You need to dry the beads on a thick needle or thin stainless steel knitting needle; when the pieces are completely dry, you can form them into a beautiful decoration.
Master class on wet felting wool beads at home
The master class presents the making of “malachite” beads of the Mistress of the Copper Mountain.
Materials and tools
- Combed ribbon of noble green color.
- A little black tint - to create veins “on the stone”.
- Bubble film speeds up the matting process.
- container with hot water.
- Liquid soap without cream additives.
- Towel.
- Gypsy needle.
- Thin knitting needle.
- A narrow satin ribbon, the color harmonizing with the intended decoration. Beads gather on it, which looks very beautiful. In this case, there is no need for a clasp - a beautiful bow will replace it.
- Glue "Moment Crystal" for processing the edge of the tape.
Sequencing
1. Blanks for beads. Tear thin long strands from the green combed ribbon, two for each bead. Don't forget that wool shrinks during felting - take extra. If you need beads of the same size, then the strands need to be prepared in advance, according to the desired number.
Popular articles Bead weaving: flowers
Taking the strand by the edge, roll it into a bun. Wind the second strand on top. You should get a tight ball. Prepare the material for all beads in the same way. Wrap thin strands of black fiber on each green piece, imitating the veins on the stone.
2. Wet felting. Immerse the ball in the soapy solution. Be sure to hold it with your fingers, thereby preventing the fibers from unwinding. The bead should be well saturated with water. After slightly squeezing the ball, begin to roll it between your palms. Movements should be very soft - without pressure.
Excess foam can be removed from the ball by dipping it into a container with soapy water. To speed up the process of falling the bead, start rolling it on bubble wrap. As the ball thickens, increase the pressure.
3. Wash and dry. Rinse the beads well in running warm water and then in cold water. Finally, roll each ball between your palms to even out the shape.
Make holes for the tape in advance, before drying. Once the beads are dry, it will be much more difficult to pierce them through. You can pierce the beads with a gypsy needle or a thin knitting needle. Make larger holes for the tape.
You can dry the balls on a knitting needle, or use toothpicks for this purpose. It will take overnight to dry. The next day, start assembling the beads into an original decoration.
4. Assembly. Place the dried beads on a cloth or towel. This is necessary so that they do not roll away anywhere. Cut the edge of the tape diagonally and treat it with Moment Crystal glue. Once the glue has dried, use a gypsy needle to string the beads onto the ribbon.
Methods for felting jewelry
Felt jewelry has become especially popular lately. They look stylish and eclectic. They can complement both an everyday casual look and the image of a business woman.
Absolutely any elements for decoration can be rolled out of wool, but most of all the craftswomen loved felt beads and voluminous sleeve bracelets.
Jewelry and Christmas tree decorations can be felted dry or wet, but the product looks neatest if you combine these two techniques. At the first stage, you can give the product a shape using needles, and then add it with a soap solution. Most often, bracelets, beads, scarves and brooches are made from wool. Despite the fact that this list is quite small, all jewelry made using the felting technique turns out to be unique and inimitable.
You can felt wool jewelry using dry or wet methods.
When making Christmas tree decorations, you can give free rein to your imagination. These can be animals suspended by a string, heroes of various fairy tales, and simply a variety of crafts in the form of stars, hearts and balls, decorated with pictures. Even a beginner can make a craft for the New Year by assembling a multi-colored garland from felted balls.
Rainbow beads
Having mastered sheeting, you can make a whole collection of stylish jewelry of all colors and shades. But what if you want to combine all the beauty of rainbow shades in one product? We offer a simple master class on making rainbow beads. To create a decoration you will need any unspun wool, vegetable, silk fibers, a simple dishwashing sponge, a serrated needle for felting, as well as a piece of “anti-stress” bubble wrap.
These rainbow beads will complement your look.
Work algorithm:
- We work with wool dry. Wool is usually sold in the form of a combed strip or a carded bundle. Pull two strands from the bundle for each bead. Roll the strand into a loose ball. We make several such preparations.
- We place each lump on a sponge, bait each bead a little, making neat punctures evenly, turning the ball slowly.
- We decorate the beads. To add rainbow colors to the decoration, we decorate the beads with colored fibers, lightly pinning them to the ball. It can be thin wool in bright colors, viscose, bamboo or banana fibers.
Decorative beads made of soft wool
To decorate beads that are wet felted, you should not use acrylic fibers. They are designed for the dry felting method.
- Let's prepare the solution. Rub a small piece of soap into warm water or add a little dishwashing liquid.
- Spread bubble wrap on a flat work surface and place the blank balls on it. We generously pour each one with soapy water and roll it in our hands until the beads become smooth and dense.
After the felt beads are washed and dried, you can assemble the decoration. By the way, many craftswomen begin decorating beads at the final stage of work, using colored fibers, beads, sequins and other decor. We pierce each bead in the middle with a needle or knitting needle, and then string it on a thread. Stylish rainbow beads are beautiful and versatile. They can be worn to work, a walk or a friendly party.
Tutorial on felting rainbow beads
Dry felting workshops
You can master the dry felting technique on a woolen toy. A master class on making a funny sheep will bring great pleasure from the work done and will allow you to make such a cute souvenir with your own hands:
To work you need to take:
From gray or white wool you need to roll up a roller in the shape of the letter L and felt it with a needle. This will be the preparation of a sheep's head.
Add an equal amount of wool to the sides of the head blank and felt the cheeks of the sheep.
Thread a sewing needle, insert the needle through the neck and bring it out in the place of the eye. String a bead and sew on one eye. Then repeat the operation with the second bead. Place the needle in the neck area and make a strong hidden knot.
On the sheep's face, knock out the mouth and nose with a needle, and then draw them with a simple pencil along the created indentations and again punch them in the tinted areas to fix the coloring.
Then roll the wool into a roller in the shape of a drop and felt the body of the toy with needles.
Felt the legs without finishing their tip. The fur should be loose at the end of the paws. The same way to felt the legs.
Form a kind of felt boots out of brown wool and felt first with a thick and then with a thin needle. Place them on the legs of the toy from the unfinished end. When the legs in felt boots are ready, pin them to the body with a needle.
Apply a little wool to the area of the tummy and hips on the body and felt. By analogy with making legs, make handles and mittens from colored wool, which you then roll onto the handles.
Attach the head to the body using felting and a sewing needle. Make small triangular ears out of wool for the head of the toy, leaving a fluffy bottom. Then attach both ears to the head with a felting needle.
Knit a small orange or blue scarf on thin knitting needles and decorate the sheep with it.
Beads made of wool using the technique of combined felting
Even a novice needlewoman can make an interesting decoration using simple techniques.
To work you need to prepare:
First you need to wind small balls of yarn of the required size, the number of which is determined arbitrarily, depending on the length of the beads.
Wrap the balls of wool so that bald spots do not appear.
Carefully roll each bead over the entire area with a needle, then moisten it one by one in a soap solution and roll it in your hands until the surface of the wool becomes dense. At this time, the beads should be regularly moistened with hot water. All beads are processed in this way until they become sufficiently hard.
Then the blanks for decoration should be rinsed well under running water, dried with a towel and dried on a radiator.
A decorative cord is threaded into a large needle, onto which beads are then strung. At each end of the decoration you should attach a small lock, which can be purchased at a sewing supply store.
Having mastered the production of such simple products using felting, you can move on to more complex crafts from unspun wool. The work will bring pleasure to the craftswoman. It has been noticed that the more products are made using the felting technique, the more actively the master’s creativity works. Handmade felting products will decorate your home and will be an excellent gift for loved ones.
We decorate beads with embroidery
You can, of course, leave the beads as they are after drying, but we will try to decorate them with additional beads and embroidery. It's easy to do, even fun.
Take a beige bead and embroider two rims horizontally with blue thread.
Now let's sew these rims with satin stitch.
In the circle we embroider a net with dark yellow thread. And on top we will add embroidery with brown thread.
Here's what we managed to do.
Next, use blue thread to embroider crosses in the mesh. Place dark beige beads in the spaces between the crosses.
Be sure to make the same pattern on the back side of the bead, because it will spin randomly on the strand.
The next bead we will decorate will be a chocolate colored bead. We also embroider two rims with blue thread, but horizontally along the entire bead. We fill the void with crosses.
We embroider French knots at the top and bottom of the design. It's easy. Wind the thread around the needle four times and stick it next to where the thread comes out.
Make small crosses in the center of the crosses with yellow thread. Complete the design with beads.
Now let's decorate the cream-colored bead with embroidery. Embroider the “harp” with a chain stitch using brown thread.
Repeat the pattern inside with blue thread. Sew in beads. Repeat the pattern inside with dark yellow thread.
Decorate another bead with flower embroidery. Embroider a French knot in the center of the flower and decorate the edges with petals. Make flowers evenly throughout the bead.
Here are the beads we got.
Wet method
Many craftswomen like wet felting of beads more than the dry method of this type of needlework.
To create beads from wool using wet felting, you will need the following tools and materials:
- wool for felting;
- silk fibers, multi-colored yarn - for decoration;
- sponge;
- felting needle;
- a bowl of hot water;
- liquid soap;
- small towel.
If you decide to make such a decoration with your own hands for the first time, follow this master class on wet felting of wool beads:
Fold felting wool into a bead of the size you need and cut it. It should be borne in mind that during the felting process the wool shrinks by about 25-30%, so you need to measure out a little more material.
Take the cut piece of wool in your hands and stretch it slightly, splitting the fibers together.
Roll the wool into a ball, trying to form it as tightly as possible
It is important to try to fold the bead without bends or creases, otherwise the finished piece of jewelry may have visible defects
When the ball is folded, place it on the sponge, holding it with your hand all the time; in the other hand, take a felting needle. If you want to make a decoration from single-color beads, at this stage you can already start wet felting. However, many needlewomen use a variety of materials that give the beads an unusual beautiful decor, for example, silk threads.
To decorate beads with silk fibers, they must be placed on top of balls of yarn and secured with a needle. If you want beads with thin, curly lines, take one strand. If you want to see an abstract pattern on beads in the form of a cobweb, first lightly split the fibers of the silk thread together.
When the beads are ready to be felted, pour hot water into a bowl and lower the wool ball into it so that only the top layer of yarn is wet. Apply a little liquid soap to the wet bead and start rolling it in your hands: first gently, and after a while, increase the pressure. At the next stage of creating beads using the wet felting technique, you need to completely immerse the bead in water, and just as smoothly but confidently continue to roll it in your hands.
Popular articles Stylish beads on a chain
Gradually the wool ball will become dense and at the same time noticeably decrease in size. To check whether the bead elements are ready for stringing, press them with your finger; if the shape of the beads remains the same, the felting process can be completed.
When the beads needed to create the jewelry are ready in the required quantity, rinse them under cold water and place them on a towel to dry slightly.
Then, while the products are still wet, pierce them in the center with a thick needle or a thin knitting needle and leave until completely dry.
String the blanks onto a beautiful thick thread, chain or thin ribbon.
Many experienced needlewomen conduct classes on felting wool beads online, which allow novice felters to independently make beautiful jewelry for themselves and as gifts for their loved ones.
Step-by-step process for felting beads. Ready-made beads in 11 steps.
Stage One. Dry roll the ball.
Step 1. Take a piece of wool of the required volume. If you have carding it will be easier for you. If you have a combed ribbon: before you take the needle, you will need to tear and tear a piece of ribbon and tangle it together as best as possible. This will make your work easier - the wool will fall off faster. P.S. physical strength is not needed here , the point is to make a ball of “tangled hair” from ordered wool fibers in a piece of combed tape. You can take different colors of wool into one bead , it will be beautiful too)