A ship in a bottle is not just a model of a sailing ship or an unusual souvenir. It is also a puzzle designed to puzzle the observer, cause amazement and delight. The viewer should ask in surprise: “But how?” And the more difficult it is for him to find the answer to this question, the more interest your work will arouse. The fifth method of assembling a ship in a bottle is the most interesting and unusual, but at the same time, the most complex and time-consuming. It provides the modeller with truly unlimited possibilities.
Is it possible to thread the eye of a needle directly inside the bottle? Yes, the fifth assembly method makes this easy to do. Having mastered this assembly method, you can safely take on the construction of the most complex models. However, the price for great opportunities will be patience, great attention and skill, which will be required of you to achieve your goal.
What may be useful
A set of tools that you may need:
- Stationery scissors and stationery knife.
- Thick cardboard and plain paper.
- Glue (PVA or special silicone for crafts).
- Wooden skewers, toothpicks, unnecessary pencils (future masts).
- Scotch.
- Styrofoam.
- Ruler, simple pencil (for marking).
From paper
There are many tips on how to make a paper boat with your own hands without using tools.
Among them, the simplest way to make a paper boat with your own hands is done using the technique of folding a paper sheet:
- In order to make a ship out of paper with your own hands, you will need an A4 paper sheet, which is folded in half in width.
- The corners of the resulting rectangle in the folded part are brought together so that their lines touch to form an isosceles triangle, with a remaining distance of approximately 3 cm to the opposite edge.
- The two lower parts are bent towards the top, each on its own side, covering the base of the triangle. The corners are bent along the sides of the triangle.
- The resulting triangle (similar to a paper cap) is pulled apart and folded across, forming a square.
- The free corners of the square are also folded again, thereby creating a triangle that also bends across and turns into a square.
- The corners of the square are folded in about 1 cm short of the top. Then the closed parts of the top are simply moved apart.
- Your DIY paper boat is ready. A mast can be inserted into the protruding part (in the middle), and the hull of the ship can be painted.
Steamboats and ships
This MK offers models of self-propelled ships and steamships. It is very easy to make a cruise ship (assembly is similar to a model yacht). You need to take a square sheet and perform the following steps: bend it diagonally. Bend the corner upwards diagonally and bend it back. Turn the workpiece inside along the bend.
Use scissors to cut the pipe.
When the work is completed, you can paint the liner to give it a “real” look. How you can decorate your ship is shown in the photo.
To make a classic steamboat with two pipes, you need to prepare a basic pancake shape. The following steps should be followed:
- turn the workpiece over and fold the corners towards the middle;
- repeat step 1 twice;
- turn two opposite corners outward to form pipes;
- Bend the other two corners in different directions and slightly flatten the figure.
Here comes the ship!
From the box
Another paper boat, how to make step by step:
- To make a paper boat, you can use a paper box. On one side of a small box, preferably narrow in shape, the outlines of the bow of the future vessel are marked, and it is better to draw the outlines to the edges of the box.
- Using a utility knife, carefully cut out the silhouette of the bow.
- The bent part of the box “side”, which remains free, is divided in half and applied to the cut out nose part. The parts are fastened with tape and glued at the junction with the bottom.
- A base for equipment (masts, bowsprit, anchor) cut from foam plastic is installed in the middle. Masts are installed and paper sails are put on.
A simple way to assemble a souvenir
There is another way to make a ship in a bottle. In this case, the ship does not have a flexible mast and is a complete product.
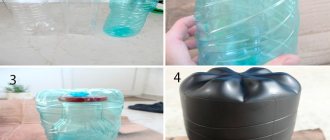
- A plastic bottle is used, the top of it is carefully cut off. The inside of the bottle is ready for use. You can easily place any item inside.
- A stand is attached to the bottom of a horizontally laid bottle using hot glue. The top of its base is also lubricated with glue. The ship is fixed on it. The inner walls of the bottle and the space around the ship can be decorated with artificial algae, figurines of fish, seagulls, and a mermaid or starfish can be placed.
- The cut part of the container must be returned to its place, smearing the edges with hot glue. Some people use tape. To hide the seam, you can use small shells, seaweed, or sand. The final touch will be an original cork or a folded sheet of paper in the form of a note.
From foam plastic
The components of the future vessel are cut out of a piece of foam plastic using a stationery knife:
- — body (for greater stability it should be wide);
- — superstructure (a rectangle half the size of the hull);
- - another rectangle, but half the size of the previous one.
A superstructure is glued to the top of the hull, closer to the aft part, and the smallest rectangle on top of it.
A toothpick – a “bowsprit” – is stuck into the bow, and a mast is placed in the middle.
A toothpick with a piece of paper - a flag - is stuck into the smallest triangle.
To make it more attractive, parts of the ship can be cleaned or painted a little.
How to make a ship out of wood
We will need:
A sheet of paper, a pencil, a linden or birch board, a jigsaw, a hatchet, a chisel, roll sticks, toothpicks, fabric for sails, PVA glue, Moment glue, a file, a sanding disc
So let's get started:
- From paper we cut out a rectangle 18 by 6 cm in the shape of a ship (like a top view).
- We trace this blank on a wooden board approximately 2 cm wide.
- We cut out two such parts with a regular or jigsaw.
- We sand one side of each part.
- We glue them together with PVA glue, fasten them with rubber bands for additional fixation, go through the seam with glue, and put a weight on top.
- While the glue dries we will make the mast and other small parts.
- We take a board 15 cm long, about 1 cm wide, plan it with a knife, giving it the shape of a cylinder, and file it. This will be the mast. We make 3 of them.
- We retreat 3-4 cm from the bow of the ship and draw a line from the lower blank to the upper corner of the upper blank, it looks like an upturned bow of the ship.
- We saw off the excess material along this line, first on one side, then on the other.
- At the bottom of the boat we draw two lines along the length, departing from the edges by 2.5 cm.
- Along these lines we cut off the excess material with a hatchet, thereby giving the bow of the ship a suitable shape.
- We sharpen the hatchet harder, removing excess material.
- We measure 4 cm from the stern of the ship, draw a line to the seam and saw.
- The ship's hull is ready, sand it on all sides.
- At the top of the workpiece, where the deck is supposed to be located, draw a rectangle.
- Take a chisel and make a recess along the lines of the rectangle.
- We make three holes on top of the ship.
- We take 3 masts. You can use chopsticks for eating rolls and sushi as an alternative to homemade masts made from a plank.
- We glue 4 toothpicks to each mast for a moment of glue.
- We fix the masts to the ship's hull using PVA glue.
- We cut out the sails from fabric (coarse fabric, such as burlap, will look great if you plan to paint the ship dark and varnish) and glue it onto PVA.
- We paint the ship with acrylic paints. Paint with light colors first, then dark ones. You don’t have to paint it, but coat it with a special wood varnish. It will be even more impressive.
The sailboat is ready. You won’t be ashamed to give it as a gift or leave it at home as an interior decoration.
From a plastic bottle
Additionally, you will need a plastic bottle (a yogurt box, juice box, or plastic canister will do).
- Approximately 5 cm away from the bottom of the bottle, use a stationery knife to make an incision approximately to the middle of the bottle.
- You will need to retreat a little less from the neck. An incision is also made to the middle.
- The notched part is removed, and a foam base for future equipment (masts, anchors, etc.) is installed in the remaining part, which has become the hull of the vessel.
- Masts with sails are installed. You can add an anchor and ropes.
Smile, captain!
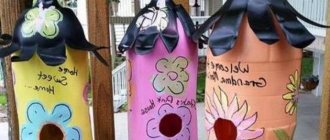
A ship made from a bottle or foam can be both a wonderful gift for a man and a luxurious element of table decoration, because the bottle in it is not a building material, but the main character. Such an original solution will allow you to solve the issue of gift wrapping and enjoy the process of creating it along with step-by-step photos!
So, to create a captain's dream, you will need:
- foam sheet 10 cm high;
- corrugated paper;
- gold mesh for decoration;
- gold braid;
- wooden skewers;
- ribbon;
- glue;
- stationery knife;
- scissors;
- bottle;
- candies.
First you need to prepare a foam base for the future vessel. To do this, you need to mark the base on a sheet of foam plastic: four rectangular pieces 20 cm wide with a rounded end on one side. The length will depend on the size of the bottle.
After this, you should cut out the parts, fold them and, if necessary, level them with a knife.
Next, in the two upper parts you need to cut out the base for the bottle. To do this, place a bottle on them from the side where the end is rounded and cut out holes.
On a note! After the hole is cut, you should try placing a bottle in it and adjust if necessary.
After the parts are ready, you can decide on the length of the future vessel, and use the remaining foam to build a stern with a side. When decorating, children's toys can be used, for example, a serious captain or a treasure chest.
Then you should glue the two lower and two upper parts of the vessel together. The edges can be sanded with sandpaper if necessary.
Article on the topic: Fairytale grandmother's square. Schemes and description. Ideas
While the glue dries, you should cut out parts for covering the vessel from corrugated paper. It's time to show your imagination: let the side be one color, and the base for the bottle another!
Now you can glue the blanks and then glue the parts together.
The resulting base needs to be decorated: cover the sides with gold mesh, sweets, and put braid around the edges.
The ship's bridge can also be decorated with candies and covered with corrugated paper.
Finally, it's time to set sail. To do this, you need to cut out 4 trapezoidal pieces from tape or paper and, piercing them through, put them on a skewer. Stick the finished mast into the base of the ship and add the rest of the details.
You can change the details: instead of a bottle, put in, for example, a box with a watch, and instead of a foam base, use an unnecessary glass vase of a similar shape. Also, a ship with candies would be an original gift: they can be poured under the deck or wrapped in a sail - the flight of imagination is not limited.
From walnut shell
Additionally, you will need walnut shells and plasticine.
Oddly enough, but halves of walnut shells are ideal for use as the hull of a small boat.
- The shell must be completely cleaned of excess parts without damaging it.
- A small piece of plasticine is placed in the cleaned part.
- Plasticine is both a ballast that gives stability and a base for the mast, so it should be evenly distributed over the entire area of the bottom of the shell. Instead of plasticine, you can use candle wax.
- A mast (toothpick) with a sail is stuck into the base.
Men are the inventors of a ship in a bottle
Many people are fond of collecting such fakes. Some people are waiting for them as a gift, while others have understood how to put a ship in a bottle and are making such models on their own. Moreover, instead of a sailboat, the inside of the bottle is filled with airplanes, cars, trains and other elements of modern technology. Dexterity and special tools help in the work.
Such structures become more magnificent and complex every year. Manufacturing methods are being improved and new models appear.
Some craft makers know how to put a ship into a bottle piece by piece. They collect it directly in the container itself using long tweezers and magnets. This method is one of the most difficult. But even a master can do it.
A wonderful souvenir is an excellent gift idea. It is used for interior decoration to create an atmosphere of mysterious adventures to distant lands and romantic sea stories.
From egg packaging
Additionally, you will need a package of ten eggs. Of course, this type of boat does not have high performance, but it is highly stable.
In addition, this manufacturing method will require no more than five minutes:
- The top and bottom parts of the package are separated from each other.
- The sides of the lower and upper parts are trimmed.
- The halves of the egg packaging are connected again, but the outer sides are glued to each other. It is very important that the contours match.
- After gluing, the hull of the ship will consist of an inverted upper part (the bottom of the ship), and the former lower part becomes the deck.
- Masts with sails and other gear are stuck into protruding ribbed shapes (for laying eggs).
From food foil
Additionally, you will need a piece of food foil - the size is approximately equal to an A4 sheet.
- A piece of foil is folded in half so that the sides match.
- The edges of the sides of the resulting rectangle are bent by about 5 mm.
- The rectangle is folded again, but along the long side so that the edges match.
- The ends are bent: on one side at an acute angle, on the other at a straight angle - you should get the outline of a boat.
- The folded edges of the sides of the boat are moved apart, and the bottom is given a flat shape.
- The basis for installing the mast will be a small piece of foam.
In general, you can make a ship with your own hands from almost any available material, the main thing is that it has the ability to float on the surface of the water, and then, giving free rein to your imagination, you can create amazing toys.